background image

10

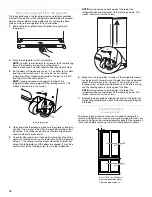
Door Closing and Door Alignment

The base grille covers the leveling screws and roller assemblies 
located at the bottom of the refrigerator cabinet below the freezer 
door or drawer. Before making adjustments, remove the base 
grille and move the refrigerator to its final location. 
1. Remove the base grille. Grasp the grille firmly and pull it 

toward you. 

2. Move the refrigerator to its final location.

NOTE: To allow the refrigerator to roll easier, raise the leveling 
legs off the floor by turning the leveling screws 
counterclockwise. The front rollers will be touching the floor. 

3. So the doors will close easier, use a 

¹⁄₄

" hex driver to turn both 

leveling screws clockwise. This will raise the front of the 
refrigerator tilting it slightly downward to the rear. Turn both 
leveling screws the same amount.

NOTE: Having someone push against the top of the 
refrigerator takes some weight off the leveling screws. This 
makes it easier to turn the screws.    

4. Open and close the doors to make sure they close as easily as 

you like. If not, increase the tilt by turning both leveling screws 
clockwise. It may take several turns of the leveling screw to 
allow the doors to close easier.

5. Check for door alignment. If one door is lower than the other, 

adjust the leveling screw, on the lower side of the refrigerator. 
Using a 

¹⁄₄

" hex driver, turn the screw clockwise to raise that 

side of the refrigerator until the doors are aligned. It may take 
several turns of the leveling screw to raise the refrigerator.

NOTE: Having someone push against the top of the 
refrigerator takes some weight off the leveling screws. This 
makes it easier to turn the screws. 

6. Make sure the refrigerator is steady. If the refrigerator seems 

unsteady or rolls forward when the door or drawer is opened 
adjust the leveling screws. Using a 

¹⁄₄

" hex driver, turn the 

leveling screw on each side clockwise until the rollers are up 
and the leveling feet are firmly against the floor. 
NOTE: Having someone push against the top of the 
refrigerator takes some weight off the leveling screws. This 
makes it easier to turn the screws.

7. Replace the base grille by aligning the ends of the grille with 

the leveling assemblies on each side and snapping the grille 
into place.

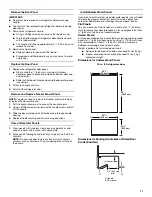
Factory Trim Kit 

(on some models)

There may be an occasion when you will need to remove the 
factory-installed trim kit, such as moving the refrigerator to a new 
home or installing custom-made decorator panels. Please read all 
instructions before removing the trim kit and decorator panels.

A. Leveling screw

A

¹⁄₄

"

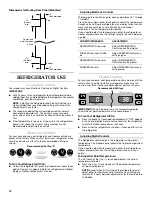
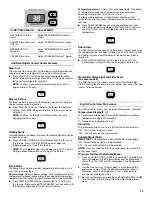
A. 2

¹⁄₂

" (6.35 cm) Clearance 

B. Raised decorator panel
C. Raised drawer panel

¹⁄₄

"

A

B

C

Summary of Contents for KBRS19KTBL - 18.5 cu. Ft. Bottom Mount Refrigerator

Page 1: ...G 16 WATER FILTER CERTIFICATIONS 18 PERFORMANCE DATA SHEETS 19 WARRANTY 21 SÉCURITÉ DU RÉFRIGÉRATEUR 23 INSTRUCTIONS D INSTALLATION 24 UTILISATION DU RÉFRIGÉRATEUR 34 ENTRETIEN DU RÉFRIGÉRATEUR 37 DÉPANNAGE 38 FEUILLES DE DONNÉES SUR LA PERFORMANCE 41 GARANTIE 43 REFRIGERATORUSER INSTRUCTIONS W10366210A You can be killed or seriously injured if you don t immediately You can be killed or seriously ...

Page 2: ...remove ground prong Do not use an adapter Do not use an extension cord Disconnect power before servicing Replace all parts and panels before operating Remove doors from your old refrigerator Use nonflammable cleaner Keep flammable materials and vapors such as gasoline away from refrigerator Use two or more people to move and install refrigerator Disconnect power before installing ice maker on ice ...

Page 3: ...ol depending on the model to OFF and then disconnect the refrigerator from the electrical source When you are finished reconnect the refrigerator to the electrical source and reset the control Thermostat Refrigerator or Freezer Control depending on the model to the desired setting See Using the Controls Water Supply Requirements Gather the required tools and parts before starting installation Read...

Page 4: ...y from the drill This also keeps normal sediment from collecting in the valve 4 Determine the length of copper tubing you need Measure from the connection on the lower right rear of the refrigerator to the water pipe Add 7 ft 2 1 m to allow for cleaning Use 6 35 mm O D outside diameter copper tubing Be sure both ends of copper tubing are cut square 5 Using a cordless drill drill a hole in the cold...

Page 5: ...he first three batches of ice produced Allow 3 days to completely fill the ice storage bin Refrigerator DoorandDrawer Graphics are included later in this section Remove and Replace Handles Architect Series 1 Using a hex key loosen the two setscrews located on the side of each handle See Graphics 2 and 4 2 Pull the handle straight out from the door Make sure you keep the screws for reattaching hand...

Page 6: ...Move to opposite side of refrigerator door as shown in Graphic 3 4 Attach the door handle mounting posts to the opposite side of the door 5 Position refrigerator handle over mounting posts as shown in Graphic 2 Drive two setscrews in the sides of the handle 6 Tighten all screws Set aside the door until the hinges and freezer compartment drawer are in place Reverse Door Panel Series IMPORTANT If yo...

Page 7: ...front See Drawer Front Removal graphic NOTE Loosen screws three to four turns Keep the screws in the drawer front 3 Lift drawer front upward and off the screws See Drawer Front Removal graphic Replace Drawer Front 1 Slide the drawer glides out of the freezer compartment Insert the screws in the top of the drawer front into the slots in the drawer brackets See Drawer Front Replacement graphic 2 Pul...

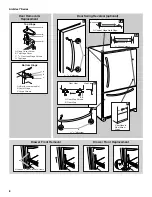
Page 8: ...ront View A B A 1 1 A A Hinge Screws 5 Door Handle Seal Screw Front 2 A 3 32 Setscrew A 3 32 Setscrew 4 A A Top Hinge A Shim on some models C Hinge Screws B Center Hinge A Hinge Cover Screw B Top Hinge Cover C 5 16 Hex Head Hinge Screws D Top Hinge B A C D Bottom Hinge A B C Drawer Front Removal A Loosen 4 Door Bracket Screws A Drawer Front Replacement ...

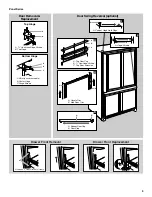
Page 9: ... A 5 16 Hex Head Hinge Screws B Top Hinge A B Bottom Hinge A B C Drawer Front Removal A Loosen 4 Door Bracket Screws A Drawer Front Replacement A Cabinet Hinge Hole Plugs A 2 A A Hinge Screws A B 5 A Bottom Door Cap B Door Stop 4 A Handle Trim B Side Door Trim A B 1 3 B C A B 1 4 Hex Head Screws C Top Door Extension A Top Door Cap ...

Page 10: ...nt If one door is lower than the other adjust the leveling screw on the lower side of the refrigerator Using a hex driver turn the screw clockwise to raise that side of the refrigerator until the doors are aligned It may take several turns of the leveling screw to raise the refrigerator NOTE Having someone push against the top of the refrigerator takes some weight off the leveling screws This make...

Page 11: ... 4 Replace the decorator panels by reversing directions Care of Decorator Panels 1 Clean panels with stainless steel cleaner and polish or mild soap and water with a clean soft damp cloth 2 Rinse panels thoroughly and blot dry using a dry soft cloth or chamois NOTE Do not use paper towels or cleaners which contain solvents such as ammonia They can damage the surface of the panels Install Custom Wo...

Page 12: ...emperature in either the refrigerator or freezer compartment use the settings listed in the chart below as a guide DigitalControls For your convenience your temperature controls are preset at the factory When you first install your refrigerator make sure the controls are still set to the recommended set points as shown Recommended Settings IMPORTANT When the power is on the temperature display sho...

Page 13: ...d alternating temperature displays The Temp Alarm light will continue to flash until the refrigerator returns to the set temperature Door Alarm The Door Alarm feature sounds a chime every few seconds when the refrigerator door has been left open for 5 continuous minutes The chime will sound until the door is closed or Door Alarm is turned off Press DOOR ALARM to turn this feature on or off The ind...

Page 14: ...supply cannot be avoided make sure the water softener is operating properly and is well maintained Do not store anything on top of the ice maker or in the ice storage bin WaterDispenser onsomemodels IMPORTANT After connecting the refrigerator to a water source or replacing the water filter flush the water system Use a sturdy container to depress and hold the water dispenser lever for 5 seconds the...

Page 15: ...se and dry removable parts and interior surfaces thoroughly Use a clean sponge or soft cloth and a mild detergent in warm water 3 Wash stainless steel and painted metal exteriors with a clean sponge or soft cloth and a mild detergent in warm water To keep your stainless steel refrigerator looking like new and to remove minor scuffs or marks it is suggested that you use the manufacturer s approved ...

Page 16: ...om items placed on top of the refrigerator Sizzling Gurgling water dripping on the heater during defrost cycle Popping contraction expansion of inside walls especially during initial cool down Water running may be heard when ice melts during the defrost cycle and water runs into the drain pan Creaking Cracking occurs as ice is being ejected from the ice maker mold The doors will not close complete...

Page 17: ...in the water A water filter may need to be installed to remove the minerals Water filter installed on the refrigerator Gray or dark discoloration in ice indicates that the water filtration system needs additional flushing Flush the water system before using a new water filter Replace water filter when indicated See Water Filtration System The water dispenser will not operate properly Refrigerator ...

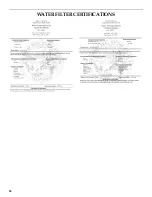
Page 18: ...18 WATER FILTER CERTIFICATIONS ...

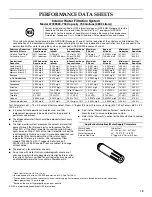
Page 19: ...nzene Carbofuran Toxaphene Cysts Turbidity Asbestos Tetrachloroethylene and Lindane Substance Reduction Aesthetic Effects NSF Reduction Requirements Average Influent Influent Challenge Concentration Maximum Effluent Average Effluent Minimum Reduction Average Reduction Chlorine Taste Odor Particulate Class I 50 reduction 85 reduction 2 00 mg L 14 000 000 mL 2 0 mg L 10 At least 10 000 particles mL ...

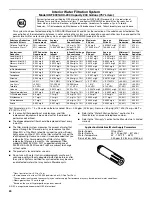
Page 20: ...rements Average Influent Influent Challenge Concentration Maximum Effluent Average Effluent Minimum Reduction Average Reduction Chlorine Taste Odor Particulate Class I 50 reduction 85 reduction 2 00 mg L 14 000 000 mL 2 0 mg L 10 At least 10 000 particles mL 0 06 mg L 370 000 mL 0 050625 mg L 196 666 mL 97 00 97 40 97 52 99 00 Contaminant Reduction NSF Reduction Requirements Average Influent Influ...

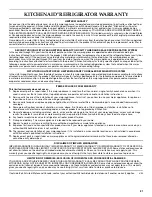
Page 21: ...air labor if this major appliance is used for other than normal single family household use or when it is used in a manner that is inconsistent to published user or operator instructions and or installation instructions 2 Service calls to correct the installation of your major appliance to instruct you on how to use your major appliance to replace or repair house fuses or to correct house wiring o...

Page 22: ...e refrigerator compartment For assistance or service in the U S A call 1 800 422 1230 In Canada call 1 800 807 6777 If you need further assistance you can write to KitchenAid with any questions or concerns at the address below In the U S A KitchenAid Brand Home Appliances Customer eXperience Center 553 Benson Road Benton Harbor MI 49022 2692 In Canada KitchenAid Brand Home Appliances Customer eXpe...

Page 23: ...ISSEMENT DANGER Voici le symbole d alerte de sécurité Ce symbole d alerte de sécurité vous signale les dangers potentiels de décès et de blessures graves à vous et à d autres Tous les messages de sécurité suivront le symbole d alerte de sécurité et le mot DANGER ou AVERTISSEMENT Ces mots signifient AVERTISSEMENT réfrigérateur prendre quelques précautions fondamentales y compris les suivantes Pour ...

Page 24: ...ver les portes de votre vieux réfrigérateur Le non respect de cette instruction peut causer un décès ou des lésions cérébrales Renseignements importants à propos de la mise au rebut des fluides réfrigérants Mettre le réfrigérateur au rebut conformément à la réglementation fédérale et locale Les fluides réfrigérants doivent être évacués par un technicien licencié et certifié par l EPA conformément ...

Page 25: ...nt d exécuter tout type d installation nettoyage ou remplacement d une ampoule d éclairage tourner la commande réglage du thermostat du réfrigérateur ou du congélateur selon le modèle à OFF arrêt et déconnecter ensuite le réfrigérateur de la source d alimentation électrique Lorsque vous avez terminé reconnecter le réfrigérateur à la source d alimentation électrique et tourner de nouveau la command...

Page 26: ... non pas par le dessous Ainsi l eau ne risquera pas d arroser la perceuse Ceci empêche également les sédiments qu on trouve normalement dans l eau de s accumuler dans le robinet 4 Pour déterminer la longueur du tube en cuivre il faut mesurer la distance entre le point de connexion au bas du côté arrière droit du réfrigérateur et la canalisation Ajouter une longueur de 7 pi 2 1 m pour permettre le ...

Page 27: ...le tube de cuivre dans le sens antihoraire pour serrer complètement Ne pas serrer excessivement 6 Vérifier la solidité du raccordement en tirant sur le tube de cuivre Fixer la canalisation d eau en plastique à la caisse du réfrigérateur à l aide d une bride en P 7 Ouvrir la canalisation d eau du réfrigérateur et inspecter s il y a des fuites Corriger toute fuite Achever l installation 1 Brancher s...

Page 28: ...us soyez prêt à la soulever de la caisse REMARQUE Prévoir un support additionnel de la porte pendant la réinstallation des charnières La force d attraction des aimants des portes ne suffit pas à les maintenir en place 3 Enlever les pièces de la charnière supérieure voir l illustration de la charnière supérieure Soulever la porte du réfrigérateur pour la séparer de la caisse 4 Enlever les pièces de...

Page 29: ...porte Voir l illustration 3 Remplacement de la porte et des charnières REMARQUE Lorsqu on inverse une porte de la série avec panneaux décoratifs utiliser la charnière supérieure alternative expédiée avec le réfrigérateur 1 Replacer les pièces de la charnière inférieure Voir l illustration de la charnière inférieure Resserrer les vis Replacer la porte du réfrigérateur REMARQUE Prévoir un support ad...

Page 30: ...is frontale de scellement de la poignée de la porte 2 A Vis de retenue de 3 32 Charnière supérieure A Cale sur certains modèles C Vis de charnière B Charnière centrale A Vis du couvercle de la charnière B Couvercle de la charnière supérieure C Vis de charnière à tête hexagonale de 5 16 D Charnière supérieure B A C D Charnière inférieure A B C A A A Vis de 3 32 4 Dépose de l avant du tiroir A Réins...

Page 31: ...16 B Charnière supérieure A B Charnière inférieure A B C A A A B 5 A Garniture du dessous de la porte B Butée de porte 4 A Garniture de poignée B Garniture de côté de porte A B A Bouchons obturateurs de charnière de caisse A Vis de charnière 1 2 3 B C A A Garniture du dessus de la porte B Vis à tête hexagonale de 1 4 C Prolongement du dessus de la porte Dépose de l avant du tiroir A Réinstallation...

Page 32: ...une porte est plus basse que l autre ajuster la vis de nivellement du côté du réfrigérateur le plus bas À l aide d un tourne écrou à tête hexagonale de tourner la vis de nivellement dans le sens horaire afin d élever ce côté du réfrigérateur jusqu à ce que les portes soient alignées Il faudra peut être appliquer plusieurs tours à la vis de nivellement pour soulever le réfrigérateur REMARQUE Le fai...

Page 33: ...ée 4 Réinstaller les panneaux décoratifs en inversant les instructions Entretien des panneaux décoratifs 1 Nettoyer les panneaux avec un nettoyant pour acier inoxydable et poli ou un savon doux et de l eau avec un linge doux propre et humide 2 Rincer à fond les panneaux et sécher en absorbant l eau comme un buvard à l aide d un chiffon sec ou d une peau de chamois REMARQUE Ne pas utiliser des essu...

Page 34: ...ateur Toujours se souvenir d attendre au moins 24 heures entre les ajustements S il est nécessaire d ajuster les températures dans le réfrigérateur ou le congélateur utiliser les réglages indiqués au tableau ci dessous comme guide Commandesnumériques Pour votre commodité les commandes de température sont préréglées à l usine Lors de l installation initiale du réfrigérateur s assurer que les comman...

Page 35: ...es la plus haute température atteinte sera affichée Pour activer cette caractéristique appuyer sur TEMP ALARM jusqu à ce que le témoin lumineux s allume Pour désactiver cette caractéristique appuyer sur TEMP ALARM pendant 3 secondes jusqu à ce que le témoin lumineux s éteigne Alarme indiquant un réchauffement Un signal d alarme sera émis à plusieurs reprises si les températures dans les compartime...

Page 36: ...ur servir des glaçons ou pour nettoyer le bac Ceci empêchera les glaçons de tomber de la machine à glaçons et dans le compartiment de congélation Après avoir remplacé le bac d entreposage mettre en marche la machine à glaçons Taux de production des glaçons La machine à glaçons devrait produire une quantité de glaçons complète environ toutes les 3 heures Pour augmenter la production de glaçons dimi...

Page 37: ...ORTANT Comme l air circule entre les deux sections toutes les odeurs formées dans une section seront transférées à l autre Vous devez nettoyer à fond les deux sections pour éliminer les odeurs Pour éviter le transfert d odeurs et l assèchement des aliments envelopper ou recouvrir hermétiquement les aliments Nettoyage de votre réfrigérateur REMARQUE Ne pas utiliser des nettoyants abrasifs ou puissa...

Page 38: ...notre site Internet et la FAQ foire aux questions pour éviter le coût d un appel de service Aux É U www kitchenaid com Au Canada www kitchenaid ca Fonctionnementdu réfrigérateur Le réfrigérateur ne fonctionne pas Le cordon d alimentation électrique est il débranché Brancher sur une prise à 3 alvéoles reliée à la terre La prise électrique fonctionne t elle Brancher une lampe pour voir si la prise f...

Page 39: ... commandes un cran plus froid Vérifier la température au bout de 24 heures Voir Utilisation de la des commande s Il y a une accumulation d humidité à l intérieur REMARQUE Une certaine accumulation d humidité est normale La pièce est elle humide Ceci contribue à l accumulation de l humidité La Les porte s est sont elle s fréquemment ouverte s ou laissée s ouverte s Ceci permet à l air humide de pén...

Page 40: ...uvelle installation Rincer et remplir le système de distribution d eau Voir Distributeur d eau La pression de l eau est elle d au moins 35 lb po 241 kPa La pression de l eau du domicile détermine l écoulement d eau du distributeur Voir Spécifications de l alimentation en eau Un filtre à eau est il installé sur le réfrigérateur Enlever le filtre et faire fonctionner le distributeur Si l écoulement ...

Page 41: ...lasse I et en vertu de la norme NSF ANSI 53 réduction de plomb mercure atrazine benzène p dichlorobenzène carbofuran toxaphène kystes turbidité amiante tétrachloroéthylène et lindane Réd de substances Effets esthétiques Critères de réduction NSF Affluent moyen Concentration dans l eau à traiter Effluent maximal Effluent moyen de réd minimale de réd moyenne Goût odeur de chlore Particules classe I ...

Page 42: ...ine tétrachloroéthylène et lindane Réd de substances Effets esthétiques Critères de réduction NSF Affluent moyen Concentration dans l eau à traiter Effluent maximal Effluent moyen de réd minimale de réd moyenne Goût odeur de chlore Particules classe I réduction de 50 réduction de 85 2 00 mg L 14 000 000 mL 2 0 mg L 10 Au moins 10 000 particules mL 0 06 mg L 370 000 mL 0 050625 mg L 196 666 mL 97 0...

Page 43: ...nifamilial normal ou lorsque les instructions d installation et ou les instructions de l opérateur ou de l utilisateur fournies ne sont pas respectées 2 Les visites de service pour rectifier l installation du gros appareil ménager montrer à l utilisateur comment utiliser le gros appareil ménager remplacer ou réparer des fusibles du domicile ou rectifier le câblage ou la plomberie du domicile 3 Les...

Page 44: ...gération Pour assistance ou service aux É U composez le 1 800 422 1230 Au Canada composez le 1 800 807 6777 Si vous avez besoin de plus d assistance vous pouvez écrire à KitchenAid en soumettant toute question ou problème à l adresse suivante Aux États Unis KitchenAid Brand Home Appliances Customer eXperience Center 553 Benson Road Benton Harbor MI 49022 2692 Au Canada KitchenAid Brand Home Applia...

Page 45: ...45 ...

Page 46: ...46 ...

Page 47: ...47 ...

Page 48: ...us droits réservés Registered Trademark TM Trademark of KitchenAid U S A KitchenAid Canada licensee in Canada Marque déposée TM Marque de commerce de KitchenAid U S A Emploi sous licence par KitchenAid Canada au Canada 4 11 Printed in U S A Imprimé aux É U ...

Reviews: