background image

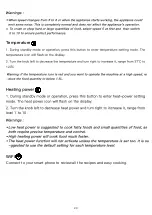
Temperature 

120°C

level 1 to 10.

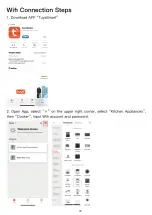
WiFi  

Connect to your smart phone to review all the recipes and easy cooking.

20

Summary of Contents for K1621

Page 1: ...Cooking Master Õïêîï ...

Page 2: ...e appliance for other than its intended purpose The risk must be borne solely by the user 3 This appliance is intended to be used in household and similar ap plications such as ments farm houses bed and breakfast type environments 4 This appliance complies with the standards in force for this type of product 5 Place the product on a stable surface Do not slot it in 6 Always connect the appliance t...

Page 3: ...if the appliance is in anyway damaged if it fell down 15 Do not let the power cord hang over the edge of a table or the work surface and make sure it does not come into contact with hot surfaces 16 Do not place and do not use this product near by any heat source 17 Avoid wrapping the cord around the appliance and do not bend it 18 Use only the accessories supplied with the appliance or any other l...

Page 4: ...ensory or mental capabilities or lack of experience and knowledge if they have been given supervision or instruction concerning use of the appliance in a safe way and understand the hazards involved Chil dren shall not play with the appliance 32 Do not allow children to use this appliance Keep the appliance and its cord out of the reach of children 33 Regarding the detailed information on how to u...

Page 5: ...he power supply if left unat 40 Improper use may result in injury 41 Be careful when pouring a hot liquid into the cooking processor or blender to avoid any splashes escaping from the appliance caused by sudden boiling 42 Warning avoid spillage on the connector vided 45 The heating element surface is subject to residual heat after use emptying the bowl and during cleaning 47 Be careful when you to...

Page 6: ...CIAL SAFETY INSTRUCTIONS pliance 2 The hole on the Jar lid can only be covered with the measuring cup Do not use clothing or other objects 3 Do not exceed the MAX mark on the Jar body 4 The Jar s surface may reach high temperature when operating 5 The instructions for food processors and blenders warm against misuse 6 Be careful if hot liquid is poured into the food processor or blender as it can ...

Page 7: ...II CHARACTERISTICS OF THE PRODUCT 1 13 2 4 5 3 9 8 7 6 10 12 11 6 ...

Page 8: ...display 5 Start pause reset knob 6 Big steamer body 7 Big steamer rack 8 Big steamer cover 9 Spatula 10 Kneading blade 11 Mixing blade 12 Filter basket small steamer 14 Fixing support 15 Measuring cup 1 Cooking Robot 1 Measuring cup 2 Steam baskets 14 15 7 ...

Page 9: ...ipes to share with your family and sub programs Reset function press the start pause knob for 2 seconds Start pause button 4 non slip feet Several accessories included II 4 POSSIBLE FUNCTIONS 1 chop vegetables and meat to the desired size 2 Mince even crushes ice for you to prepare cocktails and smoothies 3 Grind texture 4 Mill 8 ...

Page 10: ...g salad dressings such 10 Mixes way 11 Cook 12 Stir Kneading blade stirs food while it cooks it ensuring uniform heating This achieving professional consistence and texture thanks to its motor s innovating su perpower 13 Steam 14 without having to worry about stirring it or controlling time 15 Candy candy with aromatized oils without burning them and preserving all the 16 Knead You can prepare bre...

Page 11: ...achieve proper bain marie textures with its steamer 22 set the temperature until 100 ºC to reheat any precooked meal 23 Turbo this is the perfect function for processing the hardest foods It can be 1 Place the lid on the stainless steel jar so that the two small arrows on the lid and on the jar handle are properly aligned 2 Then turn the cover clockwise from the open lock to the closed lock until ...

Page 12: ...ade on the location provided on the base of the jar Make sure the 3 Turn the jar over while holding the blade gently so that it does not fall clockwise to secure the blade Mixing blade and kneading blade assembly 11 ...

Page 13: ...accessory To remove the blade from its location you may damage it NB present a risk 12 ...

Page 14: ...o prevent splashing and heat loss and is used to measure food quantity Its maximum capacity is 100 ml 1 Place the measuring cup on the cover s gap 2 Turn it clockwise to lock it and anticlockwise to open it and take it out Spatula scratch and damage the surface Warnings 13 ...

Page 15: ...Big Steamer 1 Close the steamer with its cover before using it Warnings 14 ...

Page 16: ...Small steamer 15 ...

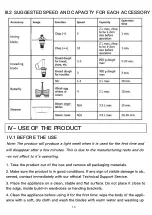
Page 17: ...III 2 SUGGESTED SPEED AND CAPACITY FOR EACH ACCESSORY IV 1 BEFORE THE USE IV USE OF THE PRODUCT 16 ...

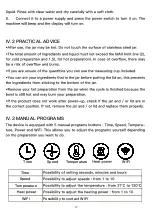
Page 18: ... IV 2 PRACTICAL ADVICE IV 3 MANUAL PROGRAMS Time Time Speed Speed Temperature Temperature WiFi WiFi Possibility to contact WiFi 17 ...

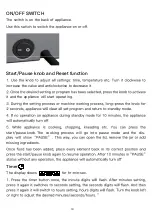
Page 19: ...d Reset function increase the value and anticlockwise to decrease it it and the appliance will start operating start pause knob The cooking process will go into pause mode and the dis missing ingredients ON OFF SWITCH The switch is on the back of appliance 18 ...

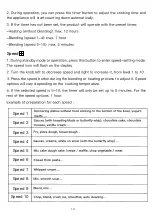
Page 20: ...matically Speed 3 Press the speed button during the blending or heating process to adjust it Speed options will vary depending on the cooking temperature Speed 1 risotto Speed 2 Speed 3 Speed 4 Speed 5 Speed 6 Speed 7 Speed 8 Speed 9 Speed 10 19 ...

Page 21: ...Temperature 120 C level 1 to 10 WiFi Connect to your smart phone to review all the recipes and easy cooking 20 ...

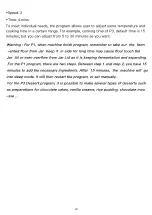
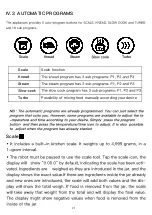
Page 22: ...IV 3 AUTOMATIC PROGRAMS and 18 sub programs Scale Scale Scale Scale function Possibility of mixing food manually according your desire Knead Knead Steam Steam Turbo Turbo 21 ...

Page 23: ...blade Program Type Temperature 300g water 25g fresh yeast 2 2 0 6 Speed 3 2 min 4 min 2 min 15 min 3 3 2 100g butter 1 2 spoon salt 1 bag of vanilla 1 egg Chocolate cake chocolate mousse vanilla cream ice pudding Classic bread and pizza pastry Pastry Dessert P1 P2 P3 22 ...

Page 24: ... Speed 3 Time 4 mins 23 ...

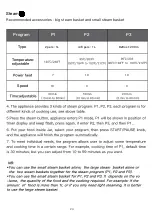
Page 25: ...Steam Recommended accessories big steam basket and small steam basket Program Type Temperature 7 10 10 Speed 30 min 50min 20 min 10 0 0 2 pers 1L 4 6 pers 1L Defrost 200 m P1 P2 P3 24 ...

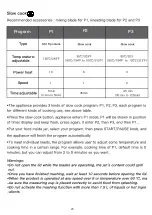
Page 26: ...Program Type Temperature 10 6 3 Speed 5 min 45min 45 min 1 1 0 Stir fry onions P1 P2 P3 25 ...

Page 27: ...d dry thoroughly cloth in warm soapy water before wiping it Never submerge the main body in water or other liquid removable bottom part of the jar after each use Wipe it with a soft damp cloth and dry it thoroughly before using it again supply and store it in a cool and safe place V CLEANING AND MAINTENANCE Turbo can press this button for the appliance to operate at maximum speed 3 This function c...

Page 28: ...rature sensor missing E03 Motor blocked ine E04 ting for too long time E05 Speed transfer failure for too long time before restarted E07 Motor temperature too ocked Speed transfer failure E08 Motor NTC failure E11 Cannot use Pulse or spe speed 4 E12 or press knob to back to normal setting mode Description Possible reasons Solution 27 ...

Page 29: ...o the applicable collection point for the recycling of electrical and electronic equipment By ensuring this product is otherwise be caused by inappropriate waste handling of this prod uct The recycling of materials will help to conserve natural re inate the packaging in an environmentally friendly way and make it available to the recycling collection service The warranty will not cover the followi...

Page 30: ...not apply µ ÝÝ ÝÝ º º ª ú ÝÝ ª º ÝÝ º ª º º ª º ª º º º Ý Þ ª º ÝÝ ª º º º º º º ª º º º º ª ºº º º º ª ª Ý ºº º ª Ý º ß º ª º ª ù 29 ...

Page 31: ...30 ...
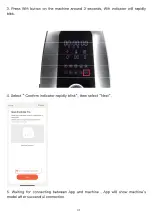
Page 32: ...blink model after successful connection 31 ...

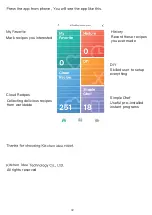
Page 33: ...erved 32 Cloud Recipes Collecting delicious recipes from worldwide Mark recipes you interested Record these recipes you ever made DIY Skilled user to setup everything Simple Chef Useful pre installed instant programs ...

Reviews: