Kisae 120V 12V-2000W-80A Owner'S Manual Download Page 10


Page 

10 


4.  Installing the Unit 

WARNING: Explosion hazard!


  DO NOT install the unit near flammable fumes or gases (such as propane tanks or large engines). 

  AVOID covering the ventilation openings. Always operate unit in an open area. 

Choosing the location: 

The unit should only be installed in locations that meet the following requirements: 

  Do not allow water or other fluids to drip or splash on the unit. 

  Environment temperature should be between -4 °F and 104 °F (-20 °C and 40 °C) 

  Allow at least three inches of clearance around the unit. The more clearance for ventilation around 

the unit, the better the performance.  
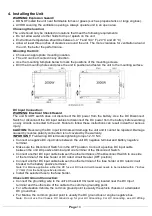
Mounting the Unit: 

  Choose an appropriate mounting location. 

  The unit can be mounted in any direction. 

  Use the mounting template below to mark the positions of the mounting screws. 

  Drill the 4 mounting holes and place the unit in position and fasten the unit to the mounting surface. 


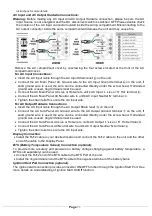
DC Input Connection: 
WARNING: Electrical Shock Hazard 

The unit ‘On/Off’ switch does not disconnect the DC power from the battery. Use the DC Disconnect 
Switch or disconnect the DC input cables to disconnect the DC power from the battery before  working 
on any circuits connected to the unit. Failure to follow these instructions can result in death or serious 
injury.


CAUTION: 

Reversing the DC Input terminals will damage the unit and it cannot be repaired. Damage 

caused by reverse polarity connection is not covered by the warranty.


IMPORTANT: 

Field wiring DC terminals tightening torque 12-13 Nm 

  Connect a negative DC input cable between the unit DC negative terminal and battery negative 

terminal. 

  Make sure the Disconnect Switch is in the OFF position. Connect a positive DC input cable 

between the unit DC positive terminal and one terminal of the Disconnect Switch. 

  Connect another DC input cable between the other terminals of the Disconnect Switch to one side 

of the terminal of the fuse holder or DC rated circuit breaker (OFF position). 

  Connect another DC input cable between the other terminal of the fuse holder or DC rated circuit 

breaker to the battery positive terminal. 

Note: For Marine application, either the DC fuse or DC rated circuit breaker needs to be installed within 7 inches 
(17.8cm) from the battery positive terminals. 

  Install the selected fuse to the fuse holder.  

Chassis DC Ground Connection: 


Connect the grounding wire to the unit’s Chassis DC Ground Lug located near the DC Input 
terminal and the other side of the cable to the common grounding point.  

  For a Recreation Vehicle, the common ground point is usually the vehicle chassis or a dedicated 

DC ground bus. 

  For Marine, the common ground point is usually the DC ground bus or engine negative bus.   

Note:  Do  not  use  the  Chassis  DC  Ground  Lug  for  your  AC  Grounding,  For  AC  Grounding,  see  AC  Wiring 

Summary of Contents for 120V 12V-2000W-80A

Page 1: ...V 2000W 80A BIC1220080 12V 3000W 100A BIC1230100 24V 2000W 40A BIC2420040 24V 3000W 50A BIC2430050 230V Series 12V 2000W 80A BIC1220080i 12V 3000W 100A BIC1230100i 24V 2000W 40A BIC2420040i 24V 3000W...

Page 2: ...1363 BIC1220080i AU Inverter Charger 12V 2000W 80A 230VAC Australia Socket NS NZS3112 BIC1230100i EU Inverter Charger 12V 3000W 100A 230VAC Schuko Socket CEE 7 4 BIC1230100i UK Inverter Charger 12V 30...

Page 3: ...mable fumes or gases such as propane tanks or large engines AVOID covering the ventilation openings Always operate unit in an open area Prolonged exposure to high heat or freezing temperatures will de...

Page 4: ...Page 4 Table of Contents 1 INTRODUCTION 5 2 PRODUCT DESCRIPTION 5 3 UNDERSTANDING THE UNIT 6 4 INSTALLING THE UNIT 10 5 UNIT OPERATION 13 6 TROUBLESHOOTING 24 7 SPECIFICATIONS 25 8 WARRANTY 27...

Page 5: ...utility power is interrupted This manual will explain how to use this unit safely and effectively Please read and follow these instructions and precautions carefully 2 PRODUCT DESCRIPTION The Sinewave...

Page 6: ...follow these instructions can damage the unit and could also result in personal injury or loss of life CAUTION Before beginning unit installation please consider the following The unit should be used...

Page 7: ...y Actual run times may vary on battery type used b DC Fuse or Circuit Breaker DC rated fuse or DC rated circuit breaker connected along the DC positive line is required Fuse Circuit Breaker Rating 12V...

Page 8: ...ent sizes refer to the applicable installation code for the DC grounding detail In marine applications the main AC DC ground bonding may require galvanic isolators to avoid galvanic corrosion Check yo...

Page 9: ...t is used to connect to the Multi Function Display of the unit k Multi Function Display The display is used to provide unit information and for setting and programming the unit l BTS Port The port is...

Page 10: ...Input terminals will damage the unit and it cannot be repaired Damage caused by reverse polarity connection is not covered by the warranty IMPORTANT Field wiring DC terminals tightening torque 12 13 N...

Page 11: ...secure the AC Input wire For AC Output Hardwire Connections Insert the AC Input cable through the AC Output Strain relief h on the unit Connect the AC Sub Panel AC Ground wire to the AC Output Ground...

Page 12: ...rovides AC Input power to the unit If AC input source is available the Status LED amber will flash for about 10 seconds indicating the AC Input source is available It will then turn to solid green or...

Page 13: ...nput is available this Power button cannot be used to turn OFF the unit Menu SET e button can be used to view the unit setting ESCAPE h button Press and hold for 5 seconds to turn OFF or ON the AC Out...

Page 14: ...Battery Default Bulk Charge Float Voltage is 14 2V 13 8V Default Flooded Battery Default Bulk Charge Float Voltage is 14 4V 13 5V AGM Battery Default Bulk Charge Float Voltage is 14 3V 13 4V Lithium...

Page 15: ...the last bar flashing indicates the unit is running in By Pass mode and the battery is in charging process The charging stages are indicated by the number of bars 4 bars in solid indicates the battery...

Page 16: ...arting Check if any object has blocked the air flow of the unit E05 When unit is in Battery Inverter mode Input battery voltage is low and warning occurs Recharge battery as unit will shutdown shortly...

Page 17: ...y Note During blackout Power button can be used to temporarily turn inverter Off to save battery power if AC Output power is not required INT ABU Automatic Backup with Charger set to Off CHG OFF By Pa...

Page 18: ...battery capacity Inverter is disabled Power indicator On AC Output indicator Off AC Output is not available due to the inverter being set to Manual Backup Mode MBU Status indicator Off After 10 secon...

Page 19: ...acity Inverter is disabled Power indicator On AC Output indicator Off AC Output is not available due to the inverter being set to Manual Backup Mode MBU Status indicator Off After 10 seconds Display a...

Page 20: ...ON Inverter Only Unit is running as inverter only no By Pass function CHG OFF ON This setting is specially designed so that the AC load connected to AC Output is always getting clean sinewave power f...

Page 21: ...Switch On Off Status indicator solid green Note Power button function is disabled in this stage Blackout When a blackout occurs unit will not provide AC Backup Display remains On for 10 seconds with...

Page 22: ...e total AC current draw from the shore power during the By Pass Charger mode to avoid tripping the shore power Branch Breaker Absorption to Float Stage Current Setting 12V 3000W 20A 15A 10A Default 5A...

Page 23: ...d Battery Disconnect Functions Battery Under and Over Voltage Setting Battery Low Disconnect voltage has selectable range 10 5 12 0V 0 1V steps Default 10 5V The Battery Low Disconnect Voltage has to...

Page 24: ...utput switch is turned Off Press and hold the ESCAPE button for 5 seconds to turn On the AC Output AC Input Source is available but is out of the acceptance range by the unit Check AC Input Source Uni...

Page 25: ...rt RJ12 Inverter Mode Battery Voltage DC Current AC Output Power Charger Mode Charging Voltage Charging Current AC Input Power Running as Battery Charger Charging Voltage Range 13 8 14 8 VDC Float Vol...

Page 26: ...Mode Battery Voltage DC Current AC Output Power Charger Mode Charging Voltage Charging Current AC Input Power Running as Battery Charger Charging Voltage Range 27 6 29 6 VDC Float Voltage Range 26 0 2...

Page 27: ...e if products are deemed non working or malfunctioning the product may be returned to the purchasing store within 30 days of original purchase Any defective unit that is returned to manufacturer withi...

Reviews: