background image

Chapter 2   Basic Operation 

2-10

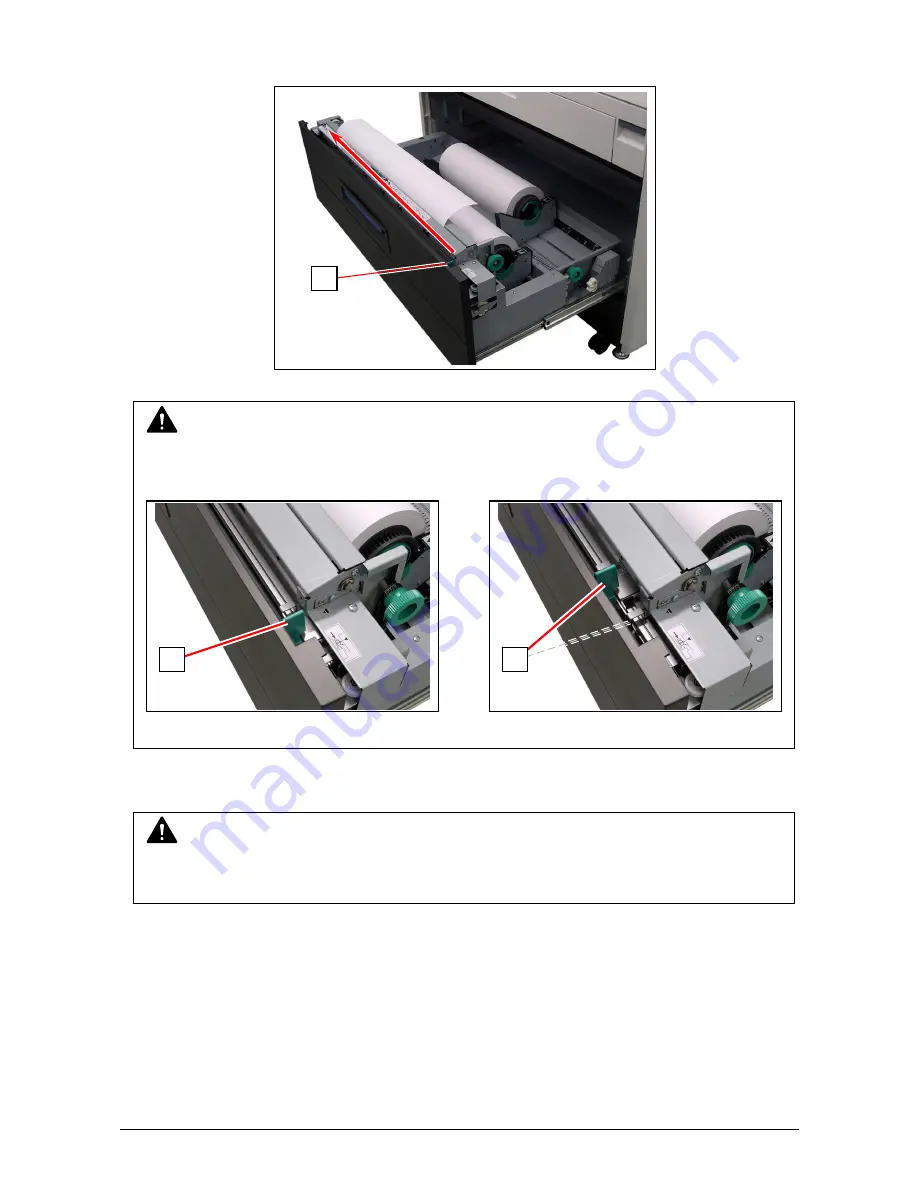
9. Slide the green Cutter Knob (12) fully from one side to the other to make a new straight edge.  
    Remove the cut portion. 


10. Gently close Roll Deck. 


NOTE 

 
Completely slide Cutter Knob (12) until it stops at either end.  
Not doing so may cause a paper jam. 


Correct      Wrong 


NOTE 

 
Be sure to close the Roll Deck fully until it locks at the correct position. 
A paper jam may occur if it is not locked firmly. 

12 

12 

12

Summary of Contents for KIP 7100

Page 1: ...Version A1 KIP 7100 User Manual...

Page 2: ...r Use a separate power line and install the PRINTER as far as possible from said equipment The International ENERGY STAR Office Equipment Program is an international program that promotes energy savin...

Page 3: ...ut the USER S Manual and have the following meaning WARNING This WARNING mark means that there is a possibility of death or serious injury if you ignore or do not follow the said instruction CAUTION T...

Page 4: ...r placing heavy items on it If the Power Cord is damaged it may cause a fire or you may receive an electric shock REPLACE THE CORD IF DAMAGED 1 Do not put a flower vase a flowerpot or any water filled...

Page 5: ...printer in a humidified room or a dusty room Also do not install the printer on an unstable floor as injuries may occur 1 Unplug the printer before you move it The power cord may be damaged and it may...

Page 6: ...pin or terminal If the appropriate plug does not fit the wall outlet in the installation the customer shall install an appropriate outlet Connector Type Configuration Standard Rating Usually found in...

Page 7: ...ions 1 5 1 4 1 General 1 5 1 4 2 Printer part 1 6 1 4 3 Scanner part 1 8 1 5 Appearance 1 9 1 5 1 Front view 1 9 1 5 2 Rear view 1 10 1 6 Specifications for the Scan Original 1 11 1 7 Specifications f...

Page 8: ...1 The installation site must not have open flames dust or ammonia gases 2 The equipment must not be exposed to the air vents from air conditioners It may affect the image quality 3 The equipment shou...

Page 9: ...ding that some specific company copies such originals as many as it requires for its own business 2 We recommend you not to copy freely such originals as government issued passport public or private i...

Page 10: ...nd the minimum is 11 279mm The maximum paper length is 6m with 36 paper or and the minimum is 8 5 210mm 5 Up to 600dpi print resolutions with an enhanced scanning system produces the highest quality i...

Page 11: ...xcluded EN ISO 7779 Ozone Max 0 05ppm Measurement method under UL Standard Dimensions 1346mm Width x 704mm Depth x 1105mm Height UI Tray excluded Weight About 244kg 538lb Environmental condition for u...

Page 12: ...ngth tracing paper vellum 1 x Standard length film Option 200 000mm Minimum 210mm 8 5 Print size from Paper Tray option ISO mm Width Length ANSI inch Width Length Warm up time Shorter than 4 minutes 3...

Page 13: ...20 Vellum US Vellum XV 20 Film 4MIL PF 4DDME Europe Asia model Plain Paper 64g m2 to 80g m2 Oce Red Label 75g m2 Tracing Paper Oce Transparent Paper 80g m2 Film Oce 3 5MIL Storage of consumables Tone...

Page 14: ...19 7ft Including the margin area Min 210mm 8 5 Including the margin area Margin area 3mm from leading trailing and both side edges Optical resolution 600dpi Digital resolution 200 300 400 600 dpi Orig...

Page 15: ...with this unit when you make scan or copy 6 Toner Hatch Original Table Open the Toner Hatch when you replace the Toner Cartridge Also put the original here and then feed it into the Scanner Unit when...

Page 16: ...t connect a telephone line 3 Dehumidify Heater Switch Optional in the US Turn on the Dehumidify Heater with this switch when you would like to dry the paper in the humid season 4 Breaker It is possibl...

Page 17: ...mm to 1 6mm Width 279 4mm to 914 4mm Length 210mm to 6 000mm If an original is thicker than 0 65mm its image quality is not guaranteed even it is transported Do not scan the following kinds of origina...

Page 18: ...pter 1 Before Use 1 12 Not square Wet Metal or fabric material Rough surface Carbon paper for example Clipped or stapled K I P K I P K I P K I P K I P K I P Wet Metal Fabric Clipped Stapled Rough surf...

Page 19: ...Chapter 1 Before Use 1 13 The following kinds of originals can be read with using a carrier sheet Image quality or the reliability of paper feeding for them is not guaranteed Patched Punched...

Page 20: ...pecifications for the Printing Paper 1 7 1 Papers not available to use Do not use the following kinds of printing paper Doing so may damage the print engine Excessively curled a diameter of 50 mm or l...

Page 21: ...n a danger of fire NOTE 1 Print image may become light if printed on a rough surface of the paper 2 Print image may become defective if the print paper has an excess curl 3 It will become a cause for...

Page 22: ...er everyday use and keep it in a polyethylene bag Void of image occurs when you print with plain paper and tracing paper If you will not make print soon remove the tracing paper from the machine and k...

Page 23: ...Turning on KIP 7100 2 2 2 2 Turning off KIP 7100 2 4 2 3 Replacing Roll Media 2 5 2 4 Replacing Toner Cartridge 2 11 2 5 Cut Sheet Media 2 15 2 6 Copying 2 16 2 7 Emergency Stop of Scan or Copy 2 18...

Page 24: ...WARNING 1 Do not handle the Power Plug with wet hands or you may receive an electrical shock 2 Make sure to earth the machine for safety 3 Do not plug the printer into a multi wiring connector in whic...

Page 25: ...n Copy Mode Screen will flash during warming up The UI screen may vary depending on your system configuration Shown with available options 4 When Ready Indicator stops flashing the KIP 7100 is ready f...

Page 26: ...ress side CAUTION The KIP 7100 print engine and UI appear to be shut down when you turn off KIP 7100 However the controller PC embedded inside the KIP 7100 is still operating and will shutdown in appr...

Page 27: ...lift and remove a roll media or an empty roll core 3 NOTE 1 A paper mis feed tends to occur just before out of a roll paper 2 A tracing roll paper is recommended to be loaded to Roll Deck 1 front Ref...

Page 28: ...Raise the green lever 4 on Flange 2 Remove both Flanges 4 from the roll core 3 3 Move a right Slide Guide 5 to match your roll media s width The right and left Side Guides will automatically move toge...

Page 29: ...r way Position them flat against Flange to secure the roll media NOTE 1 Fully insert Flange into the roll media core so that the inside rim of Flange evenly touches the side face of the roll media Cor...

Page 30: ...irection of the roll media Correct Edge comes from bottom Wrong Edge comes from top 2 The outside rim 6 of Flange should meet the black triangle 7 marked on Slide Guide Otherwise the roll media may fa...

Page 31: ...otate Feed Knob 9 clockwise so that the feeding rollers catch the leading edge 8 Hold the green grip 11 on the middle of Guide Plate and turn Guide Plate outside With holding rotate Feed Knob 9 again...

Page 32: ...aight edge Remove the cut portion 10 Gently close Roll Deck NOTE Completely slide Cutter Knob 12 until it stops at either end Not doing so may cause a paper jam Correct Wrong NOTE Be sure to close the...

Page 33: ...rtridge 1 Open the Toner Hatch 1 2 Slide the green Lever 2 to the right to unlock the Toner Cartridge Lever 2 is held automatically NOTE Be sure to unlock the Toner Cartridge by releasing the green Le...

Page 34: ...hole of the cartridge firmly by this 4 Pressing down the Cartridge Lock Lever 3 bring up the left side of the Toner Cartridge first and then remove the whole cartridge from the machine NOTE The toner...

Page 35: ...toner smooth 6 Pressing down the Cartridge Lock Lever 3 fit the pin 6 on the left side of the cartridge to the groove 7 on the machine side NOTE Please confirm that the Cartridge Lock Lever 3 firmly...

Page 36: ...tion to the arrow direction to open the toner supply hole Confirm that the projection 8 if fitted into the notch 9 8 Close the Toner Hatch 1 NOTE It is not necessary to lock the cartridge with the Lev...

Page 37: ...n the leading edge touches the feeding roller the machine automatically carries and sets the paper at the proper position NOTE 1 As a curly cut sheet will cause a mis feed straighten the sheet as far...

Page 38: ...e original on the Original Table with face up Then insert it under the Scanner Unit along with Original Guides 1 When the leading edge touches the original feeding roller the machine automatically car...

Page 39: ...tray standard rear stacking equipment option For the top tray the printer will inform you of Tray Full on exceeding capacity of stacking If the UI screen shows Tray Full remove all the prints on the t...

Page 40: ...Scanner Unit to immediately stop the original while making a copy or scan Pressing the button stops the current reading a document immediately The current printing is stopped as well and is ejected N...

Page 41: ...Sleep Mode will start after a 60 minute of inactivity to stop the power supply for Fuser Unit and some other components Sleep Mode is canceled and the machine gets ready when the machine receives a pr...

Page 42: ...idify Heater Turn on the Dehumidify Heater if the room air has too much humidity 65 or higher to prevent the above kinds of print defect Such problems above may be resolved To turn on the Dehumidify H...

Page 43: ...Jam 3 5 3 1 3 Reg Jam Internal Jam 3 6 3 1 4 Fuser Jam 3 7 3 1 5 Stack Jam 3 10 3 1 6 Original Jam 3 11 3 1 7 Accessory Jam 3 11 3 2 Other Operator Call Error 3 12 3 2 1 Roll Replacement 3 12 3 2 2 To...

Page 44: ...or Feeding Jam will be indicated when the roll paper is mis fed in the Roll Deck 1 Pull the blue lever 1 to unlock the Roll Deck Draw out the Roll Deck NOTE 1 Be careful not to get paper cuts on your...

Page 45: ...feeding rollers catch the leading edge 3 Hold the green grip 5 on the middle of Guide Plate and turn Guide Plate outside With holding rotate Feed Knob 3 again so that the leading edge comes out in 10...

Page 46: ...traight edge Remove the cut portion 5 Gently close Roll Deck NOTE Completely slide Cutter Knob 6 until it stops at either end Not doing so may cause a paper jam Correct Wrong NOTE Be sure to close the...

Page 47: ...Engine Unit 5 Replace Print Trays in the original position NOTE 1 Be sure to close the Engine Unit firmly until it locks at the correct position 2 The mis feed cut sheet should be replaced with a new...

Page 48: ...1 2 Pull up the Engine Unit Open Levers 1 to open the Engine Unit 3 Remove the mis fed paper 4 Gently close the Engine Unit 5 Replace Print Trays in the original position NOTE Be sure to close the En...

Page 49: ...Trays 1 2 Pull up the Engine Unit Open Levers 2 to open the Engine Unit 3 Remove the mis fed paper If the mis fed paper cannot be seen or removed leave the media and go to the next step 4 Hold the gra...

Page 50: ...med print to the rear NOTE If removed a mis fed paper inside the Exit Cover scattered toner can be adhered to the next print WARNING There are extremely hot parts inside the Fuser Door Do not touch an...

Page 51: ...orrection 3 9 7 Close Fuser Door 5 and Exit Cover 3 8 Gently close the Engine Unit 9 Replace Print Trays in the original position NOTE Be sure to close the Engine Unit firmly until it locks at the cor...

Page 52: ...rs 2 to open the Engine Unit 4 Pull and remove the jammed print to the top If you remove the print at this time just close the Engine Unit If the print cannot be removed see 3 1 4 Fuser Jam for the la...

Page 53: ...ess Scanner Unit down and firmly close it 3 1 7 Accessory Jam The printing paper is mis fed in the optional device such as Auto Stacker or Folder Remove the mis fed paper making reference to the User...

Page 54: ...ner supply procedure see 2 4 Replacing Toner Cartridge 3 2 3 Cutter Set NG This message is indicated when the Cutter Knob is not located at the correct position Open the Roll Deck and slide the Cutter...

Page 55: ...e done by the customer Error Code E 000 E 001 E 002 E 003 E 010 E 011 E 012 E 013 E 031 E 032 E 033 E 034 E 040 E 050 E 070 E 080 E 081 If any of the above errors appear 1 Turn off KIP 7100 and turn i...

Page 56: ...Chapter 4 Maintenance 4 1 Chapter 4 Maintenance page 4 1 Cleaning 4 2 4 1 1 Scanner Unit 4 2 4 1 2 Touch Screen 4 4...

Page 57: ...e defective if these parts are dirty 1 Turn off KIP 7100 2 Press the levers 1 up to unlock the Scanner Unit Open the Scanner Unit 3 Wipe each Scan Glass 2 Press Rollers 3 and the inside surface with a...

Page 58: ...Feed Rollers 4 Press Rollers 5 and the inside surface with a soft dry cloth 5 Gently press Scanner Unit down and firmly close it NOTE Press down Scanner Unit on both side to close it Do not close it...

Page 59: ...Chapter 4 Maintenance 4 4 4 1 2 Touch Screen 1 Wipe the Touch Screen with a dry cloth NOTE Do not use water alcohol organic solvent and glass cleaner for the cleaning...

Reviews: