background image

TROUBLESHOOTING

1. The dash cam is not recording.

Check whether your memory card has enough space. Back up any important data 

to another device first, and then format the memory card.

2. The dash cam stops during recording.

During recording, a large amount of high-definition video data is processed. Please 

use a high-speed memory card of Class 10 or higher.

3. A "File Error" prompt appears when playing back pictures and videos.

Use a legal copy memory card, and be sure to format it.

4. The image is misty.

Ensure there are no fingerprints or other marks on the camera lens. Use a soft 

and dry cloth to clean the lens. Clean the front windshield.

5. Crashing

If your device crashes, use a sharp object to press the reset button to restart the 
device.

6. No sound on the video.

Ensure the audio recording mode is on.

7. The camera keeps turning on and off automatically.

Please charge the camera with the included car charger. Do not charge the 
battery via the USB data cable with other adapters.

CAUTION!

1. Please place your device in a secure location and protect the lens from 
    scratches and dirt.
2. Do not expose the device to rain, moisture, or water under any circumstance. 
    

Only the rear camera is waterproof.

3. Avoid leaving the device in direct sunlight for extended periods of time.
4. Do not remove or expose the internal battery.

17

Summary of Contents for DL12 Pro

Page 1: ...USER MANUAL KINGSLIM DL12 Pro Dash Cam v2 0...

Page 2: ...CONTACT US For any inquiries about KingSlim products please feel free to contact us We will respond within 24 hours Tel 888 811 1140 US Email cs kingslim net Web www kingslim net...

Page 3: ...Camera Overview Installation Formatting the microSD Card Start Video Recording Icon Introduction Setup Menu Gestures Download the GPS Player Speci cations Troubleshooting Caution 2 3 4 7 7 8 9 14 16 1...

Page 4: ...11 5ft Power Cable 1 23ft Rear Camera Extension Cable 1 External GPS Module 1 Screws 4 Pry Tool 1 Cable Clips 5 Quick Start Guide 1 Double sided Adhesive Tape for Rear Camera 2 Back Straps 4 Quick St...

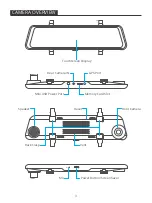
Page 5: ...CAMERA OVERVIEW MIC Touchscreen Display Mini USB Power Port Speaker Reset Vent Back Clasp Mic Power Button Screen Saver Front Camera Memory Card Slot GPS Port Rear Camera IN 3...

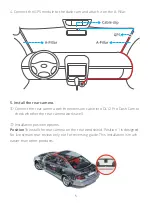
Page 6: ...before using this dash cam Do not remove or insert the memory card when the dash cam is turned on This may damage the memory card 2 Install the mirror dash cam Mount the DL12 Pro over the original re...

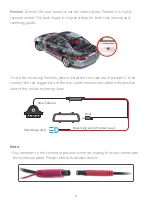
Page 7: ...ra with the extension cable into DL12 Pro Dash Cam to check whether the rear camera works well Installation position options Position 1 Install the rear camera on the rear windshield Position 1 is des...

Page 8: ...versing function please install the rear camera in position 2 then connect the red trigger wire of the rear camera extension cable to the positive lead of the vehicle reversing lamp Reversing Lamp Rev...

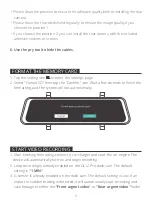
Page 9: ...o enter the Settings page 2 Select Format SD then tap the Con rm icon Wait a few seconds to nish the formatting and the system will exit automatically 1 After nishing formatting connect a car charger...

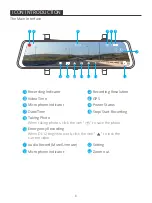
Page 10: ...Date Time Taking Photo When taking photos click the icon to save the photo 9 2 3 4 5 6 7 14 13 12 11 10 9 8 1 Audio Record Mute Unmute Microphone Indicator Recording Resolution GPS Power Status Stop S...

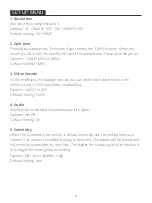
Page 11: ...footage size so you can store more video les on the memory card H 264 has better compatibility Options H 264 H 265 Default Setting H 265 4 Audio Sound will be recorded simultaneously with video Optio...

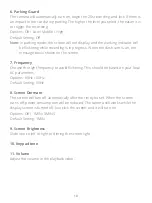
Page 12: ...message box is shown on the screen 7 Frequency Choose the right frequency to avoid ickering This should be based on your local AC parameters Options 60Hz 50Hz Default Setting 60Hz 8 Screen Dormant Th...

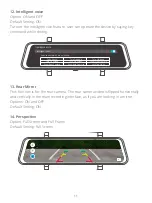
Page 13: ...is ipped horizontally and vertically in the main recording interface as if you are looking in a mirror Options ON and OFF Default Setting ON 14 Perspective Option Full Screen and Full Frame Default Se...

Page 14: ...be connected to a computer via a USB cable to copy and transfer les to from a computer UVC USB video class The device can be connected to a computer via a USB cable as a computer camera CHARGE Chargin...

Page 15: ...ard is inserted for the rst time please format it in the camera to ensure that the card is compatible with the camera 22 Default The dash cam will be restored to factory settings 23 Version Use this t...

Page 16: ...ft to right to enter the playback menu Tap the folder name to choose a folder GESTURES 1 SWITCH RECORDING DISPLAY MODES On the screen slide from right to left to switch the view modes among front view...

Page 17: ...down to adjust the viewing angle Note If you choose the view mode that displays both views of the front and rear cameras the view angle adjustment feature is disabled 4 ADJUST THE SCREEN BRIGHTNESS O...

Page 18: ...et player SPECIFICATIONS Front Camera Rear Camera Video Screen Video Coding Input Memory Card Battery Working Temperature f 1 8 170 FOV f 1 8 160 FOV 4K 1080P 2 5k 1080P 12 inch IPS touchscreen H 264...

Page 19: ...lens Use a soft and dry cloth to clean the lens Clean the front windshield 5 Crashing If your device crashes use a sharp object to press the reset button to restart the device 6 No sound on the video...

Reviews: