ADJUSTMENTS
REPLACING SANDING BELT
WARNING!: Disconnect the power cord from the power source before attempting to
replace a sanding belt.
This belt & disc sander comes with a 2” x 42” sanding belt installed on the machine,
and an additional 1” x 42” sanding belt (with 1” belt platen) is provided.
To replace the 2” x 42” sanding belt, follow these instructions:
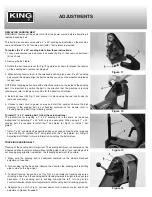
1. Loosen and remove two belt cover lock knobs (A) Fig.11, then remove belt cover
(B) as shown.
2. Remove the belt table.
3. Rotate the belt tension lever (A) Fig.12 upwards as shown to release the tension
on the sanding belt, remove sanding belt.
4. While holding tension lever in the released position, place new 2” x 42” sanding
belt around the wheels, align the belt as well as you can on the wheels and release
tension lever.
NOTE: Most sanding belts come with a directional arrow on the inside of the sanding
belt. It is important to position the belt in the direction that the machine is running
(downward), refer to labels on machine for the direction of rotation.
5. Install belt cover (B) Fig.11 and secure it in place using the two lock knobs (A)
removed previously.
6. Connect power cord to power source and start the sander, observe the belt
tracking. If the sanding belt is not tracking centered on the wheels, refer to
Tracking Sanding Belt in the following section.
To install 1” x 42” sanding belt, follow these instructions:
The instructions for installing a 1” x 42” sanding belt is the same as the above
instructions for installing 2” x 42” with only one exception. When using a 1” x 42”
sanding belt, it is required to install the 1” belt platen (A) Fig.13, to install 1” belt
platen:
1. Install 1” x 42” sanding belt as described above. Loosen and remove the large cap
screw (B) Fig.13, replace the 2” belt platen with the 1” belt platen (A). Refer to
Adjusting Belt Platen for more information on setting the belt platens.
TRACKING SANDING BELT
Tracking of the sanding belt is important. The sanding belt must run centered on the
wheels and should remain vertical without shifting side to side. If your sanding belt is
not tracking properly after installation, the following adjustment is possible:
1. Make sure the sanding belt is positioned centered on the wheels. Recheck
adjustment if needed.
2. Turn sanding belt by hand and observe the direction the sanding belt is shifting
side to side on the top wheel.
3. To adjust tracking, loosen hex. nut (A) Fig.14, and rotate the tracking cap screw
(B) using a hex. key. If the sanding belt is tracking towards the right, turn cap screw
clockwise. If the sanding belt is tracking towards the left, turn cap screw
counterclockwise. Make small adjustments until sanding belt is tracking properly.
4. Retighten hex. nut (A) Fig.14, connect power cord to power source and check
adjustment. Repeat if needed.
Figure 11
Figure 12
Figure 13
Figure 14


