ASSEMBLY
UNPACKING
Clean all rust protected surfaces with ordinary house hold type grease or spot
remover. Do not use gasoline, paint thinner, mineral spirits, etc. These may damage
painted surfaces. Apply a coat of paste wax to the tables to prevent rust. Wipe all
parts thoroughly with a clean dry cloth.
MOUNTING BELT AND DISC SANDER TO WORKBENCH
If the belt and disc sander is to be used in a permanent location, it should be fastened
securely to a firm supporting surface such as a workbench (hardware not included).
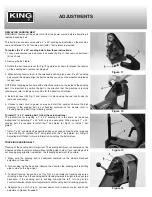
If mounting to a workbench, use the provided holes (A) Fig.3 in the base for mounting
and holes should be drilled through supporting surface of the workbench.
The belt and disc sander can also be clamped directly to a workbench using two or
more "C" clamps on base of unit.
INSTALLING SANDING BELT TABLE
1. Position the opening of the sanding belt table bracket (A) Fig.4 over the stud (B)
as shown.
2. Secure the sanding belt table (C) Fig.4 using a washer and lock handle (D).
Note:
The lock handle (D) Fig.4 is spring loaded, screw the lock handle by rotating it
clockwise. Then pull the handle outward and rotate back to starting point, release the
handle and continue tightening the lock handle until the sanding belt table is secure.
INSTALLING DISC DUST CHUTE
1. Install the disc dust chute (A) Fig.5 over the lower portion the sanding disc (B) as
shown using 6 pan head screw (C).
INSTALLING SANDING DISC TABLE
1. Position the sanding disc table (A) Fig.6 at an angle as shown, and slide the table
on so that the trunnion slots (B) slide and fit over the raised tracks (C) on the disc
guard.
2. Secure the sanding disc table (A) Fig.6 using two washers and lock handles (D) on
each side of the table.
3. The gap between the sanding disc table and the sanding disc should be a
maximum of 1/16”. If the gap is larger than 1/16”, loosen the two cap screws (E)
which secure the disc guard, slide the disc guard to achieve the proper gap and
retighten cap screws (E).
Figure 3
Figure 4
Figure 5
Figure 6


