background image

5. Use the four mounting holes inside the base to install the dome unit to the mounting

pedestal or the vessel surface.

6. Secure coax every 12-18 inches and seal all openings where the coax enters the vessel

so they are entirely waterproof 

(inside and outside of the holes)

.

7. Replace dome cover on base and align holes in dome cover with holes in base.  Attach

dome cover with dome cover screws saved earlier.  Tighten 

ALL

screws securely.

DO NOT APPLY ANY LOCKING COMPOUND TO THE SCREWS!

3. Fill end of coax cable that will connect to the MAIN port on the antenna unit with supplied

dielectric grease.  Connect this end of the coax cable to the MAIN port and tighten
connection (

Fig. 9)

If using a second (auxiliary) receiver, fill end of second coax cable and connect it to the
unlabeled port.  Tighten connection.  

DO NOT OVER TIGHTEN CONNECTIONS.

4. Snap the gel-filled boots around the coax cables, then push flush against the bottom of

the dome unit.

IMPORTANT!  The dome cover screws have a pre-applied locking compound on them.  

DO NOT APPLY ANY ADDITIONAL LOCKING COMPOUND TO THE SCREWS.
APPLYING ADDITIONAL COMPOUND WILL VOID THE WARRANTY AND MAY CAUSE
CRACKING IN THE DOME COVER.

When re-installing the dome cover, CAREFULLY lower it onto the base, tilting it side to side
as necessary to prevent damaging internal components.

Page 11

IMPORTANT!  

You must fill the ends of the

external coax cables with the

supplied dielectric grease.

Coax connections

should be snug.

DO NOT OVER TIGHTEN!

Gel-filled boots must sit flush

against bottom of dome unit.

Fig. 9

Summary of Contents for 1500-HD

Page 1: ...gton MN 55438 2453 Phone 800 982 9920 Fax 952 922 8424 www kingcontrols com 20339 REV B Satellite Solutions for Mobile Markets MEMBER Gyro Stabilized Satellite TV Antenna Model 1500 HD Model 1800 HD Installation and Operating Instructions ...

Page 2: ......

Page 3: ...eive channels broadcast from DIRECTV s Ka band satellites at 99 and 103 TABLE OF CONTENTS Section Contents Page 1 INTRODUCTION 2 2 DEFINITION OF TERMS 3 3 INSTALLATION 4 17 4 OPERATION 18 21 5 AUTOMATIC SATELLITE SWITCHING DIRECTV 22 23 6 AUTOMATIC SATELLITE SWITCHING DISH NETWORKTM EXPRESSVU 24 27 7 TROUBLESHOOTING 28 31 8 MAINTENANCE 32 9 LIMITED WARRANTY 33 DIRECTV is a registered trademark of ...

Page 4: ...verter Box Enables viewing of HDTV signals from DIRECTV 110 satellite Multi switch Installed for multiple receiver hookup DIRECTV only Power Supply Located in the vessel Supplies proper operating voltage to the Sea King SECTION 1 INTRODUCTION Page 2 Fig 1 Note HDTV Converter Multi switch installed for DIRECTV HD only Overview only see Installation Section for wiring schematics Note A TV satellite ...

Page 5: ...clockwise from Magnetic North 0 Fig 2 SIGNAL STRENGTH Intensity of electronic signal received from the satellite transmission SECTION 2 DEFINITION OF TERMS Fig 3 ELEVATION Angle in degrees measured from a level plane Fig 3 Page 3 Fig 2 ...

Page 6: ... and drill bit set tape measure 7 16 open end wrench coax connections 5 32 allen wrench channel lock or pliers to remove shipping bolt 1 8 allen wrench or phillips screw driver to remove dome cover appropriate fasteners and tools to install all components and wiring adhesive sealant compatible with vessel material Fig 4 ...

Page 7: ...nformation Exact hole spacing is shown at right Distances are to centers of holes c The dome unit should never be mounted so that it is tilted more than two degrees in any direction d Keep the dome unit as far away from the radar as possible and if possible above the level of the radar e The dome unit should be mounted as close as possible to the center of the vessel fore aft and side to side f Th...

Page 8: ...FOR OPERATION AND MAINTENANCE PURPOSES b The Tuner should not be stacked directly on top of other electronics If located in a cabinet or other enclosure make sure there is adequate ventilation around the unit If using the Tuner mounting brackets see page 17 c The Controller should be conveniently located for the end user If using the Wall Mount Faceplate see page 16 d All components should be secu...

Page 9: ...nstallation IMPORTANT CAREFULLY remove the dome cover Do not allow dome cover to catch on internal components or wiring IMPORTANT CAREFULLY remove the dome cover Do not allow dome cover to catch on internal components or wiring IMPORTANT The shipping bolt must be removed prior to installation ...

Page 10: ...ITCHING WITH DISH NETWORK OR EXPRESSVU Y0U MUST DO THE PRE INSTALLATION CHECK ON A MOTIONLESS PLATFORM SUCH AS THE DOCK OR GROUND EXTREMELY IMPORTANT NEVER lift the unit by the LNB assembly Wave Guide assembly or the dish Lift the unit by the base ONLY PRE INSTALLATION CHECK ELECTRICAL HAZARD WARNING The coaxial cable that connects the dome unit to the tuner carries a 24 volt electrical current Ex...

Page 11: ...ess platform see page 24 4 After verifying proper operation of the system DISCONNECT POWER FIRST then all other components DOME INSTALLATION AND EXTERNAL WIRING Fig 7 IMPORTANT USE ONLY THE COAX CABLES SUPPLIED WITH THE SEA KING COIL AND STORE EXCESS CABLE IN THE CABINET WITH THE COMPONENTS DO NOT CUT COAX If coax cable other than that supplied with the Sea King is used the following guidelines mu...

Page 12: ...ay be used 1 Determine the path of the coax cable s from the dome unit to the internal components Drill necessary holes 3 4 in vessel surface where coax will enter vessel Route coax cable s leaving enough slack to attach to and mount dome unit 2 Apply foam gasket s to bottom of dome unit Fig 8 Note The Sea King is wired for multiple receiver support There are two coax ports on the bottom of the do...

Page 13: ...tion Fig 9 If using a second auxiliary receiver fill end of second coax cable and connect it to the unlabeled port Tighten connection DO NOT OVER TIGHTEN CONNECTIONS 4 Snap the gel filled boots around the coax cables then push flush against the bottom of the dome unit IMPORTANT The dome cover screws have a pre applied locking compound on them DO NOT APPLY ANY ADDITIONAL LOCKING COMPOUND TO THE SCR...

Page 14: ... unit MUST be connected to the Tuner IDB in the vessel Coax connections should be snug DO NOT OVER TIGHTEN CONNECT POWER SUPPLY LAST When connecting the power supply cable to the tuner push in the power supply cable end until it is flush against the back of the tuner You must apply a light coating of dielectric grease to the female threads of internal coax connections and to the center stinger of ...

Page 15: ...aneously both receivers must be tuned to a channel broadcast from the same satellite Use the controller to manually switch satellites for the secondary receiver Dish Network ExpressVu Installation Sea King 1500 HD 1800 HD Auto switching from master receiver only Note HDTV receivers require HDMI or component video audio cable connection to TV ...

Page 16: ... require HDMI or component video audio cable connection to TV Fig 11 DIRECTV Installation Sea King 1500 HD 1800 HD Auto switching from any receiver Note To automatically switch between satellites using any receiver tune all other receivers to channel 202 on the 101 satellite ...

Page 17: ...Page 15 This page intentionally left blank ...

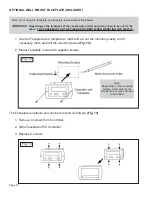
Page 18: ... cavity and if necessary mark and drill the mounting holes Fig 12 2 Mount Faceplate in wall with supplied screws Fig 13 Note Depending on the mounting surface pilot holes for the screws may or may not need to be drilled Fig 12 Note If not using the faceplate see faceplate removal instructions below IMPORTANT Depending on the thickness of the vessel wall a relief notch may need to be cut for the ca...

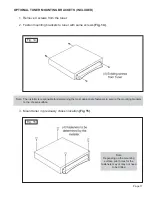
Page 19: ...m the tuner 2 Fasten mounting brackets to tuner with same screws Fig 14 Fig 14 Fig 15 Note Depending on the mounting surface pilot holes for the fasteners may or may not need to be drilled Note The installer is responsible for determining the most appropriate fasteners to secure the mounting brackets to the chosen surface ...

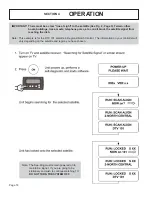
Page 20: ...from reaching the dish Note This example is for the DTV 101 satellite in Region 2 North Central The information on your controller will vary depending on the satellite and region you have chosen SECTION 4 OPERATION Page 18 Note The Sea King must remain powered on to maintain a signal If you are going to be stationary and wish to continue watching TV DO NOT TURN THE SYSTEM OFF ...

Page 21: ...ns see pages 22 23 Dish Network ExpressVu Before using the automatic switching feature you must configure the Sea King and your receiver for your desired option For switching options see pages 24 27 Your receiver may have already been configured for automatic satellite switching by the installer You can determine this by looking at the Check Switch Installation Summary screen in your receiver or c...

Page 22: ...h Network at 119 DISH 61 Dish Network at 61 DISH 129 Dish Network at 129 DISH 148 Dish Network at 148 DISH 110 119 Dish Network at 110 and 119 DISH 1000 Dish Network HDTV at 110 119 and 129 DISH 1000a Dish Network HDTV at 61 110 and 119 EXPVU 82 Bell ExpressVu at 82 EXPVU 91 Bell ExpressVu at 91 BEV 82 91 Bell ExpressVu at 82 and 91 SET SATELLITE SERVICE Page 20 ...

Page 23: ...2 NORTH CENTRAL 3 NORTH EAST 4 CENTRAL WEST 5 MIDDLE CENTRAL 6 CENTRAL EAST 7 SOUTH WEST 8 SOUTH CENTRAL 9 SOUTH EAST ALL REGIONS 0 RECALIBRATE Note To reduce satellite acquisition time you can set your current region SET REGION OPTIONAL ...

Page 24: ...y receiver can control the antenna switching if the last channel selected on all other receivers was on an odd transponder on the 101 satellite such as channel 202 At the time of publication channel 202 is broadcast on an odd transponder on satellite 101 This is subject to change If in doubt whether channel 202 is still on an odd transponder contact DIRECTV or call King Controls The antenna can on...

Page 25: ...roller and then the antenna will automatically switch to the appropriate satellite when a channel broadcast from the 101 or 119 satellite is selected 3 To change the selected satellite pair simply press the button on the controller IMPORTANT Select your current region first Failure to select your current region may result in extraordinary delays in channel acquisition see page 21 Note The program ...

Page 26: ...es 25 27 DISH 1000 1000a FOR DISH NETWORK HDTV Dish Network HD programming is broadcast from 4 satellites 61 110 119 129 The 61 and 129 satellites broadcast identical programming The 61 is generally stronger in the eastern U S and the 129 in the western U S The map below shows the approximate coverage for each satellite Your Sea King antenna can be easily configured to work with two different sate...

Page 27: ...a VIP211k HDTV receiver for Dish 1000 1000a Do not use dual tuner receivers or recorders If you do not have a clear view of the satellites the switch will not load Note The SW21 and SW64 switches are a receiver software configuration that is loaded into the receiver after running a check switch test with the dish locked on and configured for the appropriate service This one time procedure will not...

Page 28: ...perdish and Alternate boxes are NOT selected 8 Highlight Test and press Select The unit will perform a check switch test and the dish will periodically move back and forth This process will take several minutes Screen graphics may vary 4 Press Wait for dish to lock onto satellites and controller to display ...

Page 29: ... 119 129 or 110 119 61 You can now use the automatic satellite switching feature of your Sea King MUST SHOW SW21 NO X s MUST SHOW SW64 NO X s DISH 500 DISH 1000a DISH 1000 BELL EXPRESSVU Dish Network HDTV Dish Network 1000 and 1000a Changing the Satellite Trio IMPORTANT Perform the procedure below only if you are unable to receive all of your HD programming in a particular area of the country If y...

Page 30: ...ly controller is connected to tuner power supply is plugged into 110 VAC outlet SYMPTOM POSSIBLE SOLUTION Controller displays AZ FAULT Dish cannot rotate Display reads EL FAULT Disconnect power supply for 15 seconds then reconnect Restart system If problem persists perform OPTION 21 RE INITIALIZE and 0 RECALIBRATE Pages 30 31 Reseat ribbon cables inside dome unit Make sure shipping bolt is removed...

Page 31: ...er improves Check for obstruction in sky in direction of satellite Select another satellite and verify unit locks on Verify coax cables are properly terminated with SNAP N SEAL connectors only Perform OPTION 21 RE INITIALIZE and 0 RECALIBRATE Pages 30 31 Inspect all coax cables and verify connections are snug but not overly tight inside and outside dome unit When a channel from the guide is select...

Page 32: ...Page 30 OPTION 21 RE INITIALIZE and 0 RECALIBRATE ...

Page 33: ...Page 31 ...

Page 34: ... email King Controls at info kingcontrols com Rain Fade Rain or dew on the dome can cause signal interference and make the digital picture freeze pixel or go out altogether This loss of signal is commonly referred to as rain fade and is caused by the combination of water in the atmosphere and water on the dome surface To minimize this issue and eliminate the effects of water on the dome apply King...

Page 35: ...sed improperly installed or improperly maintained Repairs have been made or attempted by others that are not certified by King Controls to do such repairs Repairs are required because of normal wear and tear Alterations have been made to the product In no event shall King Controls be liable for any indirect incidental or consequential damages from the sale or use of the product This disclaimer app...

Page 36: ...Page 34 Notes ...

Page 37: ...Notes Page 35 ...

Page 38: ...Page 36 Notes ...

Page 39: ......

Page 40: ...11200 Hampshire Avenue South Bloomington MN 55438 2453 Phone 800 982 9920 Fax 952 922 8424 www kingcontrols com ...

Reviews: