background image

Basic App Guide

Using the Dial Interface

Basic App Guide

4

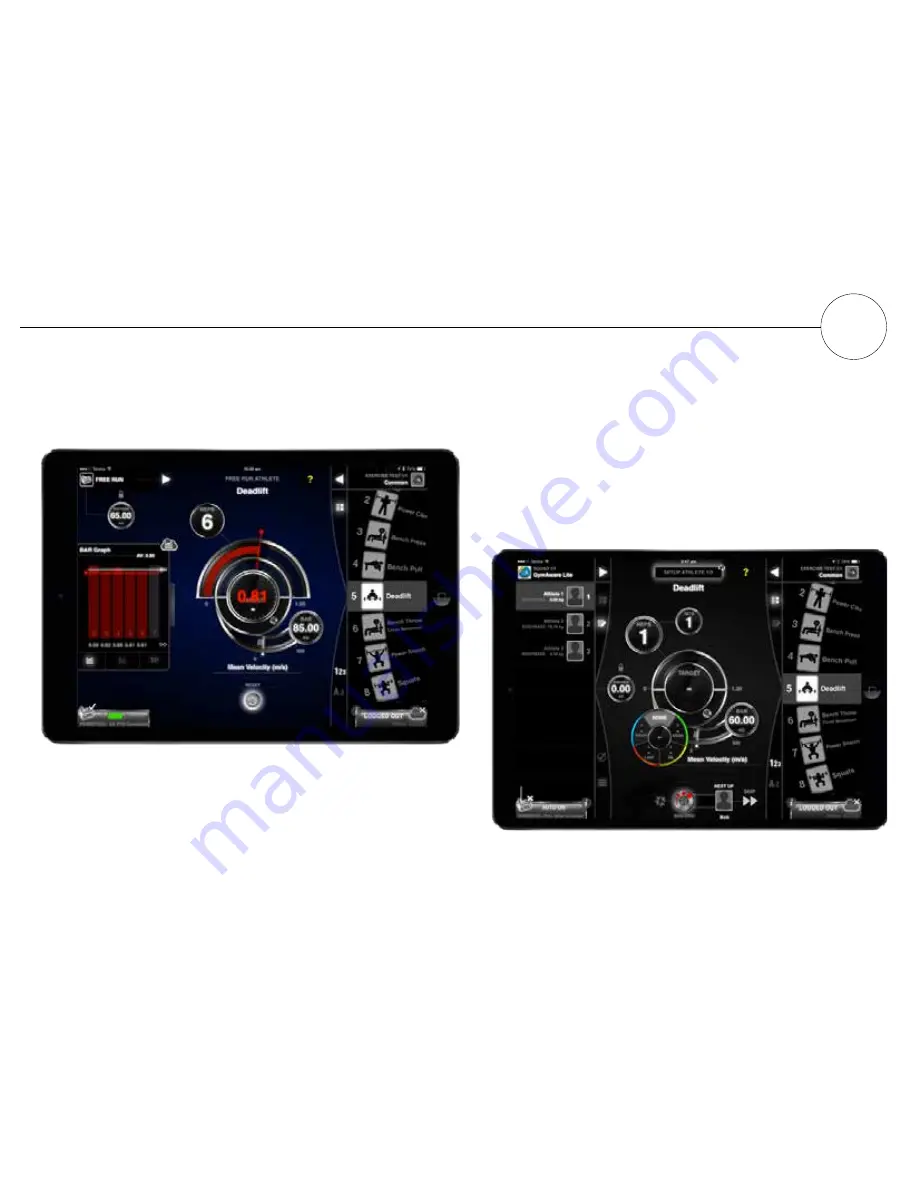
1. Free Run mode (DEFAULT)

The default mode is

 Free Run

 when not logged into the Cloud.

FREE RUN

 mode is always in a data collection state. Select exercise, 

parameter, bar weight and body mass.

target 

and 

range

 can be set if desired by tapping the central dial.

The

 RESET 

button becomes available when you have performed at 

least one rep. Tapping this button allows users the ability to clear the 

dashboard and graph at any time.

To change modes, tap the arrow top left of the screen to reveal 

the Squad List tab. Select GymAware Lite.

Three demo athletes will be revealed. Up to 10 demo athletes 

can be registered and all data and videos can be exported as 

a csv via email.

2. GymAware Lite 

One App - Three levels of use.

Summary of Contents for GymAware

Page 1: ...gymaware com January 2019 USER GUIDE...

Page 2: ...dback on our products and hope that you will contact us with any questions or comments you may have This user guide is designed to get you up and running there are some great GymAware set up tutorials...

Page 3: ...k start guide User guide VELCRO STRAP TETHER LED INDICATORS SERIAL ZERO POSITION CHARGING INDICATOR MINI USB CHARGE PORT RESET BUTTON GymAware Cloud license and accessories are available from the onli...

Page 4: ...App On initial opening only the App guide will appear as a set of slides read these then close by clicking the X at the top of the window 2 Slowly pull the tether twice to wake up your PowerTool or p...

Page 5: ...w Once HELP mode is on tap on an element to learn more and then tap the X when you are finished learning to return to the active state of the App Tap the ABOUT button to replay the introduction slides...

Page 6: ...Basic App Guide Using the Dial Interface 4 With any of the input fields you can rotate the dial to update values or use the double tap to bring up the key pad...

Page 7: ...entral dial The RESET button becomes available when you have performed at least one rep Tapping this button allows users the ability to clear the dashboard and graph at any time To change modes tap th...

Page 8: ...athlete and exercise tap the main control RECORD button to switch to the PREPARE screen The GymAware Cloud license is a paid account Make sure that you are connected to 3G 4G or WiFi is enabled and ac...

Page 9: ...and Camera settings from one main area at the Prepare or Setup screen Settings are accessed by tapping the cog icon Options include Audio and speech options Customisable target sounds Video camera se...

Page 10: ...ed icon next to the PREPARE or RECORD button depending on which screen you are in To enter the recording mode settings tap the COG icon SET timeout can be adjusted from this screen The set timeout ref...

Page 11: ...ists can be configured via gymaware com To switch between Set Up and Review tap the Box at the top of the screen Press the Record button to proceed to the Prepare screen where you can make any final a...

Page 12: ...as a final check of parameters and position athlete In this view the LEADERBOARD tab is hidden The BAR GRAPH tab has been swiped open to display the results in this form Tap the line graph option and...

Page 13: ...ave collected data sets will be displayed PARAMETER LOCK In REVIEW mode all sets collected for each exercise are able to be reviewed By default the lock icon is open This means that each set will disp...

Page 14: ...station performing the same exercise who are connected to the same Cloud account will then see the target zone Athlete Blue Zone Coaches can individualise any target zone or load per athlete without...

Page 15: ...on Aim to position the PowerTool so that it is vertically under the path of the lift The PowerTool should be positioned adjacent and away from the athletes feet On the gym floor place the PowerTool on...

Page 16: ...5 The PowerTool can be attached to any pin loaded weights machine Place PowerTool on a small weight close to the weight stack You are now set and ready to collect data Thread the pin through the Velcr...

Page 17: ...ing mount in use attached to a weights cage this needs to be attached with the ceiling mount and screws for safety During the exercise position the Velcro strap in the centre of the bar Screw the Powe...

Page 18: ...rouble shooting steps you can implement to try to resolve the issue 1 Make sure BlueTooth is on Yes a rookie mistake but it happens especially after traveling or when iPads are left out in the weights...

Page 19: ...persist visit gymaware zendesk com or contact Kinetic on 61 2 6162 1770 office kinetic com au Tether care The GymAware tether is a braided cord with a 65kg breaking strain thats a big big fish howeve...

Page 20: ...Trouble Shooting PowerTool Hardware What do the indicator LED s mean 6 or firmware upgrade...

Page 21: ...onto the tether and returning it to the unit at a moderate pace will ensure longevity of the unit More tips for caring for your GymAware unit Dropping heavy weights onto the unit causing it to break...

Page 22: ...nce the full features of the GymAware App with 10 demo athletes Collect and review results across generic lift types Basic export to csv No internet connection required GymAware Cloud Annual subscript...

Page 23: ...sults on iPad Video Preset VBT zones Internet connection required Leaderboard in App Data recorded to athlete Auto sync data to Cloud Auto sync between devices 10 registered athletes Online leaderboar...

Page 24: ...Tel 61 02 6162 1770 Email sales gymaware com gymaware com LIFT YOUR GAME VELOCITY BASED TRAINING FATIGUE MONITORING ACCURATELY MEASURE POWER OUTPUT DESIGNED FOR TEAMS VALIDATED AND RELIABLE...

Reviews: