29
To adjust the parent handle, press lock buttons on both sides of the stroller and adjust the handle to a comfortable height
(Fig. GG).
The angle of the seat can be adjusted with the lever located on the top of the backrest (Fig. HH). The seat has 3 positions:
lying, reclining and sitting.
The footrest can be adjusted in one of two positions
–
simultaneously press buttons on both sides of the footrest (Fig. II).
The seat can be adjusted in order to ensure that the child is facing the parent or the direction of travel. To do this, press
buttons on both sides of the seat, move buttons and push them back until you hear a click.
XI SAFETY BELTS
To secure your child, connect the lap and shoulder belt hooks and slide them into the center buckle until
they click into place (Fig. JJ). Safety belts should be adjusted each time in order to ensure that the child is properly secured.
Unfastening the belts should be started by pressing the button in order to open the buckle.
For the smallest children, who cannot sit up independently, belts (in a carrycot version) should be disassembled. The
seat/carrycot has attachment points for an additional harness.
Safety belts can be installed/disassembled. For assembly/disassembly, put shoulder straps, lap straps and the crotch strap
through holes in the seat. Shoulder straps can be mounted in one of two heights.
XII CARE AND MAINTENANCE
The buyer is responsible for proper installation of all functional elements as well as for
carrying out all required maintenance and adjustments in order to keep the buggy in good technical condition.
The buggy must be periodically checked for potential problems. Significant measures to be applied to ensure the child's
safety and prevent shortening of the product life have been presented below:
• Check the strength and safety of all rivets and connections.
•
Check all wheel locking equipment and tyres. If necessary, replace or repair.
• Check if all saf
ety devices work properly, particularly the main and additional fasteners that should move freely at any
time.
Please, stop using the buggy if there are doubts as to its proper use or a suspicion of any danger.
If the wheels squeak, apply a thin layer of silicone. Do not use oil or grease based products as they attract dirt, which
makes buggy movement difficult.
XIII CLEANING
If the elements of the buggy chassis have been exposed to saltwater, rinse with tap water as soon as
possible.
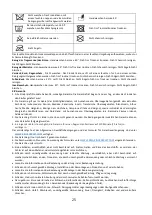
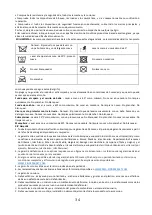
Do not wash. Clean the product gently with
a damp cloth and a mild detergent
Hand wash at max. 40˚.
Wash at max. 30°C, gentle process
Do not dry in a tumble dryer
Do not bleach
Do not dry clean
Do not iron
Do not fold or store the product when it is wet and never store it in wet conditions, as it can lead to mould growth.
Sheathing of the carrycot/seat
–
Hand wash at max. 40˚. Do not tumble dry. Do not clean chemically. Do not iron. Do not
bleach.
Sheathing of the mattress
-
Hand wash at max. 40˚. Do not tumble dry. Do not clean chemically. Do not iron. Do not
bleach.
Shade, Basket, Rain cover
–
Do not wash. The product can be washed gently with a damp cloth and a mild detergent. Do
not tumble dry. Do not clean chemically. Do not iron. Do not bleach.
Footcover
–
Machine was at max. 30˚C, gentle process. Do not bleach. Do not iron. Do not tumble dry. D
o not clean
chemically.
Mosquito net
-
Hand wash at max. 40˚. Do not tumble dry. Do not clean chemically. Do not iron. Do not bleach.
XIV Warranty
1.
All Kinderkraft products are covered by a 24-month warranty. The warranty period starts from the date the product is
handed over to the Buyer.
2.
The warranty is only valid in the member states of the European Union, excluding overseas territories (as currently
defined, including in particular: Azores, Madeira, Canary Islands, French Overseas Departments, Åland Isl
ands, Athos,
Ceuta, Melilla, Helgoland, Büsingen am Hochrhein,
Campione d'Italia and Livigno) and the territory of the United
Kingdom of Great Britain and Northern Ireland excluding the British Overseas Territories (e.g. Bermuda, Cayman Islands,
Falkland Islands).
Summary of Contents for B-TOUR
Page 2: ...2...
Page 3: ...3...
Page 4: ...4 L R...
Page 5: ...5 A B C D E F CLICK...
Page 6: ...6 G H I J K L...
Page 7: ...7 M N O P Q R III II I...
Page 8: ...8 S T U V W...
Page 9: ...9 X Y Z AA BB CC...
Page 10: ...10 DD EE FF GG HH II...
Page 11: ...11 JJ HH...
Page 12: ...12 KinderKraft TheBuggy The Buggy 0 22 4 5 1 5 0 5 15...
Page 15: ...15 Y Z Z AA BB CC DD EE FF GG HH 3 II JJ...
Page 70: ...70 0 22 4 5 1 5 0 5 15 6 6 22 4 Kinderkraft Kinderkraft B TOUR Kinderkraft 13...
Page 73: ...73 XII XIII A 40 40 30 C 40 XIV 1 2 40 30 C...
Page 84: ......

