background image

8


Port


/


16


Port


/


32


Port


User


Manual


        ‐ 

43

 ‐ 


User


group


list


User


group


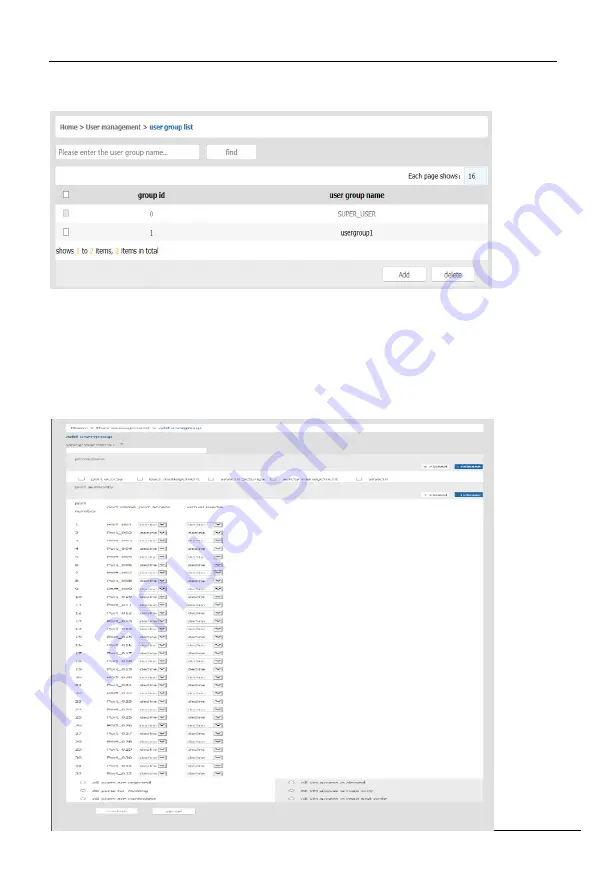
list


interface:


list


all


registered


users,


you


can


see


more


by


page


turning


User


group


name


search


Input


user


group


name,


it


shows


related


user


groups


which


make


it


convenient


when


you


have


a


large


number


of


users


Add


user


group


Click


[

add

]


button,


the


window


below


appears


Summary of Contents for KCM 1200U

Page 1: ...Rackmount KVM over IP Switch 1 Local 2 Remote Access 8 Port 16 Port 32 Port User Manual Printing date 2021 03 Version V1 0 ...

Page 2: ...rface Operating 14 4 1 UI function description 15 4 2 User Management 16 User List 16 User group list 18 Change password 19 4 3 System Settings 20 Network Settings 20 Date Time 21 Device Information 22 Encoding Parameters 23 Serial 23 4 4 Security Management 23 Security Settings 24 Audit Log 25 4 5 System Maintenance 25 Backup Restore 25 Ping host 26 Device Management 26 5 Remote Control 27 5 1 Co...

Page 3: ...etwork Settings 46 Date Time 47 Encoding Parameters 48 Serial port setting 48 6 3 Security Management 48 Security Settings 49 Audit Log 50 6 4 System Maintenance 50 Backup Restore 50 Ping host 51 Device Management 51 Remote upgrade 51 7 Appendix 52 Specifications 52 Ground Connection Requirements 53 ...

Page 4: ...sign in a 1U system rack Dual power supply Local Console Control up to 8 16 32 computers from a single console Support 1 local user and 2 remote users port share mode allows local and remote users to gain access to a server simultaneously Easy to use switching by browser based UI interface hotkeys and pushbuttons Support servers with VGA DVI HDMI DP port Support multiple operating systems Windows ...

Page 5: ... Remote users and local users can control the same server computer synchronously Support AES DES 3DES encryption Support audit function allows the administrator to audit the device through the system log and operation log Exit Macros support Configurable user and group permissions for server access and control Support strong password protection Support low bandwidth real time transmission the band...

Page 6: ... User Manual 5 Structure and Size 1 3 2 Structure and Size 1 3 3 rear view No Explanation 1 Ground connecting screw 2 Power input AC or DC 3 Power Switch 4 LAN Port 5 USB Port 6 RS485 Port 7 Monitor Port 8 PC connecting port ...

Page 7: ...8 Port 16 Port 32 Port User Manual 6 2 Hardware Installation 2 1 Rack Mounting 1 Remove the front or rear screw 2 1 1 2 Screw the bracket to the front or rear part of the KVM switch 2 1 2 ...

Page 8: ...8 Port 16 Port 32 Port User Manual 7 3 Screw the KVM device to the rack cabinet front or rear part 2 1 3 ...

Page 9: ...or and mouse to the console port see number in below diagram 4 Connect IP KVM s LAN port to the Internet see number in below diagram 5 Connect 220V AC power see number in below diagram then turn on power switch and the KVM start auto checking and make beep sound 6 Power on PC or server 2 2 1 KVM Installation Diagram 2 If you want to use a local workstation you need to connect the local workstation...

Page 10: ...KCM 1200U USB VGA Connect to USB VGA server KCM 3200H USB HDMI Connect to USB HDMI server KCM 2200D USB DVI Connect to USB DVI server KCM 4200P USB DP Connect to USB DP server Table1 3 LED Indicator of the KVM Adapter Components Function Green Online Indicates that the corresponding host has been connected to the KVM switch and Power On Orange Selected Indicates that the corresponding host is in u...

Page 11: ...Opening the KVM The KVM makes two beep sounds after power on a password window pops up for you to input user name and password 2 3 1 password window User Name admin Password admin After the KVM is powered you can power on the computer or server ...

Page 12: ... LEDs The port indicator is built into the port selector switch The online indicator green indicates that the server on the corresponding end is already connected to KVM and Power On The selected indicator orange indicates that the server of the corresponding port is working 3 KVM Reset Reset the KVM 4 Firmware Upgrade Upgrade the firmware 5 Software Upgrade Upgrade the software 6 Power Indicator ...

Page 13: ...ters brightness adjusting mode 33 is flashing on the LED tube Then press 5 6 to adjust the brightness Press 3 to exits or waits for 5s and it will auto exit 4 Press 4 for three seconds enters definition adjusting mode 44 is flashing on the LED tube Then press 5 6 to adjust the definition Press 4 exits or waits for five seconds and it will auto exit 5 Press 6 for three seconds will initialize the b...

Page 14: ...0 Pop up the UI interface Double click L_Ctrl Double click L_Alt Double click Scroll Lock Double click Caps Lock Hot key L _Alt L_Ctrl L_Win L_Ctrl L_Alt L_Win Hotkey commands are as follows Hot key the corresponding function key Function Operating Function description Port switch Number Skip ports from 1 16 Skip to previous port Skip to next port Brightness definition Reset Video R Reset the vide...

Page 15: ...control menu User Name admin Password admin After logging in the device you can see the connection status of each port In the port list 1 Click the Connect to enter the host screen 2 In the host screen press the L_Ctrl key on the keyboard twice to return to the UI interface ...

Page 16: ...IP address subnet mask etc Date Time Set date and time Device Information Device information settings Encode Parameters Video quality settings Serial Serial settings 3 Security Management Security Settings Login and password permission settings Audit Log Audit Log 4 System Maintenance Backup and restore settings Backup restore factory settings Ping host Test the network connection status with the ...

Page 17: ...n If the user does not have user management authority the user cannot access to user management interface The user in this section is who have the user management authority User List User list interface list all registered users you can see more by page turning User name or full user name search Input user name it shows related users which make it convenient when you have a large number of users ...

Page 18: ...he password can only composed of 1 16 letters numbers or special characters _ with strong password protection the password should be filled in according to the rules of strong password protection More details please check security management security setting strong password 3 Confirm password The confirm password should be the same as the setting password 4 User group Select the corresponding user...

Page 19: ... user groups which make it convenient when you have a large number of users Add user group Click add button the window below appears 1 User group name The user group name is composed of uppercase and lowercase English letters numbers and underscores 2 Permission mainly refers to management and operation permission Click show more the permission menu appears shown in picture above click show less t...

Page 20: ... permission 3 Port permission set up access and operating permission for each port Change password Change the User login password 1 Old password Enter the old password 2 New password Input new password When strong password protection is not set the password can only consist of 1 16 letters numbers or special characters _ if strong password protection is set the password must be filled in according...

Page 21: ...enerally it should be consistent with other devices in the network Default gateway Generally it should be consistent with other devices in the network MAC address physical address DCSG IP the IP address should be the same with the Authentication Server IP address DCSG Port The Port should be the same with the Authentication Server Port ...

Page 22: ...rt 16 Port 32 Port User Manual 21 Date Time System time setting User defined time manually set by the user Synchronize with NTP server the system automatically updates the time according to the time server ...

Page 23: ...Information KVM hotkeys Left Ctrl Left Ctrl Left Alt Left Alt Scroll Lock Scroll Lock Caps Lock Caps Lock Function hotkeys Left Alt Left Ctrl Left Win Left Ctrl Left Alt Left Win No function hotkey Set module EDID 1280 1024 1366 768 1920 1080 Auto ...

Page 24: ...am type high definition of the main stream low definition of the secondary stream Frame rate the number of frames encoded per second IP ratio the ratio of I and P frames per second Upper limit of code rate the maximum code rate of encoding channel 1 12MBPS Serial 4 4 Security Management ...

Page 25: ... it is selected login lock will be canceled Account lock set trying number of times for login attempts failed Timed lock set the account lock time when account login failed attempts are over the setting number of times Strong password Enable strong password when it is selected the original password will be forced to be changed Password history depth new password cannot be the same as the latest 3 ...

Page 26: ... Maintenance Provide system maintenance tools such as test tools data backup and restart Backup Restore Backup backup current system settings Restore restore the last backup of system Factory reset Restore to factory state KVM must be restarted to take effect ...

Page 27: ...8 Port 16 Port 32 Port User Manual 26 Ping host Device Management ...

Page 28: ...supports below two mouse mode Absolute mouse mode Relative mouse Intelligent mouse mode Mouse configuration is different for different operating systems please refer to below detail instructions for mouse configuration 1 Mouse and display configuration on Windows server 2003 and above version Windows XP and above version Operating systems Windows server 2003 Windows server 2005 Windows server 2008...

Page 29: ...lay of the target server under Windows XP Windows 2003 Windows2008 Start Control Panel Hardware Display Please follow the steps above to finish the setting Configure the mouse under Linux ubuntu 10 Input xset m 1 1 in the Linux command line terminal and press Enter to finish the mouse setting as shown below ...

Page 30: ...8 Port 16 Port 32 Port User Manual 29 5 2 Remote WEB interface settings Install and open IE browser click top right se ngs Internet Op ons Click Security Custom Level ...

Page 31: ...8 Port 16 Port 32 Port User Manual 30 ActiveX controls and plugins ...

Page 32: ...8 Port 16 Port 32 Port User Manual 31 Click Advanced find Allow software to run or install even if the signature is invalid and select it ...

Page 33: ...rd admin IP address 192 168 1 167 Notice For security please change the password after the first login Differentiating between capital and lowercase letters After connecting the device open the Internet explorer web browser http 192 168 1 167 Default Items Default Value User name admin Password admin ...

Page 34: ...o Plugin dialog box Click OK to use the video plugin Video access KVM port access status 1 Busy 2 Connect 3 Close Connect shows the target KVM is connected to the KVM port users can access to the target anytime close shows that the KVM is not connected to the KVM adapter or the target server or the target server is not boot up busy shows that port is access by local or remote users ...

Page 35: ...8 Port 16 Port 32 Port User Manual 34 Edit Port Name 单击 ...

Page 36: ...dow Source video params Full Screen 1 Hide or Show Toolbar When the video window starts the toolbar is always displayed by default Click the icon the toolbar will automatically hide If the mouse is moved to the toolbar position again the toolbar will be displayed 2 Setting Options 2 1 Keyboard Mouse Options When user has the operating permissions see below figure 2 1 ...

Page 37: ...Mouse Mode Setting Relative mode Relative mode is compatible with almost all the operating systems the factory default mode is relative mode Absolute mode The absolute mode is not compatible with LINUX operating system Full Screen Setting Full Screen Zoom If the Full Screen Zoom is disabled the video will be displayed in the remote full screen If the Full Screen Zoom is enabled and the target serv...

Page 38: ... server s platform is win10 it shows the resolution of video IP address KVM switch s IP address Refresh Rate video refresh rate Port number video port number Manual calibration resolution when the resolution of the target server is not consistent with the resolution of the video window it can manually calibrate the resolution after calibration Target server resolution resolution selection of manua...

Page 39: ...sed when logging in next time Shown as figure 2 4 图 2 4 Click the blank input box to display the virtual keyboard and click the keys on the virtual keyboard to display the input box 3 Send send Ctrl Alt Del Keyboard Macro click this button the target server will receive shortcut key Send Ctrl Alt Del Bring up the task manager of target server Windows operating system ...

Page 40: ...of the left corner of the video window 5 Single mouse In the video window it will hide the remote user s mouse and only show the target server s mouse 6 Source video params 7 Optimum size The initial size of the video window is 1024x768 when click this button the video window will adjust the size of the window according to the resolution of the target server 8 Full Screen The video window enter fu...

Page 41: ...s and so on If the user does not have user management permission the user cannot access to user management interface The user in this section is who have the user management permission User List User list interface list all registered users you can see more by page turning User name or full user name search Input user name it shows related users which make it convenient when you have a large numbe...

Page 42: ...d can only composed of 1 16 letters numbers or special characters _ with strong password protection the password should be filled in according to the rules of strong password protection More details please check security management security setting strong password 3 User group Select the corresponding user group Delete User Select the user you want to delete click delete Note admin cannot be delet...

Page 43: ...8 Port 16 Port 32 Port User Manual 42 Edit user Click 1234 edit user window pops up ...

Page 44: ...list interface list all registered users you can see more by page turning User group name search Input user group name it shows related user groups which make it convenient when you have a large number of users Add user group Click add button the window below appears ...

Page 45: ...nd control target server User Management user management permission Device Setting KVM device management permission Security Management security management permission System Maintenance system maintenance permission 3 Port permission Set up access and operating authority for each port Delete user group Select the user group you want to delete click delete Note SUPER_USER is system allocated which ...

Page 46: ...t new password When strong password protection is not set the password can only consist of 1 16 letters numbers or special characters _ if strong password protection is set the password must be filled in according to the rules of strong password protection Please refer to security management security setting strong password for details 6 2 System Settings ...

Page 47: ...t should be consistent with other devices in the network Default gateway Generally it should be consistent with other devices in the network MAC address physical address DCSG IP the IP address should be the same with the Authentication Server IP address DCSG Port The Port should be the same with the Authentication Server Port ...

Page 48: ... Port User Manual 47 Date Time System time setting Customized time manual setting Synchronize with the NTP server the system automatically updates the time according to the time server Time zone setting choose time zone ...

Page 49: ...e high definition of the main stream low definition of the secondary stream Frame rate the number of frames encoded per second IP ratio the ratio of I and P frames per second Upper limit of code rate the maximum code rate of encoding channel 1 12MBPS Serial port setting 6 3 Security Management ...

Page 50: ...sable Lock when it is selected login lock will be canceled Account lock set trying number of times for login attempts failed Timed lock set the account lock time when account login failed attempts are over the setting number of times Strong password Enable strong password when it is selected the original password will be forced to be changed Password history depth new password cannot be the same a...

Page 51: ... Maintenance Provide system maintenance tools such as test tools data backup and restart Backup Restore Backup backup current system settings Restore restore the last backup of system Factory reset Restore to factory state KVM must be restarted to take effect ...

Page 52: ...k is smooth result returns to ip is active If not it returns to no response from IP IP is tested target server s IP Device Management Remote upgrade Provide users with better upgrade experience and continuous technical support Upgrade method Click browse and select upgrade file upload the file to the device then click upgrade to finish upgrade ...

Page 53: ...n 8 16 32 Reset 1x touch button Upgrading switch 1x toggle switch Power 1x rocker switch LEDs Online Green 8 16 32 Selected Orange 8 16 32 Power 1 blue Cascade display 2x 7 Segment orange Remote Remote control KVM control ActiveX control Management way Web Security DES encryption Resolution 1920 1080 60Hz I R Value 100V 240Vac 50 60Hz 1 5A Power Consumption 17W 18W 19W Environment Requirements Ope...

Page 54: ...ake sure the device is connected to the ground and use the STP cable to connect the device The STP cable contains four shielded twisted pair and one ground wire the ground wire should be welded into the RJ 45 connector Grounding the STP shield cable as shown below and make sure the metal RJ45 connector is tight shield Connect one end of the RJ 45 connector to the ground RJ 45 connection socket ...

Reviews: