background image

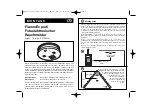
For your convenience, write down the following 

information. If you call our Consumer Hotline, 

these are the first questions you will be asked.

Smoke Alarm Model Number
(located on back of alarm):

Date Code (located on back of alarm). 
National Fire Protection Association
(NFPA) and the manufacturer
recommends replacing this alarm
ten years from the date code:

Date of Purchase:

Where Purchased:

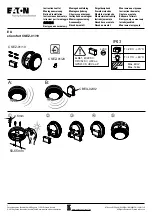
AC Wire-in Single and/or Multiple Station (up to 24 Devices) 
Photoelectric/Ionization Smoke Alarm with 9 Volt Battery 
Back Up and “HUSH” Control to temporarily silence nuisance 
alarms.

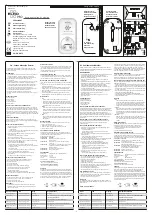
Thank you for purchasing this smoke alarm. It is an important part of 
your family’s home safety plan. You can trust this product to provide 
the highest quality safety protection. We know you expect nothing less 
when the lives of your family are at stake. Kidde alarms and accessories 
CAN ONLY BE interconnected with other Kidde alarms and accessories 
as well as specified brands and models of interconnect compatible 
alarms. Connection of Kidde products to a non-specified manufactur-
er’s interconnect system, or connection with non-specified equipment 
from another manufacturer into an existing Kidde system could result 
in nuisance alarming, failure to alarm, or damage to one or all of the 
devices in the interconnect system. Refer to the User’s Guide supplied 
with each Kidde product for interconnect compatible models, brands, 
and devices. Refer to the wiring instructions in section 3 for NFPA initi-
ating device limits.

Smoke Alarm User’s Guide

820-0905 REV. D 06/09

1475-7205-00

PI2010

For model: PI2010

1475-7205-00(820-0905-EN)_R1.indd   1

1475-7205-00(820-0905-EN)_R1.indd   1

2009.12.9   10:07:36 AM

2009.12.9   10:07:36 AM

Summary of Contents for PI 2000

Page 1: ...We know you expect nothing less when the lives of your family are at stake Kidde alarms and accessories CAN ONLY BE interconnected with other Kidde alarms and accessories as well as specified brands a...

Page 2: ...S BEFORE INSTALLATION AND KEEP THIS MANUAL NEAR THE ALARM FOR FUTURE REFERENCE CONTENTS OF THIS MANUAL 1 RECOMMENDED LOCATIONS FOR SMOKE ALARMS 2 LOCATIONS TO AVOID 3 INSTALLATION INSTRUCTIONS 4 OPERA...

Page 3: ...ing the alarm on the wall use an inside wall with the top edge of the alarm at a minimum of 4 10 cm and a maximum of 12 30 5 cm below the ceiling see figure 1 Put smoke alarms at both ends of a hall w...

Page 4: ...walls and roof This may create a thermal bar rier which can prevent the smoke from reaching an alarm mounted on the ceiling In such units install the smoke alarm on an inside wall with the top edge o...

Page 5: ...B of the U S National Electrical Code ANSI NFPA 70 NFPA 72 and or any other codes having jurisdic tion in your area The multiple station interconnect wiring to the alarms must be run in the same race...

Page 6: ...FM I KN COSM IB HD135F KN COB IC KN COP IC KN COPF I and FireX models AD ADC FADC with models without battery backup Kidde models 1235 i12020 KN COSM I 120X SM120X CO120X SL177 be advised that the mo...

Page 7: ...and wiring the AC QUICK CONNECT harness as described in the WIRING INSTRUCTIONS attach the trim ring to the electrical box see figure 6 3 Pull the AC QUICK CONNECTOR through the center hole in the tr...

Page 8: ...the base is allowed to engage the mounting bracket Rotate the alarm onto the trim ring until you hear the tamper resist tab snap into place locking the alarm on the trim ring Using the tamper resist...

Page 9: ...present The HUSH feature can be used repeatedly until the air has been cleared of the condition causing the alarm NOTE DENSE SMOKE WILL OVERRIDE THE HUSH CONTROL FEATURE AND SOUND A CONTINUOUS ALARM C...

Page 10: ...est button on any one of the interconnected alarm is pressed If no alarm sounds the unit has defective batteries or other failure DO NOT use an open flame to test your alarm you could damage the alarm...

Page 11: ...RY INSTALLATION AND REMOVAL To replace or install the batteries you must first remove the alarm from the trim ring by following the ALARM REMOVAL instructions at the beginning of this section After al...

Page 12: ...er hose and blowing or vacuuming through the openings around the perimeter of the alarm The outside of the alarm can be wiped with a damp cloth After cleaning reinstall your alarm and test your alarm...

Page 13: ...m protection a smoke alarm should be installed in each sleeping area on every level of a home Although smoke alarms can help save lives by providing an early warning of a fire they are not a substitut...

Page 14: ...t of a radioactive element in the sensing chamber to enable detection of visible and invisible combustion products The radioac tive element is safely contained in the chamber and requires no adjustmen...

Page 15: ...69 NOTIFY YOUR LOCAL FIRE DEPARTMENT AND INSURANCE COMPANY OF YOUR SMOKE ALARM INSTALLATION 11 CAUTION AS REQUIRED BY THE CALIFORNIA STATE FIRE MARSHAL Early warning fire detection is best achieved by...

Page 16: ...CASE EXCEED THE COST OF REPLACEMENT OF SMOKE ALARM AND IN NO CASE SHALL KIDDE OR ANY OF ITS PARENT OR SUBSIDIARY CORPORATIONS BE LIABLE FOR CONSEQUENTIAL LOSS OR DAMAGES RESULTING FROM THE FAILURE OF...

Reviews: