background image

16

SXRC Remote Control

Installa

tion

Software Updates

Now that you have the SXRC mounted and wired properly it is

time to update the software in all of your SX Series amplifiers.
This process has to be completed for EACH amplifier and does
require you to disconnect
and reconnect cables
between each step.
Please read the 
instructions and follow
them exactly as
described.

You only have to do this

setup and programming
process one time for each
amplifier. 

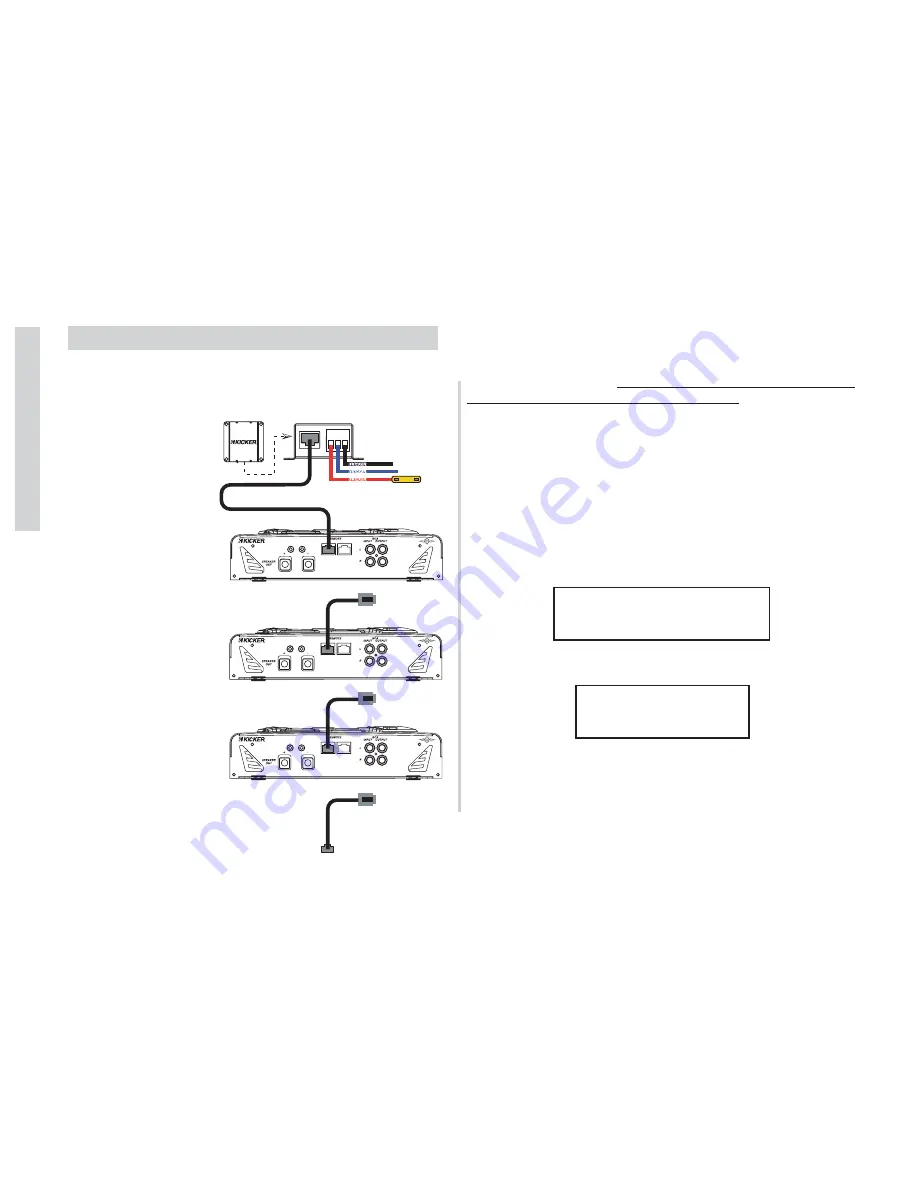
Step 1.)

Un-plug the

Communications Network
Cables from the REMOTE
OUT jacks on ALL the SX
Series amplifiers. Leave
the Communications
Network Cables 
connected to the
REMOTE IN jacks. The
SXRC Interface Box
should only be connected
to the first SX Series
amplifier as the diagram
to the right is showing.

NOTE!!!

Each SX Series amplifier must be assigned its own unique

address from the amplifier’s keypad before it can be updated and
controlled by the SXRC. 

This has to be done at each amplifier’s 

keypad and can not be done from the SXRC.

Think of the 

amplifiers like houses...no two houses can share the same street
address...the mailman would throw a complete fit! Well, the
SXRC feels the same way about two amps sharing the same
Remote Communication Address.

Each series of SX amplifiers (.2-Stereo, .1-Mono Block, .4-Four

Channel) has a unique address range that is not shared between
the others. So it is impossible to accidentally share addresses
from one series with another. All you need to do is assign a
unique (different) address to each amplifier in you system. The
possible choices for each series are:

All SX Series amplifiers are shipped from the factory with their

Remote Address set to the lowest setting.

For example, lets say you have 4 SX.2, 4 SX.4 and 4 SX.1

amplifiers in your system for a grand total of 16 amplifiers. Set the
Remote Addresses as such:

FROM AMP

+ 12

V

R

E

M

G

N

D

TO SXRC

Interface Box

Communication

Network Jack (RJ45)

Power, Ground

Remote Jack

+12 Volt

Ground

Remote

HyperFlex

HyperFlex

HyperFlex

AMP STRAPPING

IN

OUT

IN

OUT

AMP STRAPPING

IN

OUT

IN

OUT

AMP STRAPPING

IN

OUT

IN

OUT

5-Meter Network Cable

1-Meter Network Cable

1-Meter Network Cable

To Next Amplifier

Additional Network Cable

(Supplied By You)

5

Fuse

SX.2 # 1 - 10
SX.2 # 2 - 11
SX.2 # 3 - 12
SX.2 # 4 - 13

SX.2 Series 

- Addresses 10-59

SX.1 Series 

- Addresses 60-109

SX.4 Series 

- Addresses 110-119

SX.1 # 1 - 60
SX.1 # 2 - 61
SX.1 # 3 - 62
SX.1 # 4 - 63

SX.4 # 1 - 110
SX.4 # 2 - 111
SX.4 # 3 - 112
SX.4 # 4 - 113

SX.2 Series 

- Address 10

SX.1 Series 

- Address 60

SX.4 Series 

- Address 110

Summary of Contents for SXRC

Page 1: ......

Page 2: ...RECEIPT Congratulations You have just purchase the latest in microprocessor powered amplifier control technology to carry the famous KICKER name Your KICKER SXRC is designed and built to give you yea...

Page 3: ...ys find the latest version available for download there Last but not least grab a cold beverage kick back and read about this latest creation from the Livin Loud Labs Enjoy Full Control Of SX Amplifie...

Page 4: ...SIS Display Indicate Status Input Settings ISIS is a VFD Vacuum Fluorescent Display 5 way soft touch keypad and 4 memory presets that allows you to view any current settings and make changes to your S...

Page 5: ...ded with your SXRC Remote Control kit SXRC Control Head This is the DIN sized unit used to control the SXRC and your SX amplifiers It includes an attached 1 meter long 6 pin DIN cable This cable is al...

Page 6: ...1 M2 M3 M4 HOME ENT ESC SYS MEM 1 GAIN EQ LPF HPF KOMP AMP1 LOCK MEM 2 MEM 3 MEM 4 PHASE MUTE AMP2 LEFT RIGHT kicker Mounting Hardware Includes four 4 sheet metal screws for mounting the Interface Box...

Page 7: ...and or adjust SXRC and amplifier controls DOWN Used to advance down through menu selec tions and or adjust SXRC and amplifier controls These controls and their usage will be explained later with more...

Page 8: ...7 3 16 2 1 8 182 mm 53 mm 2 51 mm Mounting Surface Other Surfaces 7 3 16 2 1 8 182 mm 53 mm Using the existing DIN opening or the one you just created slide the Metal DIN Mounting Cage into the openi...

Page 9: ...l Head Mounting Clips Route the SXRC Control Head cable through one of the openings in the Trim Ring Metal Cage assembly to your SXRC Interface Box location Press the SXRC control head in to the assem...

Page 10: ...ting Surface Center to Center 5 17 32 140mm Once your holes are drilled you can use the two supplied M3 screws to secure the SXRC Control Head to your mounting surface If the supplied screws are not l...

Page 11: ...e or a variation of them so we included these for your entertainment Got your own idea E mail them to questions kicker com Attn Hank In the center console This one makes some sense as it keeps the SXR...

Page 12: ...Control Head it is time to do some wiring The first step is to plug your SXRC Control Head into the SXRC Interface Box Next run a fused 5 amp constant 12 volt ground and remote turn on to the SXRC In...

Page 13: ...n the SXRC Interface Box and on SX Series amplifiers We only use 3 of these pins for the Digital Communications Network Pins 2 7 and 8 If pins 2 7 or 8 are bent or damaged you will not be able to esta...

Page 14: ...rFlex HyperFlex HyperFlex AMP STRAPPING IN OUT IN OUT AMP STRAPPING IN OUT IN OUT AMP STRAPPING IN OUT IN OUT 5 Meter Network Cable 1 Meter Network Cable 1 Meter Network Cable To Next Amplifier Additi...

Page 15: ...clip side down onto the cable and seat it fully onto the cable The 8 wires should butt up against the end of the plug tightly Crimp the plug onto the wire securely using the RJ45 Crimp Tool Repeat the...

Page 16: ...s the same way about two amps sharing the same Remote Communication Address Each series of SX amplifiers 2 Stereo 1 Mono Block 4 Four Channel has a unique address range that is not shared between the...

Page 17: ...3 seconds then turning it back on NOTE At this point each SX Series amplifier has been assigned a unique Remote Address Be sure you have properly done this to each amplifier before proceeding If mult...

Page 18: ...E MUTE AMP2 LEFT RIGHT A B C D E F G H The SXRC will now ask you if you want to save the current settings of your amplifier into a memory preset Use the UP or DOWN keys to select I SAVE YES J SAVE NO...

Page 19: ...he SXRC Communications Network you can move on to step 14 If you can not get the amplifier to accept a software update then visit your local KICKER dealer or call KICKER Technical Services for more tr...

Page 20: ...AMP2 LEFT RIGHT p p 0 0 ro og gr ra am m 0 0 SYS MEM 1 GAIN EQ LPF HPF KOMP AMP1 LOCK MEM 2 MEM 3 MEM 4 PHASE MUTE AMP2 LEFT RIGHT v v 0 0 er ri if fy y 0 0 SYS MEM 1 GAIN EQ LPF HPF KOMP AMP1 LOCK M...

Page 21: ...k everything Try a different cable if necessary Repeat steps 15 20 after double checking your cables and jacks Once the second amp is successfully updated and in the Communications Network you can mov...

Page 22: ...ime out and return to the scrolling Default Menu If this happens you will then need to skip Step 23 and return to the Autosearch Menu by following Steps 24 26 Step 23 If the ISIS Display is showing AU...

Page 23: ...and third amplifier and make sure it is inserted properly and snapped into place If you have purchased different cables double check that they are Straight Through Ethernet Network cables If you have...

Page 24: ...ault Menu If this happens you will then need to skip Step 30 and return to the Autosearch Menu by following Steps 31 33 Step 30 If the ISIS Display is showing AUTOSEARCH press the ENT key to detect up...

Page 25: ...AMP STRAPPING IN IN OUT OUT IN IN OUT OUT AMP STRAPPING AMP STRAPPING IN IN OUT OUT IN IN OUT OUT AMP STRAPPING AMP STRAPPING IN IN OUT OUT IN IN OUT OUT AMP STRAPPING AMP STRAPPING IN IN OUT OUT IN I...

Page 26: ...y keypad You use the UP and DOWN keys to scroll through the available menu items The ENT key is used to select that menu item The ESC key backs you up one menu level from where you are and the HOME ke...

Page 27: ...lling mode and scroll through the menu items at a much faster rate Releasing the key will return it to normal speed mode HOME ENT ESC HOME ENT ESC PRESS HOLD HOME ENT ESC PRESS RELEASE HOME ENT ESC PR...

Page 28: ...ing the ESC key Each press brings up the next item in the DEFAULT menu If you want the display to start scrolling again simply press the HOME key You can change the Digital Remote Volume Control DRVC...

Page 29: ...que Remote Address It all makes sense now Once you have found the amplifier you wish to adjust simply press the ENT key to select it HOME ENT ESC 29 SXRC Remote Control Operation MAIN This is the firs...

Page 30: ...ct SX 1 Series do not have Left or Right channel options since it is a Mono Block design Skip this step and move to next paragraph Now use the UP and DOWN keys to increase or decrease the gain of the...

Page 31: ...default Q of 3 Use the UP and DOWN keys to select your bandwidth Q value and press the ESC to save your setting and return to the frequency boost cut bandwidth options menu You can now select another...

Page 32: ...l through frequency and slope and then press the ENT key to select FREQUENCY selects the crossover point and can be set at any 1 12th octave spaced frequency from 30 Hz to 20 kHz 30 Hz to 20325 Hz SX...

Page 33: ...h pass crossover option to adjust on this amplifier if desired HOME ENT ESC HOME ENT ESC HOME ENT ESC When you are done adjusting the high pass crossover on this amplifier press the ESC key while in t...

Page 34: ...key at this point on a SX 1 Series amplifier exits the PHASE menu When you are done adjusting the phase on this amplifier press the ESC key while in the Both chns left chn and right chn options menu t...

Page 35: ...r mute off Press the ESC key to save your setting and return to the both chns left chn and right chn options menu You can now select another mute option to adjust on this amplifier if desired Does not...

Page 36: ...KOMP ADJ menu allows you to adjust the activation threshold in simple terms the volume level at which it turns on off through a 48 dB window 24 dB to 24 dB The unit comes preset from KICKER at a defau...

Page 37: ...an be compared to the gear box and gas pedal of a race car The Gain Range represents what gear you re in and the Gain represents stepping on the gas In this menu you are adjusting the gear box THE GAI...

Page 38: ...KOMP AMP1 LOCK MEM 2 MEM 3 MEM 4 PHASE MUTE AMP2 LEFT LEFT RIGHT RIGHT n noi is se e o of ff f SYS MEM 1 GAIN GAIN EQ LPF HPF KOMP AMP1 LOCK MEM 2 MEM 3 MEM 4 PHASE MUTE AMP2 LEFT LEFT RIGHT RIGHT RE...

Page 39: ...in the group A LINK OFF group allows you to adjust each of the following settings and they are shared for each amplifier in the group GAIN MUTE KOMPRESSOR PINK NOISE Look for more details and explanat...

Page 40: ...gain range is 12 dB 0 0 dB to 12 0 dB there is no way to increase or decrease the gain and maintain 12 dB of difference between the amplifiers The SXRC is maintaining the differences you set between...

Page 41: ...gain set at 0 0 while amp 2 is at 0 0 When you select this group to adjust the gain you will see 0 0 in the display the highest gain setting of the group Since the gain range is 12 dB 0 0 dB to 12 0 d...

Page 42: ...CKER uses a default Q of 3 Use the UP and DOWN keys to select your bandwidth Q value and press the ESC to save your setting and return to the frequency boost cut bandwidth options menu You can now sel...

Page 43: ...Use the UP and DOWN keys to scroll through frequency and slope and then press the ENT key to select FREQUENCY selects the crossover point and can be set at any 1 12th octave spaced frequency from 30 H...

Page 44: ...can now select another high pass crossover option to adjust in this group if desired HOME ENT ESC HOME ENT ESC HOME ENT ESC When you are done adjusting the high pass crossover in this group press the...

Page 45: ...1 Series Pressing the ESC key at this point on a SX 1 Series amplifier exits the PHASE menu When you are done adjusting the phase in this group press the ESC key while in the Both chns left chn and r...

Page 46: ...from mute on or mute off Press the ESC key to save your setting and return to the both chns left chn and right chn options menu You can now select another mute option to adjust in this group if desire...

Page 47: ...eys to scroll through off red line contour or attack Press the ESC key to save your setting and return to the GROUP ADJ menu and choose another function to adjust LINK OFF In a LINK OFF group each amp...

Page 48: ...LPF HPF KOMP AMP1 LOCK MEM 2 MEM 3 MEM 4 PHASE MUTE AMP2 LEFT LEFT RIGHT RIGHT GAIN RANGE MENU Here you can adjust the selected group s UltraMatch digital input gain range The UltraMatch gain structur...

Page 49: ...eft and RIGHT indicators in the ISIS display will stay flashing to indicate this The LEFT and RIGHT indicators will stop flashing once you turn off NOISE OFF the pink noise generator HOME ENT ESC HOME...

Page 50: ...ted to the SXRC will be displayed in a scrolling list Use the UP or DOWN keys to scroll through the list of available amplifiers 50 SXRC Remote Control Operation When you have the amplifier selected y...

Page 51: ...GAIN EQ LPF HPF KOMP AMP1 LOCK MEM 2 MEM 3 MEM 4 PHASE MUTE AMP2 LEFT RIGHT HOME ENT ESC HOME ENT ESC HOME ENT ESC VOLT MAX MENU Here you can view the highest voltage seen at each amplifier s 12 volt...

Page 52: ...P AMP1 LOCK MEM 2 MEM 3 MEM 4 PHASE MUTE AMP2 LEFT RIGHT HOME ENT ESC HOME ENT ESC HOME ENT ESC TEMP MAX MENU Here you can view the highest operating temperature of the selected amplifier since its in...

Page 53: ...HISTORY MENU Here you can view the last 5 fault codes and how long ago they happened versus the run time clock for the selected amplifier The following conditions are logged THERMAL Thermal cutoff pr...

Page 54: ...he integrated pink noise generator of the SX Series amplifiers This is very useful for testing and troubleshooting your system See the Help section of this manual for more details on pink noise use Pi...

Page 55: ...gain while in the ALL AMPS SELECT AMP menu will return you to the SICK BAY menu to select another menu item 55 SXRC Remote Control Operation HOME ENT ESC HOME ENT ESC HOME ENT ESC HOME ENT ESC HOME EN...

Page 56: ...t and adjust many operating parameters for your SXRC create amplifier groups change names change lock codes and update your SX Series amplifier software A lot of very powerful tools and functions are...

Page 57: ...ction to adjust HOME ENT ESC temp c f MENU Here you can select in which format Celsius or Fahrenheit the temperature readings are displayed Use the UP or DOWN arrow keys to scroll through the availabl...

Page 58: ...the screen Use the UP or DOWN arrow keys to scroll through the available settings off and auto Press the ESC key to save your setting and return to the DISPLAY menu to select another display function...

Page 59: ...SE MUTE AMP2 LEFT RIGHT HOME ENT ESC HOME ENT ESC HOME ENT ESC HOME ENT ESC PRESS HOLD info amp MENU Here is where you select which of the amplifiers connected to the SXRC has its voltage and temperat...

Page 60: ...11 1 SYS MEM 1 GAIN EQ LPF HPF KOMP AMP1 LOCK MEM 2 MEM 3 MEM 4 PHASE MUTE AMP2 LEFT RIGHT HOME ENT ESC HOME ENT ESC led dimlvl MENU The backlit keys on the SXRC have two intensity modes On and Dim W...

Page 61: ...SETUP menu 9 90 0 s se ec c SYS MEM 1 GAIN EQ LPF HPF KOMP AMP1 LOCK MEM 2 MEM 3 MEM 4 PHASE MUTE AMP2 LEFT RIGHT HOME ENT ESC HOME ENT ESC autosearch MENU You should be familiar with this menu from...

Page 62: ...s of why you would want to use grouping are Example 1 You have multiple amplifiers driving your subwoofer s and want to control all of them at the same time Change a setting and have it changed in all...

Page 63: ...AMP2 LEFT LEFT RIGHT RIGHT HOME ENT ESC PRESS HOLD a a 0 0 dd dr r 1 11 1 SYS MEM 1 GAIN EQ LPF HPF KOMP AMP1 LOCK MEM 2 MEM 3 MEM 4 PHASE MUTE AMP2 LEFT RIGHT HOME ENT ESC GROUP NAME MENU Here you ca...

Page 64: ...assigned to To remove an amplifier from a group you use the RELEASE menu function Use the UP or DOWN keys to select which group you want to assign amplifiers to and press the ENT key to select it If t...

Page 65: ...fferent group than the one it is currently assigned to you have to release it from the current group Here is where you can perform that precise surgical removal process Don t touch the sides as you re...

Page 66: ...P ADJ menu GAIN EQ LO PASS HI PASS PHASE MUTE KOMPRESSOR KOMP ADJ GAIN RANGE BYPASS DSP PINK NOISE GAIN MUTE KOMPRESSOR PINK NOISE Link On AMP ADJ If you set the group s Link property to Link On each...

Page 67: ...t gives you when used in conjunction with the Link property Use your imagination to come up with what works for you You would select a group and assign each of your four SX 1 Series amplifiers to this...

Page 68: ...SYS MEM 1 GAIN EQ LPF HPF KOMP AMP1 LOCK MEM 2 MEM 3 MEM 4 PHASE MUTE AMP2 LEFT RIGHT REMOTE VOL MENU Here you can choose to have the selected group s output level controlled by the Digital Remote Vol...

Page 69: ...10 character name you want This is the name that scrolls in the DEFAULT menu Use the ESC and ENT keys to move the blinking cursor left or right to select which character you want to change Use the UP...

Page 70: ...HPF KOMP AMP1 LOCK MEM 2 MEM 3 MEM 4 PHASE MUTE AMP2 LEFT RIGHT HOME ENT ESC HOME ENT ESC HOME ENT ESC PRESS HOLD HOME ENT ESC AMP NAME MENU Here you can change the default name of each SX Series ampl...

Page 71: ...ired SXRC perform an Autosearch save the settings back into a global SXRC memory and your back in business Ain t technology just swell Once you are in the SAVE ALL menu you need to decide if you want...

Page 72: ...o start fresh Or perhaps you just want to start with a clean new slate Either way Ctrl Alt Delete works for Microsoft RESET SXRC works for us The SXRC is designed to handle the automotive electrical s...

Page 73: ...ure HOME ENT ESC HOME ENT ESC s st to or re ed d SYS MEM 1 GAIN EQ LPF HPF KOMP AMP1 LOCK MEM 2 MEM 3 MEM 4 PHASE MUTE AMP2 LEFT RIGHT You will know this has happened if The ISIS display on the SX Ser...

Page 74: ...gr ra am m 0 0 SYS MEM 1 GAIN EQ LPF HPF KOMP AMP1 LOCK MEM 2 MEM 3 MEM 4 PHASE MUTE AMP2 LEFT RIGHT v v 0 0 er ri if fy y 0 0 SYS MEM 1 GAIN EQ LPF HPF KOMP AMP1 LOCK MEM 2 MEM 3 MEM 4 PHASE MUTE AM...

Page 75: ...Once the SXRC is locked it will return to the DEFAULT menu and the LOCK indicator will be lit in the ISIS display From the DEFAULT menu press the ENT key to unlock the SXRC The display will show UNLO...

Page 76: ...your amplifier s serial number AND your receipt by the phone as the guys and gals answering the phone will need this information from you to be of assistance Take the time right now to fill out the f...

Page 77: ...for instant recall at any time STORING A PRESET To store the current amplifier or group settings in the SXRC into a memory preset simply press and hold the desired memory key until the ISIS display fl...

Page 78: ...sed when any signal above or below the threshold is detected When you select one of the Kompressor presets Contour Red Line or Attack each of these 6 parameters is adjusted to provide the desired effe...

Page 79: ...good for use in any configuration as it helps control dynamic peaks and limit distortion at higher output levels VERY effective at controlling speaker damaging distortion caused by over driving or cl...

Page 80: ...Interface Box until it is fully assembled Interface Box Fuse The SXRC is protected by a fuse which is internally mounted in the Interface Box If you ever need to replace this fuse an extra one has bee...

Page 81: ...plugging the Control Head directly into the Interface Box If this works then try a new cable Blue LED on garbage characters in display Power cycle your system turn off wait 3 seconds turn on Reset the...

Page 82: ...peakers then check your Gain Range settings Gain settings Crossover settings RCA cables and connections Head unit fader balance and volume controls 9If you don t have pink noise from all your speakers...

Page 83: ...9 Amplifier 10 Amplifier 11 Amplifier 12 Amplifier 13 Amplifier 14 Amplifier 15 Amplifier 16 Amplifier Remote Address Name It is going to happen you will change your mind or change your system Here i...

Page 84: ...ns Road Stillwater OK 74075 The RMA number must be clearly marked on the outside of the package Return only defective components Return of entire cabinets system packs pairs etc increases your return...

Page 85: ...85 SXRC Remote Control Notes Today s System Diagram Tomorrow s System Diagram...

Page 86: ...86 SXRC Remote Control Notes My Future Drool System Cash Money Plan...

Page 87: ...87 SXRC Remote Control Notes Pizza Delivery Earl s Thoughts...

Page 88: ......

Reviews: