background image

...touch the difference

Version 1.0 (2010/03/18)   ●   © 2010 by MaxPoint Handelsges. mbH

4. How to use the keyboard

After successful launch enjoy now during the operation a free and independent choice of location up to 

• 

approx. 10 m distance to the PC. More or less range can be caused, like mentioned above, by metallic 

dividing walls, other computer cases, monitors, ZIP drives, loudspeakers, switching power supplies etc., 

but also by different loading capacity of the batteries. 

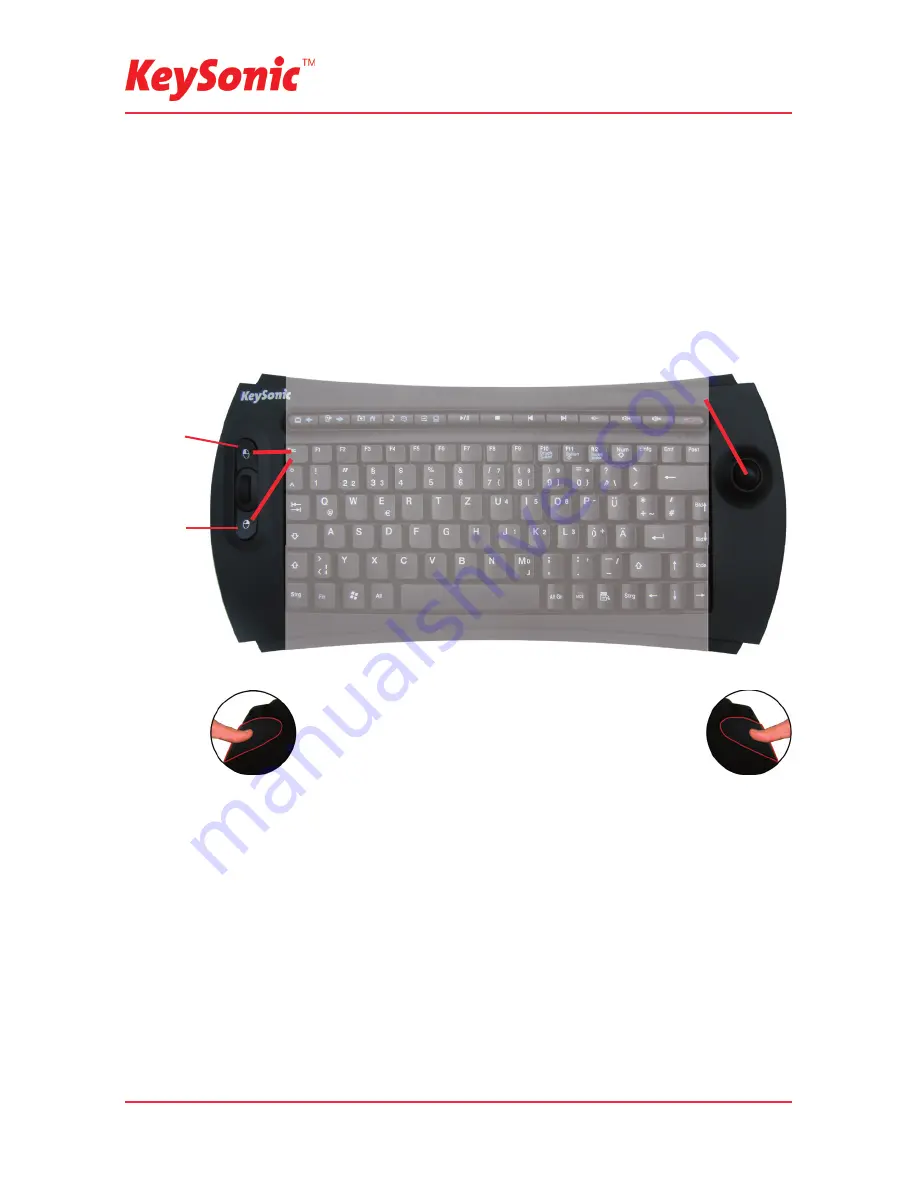
4.1 Trackball

As a mouse alternative the keyboard is equipped with a optical Trackball inclusive two mouse function keys 

allowing comfortable and ergonomic handling of the PC, for instance from a sofa. Thereby the handling of the 

Trackball is as simple as brilliant.

Move with the right thumb softly the ball of the Trackball to 

• 

move 

the cursor on the screen.  
With  the  mouse  function  keys  click  and  double  click  functions

• 


can be explained, with the scrol wheel can be scrolled up and 

down, absolutely identically as with a mouse. 

In order to „drag“, to draw or to mark, you must keep the left key

• 


with the left thumb pressed to carry out the function then with the 

right thumb on the Trackball. 
In order to increase or decrease the speed of the Mouse-pointer 

• 

movements, change the settings of the mouse options in your 

system control under Windows*.
Using notebooks with already integrated touch

• 

pad you have to 

de-activate these intern control devices in case of error messa-

ges or malfunctions*.

On the back side of the keyboard are two additional big mouse

• 


function buttons.

Should the precision of the cursor decrease after several months of usage, the following things could be 

responsible for that:

Please  check  the  installed  batteries  for  their  state.  In  the  case  of  doubt  exchange  them  for  new. 

• 

Advise: A too low battery capacity might be responsible for the fact that the operation distance to the radio 

remote control of the PC is impaired respectively signs are let out sporadically when writing.

Clean the mechanical suspension as well as the sensor of the track ball. For this, turn with the thumb 

• 

and 

the forefi nger the external plastic ring to the left (with light pressure against the clockwise), until it becomes 

unscrewed.
For easy extraction hold  your hand  about the trackball  now and  turn the keyboard,  so that the plastic 

• 

ring  and  the  ball  fall  in  your  hand  from  the  fi xture.  Clean  now  the  mechanical  role  suspension  of  the 

track ball as well as the small opening of the sensor with a soft paintbrush or with gentle air pressure. 

For cleaning DO NOT use sharp or pointed objects respectively liquid detergents, solvents or gasoline!

After the assembly in reverse order the sensibility should be returned.

9

Trackball

Left 

Mouse 

button

Right

Mouse 

button

Scroll 

wheel

Summary of Contents for KSK-5200 RFM

Page 1: ......

Page 2: ...eb 12 mA Receiver 50 mA Tastatur Standby 1 mA Tastatur Sleep Modus 35 A Betrieb 2 C bis 50 C Lagerung 25 C bis 70 C Betrieb und Lagerung bis 95 rel Tastatur USB Empfangsstecker 4 Batterien Bedienungsa...

Page 3: ...mit Schritt 3 2 In manchen F llen ist gem den Bildschirmanweisungen die Installations CD Ihres Betriebs systems er forderlich Unter diesen Umst nden folgen Sie bitte diesen Anweisungen Kontrollieren S...

Page 4: ...l zwischen Tastatur und USB Receiver erneut indem Sie die ID Taste auf der R ckseite der Tastatur dr cken und wieder loslassen Die Tastatur sollte dabei nicht mehr als 60 cm Abstand zum Receiver haben...

Page 5: ...Notebooks mit bereits integriertem Touchpad m ssen Sie bei der Verwendung der Tastatur diese internen Steuerger te deaktivieren falls es zu Fehlermeldungen oder Funktions st rungen kommt Auf der R cks...

Page 6: ...Startet den vorigen Track der CD VCD DVD bzw Media Datei Stoppt den Track der CD VCD DVD bzw Media Datei Einmaliges Dr cken startet den Track der CD VCD DVD bzw Media Datei nochmaliges Dr cken pausie...

Page 7: ...scanning 800 dpi approx 10 m 4 AA 1 5 V Keyboard 6 0 V Receiver 5 VDC 5 Keyboard Operating 12 mA Receiver 50 mA max Keyboard Standby 1 mA Keyboard Sleep Mode 35 A Operating 2 C up to 50 C Storage 25 C...

Page 8: ...solve the problem Perform an update of your operating system and return to Step 3 2 In some cases the installation CD of your operating system is necessary according to the instructions on your screen...

Page 9: ...ton on the back of the keyboard and release Make sure the distance between keyboard and receiver is within 60 cm The pairing LED will be flashing for 3 seconds indicating that the USB receiver has det...

Page 10: ...in your system control under Windows Using notebooks with already integrated touch pad you have to de activate these intern control devices in case of error messa ges or malfunctions On the back side...

Page 11: ...load condition of the batteries is below 2 4 Volt It flashes until a new battery has been inserted or until the battery has been completely used up Activates or de activates computer sound Increases...

Page 12: ...2 483 GHz Auto Hopping 19 mm technologie optique 800 dpi env 10 m 4 AA 1 5 V Clavier 6 V R cepteur 5 VDC 5 Clavier Utilisation 12 mA R cepteur 50 mA max Clavier en stand by 1 mA Clavier en mode veille...

Page 13: ...xlpoitation jour er retournez Pas 3 2 Dans certains cas le CD d installation de votre logiciel d exploitation est indissociablement selon les inst ructions sur votre cran Dans cette circonstance veuil...

Page 14: ...canal radio entre le clavier et le r cepteur USB encore Appuyez sur le bouton ID situ l arri re du clavier puis rel chez Assurez vous que votre clavier et votre dongle ne soit pas loign de plus de 60...

Page 15: ...ordinateur portable avec un touchpad int gr d sactiv le dans le pneu interne si vous recevez des messages d erreur ou des mal fonctions A l arri re du clavier se trouve 2 boutons de souris suppl men...

Page 16: ...et Ma vid o Vue pr c dent Ma TV Vue suivant Indique que la batterie est en dessous des 2 4 Volts Elle reste allum e jusqu au changement de la batterie ou lorsque celle ci est puis e Activer ou d sacti...

Reviews: