Read these instructions carefully before assembling the product or using it for the first time. They contain important information for
your safety and for the correct use and maintenance of this product. Keep the instructions in a safe place for information or for ordering
spare parts.
For your safety
■
The unit should be used only for its intended purpose, i.e. for physical exercise by adult persons. Any other use of the equipment is prohibited and may be dangerous. The
manufacturer cannot be held liable for damage or injury caused by improper use of the equipment.
■
This unit has been designed in accordance with the latest standards of safety. Any features which may have been a possible cause of injury have been avoided or made as
safe as possible.
■
Incorrect repairs and structural modifications (e.g. removal or replacement of original parts) may endanger the safety of the user.
■
Damaged components may endanger your safety or reduce the lifetime of the equipment. For this reason, worn or damaged parts should be replaced immediately and the
equipment taken out of use until this has been done. Use only original KETTLER spare parts.
■
In case of inquiry, please contact KETTLER.
■
If the equipment is in regular use, check all its components thoroughly every 1 – 2 months. Pay particular attention to the tightness of bolts and nuts.
■
Before beginning your program of exercise, consult your doctor to ensure that you are fit enough to use the equipment. Base your program of exercise on the advice given by
your doctor. Incorrect or excessive exercise may damage your health!
■
Any interference with parts of the product that are not described within the manual may cause damage, or endanger the person using this machine.
■
Before use, always check all screws and plug-in connections as well as respective safety devices fit correctly.
■
Caution: While assembly of the product keep off children’s reach (Choking hazard - contains small parts).
■
Before beginning your first training session, familiarize yourself thoroughly with all the functions and settings of the unit.
■
Our products are subject to a constant innovative quality assurance. We reserve the right to perform technical modifications.
■
Attention! The unit should be positioned in such a way that there is a space of 100 cm (49 in) on both sides and 150 cm (59 in) behind it.
■
The unit requires a power supply. Before commissioning the appliance pay attention to the fact that the correct plug-in power supply unit (observe marking) has been
connected properly.
■
Important: disconnect the apparatus from the mains before doing repair, maintenance or cleaning work.
■
When the unit is not in use, unplug it from the power supply.
■
Ensure that the power cable is not pinched and that no one can trip over it.
■
All electric appliances emit electromagnetic radiation when in operation. Please do not leave radiation-intensive appliances (e.g. mobile telephones) directly next to the
cockpit or the electronic control system as otherwise values displayed might be distorted (e.g. pulse measurement).
■
Always observe the general safety rules and precautions for working with electrical equipment.
Handling the equipment
■
Before using the equipment for exercise, check carefully to en-sure that it has been correctly assembled.
■
It is not recommended to use or store the apparatus in a damp room as this may cause it to rust. Please ensure that no part of the machine comes in contact with liquids
(drinks, perspiration etc.). This may cause corrosion.
■
The machine is designed for use by adults and children should not be allowed to play with it. Children at play behave unpredictably and dangerous situations may occur for
which the manufacturer cannot be held liable. If, in spite of this, children are allowed to use the equipment, ensure that they are instructed in its proper use and supervised
accordingly.
■
Please ensure that liquids or perspiration never enter the machine or the electronics.
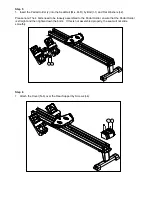
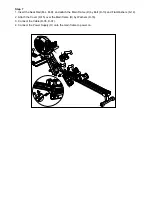
ASSEMBLY INSTRUCTIONS
Summary of Contents for 7976-300
Page 19: ......


