16
TEMPERATURE MONITORING and CONTROL
The clock is capable of monitoring and controlling temperature sensed by an external or internal probe (use function
Fn27
to
select control probe) . External probe can be located at a significant distance away. The system also stores
Minimum and
Maximum Temperature
readings that can be displayed
ON DEMAND
.
In addition, by presetting LOW and HIGH TEMPERATURE ALARMS user may control operation of
Internal Control Relay
and Alarm Buzzer
.
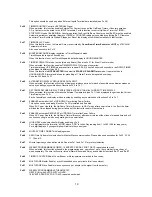
EXTERNAL TEMPERATURE PROBE Installation
Make sure that all power is disconnected.
1.
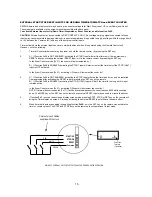
Locate the External Probe screw terminals on the back panel of enclosure.
2.
Attach one end of the Probe’s extension cable (2-conductor) to sensor terminals and the other end to temperature
probe. The extension cable may be up to several hundred feet (meters) long.
NOTE: Probe extension cable should be of low gauge to prevent heat/cold accumulation by large metal mass of the
wire which may cause unwanted changes of probe temperature.
3.
Affix extension cable to a tie-wrap or a clamp to secure it on the cover.
NOTE:
In some models, additional terminals may be provided for wiring of the “internal probe” rather than a probe already
installed in Internal Housing. All operation of such probe remains unaffected, but care should be taken to avoid
unwanted transfer of the clock’s or other equipment heat/cold to the probe in order to prevent incorrect readings.
Temperature Display and Control activation
1.
To assure that External Temperature is displayed
ALL the time
, enable Function
Fn 1
and
disable
all other display
functions (Fn 0 and Fn 2 to Fn 7).
2.
Invoke Data Programming mode by pressing SELECT-NXT key after remote programming mode has been activated
(by pressing MUTE key 4 times).
3.
Press SELECT-FUN key until display shows present temperature reading with flashing “C” or “F” character. Toggle
between CELSIUS or FAHRENHEIT unit using COUNT-UP and COUNT-DN keys.
4.
Press SELECT-NXT key until display shows text “LoAL” and set desired LOW TEMPERATURE ALARM using
COUNT-UP and COUNT-DN keys.
5.
Press SELECT-NXT key until display shows text “HiAL” and set desired HIGH TEMPERATURE ALARM using
COUNT-UP and COUNT-DN keys.
6.
Wait for several seconds without pressing any keys. Clock will resume regular operation.
NOTE: If temperature options are not installed random readings may show.
Optional Internal
and/or
External Probe
Terminals
( install 100 kohm
resistor if Probe
not connected )
Internal Probe
Housing

