background image

39

Operations

XD-DV9 (EN/T,M,X)

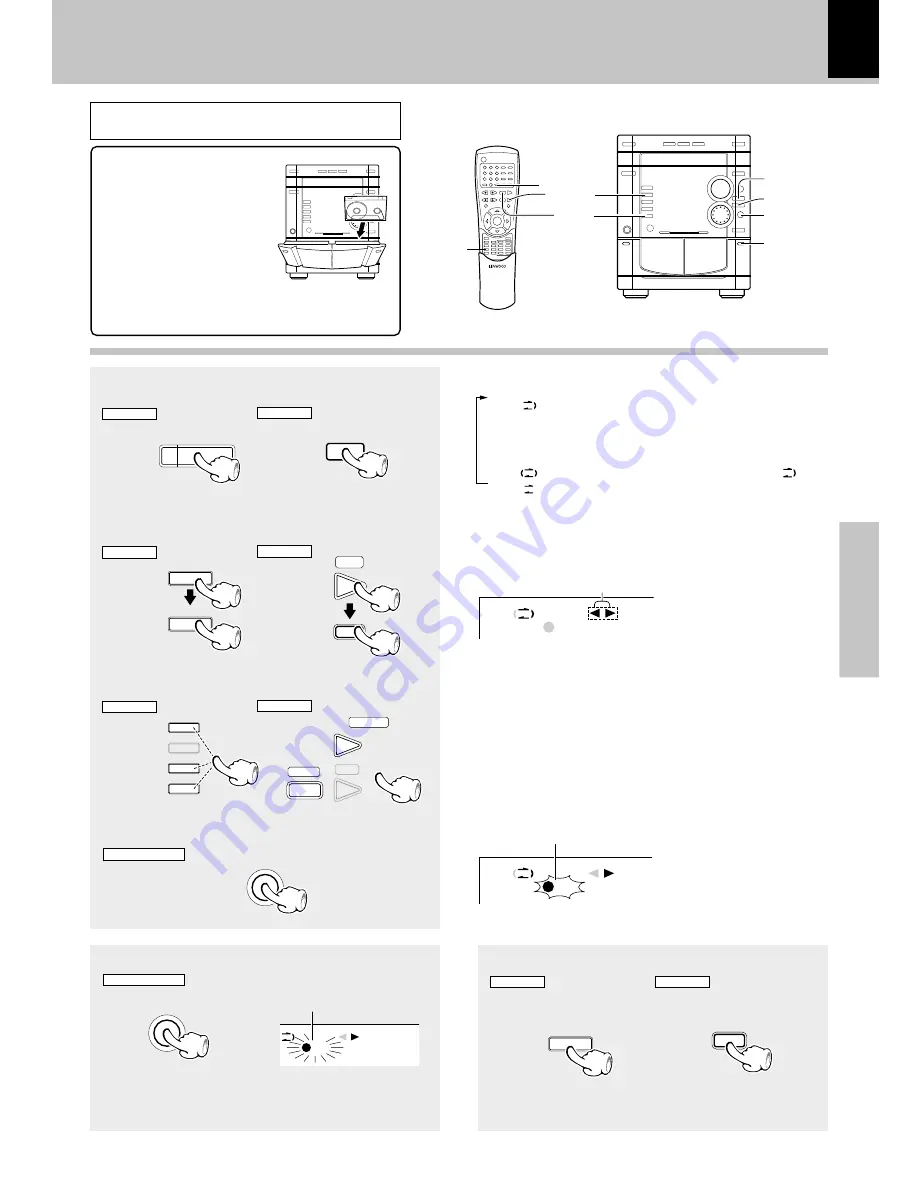
Recording (TAPE B only)

Select reveres mode

1

V

O

LU

ME CONTR

O

L

M

UL

TI CONTRO

L

LISTEN MODE

EX.BASS

DSP/EQ

TAPE B

TAPE A

A

1

Open the door.

Press the area marked

PUSH OPEN

 to load or

eject a tape

2

Insert a tape.

3

close the door.

4

Select TAPE B

÷

Remove tape slack before loading.

÷

Close the door securely.

V

O

LU

ME CONTR

O

L

M

UL

TI CONTRO

L

TAPE 

B

TAPE 

A

LISTEN MODE

EX.BASS

DSP/EQ

REV.MODE

REVERSE 
MODE

TAPE A/B

TAPE(

23

)

STOP(

7

)

TAPE A/B

TAPE B

REC/ARM

Select tape transport direction, Then
press the STOP (

7

) key.

2

REMOTE

MAIN UNIT

REV.MODE

REVERSE

MODE

1

” : The recording will end and the tape will stop at the

end in reverse direction, no matter whether record-
ing was started in forward direction or in reverse

direction.

2

:

In recording mode, this is the same as 

”.

3

:

Record stops after having recorded one side of tape.

Each press switches the modes as follows

Select the source to be recorded

3

÷

If the tape transport direction is opposite to the desired
direction, press the play key corresponding to this.

Tape direction indicators
of currently selected deck.

Start recording

4

REMOTE

MAIN UNIT

REMOTE

MAIN UNIT

REC/ARM

÷

Start playback the source, then press the 

REC/ARM

 key.

To pause recording

To stop recording

REMOTE

MAIN UNIT

STOP

7

7

MAIN UNIT ONLY

REC/ARM

MAIN UNIT ONLY

REC

A

B

REC

A

B

Lit

÷

Pressing the key pauses recording after leaving a non-recorded
space of about 4 seconds (ARM function).

÷

If the key is pressed again in less than 4 seconds after it has
been pressed, recording resumes from that instant.

REC

A

B

Preparation

DVD/CD

TAPE

TUNER

VIDEO/MD

6

`

BAND

AUX

TUNER

TAPE

DVD/CD

BAND

6

`

This flashes quickly during
ARM and slowly during
pause.

TAPE

`

STOP

7

TAPE

`

7

This unit can only use tape for the normal position
(Type 

I

).

Summary of Contents for XD-DV9

Page 1: ...XD DV9 DVD COMPACT HIFI SYSTEM INSTRUCTION MANUAL KENWOOD CORPORATION B60 4900 08 T M X OC 00 03 DIGITAL VIDEO DIGITAL VIDEO COMPACT DIGITAL AUDIO COMPACT COMPACT ...

Page 2: ...e Do not connect those leads to the earth terminal of a three pin plug For the United Kingdom WARNING TO PREVENT FIRE OR ELECTRIC SHOCK DO NOT EXPOSE THIS APPLIANCE TO RAIN OR MOISTURE The marking is located on the rear panel and says that the component uses laser beams that have been clas sified as Class 1 It means that the unit is utilizing laser beams that are of a weaker class There is no dang...

Page 3: ...ith a demonstration function only display The demonstration consists of se quential change of display and indicators showing the operations but the audio itself does not change The demonstration function can be cancelled as follows This operates automatically when a power failure has occurred or the plug of the power cable has been pulled while the power was ON Cancellation is possible by pressing...

Page 4: ... the appliance is in proper operating condition Please read all of the safety and operating instructions before operatingthisappliance Adheretoallwarningsontheappliance and in the instruction manual Follow all the safety and operating instructions These safety and operating instructions should be retained for future reference 1 Power sources The appliance should be connected to a power supply only...

Page 5: ...he first track or chapter 19 Playback from the desired track or chapter 19 Using the Display function 20 Repeat Playback 21 Using the A B repeat function 21 Program playback in a specific order 22 RANDOM playback 23 Using the Disc View function 24 Using the INTRO SCAN function 24 Selecting Audio 25 Selecting the Subtitle language 26 Selecting the Desired Screen Angle 27 Using the Zoom function 27 ...

Page 6: ...ic ture may have black spaces above and below it as shown on the right This is because the disc has been recorded in the NTSC format The screen may be somewhat hard to see but this is not malfunction When your TV is switchable between PAL SECAM NTSC Try play a disc If the picture is black and white or as shown on the right stop playback and switch the screen display formats of this unit and the TV...

Page 7: ...Set the TV to PAL Districts 2 3 3 and 6 Set the TV according to each disc to be played Video formats of DVD discs that can be played on this unit TV Format NTSC PAL Your TV format NTSC only PAL only NTSC PAL switchable Playable Disc Formats District 1 NTSC NTSC NTSC District 2 1 NTSC PAL NTSC PAL NTSC PAL District 2 2 NTSC NTSC NTSC District 2 3 NTSC PAL NTSC PAL NTSC PAL District 3 NTSC PAL NTSC ...

Page 8: ...yed Number of voice languages recorded with the audio function The number in the icon indicates the number of voice languages Max 8 languages Number of subtitle languages recorded with the subtitle function The number in the icon indicates the number of subtitle languages Max 32 languages Number of angles provided by the angle function The number in the icon indicates the number of angles Max 9 an...

Page 9: ...oid danger never use a cracked or deformed disc or a disc repaired with tape or adhesive agent Please do not use discs which are not round because they may cause a malfunction 2 Endless tapes Do not use an endless tape as this could damage the mechanism of the unit To re record Safety tab accidental erasure prevention tab After an important recording has been finished break the safety tab to preve...

Page 10: ...20 240V ANTENNA R L R R L L AM ANT OUT AUX AM ANT FM 75Ω AC 110 120V AC 220 240V IN DIGITAL OUT OPTICAL S VIDEO OUTPUT VIDEO 4 Ω SURROUND 4 Ω CENTER SPEAKERS FRONT 6Ω AC 110 120V AC 220 240V ANTENNA R L R R L L OUT AUX AM ANT FM 75Ω AC 110 120V AC 220 240V IN DIGITAL OUT OPTICAL S VIDEO OUTPUT VIDEO 4 Ω SURROUND 4 Ω CENTER SPEAKERS FRONT 6Ω AC 110 120V AC 220 240V ANTENNA R L R R L L FM 75Ω FM 75Ω...

Page 11: ...ND 4 Ω CENTER SPEAKERS R L Connection of the surround speaker system Speaker Left Speaker Right Surround speaker right Surround speaker left Center speaker Do not plug the power cord into the power outlet until all of the required connections have been made Never short circuit the and speaker cords If the left and right speakers are connected inversely or if the speaker cords are connected with re...

Page 12: ...V AC 220 240V IN DIGITAL OUT OPTICAL S VIDEO OUTPUT VIDEO 4 Ω SURROUND 4 Ω CENTER SPEAKERS FRONT 6Ω AC 110 120V AC 220 240V ANTENNA R L R R L L OUT AUX IN DIGITAL OUT OPTICAL R L Connection of the super woofer optional Powered Super woofer Connection of the TV monitor optional and VCR optional TV monitor Video code Composit video Supplied Connection of the MD recorder optional MD recorder RECORD I...

Page 13: ...STANDBY key 2 STANDBY TIMER indicator 3 DVD CD play pause 6 6 6 6 6 key TAPE play key direction key TUNER BAND key AUX VIDEO MD key STOP 7 7 7 7 7 key 4 MIC VOL control knob only for some areas q 5 MIC jack only for some areas q 6 Remote sensor 7 EX BASS indicator DOLBY DIGITAL indicator t PRO LOGIC indicator i 3 STEREO indicator i 8 MULTI CONTROL knob 9 REC ARM key 0 REV MODE key TAPE A B key EX ...

Page 14: ...input selection frequency volume level etc 3 Tuner related indicators R D S PTY and RT are only for Europe and U K 4 CD DVD or VCD related indicators This section contains the CD DVD or VCD play and pause mode indicators 5 DSP EQ Equalizer indicators 6 PGM Program RPT Repeat RDM Random indicators P B C Playback control indicator 7 Cassette deck related indicators This section contains the cassette...

Page 15: ...MODE key w KARAOKE key q DSP EQ SET UP REVERSE MODE EX BASS DUBBING CLEAR BOOK MARK ECHO MODE KARAOKE STEP ZOOM A B PRO LOGIC SET UP PGM RANDOM Loading batteries 2 Insert batteries 3 Close the cover 1 Remove the cover Insert two R03 LR03 AAA size bat teries following the polarity indications Align the poles and properly when inserting the batteries Operation Plug the power cord into the mains powe...

Page 16: ... timer 1 ON STANDBY TIMER CLOCK M ULTI CONTRO L ENTER M ULTI CONTRO L ENTER M ULTI CONTRO L ENTER 2 3 4 5 To increase To decrease Blink The minute display starts to blink Blink To increase To decrease When operating on the remote control unit Press the Cursor Left Right keys to select ADJUST TIME Display the clock TIMER CLOCK When the TIMER CLOCK key is pressed while the power is off the present t...

Page 17: ...able plug of this unit is inserted into a receptacle a minute current flows for memory protection This status is referred to as the STANDBY mode and the unit in the STANDBY mode can be turned ON from the remote control unit VIDEO MD VIDEO MD In regard to input switching be tween VIDEO and MD When the VIDEO MD key is pressed for more than 2 seconds the input is switched to the AUX terminal at the r...

Page 18: ...SS Lit When the EX BASS function is switched on richer bass tones can be reproduced Switching is not possible when the DOLBY DIGITAL indica tor is lit WhenEX BASSisswitchedON theDSP EQmodeandthe LISTEN MODE PRO LOGIC 3 STEREO are cancelled This unit has an EQ mode EQUALIZER mode to select the desired tone and a DSP mode for simulation of the sound field by digital signal processing built in The EQ...

Page 19: ... no disc is set in a tray the unit skips to the next tray OPEN CLOSE DVD CD 6 DVD CD 6 REMOTE MAIN UNIT REMOTE MAIN UNIT STOP 7 7 M ULTI CONTRO L P CALL 4 REMOTE MAIN UNIT TUNING 1 Remote control unit only DISC SELECTOR DISC 1 DISC 2 DISC 3 DISC SKIP REMOTE MAIN UNIT Close the tray The label must be on top Disc number 2 1 3Press the DVD CD 6 key DVD CD 6 DISC CHANGE Press the 7 key twice to cancel...

Page 20: ...ic keys to enter a different track number then press the ENTER key To enter the time from which you want to start use the cursor left right 2 3 key to select time display Use the numeric keys to enter the time then press the ENTER key To display track number and elapsed Time 2 Press the cursor keys or numeric keys ENTER To display AUDIO and SUBTITLE information During playback press the DISPLAY ke...

Page 21: ... not work When in VCD 2 0 mode MENU ON mode this function does not work Operation becomes possible when the MENU key is pressed and the P B C display is extin guished Press the REPEAT key repeatedly Press the REPEAT key repeatedly Using the A B repeat function The A B repeat function lets you mark a segment to repeat between the beginning A and the end B of the segment you want to review 1 Press t...

Page 22: ...03 04 06 07 08 09 10 11 12 13 14 15 16 17 18 19 20 3 05 23 5 To select more than title or chapter repeat step 3 4 Press the 6 key 6 Notes Notes Notes Depending on the disc the program function may not work 1 When you make a wrong selection dur ing programming Use the cursor up down 5 key to select CLEAR LAST TITLE or CHAPTER or TRACK then press the ENTER key ENTER ENTER 2 When you want to delete t...

Page 23: ...R key PGM RANDOM CD VCD RANDOM playback As the tracks each time are selected randomly PROGRAM 2 3 RANDOM RETURN ENTER 01 02 03 04 05 06 07 08 09 10 11 12 13 14 15 23 The disc will be played back in random order Notes Notes Notes The function of RANDOM is operated in only CD VCD Press CLEAR key to resume normal playback Playback of discs Program playback in a specific order continued PGM A ENTER Li...

Page 24: ...n the key is pressed TRACK VIEW only CD Using the INTRO SCAN function When you press TOP MENU key during CD playback the unit enters the INTRO SCAN mode INTRO SCAN lets you listen to the beginning of each track for about 10 seconds After INTRO SCAN has been performed for all tracks normal play starts from the first track TOP MENU Note Note Note When in VCD 1 1 and 2 0 mode MENU OFF mode this funct...

Page 25: ...s the AUDIO key on the remote 2 Use the cursor up down 5 key to select STEREO RIGHT or LEFT on a VCD or CD Using the MENU key only DVD 1 During playback press the MENU key on the remote 2 Use the cursor up down 5 key to select AUDIO information 3 Press the ENTER key 4 Use the cursor up down 5 key to select the desired language on DVD 5 Press the ENTER key ENTER ENTER AUDIO 5 STEREO MENU ENTER 3 AU...

Page 26: ...d by abbreviations SUB TITLE ENTER SUBTITLE 5 ENG OFF 1 During playback press the MENU key on the remote 2 Use the cursor up down 5 key to select SUBTITLE information 3 Press the ENTER key 4 Use the cursor up down 5 key to select the desired language on DVD 5 Press the ENTER key MENU ENTER 3 AUDIO 4 SUBTITLE ENTER 1 ENGLISH 2 FRANCAIS ENTER Playback of discs 3 Use the cursor left right 2 3 key to ...

Page 27: ...a particular scene you can select the Angle function DVD VCD Using the Zoom function When a DVD VCD contains zoom function of a par ticular scene you can select the zoom function Check to see if ANGLE marks present at the screen ENTER 1 During playback or pause mode presstheZOOM keyontheremote 2 Use the cursor left right 2 3 or up down 5 key to select the part of the screen you want to zoom 3Press...

Page 28: ... a marked scene BOOK MARK PTY MARKER 2 1 2 3 3 PLAY CLEAR 2Use the cursor left right 2 3 key to select a marked scene ENTER 3Press the 6 Play pause key to skip to the marked scene 6 1 During playback press the BOOK MARK key on the remote Clearing a Bookmark BOOK MARK PTY MARKER 2 1 2 3 3 PLAY CLEAR 2 Use the cursor left right 2 3 key to select the bookmark number you want to delete ENTER 3 Press t...

Page 29: ... the player preference menu to select the language for the player s on screen displays Use the Menu preference menu to select the language you want a DVD s disc menu to be displayed in Use the Audio preference menu to select the soundtrack language Use the Subtitle preference menu to select the language the disc s subtitles are to be displayed in Allows users to set the level necessary to prevent ...

Page 30: ...key 1Press the SETUP key in the DISC stop mode SET UP 2Press the cursor up down 5 key on the remote to select the DISC MENU 3 Press the ENTER key ENTER SETUP MENU 1 PLAYER MENU ENGLISH 2 DISC MENU ENGLISH 3 AUDIO ENGLISH 4 SUBTITLE ENGLISH 5 PARENTAL UNLOCKED 6 AUDIO OPTION 7 DISPLAY OPTIONS RETURN ENTER 5 ENTER 4 Press the cursor up down 5 key on the remote to select desired language 5 Press the ...

Page 31: ...o select the SUBTITLE 3 Press the ENTER key ENTER SETUP MENU 1 PLAYER MENU ENGLISH 2 DISC MENU ENGLISH 3 AUDIO ENGLISH 4 SUBTITLE ENGLISH 5 PARENTAL UNLOCKED 6 AUDIO OPTION 7 DISPLAY OPTIONS RETURN ENTER 5 ENTER 4 Press the cursor up down 5 key on the remote to select desired language 5Press the ENTER key ENTER ENTER SUBTITLE language setting The screen return to SETUP MENU To make the SETUP MENU ...

Page 32: ...the cursor up down 5 keys and press the ENTER key PARENTAL CONTROL UNLOCK LOCK LEVEL 8 ADULT LEVEL 7 LEVEL 6 LEVEL 5 LEVEL 4 LEVEL 3 LEVEL 2 LEVEL 1 KIDS SAFE RETURN ENTER 5 ENTER ENTER ENTER ENTER ENTER ENTER 1 2 3 4 5 6 7 8 0 A B TAPE DISC SKIP 9 After entering the new password re enter it one more time to make sure the password works The parental level function is compatible only with parental ...

Page 33: ...lays when DVDs plays mul tiple angles of a particular scene Prevent picture shaking in still mode and display small text clearer Use to turn on screen messages on or off Adjust the brightness of screen Depending on a disc you can play a NTSC DVD disc by QUASI PAL mode 4 3 LETTER BOX Select when you want to see the total 16 9 ratio screen DVD supplies even though you have a TV with a 4 3 ratio scre...

Page 34: ...G MODE Each press switches the mode 1 P CALL preset call mode 2 AUTO auto tuning mode 3 MANUAL manual tuning mode Select a station 4 P CALL preset call AUTO auto tuning MANUAL manual tuning REMOTE MAIN UNIT M ULTI CONTRO L P CALL 4 M ULTI CONTRO L TUNING 1 M ULTI CONTRO L TUNING 1 REMOTE MAIN UNIT REMOTE MAIN UNIT V O LUME CONTR O L M ULTI CONTRO L TAPE B TAPE A LISTEN MODE EX BASS DSP EQ MULTI CO...

Page 35: ... ULTI CONTRO L TAPE B TAPE A LISTEN MODE EX BASS DSP EQ MULTI CONTROL ENTER ENTER P CALL 4 Storing the broadcast stations one by one presetting Press the ENTER key 2 REMOTE MAIN UNIT ENTER ENTER Select the desired preset number 3 REMOTE MAIN UNIT M ULTI CONTRO L P CALL 4 Press the ENTER key 4 REMOTE MAIN UNIT ENTER ENTER Repeat steps 1 to 4 to preset other sta tions ST AUTO MHz A 1 2 3 ST AUTO MHz...

Page 36: ...lows 1 PS NAME display 2 RT display 3 CT display 4 Current FM frequency display PS NAME If the PS information is being received the PS name BBC AFO NDR etc is shown on the display If the PS information is not received the original FM fre quency is shown Even though no RDS DISP key is pressed the reception of PS information ensues the PS name is displayed RT display Text data accompanying the RDS b...

Page 37: ...mation is composed of an identification symbol which helps the FM radio to recognize the program type of each FM station The 29 PTY modes are shown in the display by pressing the PTY key Using the PTY function Select the FM broadcast station 1 TUNER BAND Press the PTY key 2 BOOK MARK PTY If the received station is transmitting the RDS information RDS lights up ST AUTO A R D S Lit The PTY MODE POP ...

Page 38: ...If the tape transport direction is opposite to the desired direction press the play key corresponding to this Tape direction indicators of currently selected deck To wind tape at high speed M ULTI CONTRO L REMOTE MAIN UNIT TUNING 1 To stop playback REMOTE MAIN UNIT STOP 7 7 V O LUME CONTR O L M ULTI CONTRO L TAPE B TAPE A LISTEN MODE EX BASS DSP EQ REVERSE MODE MULTI CONTROL REV MODE TAPE A B TAPE...

Page 39: ... the same as 3 Record stops after having recorded one side of tape Each press switches the modes as follows Select the source to be recorded 3 If the tape transport direction is opposite to the desired direction press the play key corresponding to this Tape direction indicators of currently selected deck Start recording 4 REMOTE MAIN UNIT REMOTE MAIN UNIT REC ARM Start playback the source then pre...

Page 40: ... key 3 Select the TAPE 1 REMOTE MAIN UNIT TAPE TAPE REMOTE MAIN UNIT DUBBING DUBBING Select Dubbing mode then press ENTER key 4 REMOTE MAIN UNIT Press ENTER key to start dubbing 5 REMOTE MAIN UNIT ENTER ENTER Each press switch the mode 1 NORMAL Dubbing at the normal speed 2 HIGH x2 Dubbing at about twice the normal speed The cassette in TAPE A is copied to the cassette in TAPE B Note Note M ULTI C...

Page 41: ...s the KARAOKE key 2 Use the cursor up down 5 key to select KARAOKE ON or KARAOKE OFF display KARAOKE ENTER 3 Use the cursor left right 2 3 key to select ON ENTER Press the KARAOKE key to turn off the display 2 1 KARAOKE OFF REQUEST ENTER 5 2 3 KARAOKE ON REQUEST ENTER 5 2 3 Remote control unit only KARAOKE function keys Start playback 4 6 MIC VOL Press 6 key to start playback Adjust volume level o...

Page 42: ...ht 2 3 key to select desired mode ENTER ENTER Each press switches the modes as shown below During playback DVD 1 V1 muting vocal 1 2 V2 muting vocal 2 3 1 2 muting vocal 1 and 2 4 OFF vocal fader off During playback VCD 1 L muting left channel vocal 2 R muting right channel vocal 3 OFF vocal fader off Each press switches the modes as shown below 1 ON 2 OFF ENTER ENTER Some karaoke discs have a gui...

Page 43: ...ke singing sound better 1 Press the ECHO key 1 ECHO 1 2 ECHO 2 3 ECHO OFF ECHO 1 Press the KARAOKE key 2 Use the cursor up down 5 key to select REQUEST display KARAOKE ENTER KARAOKE ON REQUEST ENTER 5 2 3 KARAOKE ON REQUEST ENTER 5 2 3 3 Compose the title or track number 1 2 3 4 5 6 7 8 0 A B TAPE DISC SKIP 9 KARAOKE ON REQUEST 02 ENTER 5 2 3 RDM P B C B 1 2 3 Notes Notes 4 Press the 6 key to star...

Page 44: ... excellent sound movement across the front of the room and a surround ambiance that seems to immerse you in a movie Your system is equipped with a Dolby Pro Logic surround decoder to let you enjoy the wide variety of currently available Dolby Surround home video software Dolby 3 Stereo Use Dolby 3 Stereo for systems that do not have surround speakers When in the Dolby 3 Stereo mode surround inform...

Page 45: ...tstream PCM during playback A digital surround sound format that is recorded by MPEG 2 Au dio Selectthesuitableoutputsig nal type of MPEG 2 DIGITAL OUT Bitstream PCM duringplayback Thisprogramfeaturesdiscrete5 1 channel sound track and must be played though DTS capable equipment Whenplayedthrough DTS equipment sound will be heard from all five system speak ers and a super woofer Compresses the dyn...

Page 46: ...EAKER SETUP then press the ENTER key 4Press the cursor up down 5 key or cursor Left Right 2 3 to select the desired item then press the ENTER key SPEAKER SETUP RETURN ENTER 23 5 TEST C 3 dB 3 dB 5 dB 5 dB 1 mS 15 mS L R S W SR SL Operation method for speaker setting Movement mode When the marks for ENTER 5 23 are displayed at the right bottom of the screen movement between the boxes on the screen ...

Page 47: ... This selects the size large small or none of the center speaker Select small for the accessory speaker 4 This adjusts the delay time for the center speaker delay time in regard to the front speakers 5 Thisselectsthesize large small oftherightfrontspeaker The right front speaker follows the left front speaker Operation is not required when selection has been made for 1 6 This selects super woofer ...

Page 48: ...witches the mode 1 YES 2 NO Each press switches the mode 2 20MS 3 25MS 4 30MS 1 15MS V O LUME CONTR O L M ULTI CONTRO L TAPE B TAPE A LISTEN MODE EX BASS DSP EQ DOLBY DIGITAL PRO LOGIC 3 STEREO PRO LOGIC 3 STEREO Light up When the listening position is located be tween the front and surround speakers When the listening position is closer to the surround speakers When the listening position is clos...

Page 49: ...setting mode is ended and return is made to the original display When T TONE ON has been selected When T TONE ON has been selected and the ENTER key is pressed the test noise will be heard sequentially from the speakers When NO has been selected for Center speaker setting 4 and Surround speaker setting 5 on page 48 that speaker will not be shown and no sound will be put out for it When speakers wi...

Page 50: ...es 3 SLEEP 30 30 minutes 4 SLEEP 45 45 minutes 5 SLEEP 60 60 minutes 6 SLEEP 90 90 minutes The following items can be selected by turning the MULTI CONTROL jog dial 1 SLEEP TIMER 2 ADJUST TIME 3 TIMER PLAY 4 TIMER RECORDING 5 AUTO POWER SAVE Using the MULTI CONTROL jog dial 1 During POWER ON Press the SLEEP key Using the remote control unit SLEEP Each press switches the SLEEP TIME as follows 1 SLE...

Page 51: ...lled 5 Select ON time M ULTI CONTRO L ENTER Enter the figure of hour then press the ENTER key and enter the figure of minute Press the ENTER key 6 Select OFF time M ULTI CONTRO L ENTER Enter the figure of hour then press the ENTER key and enter the figure of minute Press the ENTER key 7 Select timer mode M ULTI CONTRO L ENTER The following items can be selected by turning the MULTI CONTROL jog dia...

Page 52: ... PLAY 4 TIMER RECORDING 5 AUTO POWER SAVE 4 Select desired timer then press the ENTER key The following items can be selected by turning the MULTI CONTROL jog dial 1 EVERYDAY executing a timer program once every day 2 ONE TIME executing it only once 3 TIMER OFF cancelled 5 Select ON time M ULTI CONTRO L ENTER M ULTI CONTRO L ENTER Enter the figure of hour then press the ENTER key and enter the fig...

Page 53: ... When the power is ON and neither recording nor playback is executed for 30 minutes or more the power is switched off automatically by this function M ULTI CONTRO L ENTER 3 Select APS OFF or APS ON then press the ENTER key 1 APS OFF Auto power save is not used 2 APS ON Auto power save is used When the TUNER or VIDEO MD input is selected this function operates only when the volume is set to zero Fo...

Page 54: ...nce in temperature between this unit and the outside This unit may not function properly if condensation oc curs In this case leave the unit for a few hours with the power left ON and restart the operation after the con densation has dried up Be specially cautious against condensation in a fol lowing circumstance When this unit is carried from a place to another across a large difference in temper...

Page 55: ...et the timer ON time and OFF time Execute the timer program Connect antennas Select a band Tune to the frequency of the desired sta tion Install the outdoor antenna in an apart posi tion from the road SwitchthesuspectedelectricapplianceOFF Install the TV or the system at an increased distance between them Preset stations with tunable frequencies Preset stations again Check the speaker connection T...

Page 56: ...inding A nonrecorded tape is played The cassette holder is not closed com pletely A tape is not inserted in the unit The tape is wound too tight due to irregular winding The tape is fully wound to one of the reels The head is dirty The tape is stretched or shrunk The tape head is magnetized External noise is induced A tape recorded with Dolby NR ON is being played on this unit The capstans or pinc...

Page 57: ...e are no signals recorded on the side of the disc being played The TV is not turned on The connection cords are not properly con nected The picture is slightly disrupted during fast forward and fast reverse operations The volume control of this set is not ad justed properly The player is in a special playback mode A nearby device is generating noise The disc is dirty The disc is damaged There is c...

Page 58: ...splay function to on Setthediscmenulanguagefunction MENU as required Set the surround speakers to Used in the speaker mode setting of initial setup SPEAKER SETUP Playback will not start even after a title is selected Theviewingrestrictionlevel RATING can not be changed The voice or subtitle language selected in the initial setting is not played No message appears on the TV screen after a key is pr...

Page 59: ...evel impedance 1 Vp p 75 Ω S video output Y output level impedance 1 Vp p 75 Ω C output level impedance NTSC 0 286 Vp p 75 Ω PAL 0 3 Vp p 75 Ω SECAM 0 3 Vp p 75 Ω Compression format MPEG1 MPEG2 Digital output 15 dBm 21 dBm Wave length 660 mm General Power consumption 230 W Dimensions W 270 mm H 326 mm D 360 mm Weight net 10 9 kg Front Speakers LS DV9 Enclosure Bass reflex type Magnetically shielde...

Page 60: ...found on the back of the unit in the spaces designated on the warranty card and in the space provided below Re fer to the model and serial numbers whenever you call upon your dealer for information or service on this product Model Serial Number ...

Reviews: