background image

English   

35

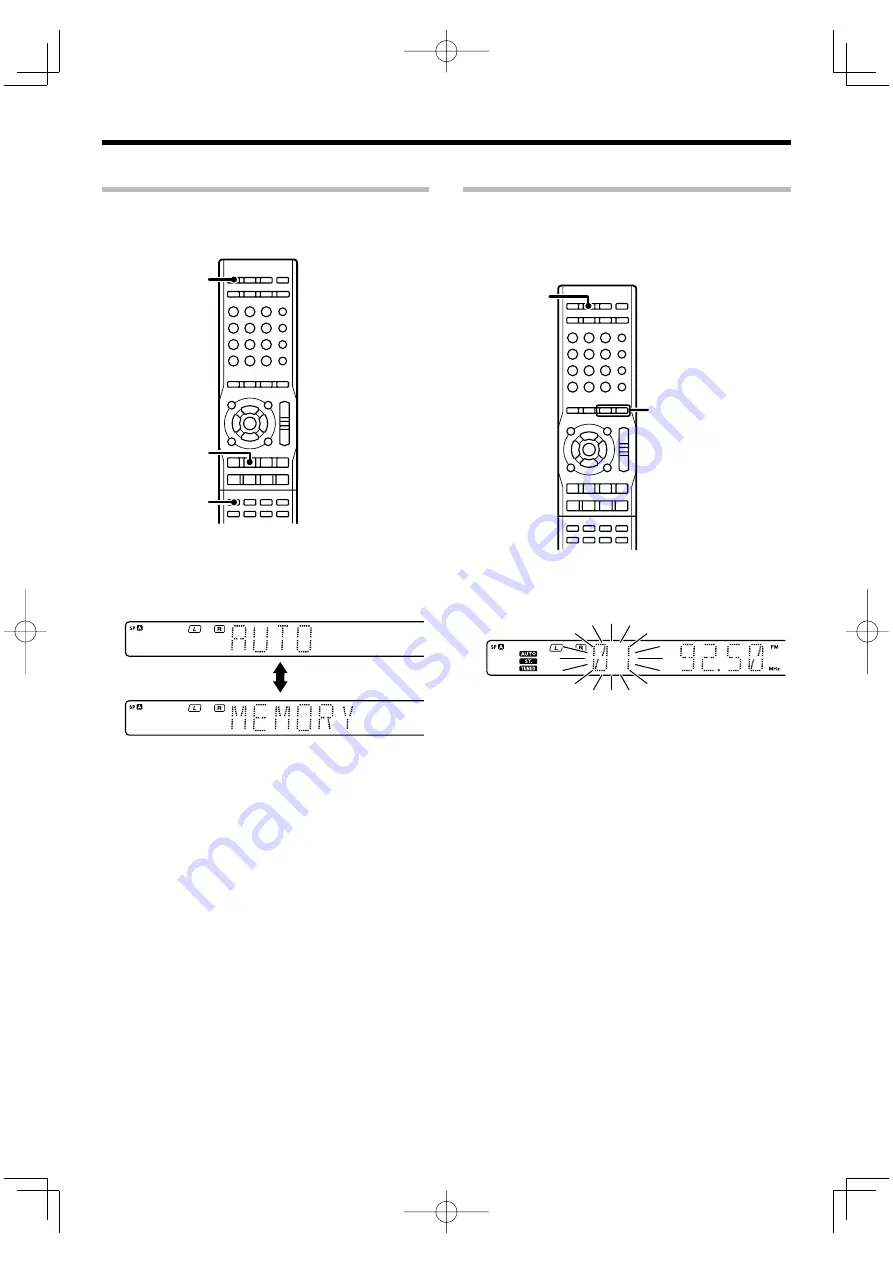
RDS Auto Memory

This function automatically stores up to 40 RDS stations in the 
preset memory. In order to use the PTY function, the RDS stations 
must be stored in the preset memory using the RDS AUTO 
MEMORY function.

TUNER

AUTO MEMORY

BAND

œ

 Use [TUNER] to select the tuner.

 Use [BAND] to set the broadcast band to "FM".

é

 Press [AUTO MEMORY].


After a few minutes, up to 40 RDS stations are preset in 
order from channel "01".
Stations already stored in the preset memory may be 
replaced by RDS stations. (i.e., If the RDS AUTO MEMORY 
function detects 15 RDS stations, the stations currently 
preset at numbers 01–15 will be replaced by the RDS 
stations.)

Presetting radio stations manually

The RDS auto memory function assigns preset numbers to RDS 
stations starting from preset number "1". Therefore, be sure 
to execute the RDS auto memory function before using the 
following operations to manually store AM stations and other FM 
stations, and RDS stations. 
See <RDS Auto Memory>.


MULTI CONTROL 

O

/

MEMORY

œ

 Tune to the station you want to store.

 Press [MEMORY] while receiving the station.


Proceed to step 

é

 within 20 seconds.

(If more than 20 seconds elapse, press [MEMORY] again.)

é

 Use [MULTI CONTROL 

/

5

] to select one of the 

station presets (1 – 40).

®

 Press [MEMORY] again to confirm the setting.

Repeat steps 

œ

é

, and 

®

 to store as many 

stations as necessary.
If you store a station at a previously used preset, the 
previous station will be replaced by the new one.

B60-5772-00̲00̲EN.indd   35

B60-5772-00̲00̲EN.indd   35

08.7.24   1:29:44 PM

08.7.24   1:29:44 PM

Summary of Contents for KRF-V6300D

Page 1: ...rd to the EMC Directive 2004 108 EC Manufacturer Kenwood Corporation 2967 3 Ishikawa machi Hachioji shi Tokyo 192 8525 Japan EU Representative s Kenwood Electronics Europe BV Amsterdamseweg 37 1422 AC UITHOORN The Netherlands B60 5772 00 00 EN indd 1 B60 5772 00 00 EN indd 1 08 7 24 1 29 03 PM 08 7 24 1 29 03 PM ...

Page 2: ...3 2 If any accessories are missing or if the unit is damaged or fails to operate notify your dealer immediately If the unit was shipped to you directly notify your shipper immediately Kenwood recommends that you retain the original carton and packing materials in case you need to move or ship the unit in the future Keep this manual handy for future reference Safety precautions WARNING TO PREVENT F...

Page 3: ...should be adhered to Follow Instructions All operating and use instructions should be followed 1 Cleaning Unplug this product from the wall outlet before cleaning Do not use liquid cleaners or aerosol cleaners Use a damp cloth for cleaning 2 Attachments Do not use attachments not recommended by the product manufacturer as they may cause hazards 3 Water and Moisture This product shall not be expose...

Page 4: ...g by program type PTY search Using the RDS DISP key Recording 38 Recording mode setting in digital audio source recording Recording audio analog sources Recording video Adjusting the sound 39 Adjusting the Tone Bass Boost ACTIVE EQ mode Adjustment according to the playing source Speaker level adjustment Input level adjustment Midnight mode Panorama mode Dimension mode Center Width mode Convenient ...

Page 5: ...ssume that the user mainly operates the receiver using the remote control unit When the same operation is also available on the main unit the operating method is indicated in illustrations The VOLUME CONTROL MULTI CONTROL and INPUT SELECTOR knobs on the main unit are operated by turning the knobs clockwise or counterclockwise Example TONE BASS BOOST MULTI CONTROL O ACTIVE EQ MULTI CONTROL ACTIVE E...

Page 6: ...uto tuning or manual tuning mode Use to select a recording mode STRAIGHT DECODE key Use to switch the straight decode mode on off DIMMER key w Use to switch the brightness of the display and indicators INPUT MODE key Use to select the input mode ACTIVE EQ key Use to select ACTIVE EQ setting INPUT SELECTOR knob Use to select the input sources PURE AUDIO MODE key PURE AUDIO MODE indicator Use to swi...

Page 7: ...ndicator Blinks when muting is on TONE indicator Lights up when the tone setting is on Listen mode Input signal format indicators RDS indicator Lights up when receiving an RDS station PTY indicator Lights up when searching a radio station by program type AUTO indicator Lights up when the tuning mode is Auto TUNED indicator Lights up when a radio station is tuned Input channel indicator The indicat...

Page 8: ...ayer BAND key Use to select the broadcast band 6 key Use to operate the Kenwood DVD player AUTO MONO key Use to select the auto tuning or manual tuning mode 7 key Use to operate the Kenwood DVD player 0 P CALL 4 keys Use to call preset channel fl Use to operate the Kenwood DVD player RECEIVER key Use to turn this unit on and off DVD key Use to turn the Kenwood DVD player on and off ACTIVE EQ key Us...

Page 9: ... component you need to operate first to swith the remote control unit to the selected input source mode and then press the keys of the corresponding operation Operating range Approx Remote sensor Infrared ray system Standby indicator When the remote controllable distance gets shorter than before replace both batteries with new ones Placing the remote sensor in direct sunlight or in direct light fr...

Page 10: ...ing position at in an as high as possible height ideally one meter above the height of the listener s ears Symmetrical installation is ideal The surround speakers reproduce the feeling of movement and presence of sound Subwoofer In general install on the front center position near the front speakers The subwoofer reproduces the powerful bass effects As it is less directional to other speakers it c...

Page 11: ...DVD 6CH IN PLAY IN AUDIO R R L R L AUDIO PRE OUT ANTENNA FRONT CENTER AUX CD DVD SURROUND SUB WOOFER MONITOR OUT DVD 6CH IN VIDEO 2 IN VIDEO 2 CD DVD DVD 6CH OPTICAL OPTICAL COAXIAL SUB WOOFER SURROUND BACK L MONO SURROUND BACK R MD TAPE MD TAPE FM 75 VIDEO2 VIDEO1 VIDEO1 HDMI DIGITAL IN AM GND DVD 6CH IN PLAY IN REC OUT SPEAKER FRONT R L VIDEO S VIDEO DVD 6CH IN VIDEO 2 IN VIDEO 1 IN VIDEO1OUT MO...

Page 12: ...UDIO R R L R L DVD 6CH IN VIDEO 2 IN VIDEO 1 IN VIDEO1OUT MONITOR OUT VIDEO S VIDEO AUDIO FRONT CENTER AUX CD DVD SURROUND SUB WOOFER MONITOR OUT DVD 6CH IN VIDEO CD OP MD T VIDEO2 VID HDMI DVD 6CH IN PLAY IN R L R L R FRONT CENTER AUX CD DVD SURROUND SUB WOOFER VIDEO2 DVD 6CH IN PLAY AUDIO R L R L AUDIO OUT COAXIAL DIGITAL OUT AUDIO VIDEO OUT S VIDEO OUT To TV Monitor S VIDEO MONITOR IN To TV Mon...

Page 13: ... 6CH DIGITAL IN R L R L CD player AUDIO OUT Connecting an MD player a cassette player 1 Connect the audio line Connection A and B AUDIO PRE OUT ANTENNA FRONT CENTER AUX CD DVD SURROUND SUB WOOFER MONITOR OUT DVD 6CH IN VIDEO 2 IN VIDEO 2 CD DVD DVD 6CH OPTICAL OPTICAL COAXIAL SUB WOOFER SURROUND BACK L MONO SURROUND BACK R MD TAPE MD TAPE FM 75 VIDEO2 VIDEO1 VIDEO1 HDMI DIGITAL IN AM GND DVD 6CH I...

Page 14: ... R L R L R L VIDEO S VIDEO DVD 6CH IN VIDEO 2 IN VIDEO 1 IN VIDEO1OUT MONITOR OUT COMPONENT VIDEO IN DVD 6CH VIDEO 1 VIDEO 2 MON OPTICAL OPTICAL COAXIAL VIDEO 2 CD DVD DVD 6CH DIGITAL IN FRONT CENTER AUX CD DVD SURROUND SUB WOOFER VIDEO2 DVD 6CH IN PLAY AUDIO R L R L DVD 6CH IN VIDEO 2 IN VIDEO 1 IN VIDEO1OUT MONITOR OUT VIDEO S VIDEO DVD player etc AUDIO OUT OPTICAL DIGITAL OUT AUDIO VIDEO OUT S ...

Page 15: ... HDMI DIGITAL IN AM GND DVD 6CH IN PLAY IN REC OUT SPEAKER B SPEAKER A FRONT SPEAKERS 6 16 R RED WH R L R L R L R L R L VIDEO S VIDEO DVD 6CH IN VIDEO 2 IN VIDEO 1 IN VIDEO1OUT MONITOR OUT COMPONENT VIDEO IN DVD 6CH VIDEO 1 VIDEO 2 MON AUX CD DVD MD TAPE MD TAPE IDEO2 VIDEO1 VIDEO1 PLAY IN REC OUT AUDIO R L R L L DVD 6CH IN VIDEO 2 IN VIDEO 1 IN VIDEO1OUT MONITOR OUT VIDEO S VIDEO DVD recorder or ...

Page 16: ...e necessary to switch the input of the TV according to the type of video input COMPONENT input or VIDEO COMPOSITE input Refer to the instruction manual of your TV for more information Setting up the system AUDIO PRE OUT ANTENNA FRONT CENTER AUX CD DVD SURROUND SUB WOOFER MONITOR OUT DVD 6CH IN VIDEO 2 IN VIDEO 2 CD DVD DVD 6CH OPTICAL OPTICAL COAXIAL SUB WOOFER SURROUND BACK L MONO SURROUND BACK R...

Page 17: ...nna cord Fix the antenna on the wall FM outdoor antenna FM outdoor antenna Lead the 75Ω coaxial cable connected to the FM outdoor antenna into the room and connect it to the FM 75Ω terminal AM loop antenna Use an antenna adapter commercially available FM indoor antenna FM outdoor antenna commercially available AUDIO PRE OUT ANTENNA FRONT CENTER AUX CD DVD SURROUND SUB WOOFER MONITOR OUT DVD 6CH IN...

Page 18: ...FER SURROUND BACK L MONO SURROUND BACK R PRE OUT SPEAKER B SPEAK R RED R L FRONT SPEAKERS 6 1 Connecting the speakers Front speakers A Right Surround speakers Center speaker Powered subwoofer Left Right Left Speaker impedance After confirming the speaker impedance indications printed on the rear panel of the receiver connect speakers with matching impedance ratings Using speakers with a rated impe...

Page 19: ...cuit the and speaker cords If the left and right speakers are connected inversely or the speaker cords are connected with reversed polarity the sound will be unnatural with ambiguous acoustic imaging Be sure to connect the speakers correctly Connecting the terminals Connecting the terminals B60 5772 00 00 EN indd 19 B60 5772 00 00 EN indd 19 08 7 24 1 29 27 PM 08 7 24 1 29 27 PM ...

Page 20: ...ON CENTER SURROUND SURROUND SPEAKERS 6 16 GREEN GRAY BLUE R B R L 1 After completing all of the necessary connections connect the power cord to a wall power outlet The standby indicator on the front panel lights red to indicate the standby mode 2 Press the Power key of this unit or the RECEIVER key of the remote control unit to turn this unit ON The standby indicator on the front panel goes out an...

Page 21: ... 1 channel system If the setup for the 6 1 channel or 7 1 channel system is required go through Speaker setup Detailed Setup The speaker setup can be completed by simply selecting the room type and listening position The audio will be corrected automatically according to the characteristics of the speaker system in use If more detailed speaker settings are required use the procedure in Speaker set...

Page 22: ...te non directional bass signals to the subwoofer for more dynamic deep bass sound effects Audio Delay Lip Sync AUDIO DELAY Adjust the deviation in time between the video and audio Speaker settings completed Getting into the setup mode The setup procedure is identical for all of the setting elements Once you remember the following procedure you can easily set up other setting elements SETUP MULTI C...

Page 23: ...when either BS LRG or BS NML is selected 2 The function for adding the bass of other channels to the subwoofer channel according to the speaker setup Go to the next setting TEST TONE If you wish to exit the setup mode see To exit the setup mode Reference for speaker size LRG A speaker with a sufficient bass reproduction capability a speaker with a large woofer or a large cabinet size NML A speaker...

Page 24: ...e setting DISTANCE This sets the distance from each speaker to the listening position œ Measure the distance from the listening position to each speaker and jot down in the table below Speaker Input channel indicator Distance from the listening position Front speaker left L feet meters Center speaker C feet meters Front speaker right R feet meters Surround speaker right RS feet meters Surround Bac...

Page 25: ...d effect of bass tone in the Dolby Digital and DTS signal œ See Getting into the setup mode and select LFE LVL Use MULTI CONTROL 5 to adjust the low frequency effect level The level is adjusted from 0dB to 10dB in 1dB step decrements é Press SETUP Go to the next setting AUDIO DELAY If you wish to exit the setup mode see To exit the setup mode Audio Delay Lip Sync AUDIO DELAY If the monitored video...

Page 26: ... 3 Analog input Analog input 1 Factory setting 2 6CH INPT setting can be switched only when the input selector is set to DVD 6CH 3 This cannot be selected when in DTS play mode Full Auto F AUTO The unit detects the digital or analog input signal automatically The unit selects the input mode and listen mode automatically during playback to match the type of input signal Dolby Digital DTS or PCM and...

Page 27: ... the input source in the original sound STRAIGHT DECODE The signal input from a source can be output directly without any sound field effect added to it STRAIGHT DECODE œ Select the source you want to play Start playback from the selected source é Press STRAIGHT DECODE STRAIGT DECODE indicator lights up When STRAIGHT DECODE is enabled the listen mode is selected automatically according to the inpu...

Page 28: ...the input signal Enjoying various surround effects ª PURE AUDIO MODE indicator lights up the display will be turned off and no video signal is output to the TV monitor No video signal to the TV monitor Except the HDMI video signal The display is turned off PURE AUDIO MODE indicator lights up To cancel Press PURE AUDIO MODE again PURE AUDIO MODE is also canceled when the listen mode is changed or S...

Page 29: ... DTS DSP mode DVD 6 channel SR SL C L R SW TV SCREEN The below speaker placements are for 6 1 channel surround sound system which are Dolby Digital EX DTS ES Neo 6 SB SR SL C L R SW TV SCREEN The below speaker placements are for 7 1 channel surround sound system which are Dolby Pro Logic IIx Neo 6 SBR SBL SR SL C L R SW TV SCREEN L Front Left speaker SW Subwoofer C Center speaker R Front Right spe...

Page 30: ...ltichannel audio In 5 1 channel surround sound the three front channels Left Center Right deliver crisp clean dialogue and accurate placement of on screen sounds while twin surround channels Left Surround Right Surround wrap around the audience and immerse them in the action The LFE Low Frequency Effects channel delivers real impact for explosions and other effects that can literally be felt as we...

Page 31: ... to create reverberation without spoiling the sound quality of the original signal DVD 6 channel mode Using a DVD player or the like equipped with six 5 1 output channels and this unit you can enjoy multi channel encoded DVD source material in all its splendor Since the source signals are digital and each channel is input independently the resulting sound quality sense of spaciousness and dynamic ...

Page 32: ...and PRO LOGIC PLII GAME Pro Logic II surround Game mode DOLBY DIGITAL and PRO LOGIC PRO LOGIC Pro Logic mode DOLBY DIGITAL and PRO LOGIC STEREO Stereo mode DOLBY DIGITAL Available when the input signal has only 2 channels When Dolby Digital EX is selected DOLBY DIGITAL EX will scroll from right to left DOLBY DIGITAL EX indicator is lit When the DTS signal is input Display Listen mode Indicator DTS...

Page 33: ...ing instructions Depending on the type of the signal or speaker setting some listen modes cannot be selected When playback is started the sound may be cut or interrupted before the input source is confirmed as Dolby Digital To enjoy Dolby Digital surround as well as all the other listen modes from a single component be sure to use a Dolby Digital compatible source component Dolby Digital or DTS si...

Page 34: ... Data System RDS is a system that transmits useful information in the form of digital data for FM broadcasts along with the broadcast signal Tuners and receivers designed for RDS reception can extract the information from the broadcast signal for use with various functions such as automatic display of the station name Before using a function utilizing the RDS be sure to perform the RDS Auto Memory...

Page 35: ...adiostationsmanually The RDS auto memory function assigns preset numbers to RDS stations starting from preset number 1 Therefore be sure to execute the RDS auto memory function before using the following operations to manually store AM stations and other FM stations and RDS stations See RDS Auto Memory MULTI CONTROL O MEMORY œ Tune to the station you want to store Press MEMORY while receiving the ...

Page 36: ...esired station Each time you press the key another preset station is received in order Holding down the P CALL 4 lets you skip through the presets receiving each preset station at 0 5 second intervals Tuning by program type PTY search This function lets you set the tuner to automatically search for stations which are currently broadcasting the type of program genre you want to listen to Under cert...

Page 37: ...ple Searching for a Rock Music broadcast Display while searching Blinks Program type name display Display when a station is received Goes out Station name display To select another program type Repeat steps œ and é MULTI CONTROL 5 can also be used to select a station No sound is heard while PTY is blinking If the desired program type cannot be found NO PROG is displayed then after several seconds ...

Page 38: ...eld throughout this mode and the signal is converted into stereo signals But once the digital signal is changed to other signal no signal is output When the A REC mode is selected the digital input signal is converted to stereo signals even if the digital signal is changed When the digital mode changes during recording in the A REC mode the audio input source may be interrupted momentarily For A R...

Page 39: ... a PCM or analog signal and the listen mode of this unit is set to Stereo Press BASS BOOST Press the key once to select the maximum 10 low frequency emphasis setting TONE will automatically be turned ON To cancel Press BASS BOOST again Bass Boost does not function when this unit is in the sound quality or ambience effects adjustment mode When the ACTIVE EQ mode is set to ON set it to OFF and then ...

Page 40: ... when the power is turned on off or when the input selection is changed 2 Analog mode only 3 Dolby Digital and DTS mode only 4 Pro Logic II Music mode and Pro Logic IIx Music mode only Use the MULTI CONTROL 5 to adjust the setting as desired For detailed adjustment method see the explanation of each item To exit the sound adjustment mode Press SOUND Speaker level adjustment Speaker level adjustmen...

Page 41: ...ing 1 ON PANORAMA mode is ON 2 OFF PANORAMA mode is OFF Dimension mode Dimension mode Pro Logic IIx Music and Pro Logic II Music mode only When listening to music with certain recordings you will also be able to achieve a suitable balance from all the speakers by adjusting the dimension mode œ Press SOUND repeatedly until DIMENSION appears on the display The DIMENSION indication scrolls across the...

Page 42: ...dphones Operation available only on the main unit œ Press SPEAKERS A B OFF so that the speaker indicator goes off Make sure the SP indicator is turned off If you turn off all of the speakers when in surround mode the surround mode will be canceled as well resulting in stereo playback Connect headphones to the PHONES jack PHONES é Use VOLUME fi to adjust the volume Muting the sound Muting the sound ...

Page 43: ...you to control the connected Kenwood DVD player with this remote control unit é Press each key for DVD player operation Refer to the operation manual of the DVD players for the detailed operating instructions To return to the receiver operation mode press other Input source key DVD player operation keys You can perform these basic operations using the keys described below when connected to Kenwood...

Page 44: ...eakers The speaker is not set up correctly Set it up properly referring to Speaker setup Sound is not output from the surround speakers and or the center speaker or their sound is very soft The surround speaker cords and or the center speaker cord is disconnected Connect it properly referring to Connecting the speakers The speaker is not set up correctly Set it up properly referring to Speaker set...

Page 45: ...at cannot be received Preset a station with a receivable frequency fi Remote control unit Symptom Cause Remedy Remote control operation is not possible The remote control is set to the DVD player operation mode Press any of the Input Source keys to select the appropriate operation mode Batteries are exhausted Replace with new batteries 9 The remote control unit is too far away from the main system ...

Page 46: ...at resetting the microcomputer will clear the contents of the memory and return the unit to the state it was in when it left the factory In regard to contact cleaner In regard to contact cleaner Do not use contact cleaners because it could cause a malfunction Be specially careful not to use contact cleaners containing oil for they may deform the plastic component Maintenance of the unit Maintenanc...

Page 47: ... DVD VIDEO 2 Coaxial DVD 6CH VIDEO section VIDEO input sensitivity impedance VIDEO 1 VIDEO 2 DVD 6CH AV AUX Composite 1 Vp p 75 Ω VIDEO output level impedance VIDEO 1 MONITOR Composite 1 Vp p 75 Ω S VIDEO input sensitivity impedance VIDEO 2 DVD 6CH Y singal 1 Vp p 75 Ω C singal 0 286 Vp p 75 Ω S VIDEO output level impedance MONITOR Y singal 1 Vp p 75 Ω C singal 0 286 Vp p 75 Ω COMPONENT VIDEO inpu...

Page 48: ...esignated on the warranty card and in the space provided below Refer to the model and serial numbers whenever you call upon your dealer for information or service on this product Model Serial Number B60 5772 00 00 EN indd 48 B60 5772 00 00 EN indd 48 08 7 24 1 29 57 PM 08 7 24 1 29 57 PM ...

Reviews: