background image

18


|


English

General features

Angle Control

Setting the panel angle.

1

  Enter Angle Control mode

Using the Control knob, select "ANGLE".

For the operation method, refer to <Function 
Control mode> (page 9).

2

  Set the panel angle

Turn the Control knob to right or push it 
towards right.

Each time you turn the Control knob, the panel 
angle is changed in four levels.

3

  Exit Angle Control mode

Press the Control knob.

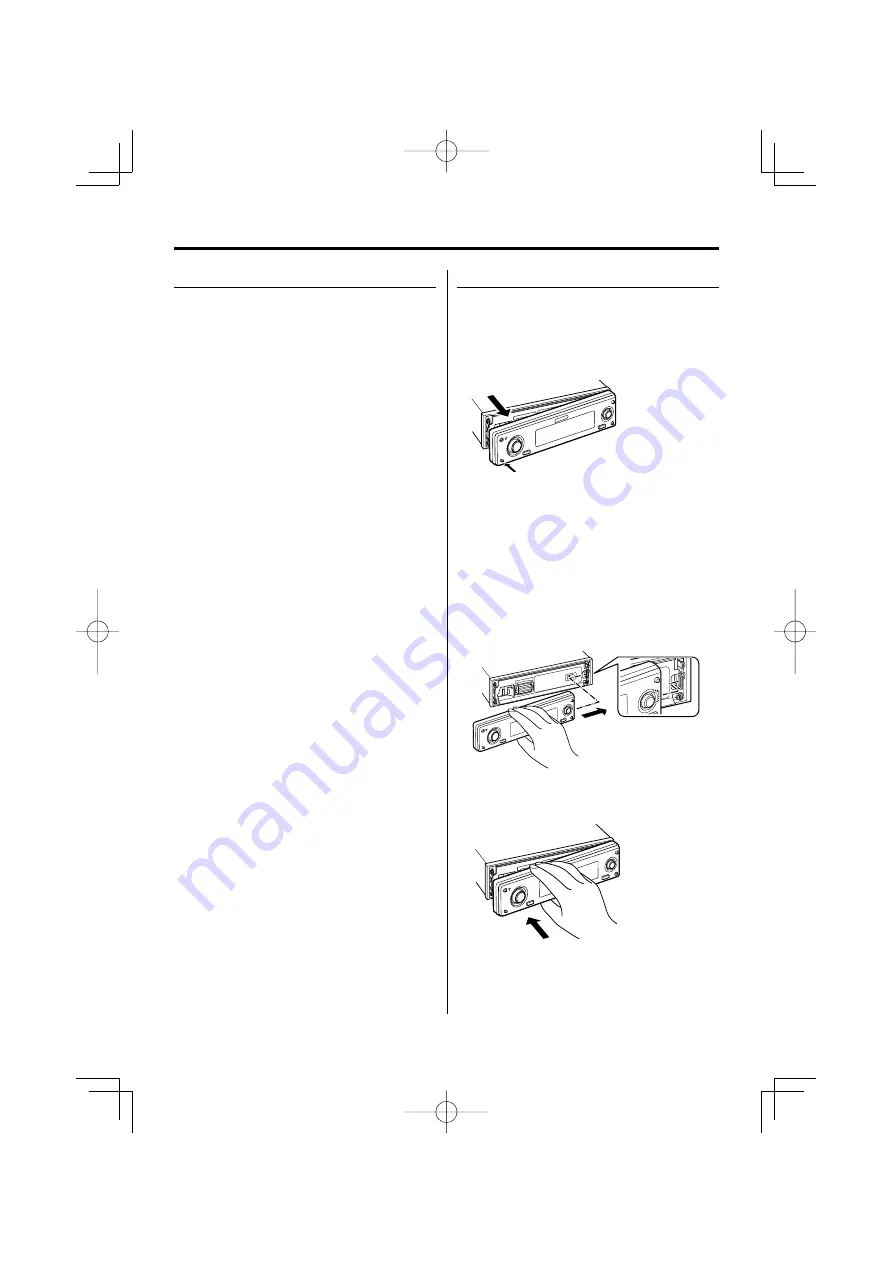
Theft Deterrent Faceplate

The faceplate of the unit can be detached and taken 
with you, helping to deter theft.

Removing the Faceplate

Press the Release button.

The faceplate is unlocked, allowing you to detach it.

¤

•  The faceplate is a precision piece of equipment and can 

be damaged by shocks or jolts. 

•  Keep the faceplate in its faceplate case while detached.
•  Do not expose the faceplate (and the faceplate case) to 

direct sunlight or excessive heat or humidity. Also avoid 
places with too much dust or the possibility of water 
splashing.

Reattaching the Faceplate

1

  Align the shaft on the unit with the depression 

on the faceplate.

2

  Push the faceplate in until it clicks.

The faceplate is locked in place, allowing you to use 
the unit.

B64-3770-00̲00̲M̲English.indd   18

B64-3770-00̲00̲M̲English.indd   18

07.5.10   2:03:41 PM

07.5.10   2:03:41 PM

Summary of Contents for KDC-X9006U

Page 1: ...CD RECEIVER KDC X9006U INSTRUCTION MANUAL B64 3770 00 00 MW HD B64 3770 00 00 M English indd 1 B64 3770 00 00 M English indd 1 07 5 10 2 03 30 PM 07 5 10 2 03 30 PM ...

Page 2: ...rch Folder Album Search Direct Music Search Direct Disc Search Play function of CD and Audio file File Select Text Title Scroll Recording Downloading 26 About Internal Memory Copying from USB device Setting the recordable time Recording music CD Deleting files in memory Menu system 30 Menu System Security Code Source Select Mode iPod mode setting Touch Sensor Tone Manual Clock Adjustment Date Adju...

Page 3: ...is removed Therefore the panel must be attached while the electrical system of the car is operating Do Not Load 8 cm 3 in CDs in the CD slot If you try to load a 8 cm 3 in CD with its adapter into the unit the adapter might separate from the CD and damage the unit About CD players disc changers connected to this unit Kenwood disc changers CD players released in 1998 or later can be connected to th...

Page 4: ...ory may be damaged Refer to Recording music CD page 28 and Copying from USB device page 27 for information on canceling recording or copying Press the reset button if the disc auto changer fails to operate correctly Normal operation should be restored Reset button Cleaning the Unit If the faceplate of this unit is stained wipe it with a dry soft cloth such as a silicon cloth If the faceplate is st...

Page 5: ... kenwood com usb About USB device Install the USB device in the place where it will not prevent you from driving your vehicle properly You cannot connect a USB device via a USB hub Take backups of the audio files used with this unit The files can be erased depending on the operating conditions of the USB device We shall have no compensation for any damage arising out of erasure of the stored data ...

Page 6: ...y of this unit For the information about the displayed icons refer to the instruction manual of Hands Free Box Bluetooth connection status cannot be displayed Handling CDs Do not touch the recording surface of the CD Do not stick tape etc on the CD or use a CD with tape stuck on it Do not use disc type accessories Clean from the center of the disc and move outward When removing CDs from this unit ...

Page 7: ... required Display Tuner TUNER USB device iPod USB iPod Internal Memory Internal Memory CD Compact Disc TV Optional accessory TV External disc Optional accessory CD Changer Auxiliary input AUX Auxiliary input Optional accessory AUX EXT Standby Illumination only mode STANDBY When connection of the iPod is recognized the source display changes from USB to iPod Switch between SRC Select mode 1 and 2 i...

Page 8: ... 15 Front 15 Exit Audio Control mode Volume control mode 5 Exit Audio Control mode Press any button Press a button other than the VOL knob 0 and ATT button Audio Setup Setting the Sound system such as Volume offset and Dual Zone 1 Select the source to adjust Press the SRC button Refer to Selecting the Source page 7 2 Enter Audio Setup mode Press the VOL knob for at least 1 second 3 Select the Audi...

Page 9: ...se the TEL Mute feature you need to hook up the MUTE wire to your telephone using a commercial telephone accessory Refer to Connecting Wires to Terminals page 41 Function Control mode To set up various functions of this unit select tree structured function items 1 Enter Function Control mode Press the FNC button 2 Select your desired setup item Select a setup item using the Control knob Operation ...

Page 10: ...A Digital Time Alignment Fine tune the difference in distance between speakers set with Cabin Setting Use together with Position Control page 11 1 Set reference point so that the front rear positions and height are at the position of the ears of the person sitting in the front seat and the left right position is at the center of the cabin 2 Measure the distance from the reference point to the spea...

Page 11: ...ront Manual Position Setting 1 Select the items to adjust for Position Push the Control knob towards up or down Display Position Item L FRONT Front Left L REAR Rear Left L SW Subwoofer Left FRONT R Front Right REAR R Rear Right SW R Subwoofer Right 2 Adjust the Position Turn the Control knob or push it towards left or right Each time you push the knob the setting alternates between the settings sh...

Page 12: ...it towards left or right Each time you push the knob the band alternates between 1 Band 1 and 4 Band 4 2 Select the items to adjust for Equalizer Push the Control knob towards up or down Each time you push the knob the item to be adjusted alternates between the items shown in the table below 3 Adjust the Equalizer Turn the Control knob or push it towards left or right Each time you push the knob t...

Page 13: ...justment TruBass Assists the playback for the super bass sound SRS 3D Space Control Adjusts the soundscape SRS 3D Center Control Adjusts the center image such as vocal part in music Definition Improves sound quality in high range and creates clear sound 5 Exit WOW HD Control mode Press the FNC button To get the best sound first go through Sound Management system page 10 Memory mode Storing the val...

Page 14: ...ing display types Display Display Type TYPE SELECT A 1 9 TYPE SELECT B 3 3 2 9 TYPE SELECT C 3 0 3 2 9 TYPE SELECT D 8 7 7 9 3 Exit Display Type Selection mode Press the Control knob 4 Enter Display Mode Selection mode Display Type B Display Type C only Using the Control knob select DISPLAY MODE 5 Select the Display Mode Turn the Control knob Select from the following display mode Mode TYPE SELECT...

Page 15: ...Changing the text display 1 Enter Text Display Selection mode Using the Control knob select DISPLAY TEXT For the operation method refer to Function Control mode page 9 2 Select the text Turn the Control knob or push it towards left or right See The text display page 16 Select the row only for display type with multiple rows Push the Control knob towards up or down The cursor moves to the selected ...

Page 16: ...lock Speana Clock 345 Clock Clock 1 7 Date Date 1345 7 Blank Blank 1345 7 Display Type A Display Type B Display Type C Font Color Selection Selecting the display font color 1 Enter Font Color Selection mode Using the Control knob select DISPLAY COLOR For the operation method refer to Function Control mode page 9 2 Select the text display part Select the character color outline color Display Type A...

Page 17: ...ss the Control knob for at least 1 second 5 Move the cursor to the enter character position Push the Control knob towards right or left 6 Select the character type Press the Control knob Each time you press the knob the character type alternates between the types shown in the table below Character type Alphabet upper case Alphabet lower case Numbers and symbols Special characters Accent characters...

Page 18: ...oving the Faceplate Press the Release button The faceplate is unlocked allowing you to detach it The faceplate is a precision piece of equipment and can be damaged by shocks or jolts Keep the faceplate in its faceplate case while detached Do not expose the faceplate and the faceplate case to direct sunlight or excessive heat or humidity Also avoid places with too much dust or the possibility of wa...

Page 19: ...tation 1 Select tuner source Press the SRC button Select the TUNER display Refer to Selecting the Source page 7 2 Select the band Push the Control knob towards FM or AM Each time you push the knob toward FM it switches between the FM1 FM2 and FM3 bands 3 Tune up or down band Push the Control knob towards 4 or During reception of stereo stations the ST indicator is ON Tuner TV control features FM A...

Page 20: ... 2 seconds When 6 stations that can be received are put in the memory Auto Memory Entry closes Station Preset Memory Putting a station in the memory 1 Select the band Push the Control knob towards FM or AM 2 Select the frequency to put in the memory Push the Control knob towards 4 or 3 Enter Preset Memory mode Using the Control knob select P MEMORY For the operation method refer to Function Contro...

Page 21: ...lect the TV channel to put in the memory Push the Control knob towards 4 or 3 Enter Preset Memory mode Using the Control knob select P MEMORY For the operation method refer to Function Control mode page 9 4 Select the number to put in the memory Turn the Control knob 5 Determine the number to put in the memory Press the Control knob 6 Allow the determined number to take effect Press the Control kn...

Page 22: ...5 When a disc is inserted the IN indicator is ON When a disc is inserted Press the SRC button Select the Compact Disc display Refer to Selecting the Source page 7 Eject the disc 1 Eject the disc Press the 0 button 2 Return the panel to the original position Press the 0 button You can eject the disc for 10 minutes after switching off the engine Playing USB iPod device When the USB device is not con...

Page 23: ...emoving the USB device 1 Set the remove mode as the USB source Press the 0 button for at least 2 seconds USB REMOVE display blinks 2 Remove the USB device Playing Internal Memory Press the SRC button Select the Internal Memory display Refer to Selecting the Source page 7 Playing External Disc Playing discs set in the optional accessory disc player connected to this unit Press the SRC button Select...

Page 24: ... on the remote control 2 Do Disc Search Press the FM or AM button Cancelling Direct Disc Search Press the 38 button Play function of CD and Audio file Setting up the Repeat Play and Scan Play 1 Set up the play function Using the Control knob set your desired setup item to On Off For the operation method refer to Function Control mode page 9 When the play function is turned on ON is displayed Displ...

Page 25: ...rol knob towards up Return to first item Push the Control knob towards up for at least 1 second Operation system for other than iPod Operation type Operation Movement between items Turn the Control knob Selection of item Push the Control knob towards right Return to previous item Push the Control knob towards left Return to first item Push the Control knob towards left for at least 1 second The 2 ...

Page 26: ...is started while recording or copying Record or copy with the engine running Do not press the reset button or remove the battery while recording copying or erasing Otherwise the audio file in the internal memory may be lost The audio file in the internal memory cannot be copied to another media Only the following controls can be used while recording copying or erasing Volume Attenuator Power off W...

Page 27: ...ob 4 Start copy Select OK using the Control knob Number of files copied Completed is displayed when copying completes Cancelling copy 1 Cancel copy Press the FNC button Exits Copy mode if pressed by step 3 2 Select YES Select YES using the Control knob 5 Exit Copy mode Select EXIT using the Control knob Returns to step 3 if NEXT is selected If a folder is selected the files in the folder are copie...

Page 28: ...mode page 9 3 Select record mode Push the Control knob towards right or left Multiple song record mode is set when the control knob is turned right and single song record mode is set when it is turned left 4 Select the song to record Turn the Control knob or push it towards up or down Record mode Operation Single song Selects a single song Multi song Selects all songs or from specified song to the...

Page 29: ... CD000_001 wma Multi song recording Folders are named sequentially starting from CD001 File and folder name are incremented successively from the last number even if files in the middle are deleted The number returns to 001 when 999 is reached Setting file name and folder name is recommended Deleting files in memory Deleting audio files in memory Read About Internal Memory page 26 before starting ...

Page 30: ...sh the Control knob towards right or left Example When you select Beep each time you push the knob it alternates between Beep ON or Beep OFF Select 1 of them as the setting You can continue by returning to step 2 and setting other items 4 Exit Menu mode Press the FNC button When other items those applicable to the basic operation method above are displayed their setting content chart is entered No...

Page 31: ...so displayed 8 Do the step 4 through 7 step operation and reenter the security code Approved is displayed The Security Code function activates If you enter a Code different from your Security Code you have to start over from step 4 9 Exit Security Code mode Press the FNC button Resetting the Security Code function when the audio unit is first used after removed from the battery power source or the...

Page 32: ...t mode Press the Control knob for at least 1 second The date display blinks 3 Selecting the item day month or year to adjust Push the Control knob towards right or left The items that are blinking are items that you can adjust 4 Adjust each item Turn the Control knob or push it towards up or down 5 Repeat step 3 and 4 operation and adjust the date 6 Exit Date adjustment mode Press the FNC button I...

Page 33: ... Display and Setting Contrast 1 Contrast 4 Original setting In Standby mode Display reversing Setting If no operation is performed for a predetermined period of time switching between negative and positive display modes takes place automatically Display reversing maintains the initial brightness of the display for a long period of time Display Setting Display N P Auto Auto reverse display Display ...

Page 34: ...frequency 20 When LX AMP unit connecting AMP Control You can control the LX AMP connected to the unit 1 Select AMP Control mode Turn the Control knob Select the AMP Control display 2 Enter AMP Control mode Press the Control knob for at least 1 second 3 Select the AMP Control item for adjustment Push the Control knob towards up or down For the details on the AMP Control item see the Instruction man...

Page 35: ... in auxiliary input or the auxiliary input of optional KCA S220A is used In Standby mode Selecting Chinese Characters Setting up the display of Chinese characters and undistinguishable English characters Display Setting Chinese OFF Displays texts using European characters Chinese ON Displays texts using Chinese characters Texts displayed using Chinese characters are as follows Folder name File nam...

Page 36: ...l knob for at least 1 second File Check display blinks 6 Select files to be downloaded Turn the Control knob or push it towards up or down Press the Control knob 7 Start downloading Select YES using the Control knob When the downloading finishes Finished is displayed Picture downloading may take as long as 20 minutes Quantity Cancelling Downloading Press the FNC button 8 Exit the downloading mode ...

Page 37: ... Enter the Formatting mode Press the Control knob for at least 1 second Format is displayed 5 Start format Select YES using the Control knob Format display blinks When the formatting finishes Completed is displayed 6 Exit Formatting mode Press the FNC button In Standby mode Demonstration mode setting Sets the demonstration mode 1 Select the Demonstration mode Turn the Control knob Select the DEMO ...

Page 38: ...hot places such as on the dashboard Basic operations VOL buttons Adjusts the volume SRC button Each time you press the button the source alternates For the source alternating order refer to Selecting the Source page 7 ATT button Turns the volume down quickly When the button is pressed again the volume returns to the previous level SRC VOL ATT AUD ATT DIRECT 0 9 SRC VOL AUD FM AM 2 ZONE This button...

Page 39: ... buttons 1 6 to recall preset stations DIRECT button Enters and cancels the Direct Access Tuning page 20 mode In Disc USB iPod Internal Memory source 4 buttons Going forwards and backwards between music buttons Going forwards and backwards between disc folders 38 button Each time you press the button the music is played or paused 0 9 buttons When in Direct Music Search page 24 and Direct Disc Sear...

Page 40: ...all the unit so that the faceplate will not hit the lid when closing and opening If the fuse blows first make sure the wires aren t touching to cause a short circuit then replace the old fuse with one with the same rating Insulate unconnected wires with vinyl tape or other similar material To prevent a short circuit do not remove the caps on the ends of the unconnected wires or the terminals Conne...

Page 41: ...nna or to the power terminal for the booster amplifier of the film type antenna External amplifier control wire Pink Black To EXT AMP CONT terminal of the amplifier having the external amp control function Front left output White Front right output Red To connect the Kenwood navigation system consult your navigation manual TEL mute wire Brown Connect to the terminal that is grounded when either th...

Page 42: ...r frame and then remove the hard rubber frame 2 Align the holes in the unit two locations on each side with the vehicle mounting bracket and secure the unit with the accessory screws 8 mm MAX M5mm M5mm 8 mm MAX T N T N T N T Toyota cars N Nissan cars Accessory3 for Nissan car Accessory4 for Toyota car 3 4 During installation do not use any screws except for those provided The use of different scre...

Page 43: ...own 4 Lower the removal tool toward the bottom and pull out the unit halfway while pressing towards the inside Screw M4X8 commercially available Accessory2 Be careful to avoid injury from the catch pins on the removal tool 5 Pull the unit all the way out with your hands being careful not to drop it Screwing the Faceplate on the Unit If you want to fasten the faceplate to the main unit so that it d...

Page 44: ...on None is selected for the rear speakers Sound Management system page 10 Cannot select the output destination of the subsource in the Dual zone Cannot adjust the volume of the rear speakers The Dual zone function is disabled Audio Setup page 8 Cannot register a security code Cannot set up Display Illumination Control Demonstration mode Setting page 37 is not turned off Cannot play audio files CD ...

Page 45: ...n The file system of the connected USB device is broken Copy the files and folders for the USB device again referring to http www kenwood com usb If the error message is still displayed initialize the USB device or use other USB devices Error 05 The disc is unreadable Blank Disc Nothing has been recorded on the MD No Track No tracks are recorded on the MD although it has a title No Panel The facep...

Page 46: ...opying was canceled because internal memory space ran out while recording from music CD or copying from USB device Delete unnecessary files and record or copy once more Name Exists Raname Name Exists Auto Rename The name entered while recording CD already exists Or a file or folder with the same name already exists while copying from USB device Change the name or delete the existing file and recor...

Page 47: ...2 Audio Layer 3 WMA decode Compliant with Windows Media Audio AAC decode AAC LC m4a files WAV decode Linear PCM USB Interface USB Standard USB 1 1 2 0 Maximum Supply current 500 mA File System FAT16 32 MP3 decode Compliant with MPEG 1 2 Audio Layer 3 WMA decode Compliant with Windows Media Audio AAC decode AAC LC m4a files WAV decode Linear PCM Audio section Maximum output power 50 W x 4 Full Band...

Page 48: ...B64 3770 00 00 M English indd 48 B64 3770 00 00 M English indd 48 07 5 10 2 04 00 PM 07 5 10 2 04 00 PM ...

Reviews: