background image

3

Shortcrust pastry and scones

Put the flour into the bowl. Use fat straight from the refrigerator and cut into
2cm/

3

4

in cubes. Process until the mixture resembles fine breadcrumbs but take

care not to overprocess. Leave the machine running and add the liquid down
the feed tube. Process until one or two balls of pastry are formed. Chill before
use.

Soups

Purée soups either before or after cooking. Drain the ingredients and place into
the bowl with a small quantity of liquid from the recipe. Process until the desired
consistency has been reached, then add to the remainder of the liquid.

Nuts

Chop nuts for cakes and biscuits by placing into the bowl and processing until
the desired consistency is obtained.

Cake making

Sponge type cakes are best made by the ‘all in one method’. All the ingredients
are placed into the bowl and processed until smooth - approximately 10
seconds. A ‘soft tub’ margarine used straight from the refrigerator and cut into
2cm/

3

4

in cubes should always be used.

Savoury dips/spreads

Place the solid ingredients into the bowl in 2.5cm/1in cubes. Process until finely
chopped. Add the cream etc., and continue to process until the ingredients are
well blended.

Batters

With the knife blade in position place the dry ingredients, egg and a little liquid in
the bowl, process until smooth. Add the remaining liquid down the feed tube
whilst the machine is operating.

Yeast dough

Place the flour, fat and other dry ingredients into the bowl and process for a few
seconds to mix. With the machine running add the liquid mixture down the feed
tube and continue processing until the mixture forms a dough and becomes
smooth in appearance and elastic to touch - this will take 45-60 seconds. Allow
the dough to rise then re-knead for 10 seconds.

whisk

Use for egg whites and cream only. The whisk is unsuitable for other recipes.
Make sure the bowl and whisk are free from any traces of grease or egg yolk
when whisking egg whites.

slicing and shredding plates

what the cutting plates can do.

slicing plate - 

slices carrots, potato, cabbage, cucumber, courgette, beetroot,

onion.

shredding plate - 

grates cheese, carrot, potato and foods of a similar texture.

to assemble the plate carrier

1 Clip the spacer onto the end of the plate carrier 

.

2 Select the desired plate and fit into the carrier with the cutting side uppermost.

Locate one end of the plate under the rim and press the other end into position
it will only fit one way round 

.

important

When using the slicing and shredding plates the  spacer must be clipped into
position on the end of the carrier.

using the cutting plates

shredding plate

Cut pieces of food to fit the feed tube. Fill the tube almost to the top and push
down using the pusher with an even pressure whilst the machine is running.
Longer shreds can be obtained by stacking pieces horizontally in the feed tube
eg carrot.

slicing plate

If necessary cut food to fit the feed tube. Core foods such as apples and
peppers. Pack the food in an upright position in the feed tube. The height
should be slightly shorter than the feed tube. Using the pusher, push down with
an even pressure whilst the machine is running.

hints

Use fresh ingredients.

Don’t cut food up too small. Fill the feed tube fairly full, this prevents food from
slipping sideways during processing.

When slicing or shredding: food placed upright comes out shorter than food
placed horizontally.

After using a cutting plate there will always be a small amount of waste on the
plate or in the food.

Do not allow food to build up to the underside of the plate - empty regularly.

Push food down the feed tube using an even pressure.

maxi blend canopy

When blending, use the maxi blend canopy in conjunction with the knife blade.
It allows you to increase the liquid processing capacity of the bowl and improve
the chopping performance of the blade.

1 Place the canopy into the bowl over the knife blade - 

do not push down 


.

2 Fit the lid - the lid will ensure that the canopy is located at the correct height 

.

citrus press 

(optional attachment)

The citrus press is used to juice citrus fruit ie oranges, lemons, limes and
grapefruits.

1 Fit the bowl onto the processor. Add the strainer and turn clockwise until the fin

on the strainer aligns with the mark on the processor body 

.

2 Attach the cone onto the drive shaft turning until it drops all the way down 

.

3 Cut the fruit in half. Switch on and press the fruit onto the cone.

liquidiser

Use the liquidiser for fine soups, drinks and mayonnaise.

to use the liquidiser

1 Remove the outlet cover 

.

2 Put the ingredients into the jug.
3 Screw the lid and filler cap onto the jug.
4 Screw the jug onto the outlet.
5 Switch on.
6 After using the liquidiser always replace the outlet cover.

important

The liquidiser attachment will work only with the processor bowl

and lid in position.

When using the liquidiser outlet we recommend that there are no

tools in the processor bowl.

hints

When making mayonnaise, put all the ingredients, except the oil into the liquidiser.
Then with the machine running, pour the oil into the filler cap and let it run through.

Thick mixtures, eg pates and dips, may need scraping down. If it’s difficult to
process, add more liquid.

Allow hot liquids to cool before blending in the liquidiser – if you haven’t fitted
the lid securely and it comes off, you could get splashed.

To ensure the long life of your liquidiser, never run it for longer than 60 seconds.
Switch off as soon as you’ve got the right consistency.

Don’t process spices - they may damage the plastic.

The machine won’t work if the liquidiser is fitted incorrectly.

Don’t put dry ingredients into the liquidiser before switching on. If necessary, cut
them into pieces; remove the filler cap; then with the machine running, drop
them through one by one.

Don’t use the liquidiser as a storage container. Keep it empty before and after
use.

Never blend more than 1 litre (1

3

4

pts) - less for frothy liquids like milkshakes.

cleaning

Always switch off and unplug before cleaning.

Never let the power unit, cord or plug get wet.

Handle blades and cutting plates with care - they are extremely sharp.

Some foods will discolour the plastic. This is perfectly normal. It won’t harm the
plastic or affect the flavour of your food. Rubbing with a cloth dipped in
vegetable oil helps remove discolouring.

power unit

Wipe with a damp cloth, then dry.

Wrap excess cord around the cord stowage at the back of the appliance.

liquidiser

1 Fill with warm water, fit the lid and filler cap, then switch on for 20-30 seconds.
2 Empty, then rinse. If it’s still dirty, use a brush.
3 Wipe, then leave to air-dry.

Summary of Contents for FP180 Series

Page 1: ...FP180 series ...

Page 2: ...English 2 4 Português 5 7 Español 8 10 Türkçe 11 13 Ïesky 14 16 Magyar 17 19 Polski 20 22 Русский 23 25 Ekkgmij 26 28 U N F O L D w 9 2 1 3 ...

Page 3: ...1 1 ...
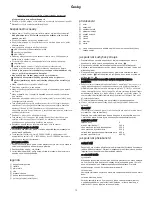
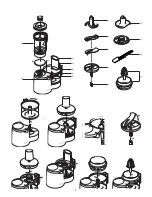
Page 4: ...the cord stowage at the back of the appliance key safety interlock pusher feed tube lid bowl food processor drive on off pulse lever attachments liquidiser knife blade shredding plate slicing plate plate carrier spacer whisk maxi blend canopy spatula Citrus press is an optional accessory and may not be included in your pack to use the food processor 1 Fit the bowl onto the processor base handle to...

Page 5: ...up too small Fill the feed tube fairly full this prevents food from slipping sideways during processing When slicing or shredding food placed upright comes out shorter than food placed horizontally After using a cutting plate there will always be a small amount of waste on the plate or in the food Do not allow food to build up to the underside of the plate empty regularly Push food down the feed t...

Page 6: ... Made in China IMPORTANT INFORMATION FOR CORRECT DISPOSAL OF THE PRODUCT IN ACCORDANCE WITH EC DIRECTIVE 2002 96 EC At the end of its working life the product must not be disposed of as urban waste It must be taken to a special local authority differentiated waste collection centre or to a dealer providing this service Disposing of a household appliance separately avoids possible negative conseque...
Page 7: ... nº 1935 2004 de 27 10 2004 sobre materiais concebidos para estarem em contacto com alimentos antes de utilizar pela primeira vez 1 Retire todas as protecções plásticas incluindo as que cobrem a lâmina de aço Estas deverão ser eliminadas já que se destinam apenas a proteger a lâmina durante o fabrico e o transporte 2 Lave os componentes ver limpeza 3 Enrole o excesso de cabo em redor dos ganchos d...

Page 8: ...semelhante montar o suporte dos discos 1 Fixe o espaçador à extremidade do suporte dos discos 2 Seleccione o prato desejado e coloque o no suporte com o lado de corte virado para cima Localize a extremidade do disco por baixo do aro e pressione a outra extremidade de modo a que rode numa única direcção importante Quando utilizar os pratos de cortar e picar o espaçador deverá estar colocado na sua ...

Page 9: ...ção Enxague com um pano húmido de seguida seque Enrole o excesso de cabo em redor dos ganchos de arrumação do cabo situados na parte de trás do aparelho liquidificador 1 Encha de água quente coloque a tampa com a tampa de enchimento introduzida e depois ligue no interruptor por 20 a 30 segundos 2 Despeje e enxagúe Se ainda estiver sujo utilize uma escova de loiça 3 Seque com um pano e em seguida d...

Page 10: ... únicamente para proteger la cuchilla durante su fabricación y transporte 2 Lave las piezas vea Limpieza 3 Recoja el exceso de cable en el lugar de almacenamiento de la parte trasera del aparato elementos principales enclavamiento de seguridad embutidor tubo de entrada tapa bol mecanismo del robot de cocina palanca de encendido apagado pulsátil accesorios licuadora cuchilla disco troceador disco r...

Page 11: ...os con el embutidor ejerciendo una presión uniforme con la máquina en funcionamiento Para obtener tiras más largas amontone los trozos por ejemplo las zanahorias horizontalmente en el tubo de entrada disco rebanador Si es necesario corte los alimentos antes de introducirlos en el tubo de entrada Quite el corazón de frutas y verduras tales como manzanas y pimientos Coloque los alimentos verticalmen...

Page 12: ...ontinuación aclare Si sigue sucia utilice un cepillo 3 Pase un paño y deje que se seque al aire No deje la licuadora a remojo en agua Y no deje agua dentro otras piezas Límpielas a mano y séquelas completamente Todos los accesorios excepto la licuadora pueden lavarse en la bandeja superior del lavavajillas servicio y atención al consumidor Por razones de seguridad si el cable está dañado debe ser ...

Page 13: ...e nakliyat s ras nda b çaklar korumak üzere tak lm flt r ve at labilir 2 Parçalar y kay n Bknz Temizlik 3 Elektrik kablosunun fazla gelen k sm n cihaz n arka taraf ndaki kablo muhafazas na sar n parçalar emniyet kilidi g da iticisi g da girifli kapak kase tahrik mili açma kapama titreflim kolu ek parçalar sıvılafltırıcı ö ütücü b çak do rama b ça dilimleme b ça b çak taban ara parças ç rp c büyük kar ...

Page 14: ...riflinin üst kenar nda biraz boflluk b rakacak flekilde dizin ve cihaz düzenli bir flekilde çal fl rken g da iticisi ile itin öneriler Taze g dalar kullan n G dalar çok küçük parçalar halinde kesmeyin G da giriflini iyice doldurarak g dalar n yanlardan f rlamas n önleyebilirsiniz Dilimlerken ya da do rarken Cihaza dik olarak itilen g dalar yatay olarak itilenlerden daha k sa ç kar Kesici b çaklar kullan...

Page 15: ...yice kurulay n Sıvılafltırıcı ö ütücü dıflındaki tüm ek parçalar bulaflık makinesinin üst rafında yıkanabilir servis ve müşteri hizmetleri Kablo hasar görürse güvenlik nedeniyle KENWOOD ya da yetkili bir KENWOOD tamircisi tarafından değiştirilmelidir Aşağıdakilerle ilgili yardıma ihtiyacınız olursa cihazınızın kullanımı veya servis veya tamir Cihazınızı satın aldığınız yerle bağlantı kurun Kenwood ta...

Page 16: ...icí hrdlo víko pracovní nádoba pohon kuchyňského strojku páïkovƒ p epínaï on off pulse příslušenství mixér sekací nůž strouhací kotouč plátkovací kotouč unašeč kotoučů vložka šlehač maxi kryt stěrka Lis na citrusové ovoce se dodává na přání a není nutně součástí výbavy Vašeho strojku jak používat kuchyňský strojek 1 Pracovní nádobu nasaďte na podstavec strojku rukojetí dozadu Nechte dosednout a ot...

Page 17: ...e kousky potravin ve svislé poloze Kousky by měly být o něco kratší než plnicí hrdlo Za chodu strojku tlačidlem na obsah rovnoměrně tlačte t ti ip py y Používejte čerstvé suroviny Suroviny nekrájejte na příliš malé kousky Plnicí hrdlo by mělo být dost plné aby suroviny při zpracování neujížděly na stranu Při krájení na plátky nebo strouhání se svisle umístěné kousky zpracují na kratší a vodorovně ...

Page 18: ...vna firmou Kenwood pověřená Potřebujete li poradit ve věcech používání spotřebiče nebo údržby náhradních dílů nebo oprav Obraťte se na obchod kde jste spotřebič zakoupili Zkonstruováno a vyvinuto společností Kenwood ve Velké Británii Vyrobeno v Číně INFORMACE PRO SPRÁVNÉM SEŠROTOVÁNÍ VÝROBKU VE SMYSLU EVROPSKÉ SMÊRNICE 2002 96 Po ukončení doby své životnosti nesmí být výrobek odklizen společně s d...

Page 19: ...szabálynak az elsŒ használat elŒtt 1 Az elsŒ bekapcsolás elŒtt távolítsa el az összes csomagolóanyagot többek között a vágókés pengéjének mıanyag védŒborítóit Ezeket a borítókat el kell dobni hiszen rájuk csak a gyártás és a szállítás közben van szükség 2 Mossa át az egyes részegységeket lásd A készülék tisztítása c fejezetet 3 A hálózati vezeték felesleges részét tekerje a gép hátlapján erre a cé...

Page 20: ... és krém felveréséhez használja A habverŒ egyebek elkészítésére nem alkalmas Tojásfejére felverése elŒtt gyŒzŒdjék meg arról hogy a keverŒedény és a habverŒ tiszta és zsírmentes valamint hogy se a keverŒedényben se a habverŒn nincs tojássárgája maradvány szeletelŒ és reszelŒ lapok mire alkalmasak a különbözŒ vágó lapok szeletelŒ lap alkalmas répa burgonya káposzta uborka cékla cukkíni alma és hagy...

Page 21: ...nni Bizonyos élelmiszerek a mıanyag tartós elszínezŒdését idézhetik elŒ Ez teljesen elfogadható A folyamat nem rongálja a mıanyagot illetve nem befolyásolja az élelmiszerek ízét Töröljük le a mıanyag felületeket egy növényi olajba mártott ruhával ez enyhíti az elszínezŒ hatást hajtómı Törölje le nedves majd száraz ruhával A hálózati csatlakozó vezeték felesleges részét tekerje a készülék hátlapján...

Page 22: ...a 2004 r dotyczącym materiałów przeznaczonych do kontaktu z żywnością p pr rz ze ed d u uż ży yc ci ie em m m ma al la ak ks se er ra a p po o r ra az z p pi ie er rw ws sz zy y 1 Usuń opakowanie urządzenia wraz z plastykowymi ochraniaczami noży Zabezpieczenia te należy wyrzucić gdyż służą one tylko do ochrony ostrzy podczas produkcji i transportu 2 Umyj części oznaczone cleaning do czyszczenia 3 ...

Page 23: ...ająca Pokrój żywność na kawałki tak aby zmieściły się w podajniku Napełnij podajnik i użyj popychacza z odpowiednią siłą gdy malakser pracuje Dłuższe kawałki można włożyć do podajnika pionowo np marchewka tarcza siekająca Jeśli to konieczne pokrój żywność tak aby zmieściła się do podajnika Jabłka i paprykę należy wydrążyć Pokrojoną żywność włóż do podajnika pionowo Ich długość powinna być trochę m...

Page 24: ...j ręcznie i dokładnie wysusz Wszystkie elementy wyposa enia z wyjåtkiem pojemnika do miksowania mogå byç myte w górnym koszu zmywarki automatycznej serwis i obsługa klienta Jeśli sznur uległ uszkodzeniu musi być ze względów bezpieczeństwa wymieniony przez firmę Kenwood lub jej autoryzowany punkt naprawczy Jeśli potrzebujesz pomocy odnośnie użytkowania Twojego malaksera lub serwisu części zamiennyc...

Page 25: ...ствует директиве ЕС 2004 108 EC по электромагнитной совместимости а также норме ЕС 1935 2004 от 27 10 2004 по материалам предназначенным для контакта с пищевыми продуктами ПEРEД ПEРВЫМ ВКЛЮЧEНИEМ 1 Удалите весь упаковочный материал включая пластмассовые чехлы на лезвиях ножа крыльчатки Эти чехлы служат для защиты лезвий только на время изготовления и транспортировки комбайна 2 Вымойте принадлежнос...

Page 26: ...айн на несколько секунд для их смешивания Во время работы машины добавьте через загрузочную трубку жидкую смесь и продолжайте обработку до образования теста имеющего однородную консистенцию и эластичного на ощупь на это уйдет 45 60 секунд Дайте возможность тесту подняться а затем снова замесите его в течение 10 секунд Венчик взбивалка Используется только для взбивания яичных белков и сливок Для др...

Page 27: ...вания Никогда не смешивайте более 1 л для пенистых смесей типа молочных коктейлей это значение должно быть еще меньше Чистка комбайна До начала чистки всегда выключайте машину и вынимайте вилку из розетки Никогда не погружайте в воду силовой блок сетевой шнур или штепсельную вилку Будьте осторожны при обращении с ножом крыльчаткой и режущими пластинами они исключительно остры Некоторые продукты сп...

Page 28: ...ÒÓÂÙ È Ì ÙËÓ Ô ËÁ ÙË 2004 108 Û ÂÙÈÎ Ì ÙËÓ ÏÂÎÙÚÔÌ ÁÓËÙÈÎ Û Ì ÙfiÙËÙ Î È ÙÔÓ Î ÓÔÓÈÛÌfi ÚÈıÌfiÓ 1935 2004 ÙË 27 10 2004 Û ÂÙÈÎ Ì ٠ÏÈÎ Ô ÚÔÔÚ ÔÓÙ È Ó ÚıÔ Ó ÛÂ Â Ê Ì ÙÚfiÊÈÌ ÚÈÓ ÚËÛÈÌÔ ÔÈ ÛÂÙ ÙË Û ÛΠÁÈ ÚÒÙË ÊÔÚ 1 Ê ÈÚ ÛÙ fiÏ Ù ÂÚÈÙ Ï ÁÌ Ù ÙË Û ÛÎÂ Û Û Ì ÂÚÈÏ Ì ÓÔÌ ÓˆÓ Î È ÙˆÓ Ï ÛÙÈÎÒÓ Î Ï ÌÌ ÙˆÓ ÙˆÓ Ï ˆÓ ÎÔ Ù Ù Î Ï ÌÌ Ù ı Ú ÂÈ Ó ÂÙ ÙÔ Ó Î ıÒ Â Ó È ÁÈ Ó ÚÔÛÙ ÙÂ Ô Ó ÙËÓ Ï ÌfiÓÔ Î Ù ÙË È ÚÎÂÈ ÙË Î...

Page 29: ...ÛÎÒÛÂÈ Î È Ó Î Ù Ù ÙË Í Ó ÁÈ 10  ÙÂÚfiÏÂ Ù Ó Â Ù Ú ÃÚËÛÈÌÔ ÔÈ ÛÙ ÙÔÓ ÌfiÓÔ ÁÈ Á Î È ÎÚ Ì Ó Â Ù Ú Â Ó È Î Ù ÏÏËÏÔ ÁÈ ÏÏÂ Û ÓÙ Á µÂ Ȉı Ù fiÙÈ ÙÔ Ì ÔÏ Î È Ô Ó Â Ù Ú ÂÓ Ô Ó ÔÏ ÌÌ Ù fi Ï Ô ÎÚfiÎÔ ÁÔ fiÙ Ó Ó Î Ù ÂÙÂ Û Ú È ÁÒÓ ÛÎÔÈ ÎÔ Ì ÙÔ Î È ÙÚÈ Ì ÙÔ È Ì ÔÚÔ Ó Ó Î ÓÔ Ó ÔÈ Îfi Ù ÛÎÔ ÎÔ Ì ÙÔ Îfi ÂÈ Î ÚfiÙ Ù ÙÂ Ï ÓÔ ÁÁÔ ÚÈ ÎÔÏÔÎ ı ÎÈ ÓÙ ÚÈ ÎÚÂÌÌ È ÛÎÔ ÙÚÈ Ì ÙÔ ÙÚ ÂÈ Ù Ú Î ÚfiÙ Ù ÙÂ Î È ÙÚfiÊÈÌ ÚfiÌÔÈ Ê Ò Ó ...

Page 30: ...Î ı ÚÈÛÌ ÔÙ ÌËÓ Ê ÛÂÙ ÙË Û ÛΠÙÔ Î ÏÒ ÈÔ ÙÔ ÊÈ Ó Ú Â ÚÔÛ ÂÙ fiÙ Ó È ÓÂÙ ÙÈ ÏÂ Â Î È ÙÔ ÛÎÔ ÎÔ Â Ó È ÂÍ ÈÚÂÙÈÎ ÎÔÊÙÂÚ ªÂÚÈÎ ÙÚfiÊÈÌ Ì ÔÚÂ Ó ÚˆÌ Ù ÛÔ Ó ÙÔ Ï ÛÙÈÎfi Ùfi Â Ó È fiÏ Ù Ê ÛÈÔÏÔÁÈÎfi ÂÓ ı  ËÚ ÛÂÈ ÙÔ Ï ÛÙÈÎfi ÙË Á ÛË ÙÔ Ê ÁËÙÔ Û Ô Î ı ÚÈÛÌ ÌÂ Ó Ó ÂÌ ÔÙÈÛÌ ÓÔ ÛÂ Ê ÙÈÎfi Ï È ÔËı ÂÈ ÛÙËÓ Ê ÚÂÛË ÙÔ ÚÒÌ ÙÔ ÂÓÙÚÈÎ ÌÔÓ ÎÔ ÛÙ ÌÂ Ó ÁÚfi Ó Î È ÛÙÂÁÓÒÛÙÂ Ï ÍÙ ÙÔ Î ÏÒ ÈÔ Ô ÂÚÈÛÛ ÂÈ ÛÙÔÓ ÔıËΠÙÈÎfi ÒÚÔ...

Page 31: ... I D l L K I W U ß M U N U º O O q K v d ô K v s º U W B u Ê B O U W Ë U W F L ö w U W K n º K p J N d w π V ß b t _ ß U F K I W U º ö W u ß D W D O O W N E K Ë d Ø e Å O U W F L b s D O O W N E K K B u K v º U b u ß ª b  π N U Ë d B O U W Ë ß b _ e B K w U L π d c Í Æ L X A d π N U M t B L O r Ë D u d d o o w n e K w L L K J W L b Å M l w B O s F K u U U W u Ø O H O W ª K h B O W s L M Z º V u O...

Page 32: ...U q B H O W 2 I w B H O W L d u W r Ø N U u K v U q O Y J u Ê N W I D O l π U Á _ K v Ø e b È N U U B H O W ß H q ù U Ë G j D d ü î d w u F t ß u X L U Î Ø U Ê ù π U Á Å O U Î U  M b ß F L U Å H U z A d Ë I D l D u w Q Ê L U b π V Ê X u N U W d U q Ø O H O W ß ª b  ŠH U z I D O l Å H O W I D l D u w Æ D l D F U  v Æ D l M U ß V u K I O r K v _ u v N U t I d U Î r œ l D F U  v _ ß H q u ß D W ...

Page 33: ...F W u K I O r D U Ë U U Ë b A G O q N U b œ D F U  K W A G O q ô I U A G O q L I D l L K I U N U º O O q H d º J O s Å H O W I D O l D u w Å H O W A d U q B H O W U b î H U Æ W D U î K j K F I W U W º D W B U K O L u Ê w U W î O U t Ë Æ b ô J u Ê e Ë œ l N U ß F L U N U b œ D F U  1 l u U D U u Æ U b π N U d O U Î d Ø O V L I i u R î d π N U î H i u U r t U J U  w J U t S œ t U π U Á I U º U W ...

Page 34: ...Head Office Address Kenwood Limited New Lane Havant Hampshire PO9 2NH UK www kenwoodworld com Designed and engineered by Kenwood in the UK Made in China 54123 2 ...

Reviews: