background image

3

 EN

Preparations

Read Instructions – 

All the safety and operating instructions

should be read before the product is operated.

Retain Instructions – 

The safety and operating instructions

should be retained for future reference.

Heed Warnings – 

All warnings on the product and in the

operating instructions should be adhered to.

Follow Instructions – 

All operating and use instructions

should be followed.

1. Cleaning

 – Unplug this product from the wall outlet be-

fore cleaning. Do not use liquid cleaners or aerosol cleaners.
Use a damp cloth for cleaning.

2. Attachments

  – Do not use attachments not recom-

mended by the product manufacturer as they may cause
hazards.

3. Water and Moisture

 – This product shall not be exposed

to dripping and splashing - for example, near a bath tub, wash
bowl, kitchen sink, or laundry tub; in a wet basement; or near
a swimming pool; and the like. Do not place an object con-
taining liquid, such as a flower vase, on the appliance.

4. Accessories

 – Do not place this product on an unstable

cart, stand, tripod, bracket, or table. The product may fall,
causing serious injury to a child or adult, and serious damage
to the product. Use only with a cart, stand, tripod, bracket, or
table recommended by the manufacturer. Any mounting of
the product should follow the manufacturer’s instructions,
and should use a mounting accessory recom-
mended by the manufacturer.
A product and cart combination should be
moved with care. Quick stops, excessive force,
and uneven surfaces may cause the product and
cart combination to overturn.

5. Ventilation

 – Slots and openings in the cabinet are pro-

vided for ventilation and to ensure reliable operation of the
product and to protect it from overheating, and these open-
ings must not be blocked or covered. The openings should
never be blocked by placing the product on a bed, sofa, rug,
or other similar surface. This product should not be placed in
a built-in installation such as a bookcase or rack unless proper
ventilation is provided or the manufacturer’s instructions have
been adhered to.

6. Power Sources

 – This product should be operated only

from the type of power source indicated on the product. If
you are not sure of the type of power supply to your home,
consult your product dealer or local power company.

7.

CAUTION

    - Polarization

  – This product may be

equipped with a polarized alternating-current line plug (a plug
having one blade wider than the other). This plug will fit into
the power outlet only one way. This is a safety feature. If you
are unable to insert the plug fully into the outlet, try reversing
the plug. If the plug should still fail to fit, contact your electri-
cian to replace your obsolete outlet. Do not defeat the safety
purpose of the polarized plug.

8. Power Cord Protection

 – Power-supply cords should be

routed so that they are not likely to be walked on or pinched
by items placed upon or against them, paying particular at-
tention to cords at plugs, convenience receptacles, and the
point where they exit from the product.

9. Lightning

 – For added protection for this product during

a lightning storm, or when it is left unattended and unused
for long periods of time, unplug it from the wall outlet and
disconnect the antenna or cable system. This will prevent
damage to the product due to lightning and power-line surges.

10.Overloading

 – Do not overload wall outlets, extension

cords, or integral convenience receptacles as this can result
in a risk of fire or electric shock.

11.Object and Liquid Entry

 – Never push objects of any

kind into this product through openings as they may touch
dangerous voltage points or short-out parts that could result
in a fire or electric shock. Never spill liquid of any kind on the
product.

12.Servicing

 – Do not attempt to service this product your-

self as opening or removing covers may expose you to dan-
gerous voltage or other hazards. Refer all servicing to quali-
fied service personnel.

13.Damage Requiring Service

 – Unplug this product from

the wall outlet and refer servicing to qualified service person-
nel under the following conditions:

a)

When the power-supply cord or plug is damaged,

b)

If liquid has been spilled, or objects have fallen into
the product,

c)

If the product has been exposed to rain or water,

d)

If the product does not operate normally by following
the operating instructions.

e)

If the product has been dropped or damaged in any
way, and

f)

When the product exhibits a distinct change in per-
formance – this indicates a need for service.

g)

If an abnormal smell or smoke is detected.

14.Replacement Parts

 – When replacement parts are re-

quired, be sure the service technician has used replacement
parts specified by the manufacturer or have the same char-
acteristics as the original part. Unauthorized substitutions may
result in fire, electric shock, or other hazards.

15.Safety Check

 – Upon completion of any service or re-

pairs to this product, ask the service technician to perform
safety checks to determine that the product is in proper op-
erating condition.

16.Wall or Ceiling Mounting

  – This product should be

mounted to a wall or ceiling only as recommended by the
manufacturer.

17.Heat

 – This product should be situated away from heat

sources such as radiators, heat registers, stoves, or other
products that produce heat. Do not place a flaming object,
such as a candle or lantern, or near the product.

18.Power Lines

 – An outside antenna system should not be

located in the vicinity of overhead power lines or other elec-
tric light or power circuits, or where it can fall into such power
lines or circuits. When installing an outside antenna system,
extreme care should be taken to keep from touching such
power lines or circuits as contact with them might be fatal.

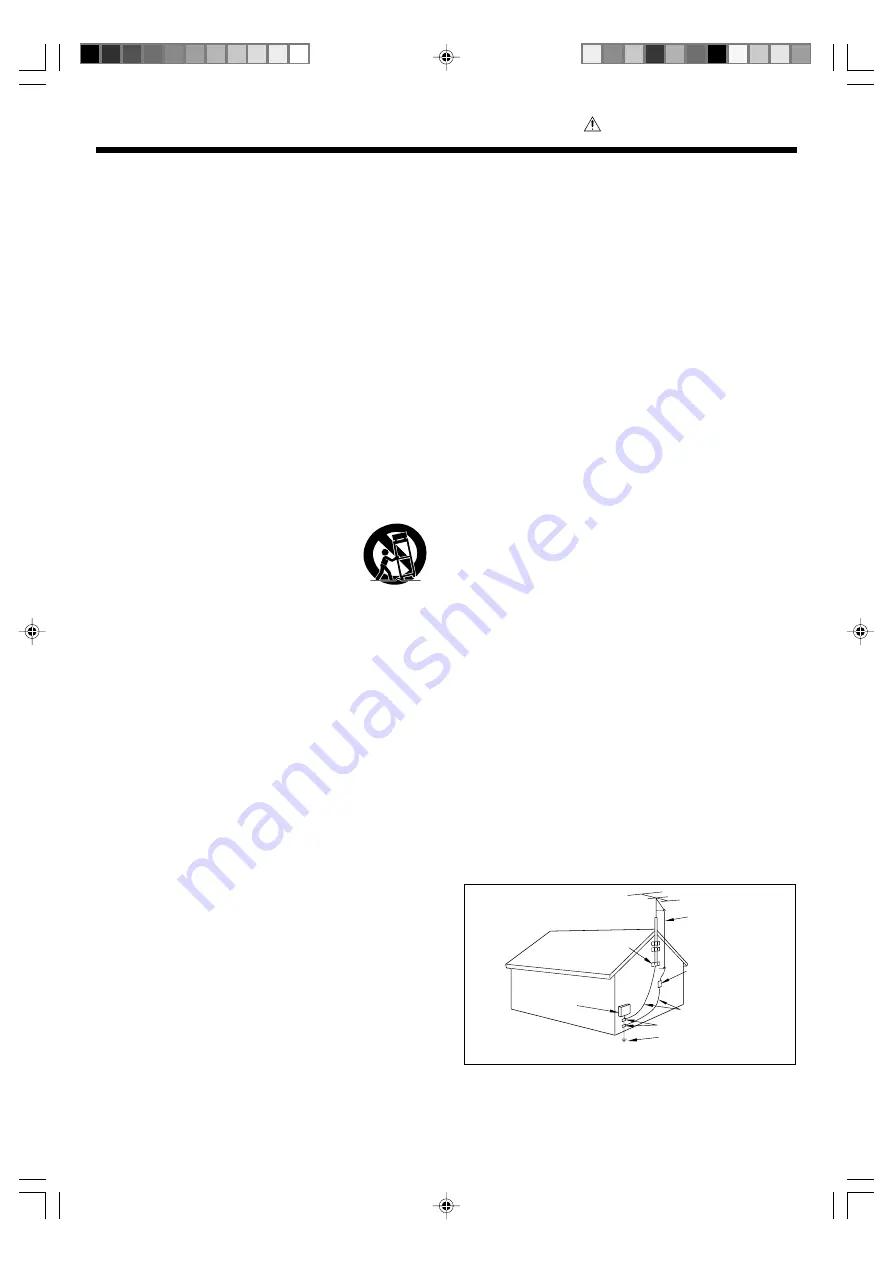
19.Outdoor Antenna Grounding

 – If an outside antenna or

cable system is connected to the product, be sure the an-
tenna or cable system is grounded so as to provide some
protection against voltage surges and built-up static charges.
Article 810 of the National Electrical Code, ANSI/NFPA 70,
provides information with regard to proper grounding of the
mast and supporting structure, grounding of the lead-in wire
to an antenna discharge unit, size of grounding conductors,
location of antenna-discharge unit, connection to grounding
electrodes, and requirements for the grounding electrode.

EXAMPLE OF ANTENNA

GROUNDING AS PER NATIONAL

ELECTRICAL CODE

POWER SERVICE GROUNDING
ELECTRODE SYSTEM
(NEC ART 250, PART H)

NEC – NATIONAL ELECTRICAL CODE

GROUNDING CONDUCTORS
(NEC SECTION 810-21)

ANTENNA
LEAD IN WIRE

ANTENNA
DISCHARGE UNIT
(NEC SECTION 810-20)

GROUND CLAMP

ELECTRIC
SERVICE
EQUIPMENT

GROUND
CLAMPS

Notes:
1. Item 7 is not required except for grounded or polarized

equipment.

2. Item 19 complies with UL in the U.S.A.

IMPORTANT SAFETY INSTRUCTIONS

Caution : Read this page carefully to

ensure safe operation.

*5634/01-15/EN

06.3.24, 3:27 PM

3

Summary of Contents for DVF-3300

Page 1: ...DVF 3300 DVD VCD CD PLAYER INSTRUCTION MANUAL B60 5634 18 02 K E X OC 06 01 ...

Page 2: ...ation CAUTION RISK OF ELECTRIC SHOCK DO NOT OPEN The marking of products using lasers For countries other than U S A and U S Military Caution Read this page carefully to ensure safe operation U S A Canada and US Military AC 110 240 V Europe AC 230 V only Australia AC 240 V only The marking this product has been classified as Class 1 It means that there is no danger of hazardous radiation outside t...

Page 3: ...t overload wall outlets extension cords or integral convenience receptacles as this can result in a risk of fire or electric shock 11 Object and Liquid Entry Never push objects of any kind into this product through openings as they may touch dangerous voltage points or short out parts that could result in a fire or electric shock Never spill liquid of any kind on the product 12 Servicing Do not at...

Page 4: ... instructions However there is no guarantee that interfer ence will not occur in a particular installation If this equipment does cause harmful interference to radio or television reception which can be determined by turning the equipment off and on the user is encouraged to try to correct the interference by one or more of the following mea sures Reorient or relocate the receiving antenna Increas...

Page 5: ...epeat play 25 Program play 26 Movie disc playback features 27 Select Audio Language 28 Select the Audio channel 28 Using Marker 28 Select Camera angle 29 Select Subtitle Language 29 Zoom function 30 3D Surround 30 Time Search 30 Music disc playback features 31 Using the TV screen to start playback 31 Playback from desired track 31 3D Surround 31 To display the ID3 tag 31 Random play 31 Photo files...

Page 6: ...de 1 layer Approx 75 min 1 side 2 layers Approx 82 min 2 sides 1 layer Approx 150 min 2 sides 2 layers Approx 133 min 1 side 1 layer Approx 242 min 1 side 2 layers Approx 266 min 2 sides 1 layer Approx 484 min 2 sides 2 layers DVD VIDEO DVD R RW DVD R RW CD CD R CD RW Logo mark on disc Playable Disc 8cm 12cm 8cm Max 20 min VCD SVCD One side only 12cm 8cm 12cm One side only Max 74 min In case of an...

Page 7: ...y sometimes unable to be played on this player due to certain restrictions Regioncodesintheworld The DVD players are given a region code according to the country or area it is marketed as shown in the follow ing map Professional use disc Air Line cabin service Indicates the region code where the disc can be played Number of voice languages recorded with the audio function The number in the icon in...

Page 8: ... including DivX 6 with standard playback of DivX media files GuidanceofFiles Creating media for playing back on this equipment Compressing MP3 WMA Please set up the transfer bit rate setting for the compression software when compressing MP3 WMA files as follow MP3 Files 128kbps recommended 8 320 kbps WMA Files 128kbps recommended 32 320 kbps This unit is compatible with 32 kHz 44 1 kHz recommended...

Page 9: ...be closed or finalized will not be played back correctly with this equipment There are cases where the folder names and file names will not be displayed correctly depending on the software used to save them Do not store files or folders other than playable files on media to be played back with this equipment It is recommended that ten or less sessions are stored when recording MP3 WMA files onto a...

Page 10: ...e TV type Please confirm the type of your TV Check the video format of the TV to be used Checking the Video Format When the video formats are different Try playing the disc If the video formats of the disc and TV do not match the played video may be black and white or become as shown below Top and bottom areas are dark Top and bottom edges are not displayed Picture turbulence due to sync unmatchin...

Page 11: ...F switch to OFF Maintenance of the unit Do not use contact cleaners because it could cause a malfunction Be specially careful not to use contact cleaners containing oil for they may deform the plastic component During playback the disc rotates at high speed in the player Therefore to avoid danger never use a cracked or deformed disc or a disc repaired with tape or adhesive agent Please do not use ...

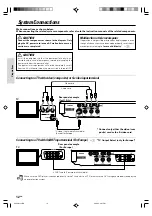
Page 12: ...ially available Note Note Make sure the DVD player is connected directly to the TV and not to a VCR otherwise the DVD image could be distorted by the copy protection system Connect only either the video com posite cord or the S video cord Rear panel example For Europe S video Commercially available Except for Europe TV Output Select only for Europe Video cord CAUTION Connect the components as show...

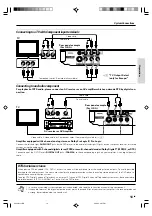
Page 13: ...by Pro Logic II Pro Logic Connect the left and right AUDIO OUT jacks on the DVD player to the audio left and right IN jacks on your amplifier receiver or stereo system using the audio cords Amplifierequippedwith2 channeldigitalstereo PCM oramulti channeldecoder DolbyDigital MPEG2 orDTS Connect one of the DVD Player s DIGITAL OUT jacks COAXIAL to the corresponding in jack on your amplifier Use a di...

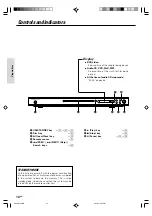
Page 14: ...called standby mode Under the condition the system can be turned ON by the remote control unit DVD video Elapsed time of the chapter being played Audio CD VCD DivX MP3 Elapsed time of the track or file being played At the time of audio CD stop mode 00 00 displayed 1 ON STANDBY key 2 Disc tray 3 0 Open Close key 4 Remote sensor 5 4 PREV NEXT Skip Search keys 6 3 Play key 7 7 Stop key 8 8 Pause key ...

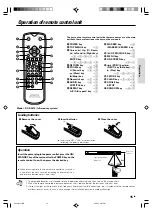
Page 15: ...he polarity indications Operation Operating range approx Remote sensor 1 The provided batteries are intended for use in operation checking and their service life may be short 2 When the remote controllable distance becomes short replace both of the batteries with new ones 3 If direct sunlight or the light of a high frequency fluorescent lamp inverter type etc is incident to the remote sensor malfu...

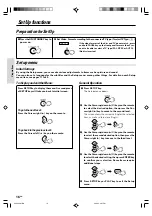
Page 16: ...econdpress of SETUP key will take you back to initial screen To go to the next level Press the Cursor right 3 key on the remote To go back to the previous level Press the Cursor left 2 key on the remote General Operation 1 Press SETUP key The Setup menu appears 2 UsetheCursorup down 5 keysontheremote to select the desired option then press the Cur sor right 3 key to move to the second level Thescr...

Page 17: ...uts off the portions that do not fit Progressive Scan If you are using the COMPONENT VIDEO jacks but are connecting the DVD Player to a standard analog televi sion set Progressive Scan to Off If you are using the COMPONENT VIDEO jacks for connection to a TV or monitor that is compatible with a progressive scan signal set Progressive Scan to On Once the setting for progressive scan output is entere...

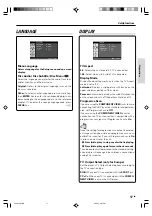
Page 18: ... AUDIO EachDVDdischasavarietyofaudiooutputoptions Set the player s AUDIO options according to the type of audio system you use Dolby Digital DTS MPEG Bitstream Select Bitstream ifyouconnecttheDVD Player s DIGITAL OUT jack to an amplifier or other equipment with a Dolby Digital DTS or MPEG de coder PCM for Dolby Digital MPEG Select when con nected to a two channel digital stereo amplifier DVDs enco...

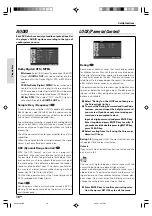
Page 19: ...it again to verify 4 Press SETUP key to exit the menu If you forget Password If you forget your password you can clear using the fol lowing steps 1 Press SETUP key to display the Setup menu 2 Inputthe6 digitnumber 210499 andthepass word is cleared 3 Enter a new code as described above Area Code Enter the code of the country area whose standards were used to rate the DVD video disc based on the lis...

Page 20: ...destination is the scene to be played the contents will be played Returning When several menus scenes can be selected in each level screen switching is possible with the keys NEXT and 4 PREV DivX R VOD You can display the DivX DRM Digital Rights Management Registration code for your unit only The Registration code is used for VOD Video On Demand service agent You can purchase or rent an encrypt mo...

Page 21: ...Language Code Language Code Singhalese 8373 Slovak 8375 Slovenian 8376 Somali 8379 Spanish 6983 Sudanese 8385 Swahili 8387 Swedish 8386 Tagalog 8476 Tajik 8471 Tamil 8465 Tatar 8484 Telugu 8469 Thai 8472 Tibetan 6679 Tigrinya 8473 Tonga 8479 Turkish 8482 Turkmen 8475 Twi 8487 Ukrainian 8575 Urdu 8582 Uzbek 8590 Vietnamese 8673 Volapük 8679 Welsh 6789 Wolof 8779 Xhosa 8872 Yiddish 7473 Yoruba 8979 ...

Page 22: ...emorized the scene is automatically recalled If you don t want to use the Last Scene Memory press the STOP key during stop This player does not memorize the scene of a disc if you switch off the player before commencing to play the disc Note Note Example On Screen Display during playing DVD video Title Number Chapter Number Time search Audio language and Digital Audio Output mode Subtitle language...

Page 23: ...mum limitations of the media A certain amount of time is required for the player to confirm the media on which DivX MP3 WMA JPEG files have been recorded before playback will commence Press Cursor up down 5 keys on the remote to select desired track or file then press the PLAY key or the ENTER key to start playback Press and hold Cursor up down 5 keys to go to the next previous page or press MENU ...

Page 24: ...earching Press the 3 key at any time to resume normal playback At the time of DVD video DivX playback 1 key or 4 key 2 key or 4 key 3 key or 4key 4 key or 4key 4 To skip backward To skip forward 4 To search backward FR To search forward FF MAIN UNIT REMOTE Discplaybackfeatures The Chapter feature won t work if the disc isn t for matted with separate chapters Note Note 1 During playback press 4 or ...

Page 25: ...ess the key switches the REPEAT mode At the time of DVD video playback 1 Chapter 2 Title 3 Off Repeat off 1 Press the A B key on the remote when you want to choose a scene sound as the beginning point 2 Press the A B key again to choose a scene sound as the end point To cancel repeat playback press the REPEAT key and select Off P B C on mode of VCD the Repeat play function does not work A BRepeatp...

Page 26: ...it mode Press P MODE key again 3 Select a specific track on the List by Press Cur sor up down 5 keys then press ENTER key to place the selected track on the Program list E To repeat program play During program playback press the REPEAT key on the remote Each press the key switches the mode 1 TRACK repeats the current track or file 2 ALL repeats all the tracks files on programmed list 3 Goes off re...

Page 27: ...ess the key the picture advances one frame Press the 3 key to resume normal playback REMOTE At the time of DVD video playback 1 Press ON SCREEN key 2 Press the Cursor up down 5 keys on the re mote to select the title or chapter icon 3 Press the numeric keys then press the 3 play key Example To select track No 23 23 Numeric keys REMOTE At the time of VCD playback Press the numeric keys then press t...

Page 28: ...nguage is switched each time the AUDIO key is pressed Using Marker Themarker featureletsyoumarkapointonthediscthat you can go to quickly You can store up to 9 marker points Create the Marker 1 When you reach the scene you want to mark press MARKER key 2 Press the Cursor right left 2 3 keys on the re mote to select a marker number that you want to recall or clear To recall or clear a marked scene 1...

Page 29: ...anguage while you re watching a disc but only if the disc was created with subtitles SelectSubtitleLanguage During playback press the SUBTITLE key on the remote 1 The subtitle feature only works if the disc was cre ated with multiple subtitle tracks 2 The subtitle menu of the disc appears in some discs 3 The subtitle file of the DivX file is displayed only srt txt smi ssa and sub 4 If there is no ...

Page 30: ...reo speakers 1 During playback press the ON SCREEN key on the remote 3 Press Cursor left right 2 3 keys on the remote to select 3D SUR 2 Press Cursor up down 5 keys on the remote to select the sound option The sound option will be highlighted Sound icon To turn off the 3D Surround effect select Normal TimeSearch To start playing at any chosen time on the disc 1 During playback press the ON SCREEN ...

Page 31: ... tag Press the ON SCREEN key on the remote to dis play the ID3 tag Song Artist Album Comment and Genre display ap pears on the TV screen If there is no information No ID3 Tag Info appear on the display Each press the key switches the mode Randomplay The tracks of the disc are played in random order The Random Play display appears on the TV screen During playback press the RANDOM key on the remote ...

Page 32: ...ise or counter clockwise 2 Press the Cursor 2 3 5 keys on the remote to move through the zoomed picture Tohidethemenubar Press the RETURN key on the remote to hide the menu bar Menu bar Switching between display and no display is done each time the RETURN key is pressed Hide Slideshow 1 Insert a disc and close the tray The Slide show function can be used to switch photo images automatically from o...

Page 33: ...he TV is not turned on The connection cords are not properly con nected The picture is slightly disrupted during fast forward and fast reverse operations The audio output cords are not properly con nected The volume control of the TV or amplifier is not adjusted properly The player is in a special playback mode Setting to progressive mode has been done for a TV not compatible with progressive mode...

Page 34: ...ut the 6 digits number 210499 and the password is cleared 3 Enter a new code Use a DVD disc containing the recording of the selected voice or subtitle language Press SUBTITLE or the AUDIO key on the remote and select the language Select at the menu screen of the disc Select disc menu language Menu playback is available only with VCD discs recorded with P B C Playback will not start even after a ti...

Page 35: ...T AND MAY CAUSE ARTI FACTSTOBEDISPLAYEDINTHEPICTURE INCASEOF 525 OR 625 PROGRESSIVE SCAN PICTURE PROB LEMS ITISRECOMMENDEDTHATTHEUSERSWITCH THE CONNECTION TO THE STANDARD DEFINITION OUTPUT IFTHEREAREQUESTIONSREGARDINGOUR TV SET COMPATIBILITY WITH THIS MODEL 525P AND 625P DVD PLAYER PLEASE CONTACT OUR CUS TOMER SERVICE CENTER DTS and DTS Digital Out are reg istered trademarks of Digital Theater Sys...

Page 36: ...t level 1 Vp p 75 Ω S video output level Except for Europe Y signal 1 Vp p 75 Ω C signal NTSC 0 286 Vp p 75 Ω PAL 0 300 Vp p 75 Ω Component Video output level Y signal 1 Vp p 75 Ω CB signal 0 7 Vp p 75 Ω CR signal 0 7 Vp p 75 Ω RGB output level SCART For Europe 0 7 Vp p 75 Ω Horizontal resolution More than 500 lines Video signal to noise ratio More than 68 dB General Power consumption 8 W Dimensio...

Reviews: