68
68
69
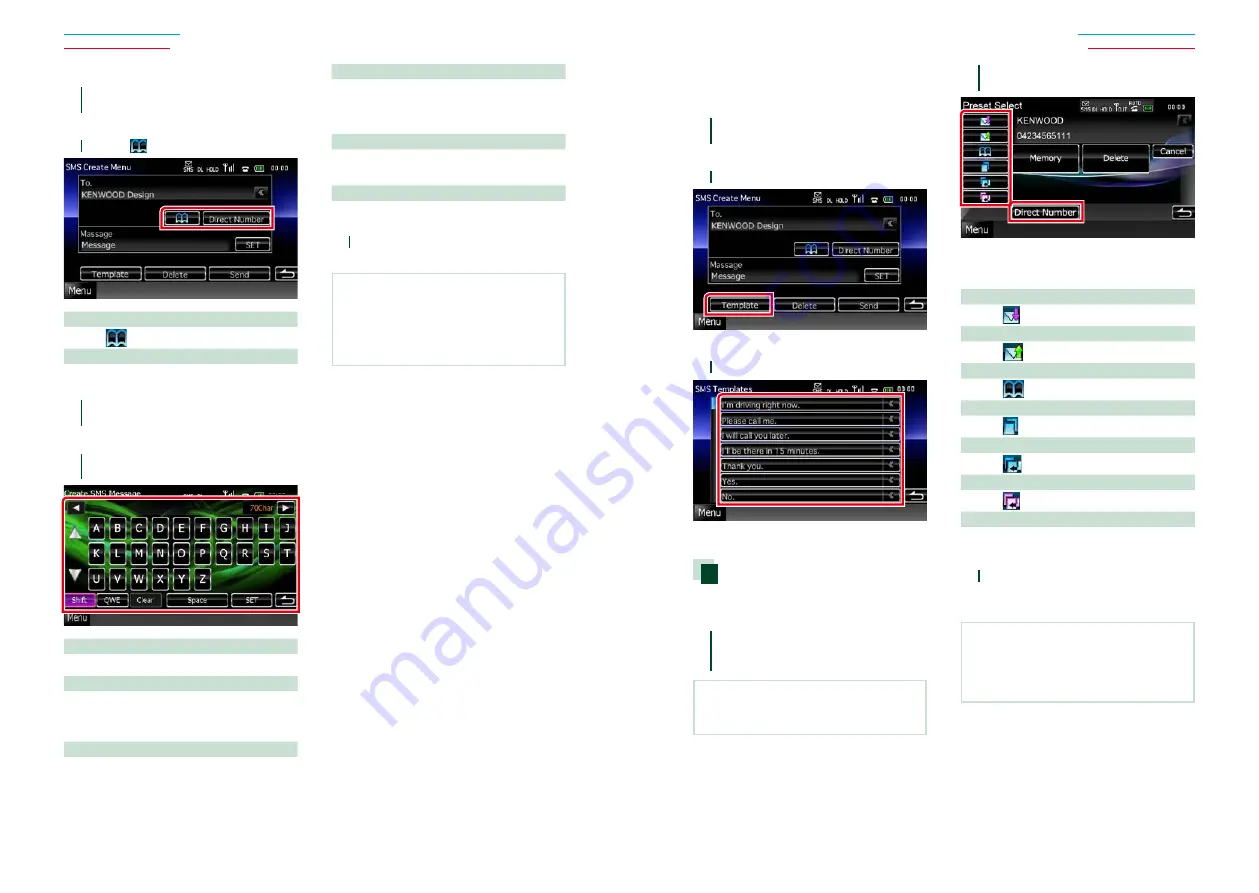
Creating a new message
1
Touch [Create Message] in the SMS
Select screen.
SMS Create Menu screen appears.
2
Touch [
] or [Direct Number].
Select from the phonebook
Touch [
].
Enter the phone number
Touch [Direct Number].
3
Touch [SET] of [Message] in the SMS
Create Menu screen.
Create SMS Message screen appears.
4
Enter a message using keys and touch
[SET].
Moves the cursor
Use [
2
] [
3
].
Switches the keyboard layout
Use [
5
] [
∞
]. The layout changes in the
following sequence; Alphabet, numbers, local
language.
Toggles between uppercase and lowercase
Touch [Shift].
Changes the layout of the character keys
[ABC]
: Alphabetical layout
[QWE]
: Qwerty layout
[ALT]
: Alternate key
Erases the entered character
Touch [Clear]. To erase all the input characters,
touch for 2 seconds.
Enters a space
Touch [Space] at desired position.
5
Touch [Send].
The message is sent.
NOTE
• [Delete] appears only when a draft message
is being edited. Touching [Delete] deletes the
message. After you touch [Delete], a confirmation
message appears. Follow the message and
complete the operation.
Using templates
You can create a message easily by selecting
the desired sentence from the template list.
1
Touch [Create Message] in the SMS
Select screen.
SMS Create Menu screen appears.
2
Touch [Template].
Template list screen appears.
3
Touch the desired template.
Selected template is entered.
Phone number preset
You can register frequently used phone
numbers to this unit.
1
Touch [Preset 1], [Preset 2], or
[Preset 3] for 2 seconds in the Hands
Free screen.
NOTE
• When there is no preset number, touching the
key momentarily moves to the step 2.
2
Touch desired key and enter the
number you want to register.
See the table below for explanations for
each key.
Register from received SMS messages
Touch [
].
Register from sent SMS messages
Touch [
].
Register from phonebook
Touch [
].
Register from outgoing calls list
Touch [
].
Register from incoming call list
Touch [
].
Register from missed calls list
Touch [
].
Enter phone numbers
Touch [Direct Number].
3
Touch [Memory].
Entered number is registered to the
preset number you selected.
NOTE
• Touching [Delete] deletes the currently displayed
number. After you touch [Delete], a confirmation
message appears. Follow the message and
complete the operation.
Summary of Contents for DNX4310DAB
Page 55: ......


