background image

English  

ñ


29

If a connectable Bluetooth device is not displayed, 
touch [Search] and do the pairing of the devices.

•  “iPod connection setup” also appears when the unit 

is reset. 

•  The setting of “iPod connection setup” is just for the 

unit and regardless of the account.


Ñ

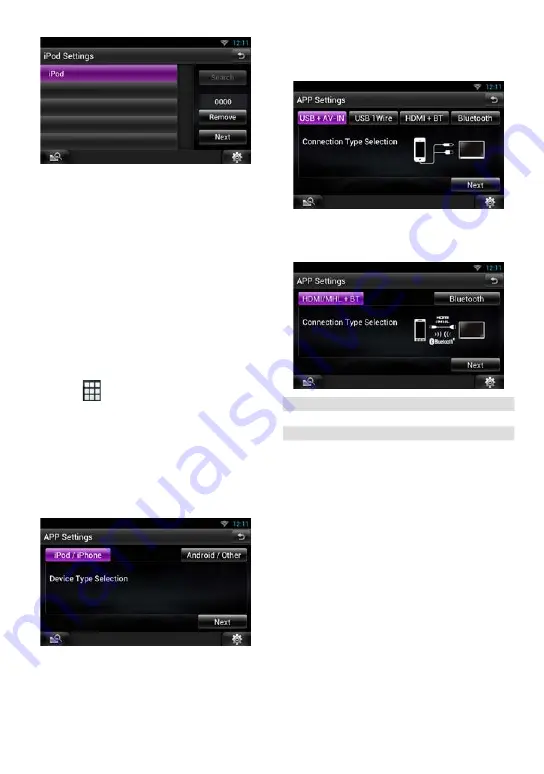
Application link setup

When you first select Apps as a source, the setting 
screen for the connection with the device installed 
the apps will appear.

Press the <HOME> button twice to the 
Source launcher panel.

Touch [ 

 ] in the Source launcher 

panel.

Touch [APPS].

Application link setup screen appears.

Touch [CHANGE].

Select the device installed the apps.

Select the way to connect the device with 
this unit.


When selecting [iPod/iPhone]

For the setting items refer to 

iPod/iPhone 

connection setup (P.28)

.


When selecting [Android/Other]

HDMI/MHL + BT

Select when connecting with KCA-MH100.

Bluetooth

Select when connecting via Bluetooth only.

Touch [Next].

Confirmation screen appears.

Touch [Done].


NOTE

•  For the details of the necessary cable and adapter 

to connect with iPod/iPhone and Android, refer to


iPod/iPhone connection and setting (P.27)


and 

Android connection (P.27)

.

Summary of Contents for DNN9710BT

Page 1: ... NAVEGACIÓN CONECTADO Guía de inicio rápido Take the time to read through this instruction manual Familiarity with installation and operation procedures will help you obtain the best performance from your new GPS Navigation System For your records Record the serial number found on the back of the unit in the spaces designated on the warranty card and in the space provided below Refer to the model ...

Page 2: ...reference NOTE The panels shown in this guide are examples used to provide clear explanations of the operations For this reason they may be different from the actual panels In operation procedures bracket shape indicates the key or button you should control indicates the name of panel buttons indicates the name of touch keys About The Quick Start Guide 2 Precautions 3 Safety Precautions and Import...

Page 3: ...and wait for the condensation to evaporate If the unit still does not operate normally after a while consult your Kenwood dealer Ñ Ñ Precautions on handling discs Do not touch the recording surface of the disc Do not stick tape etc on the disc or use a disc with tape stuck on it Do not use disc type accessories Clean from the center of the disc and move outward When removing discs from this unit p...

Page 4: ...2 Fig 1 Fig 2 Ñ Ñ Cleaning The Unit If the faceplate of this unit is stained wipe it with a dry soft cloth such as a silicon cloth If the faceplate is stained badly wipe the stain off with a cloth moistened with neutral cleaner then wipe it again with a clean soft dry cloth CAUTION Applying spray cleaner directly to the unit may affect its mechanical parts Wiping the faceplate with a hard cloth or...

Page 5: ...re Using the navigation system at extreme temperatures can lead to malfunction or damage Also note that the unit can be damaged by strong vibration by metal objects or by water getting inside the unit 2CAUTIONS Failure to avoid the following potentially hazardous situations may result in injury or property damage The navigation system is designed to provide you with route suggestions It does not r...

Page 6: ...enjoy music and video in a smartphone Wi Fi connected by Kenwood Wireless Link Ñ Ñ 4G 3G Dongle DNN991HD Connect to the Internet directly with 4G 3G Dongle The Internet device like smartphone is not necessary Ñ Ñ About the account To use internet services via this system you need to create an account in the Route Collector site In addition to the owner account you can register up to four user acco...

Page 7: ...de Wi Fi to ON 3 Select the Wi Fi access point to register from the list 4 Enter the Password 5 Touch Connect After setting press the 6 button Mobile Network settings DNN991HD Set the direct Internet connection with 4G 3G Dongle 1 Touch Mobile Network settings 2 Touch Mobile Network configuration 3 Enter the network information 4 Touch Save 5 Touch Mobile Network After setting press the 6 button D...

Page 8: ...ctor site 1 Touch Create Account 2 Enter account information You cannot register an account which has already been used Register another account name 3 Touch OK The account is temporarily registered in the Route Collector site 4 Activate the account A confirmation mail is sent to the registered mail address Open the indicated URL to complete account registration Set Owner Account 1 Touch Set Owner...

Page 9: ...oller in a place where it will not move during braking or other operations A dangerous situation could result if the remote controller falls down and gets wedged under the pedals while driving Do not leave the battery near fire or under direct sunlight A fire explosion or excessive heat generation may result Do not recharge short break up or heat the battery or place it in an open fire Such action...

Page 10: ... screen Pressing for 1 second switches AV out sources 6 HOME Displays the Home screen P 12 Pressing for 1 second turns the power off When the power off turns the power on No Name Motion 7 6 Back Return to the previously viewed screen Pressing for 1 second displays the Hands Free screen Instruction Manual P 122 8 G Eject Ejects the disc When the panel is opened pressing closes the panel and pressin...

Page 11: ...to display the quick menu The content of the menu are as follows Touch to turn on or off the external device power supply Displays the SETUP Menu screen Displays the Audio Control Menu screen Displays the control screen of current source Icon feature differs depending on the source RETURN Returns to previous screen Ñ Ñ List screen There are some common function keys in the list screens of most sou...

Page 12: ...o display the Home screen 2Flick the screen left or right to select the Service panel Media panel Source launcher panel or Network contents panel 1 Service panel Weather widget Displays the weather forecast for the selected region Network widget Displays the schedule SNS or RSS 2 Media panel Now playing Displays the title of the song being played or the name of the station you are listening to and...

Page 13: ...l 1 Touch and hold the icon 2 Drag the icon to the desired position or Recycle Bin Adding of a shortcut icon to Source launcher panel 1 Touch in Source launcher panel 2 Touching the icon continuously to display the Source launcher panel screen 3 Drag the icon to an empty space How to Use the Navigation System 1Press the NAV button to display the navigation screen 2Operate the desired function from...

Page 14: ... with a magenta line As you travel your navigation system guides you to your destination with voice prompts arrows on the map and directions at the top of the map If you depart from the original route your navigation system recalculates the route 1 2 3 4 5 6 8 9 7 1 Views the Next Turn page or the junction view page when available 2 Views the Turn List page 3 Views the Where Am I page 4 Stops the ...

Page 15: ...el and select Software Updates Download 3 Read and accept the terms of the Software License Agreement 4 Follow the instructions on the Web site to complete the installation of the software update Updating maps You can purchase updated map data from Garmin or ask your Kenwood dealer or Kenwood service center for details 1 Go to www garmin com Kenwood 2 Select Order Map Updates for your Kenwood unit...

Page 16: ...nnects the device E F Searches the previous next content E F or move the cursor in the center bar Fast forwards or Fast backwards Disc media CD USB device SD card only Repeats current content Plays all contents in random order NOTE For other operations refer to the Instruction Manual If desired key is not displayed in the multi function bar touch the to switch the menu 3Search the track file you w...

Page 17: ...source control screen see How to Play Music P 15 However searching by category link album artwork is not available How to Listen to the Radio HD Radio tuner SiriusXM HD Radio tuner SiriusXM only by the DNN991HD 1Press the HOME button twice to the Source launcher panel 2Touch in the Source launcher panel 3Touch TUNER HD Radio or SiriusXM The unit switches to the radio HD Radio tuner SiriusXM sold s...

Page 18: ... list in the Searched Device List screen 8 Enter PIN code form the cell phone Registering is completed The PIN code is set to 0000 as default 2Connect your cell phone to the unit 1 Touch the device name you want to connect in the Bluetooth SETUP screen 2 Touch ON of TEL HFP in the BT Connection Settings screen The selected device is connected to the unit When registration of your cell phone is com...

Page 19: ... as the heat sink and enclosure become hot NOTES Mounting and wiring this product requires skills and experience For best safety leave the mounting and wiring work to professionals Make sure to ground the unit to a negative 12V DC power supply Do not install the unit in a spot exposed to direct sunlight or excessive heat or humidity Also avoid places with too much dust or the possibility of water ...

Page 20: ... on the car are working properly Mount the unit so that the mounting angle is 30 or less This unit has the cooling fan P 24 to decrease the internal temperature Do not mount the unit in a place where the cooling fan of the unit are blocked Blocking these openings will inhibit the cooling of the internal temperature and result in malfunction Do not press hard on the panel surface when installing th...

Page 21: ...f the mounting sleeve with a screwdriver or similar utensil and attach it in place Japanese cars 6 or 7 6 or 7 Car Bracket NOTE Make sure that the unit is installed securely in place If the unit is unstable it may malfunction eg the sound may skip Ñ Ñ Trim plate 1 Attach accessory 8 to the unit 8 General Motors cars DNN991HD 1 Cut out accessory 4 to meet the shape of the opening of the center cons...

Page 22: ...antenna in an area away from any antennas that are used with CB radios or satellite televisions The GPS antenna should be installed at a position that is spaced at least 12 inch 30 cm from cellular phone or other transmitting antennas Signals from the GPS satellite may be interfered with by these types of communication Painting the GPS antenna with metallic paint may cause a drop in performance Ñ ...

Page 23: ...When the lower level is removed remove the upper two locations Ñ Ñ Removing the unit 1 Remove the trim plate by referring to step 1 in Removing the trim plate 2 Insert the two extraction key accessory3 deeply into the slots on each side as shown 3 3 Lower the extraction key toward the bottom and pull out the unit halfway while pressing towards the inside NOTE Be careful to avoid injury from the ca...

Page 24: ...grounded when either the telephone rings or during conversation To use the Mute feature you need to hook up this wire to your telephone by using a commercial telephone accessory Depending on what antenna you are using connect either to the control terminal of the motor antenna or to the power terminal for the booster amplifier of the film type antenna Max 300mA 12V When using the optional power am...

Page 25: ... reverse lamp harness when using the optional rear view camera Accessory 2 FM AM antenna input Accessory Bluetooth Microphone Accessory 9 GPS Antenna Blue Red To Relay Box If no connections are made do not let the cable come out from the tab WI FI receiver Reception may drop if there are metal objects near the Bluetooth antenna and WI FI receiver Install the WI FI receiver besides the place enclos...

Page 26: ...iPod USB terminal 0 8m iPod USB maximum power supply current 5 V 1 A USB terminal 0 8m USB maximum power supply current 5 V 500 mA 3 2 4 HDMI MHL input MHL maximum power supply current 5 V 900 mA When you connect the cable to HDMI MHL terminal remove the fixture After connecting the cable put the fixture again 1 Fixture HDMI MHL connector 1 2 3 1 3 3 3 3 KCA iP202 Optional Accessory KCA iP102 Opti...

Page 27: ... applications Refer to Apps Operation P 82 in the Instruction Manual Do not leave the cable or the adapter made by other makers inside the car It might lead the malfunction caused by heat Ñ Ñ iPod iPhone connection and setting Connectable iPod iPhone The following models can be connected to this unit Made for Type iPhone 5 A B E iPhone 4S C D E iPhone 4 C D F iPhone 3GS C D F iPhone 3G C D F iPhon...

Page 28: ...to Application link setup P 29 Do not leave the cable or the adapter made by other makers inside the car It might lead the malfunction caused by heat iPod iPhone connection setup When you first select iPod as a source the setting screen of the iPod iPhone connection will appear 1Press the HOME button twice to the Source launcher panel 2Touch in the Source launcher panel 3Touch iPod iPod connection...

Page 29: ...launcher panel 2Touch in the Source launcher panel 3Touch APPS Application link setup screen appears 4Touch CHANGE 5Select the device installed the apps 6Select the way to connect the device with this unit When selecting iPod iPhone For the setting items refer to iPod iPhone connection setup P 28 When selecting Android Other HDMI MHL BT Select when connecting with KCA MH100 Bluetooth Select when c...

Page 30: ... meet Apple performance standards Apple is not responsible for the operation of this device or its compliance with safety and regulatory standards Please note that the use of this accessory with iPod or iPhone may affect wireless performance iPhone iPod iPod classic iPod nano and iPod touch are trademarks of Apple Inc registered in the U S and other countries Lightning is a trademark of Apple Inc ...

Page 31: ...mark of MHL LLC Incorporates MHL 2 BlackBerry RIM Research In Motion and related trademarks names and logos are the property of Research In Motion Limited and are registered and or used in the U S and countries around the world Used under license from Research In Motion Limited ABOUT DIVX VIDEO DivX is a digital video format created by DivX LLC a subsidiary of Rovi Corporation This is an official ...

Page 32: ...nditions of Use Users who desire to take advantage of this Service must however first register themselves upon agreeing to the terms of this Agreement This Service may only be used by Users for personal use not for commercial use The terms of this Agreement may be revised or modified as necessary at our option without prior notice In such event Users shall hereby agree to the application of any su...

Page 33: ...nt utility model rights trademark trade secrets and know how the portrait rights privacy publicity rights and other personal rights and proprietary rights or other property rights of the information text image program layout design architecture and others related to the Service are owned by us or provided to us under license from the rights holder except for the rights of the thing which are made ...

Page 34: ...e incluyen en este manual son ejemplos utilizados para ofrecer explicaciones de las distintas operaciones Por esta razón pueden diferir de los paneles que se visualizan en realidad En los procedimientos operativos las llaves indican la tecla o botón que debe emplear indica el nombre de los botones del panel Indica el nombre de las teclas Acerca de la guía de inicio rápido 34 Precauciones 35 Precau...

Page 35: ...no funciona de forma normal después de un tiempo consulte con su distribuidor Kenwood Ñ Ñ Precauciones con el manejo de los discos No toque la superficie de grabación del disco No pegue cinta etc en el disco ni utilice ningún disco con cinta adherida No utilice accesorios de tipo disco Limpie desde el centro del disco hacia el exterior Al extraer los discos de esta unidad hágalo horizontalmente Si...

Page 36: ... Limpieza de la unidad Si la placa frontal de la unidad está manchada límpiela con un paño suave y seco como un paño de silicio Si la placa frontal está muy manchada límpiela con un paño humedecido con detergente neutro y después vuelva a limpiarla con un paño suave y seco PRECAUCIÓN Si aplica un limpiador en spray directamente sobre la unidad puede dañar sus componentes mecánicos Si limpia la pla...

Page 37: ...dría producir un mal funcionamiento o daños en el mismo Tenga también en cuenta que la unidad puede ser dañada por vibraciones fuertes objetos de metal o la penetración de agua en su interior 2PRECAUCIONES Si no evita las situaciones potencialmente peligrosas pueden producirse daños personales o materiales El sistema de navegación está diseñado para ofrecerle sugerencias de ruta No refleja cierres...

Page 38: ...onexión inalámbrica de Kenwood Ñ Ñ Dongle 4G 3G DNN991HD Conexión a Internet directamente con el dongle 4G 3G No es necesario un dispositivo con conexión a Internet como un smartphone Ñ Ñ Acerca de la cuenta Para utilizar servicios de Internet a través de este sistema deberá crear una cuenta en el sitio web de Route Collector Además de la cuenta de propietario podrá registrar hasta 4 cuentas de us...

Page 39: ...acceso Wi Fi para registrarlo 4 Introduzca la contraseña 5 Toque Connect Conectar Tras el ajuste pulse el botón 6 Mobile Network settings Ajustes de redes móviles DNN991HD Configure la conexión directa a Internet con el dongle 4G 3G 1 Pulse Mobile Network settings Ajustes de redes móviles 2 Pulse Mobile Network configuration Configuración de redes móviles 3 Introduzca la información de red 4 Toque...

Page 40: ...s de la web http www route collector com Este paso puede omitirse si ya se ha registrado en el sitio web de Route Collector 1 Toque Create Account 2 Introduzca la información de la cuenta No podrá registrar una cuenta que ya haya sido utilizada Registre la cuenta con otro nombre 3 Toque OK La cuenta ha quedado registrada temporalmente en el sitio web de Route Collector 4 Active la cuenta Se enviar...

Page 41: ...Owner propietario Ñ Ñ Cómo preparar el mando a distancia Introduzca dos baterías tipo AAA R03 con los polos y correctamente situados según las instrucciones que aparecen dentro del compartimento PRECAUCIÓN Coloque el mando a distancia en un lugar en el que no se pueda mover en caso de frenado u otras operaciones Podría producirse una situación peligrosa si el mando a distancia se cae y queda atrap...

Page 42: ...E Muestra la pantalla de inicio P 44 Si se pulsa durante 1 segundo se apaga la unidad Si la unidad está apagada la enciende No Nombre Movimiento 7 6 Atrás Vuelve a la pantalla que se ha visualizado anteriormente Al pulsarlo durante 1 segundo se muestra la pantalla del manos libres Manual de instrucciones P 122 8 G Expulsar Expulsa el disco Si se pulsa cuando el panel está abierto el panel se cierr...

Page 43: ... rápido El contenido del menú es el siguiente Toque para activar o desactivar la alimentación del dispositivo externo Muestra la pantalla de menú SETUP Muestra la pantalla de menú Audio Control Muestra la pantalla de control de la fuente actual La forma del icono varía en función de la fuente RETURN Regresa a la pantalla anterior Ñ Ñ Pantalla de lista Existen teclas de funciones comunes en las pan...

Page 44: ...cia la izquierda o la derecha sobre la pantalla para seleccionar el panel de servicios panel de medios panel de selección de fuentes o panel de contenido en red 1 Panel de servicio Widget de meteorología Muestra la previsión meteorológica para la región seleccionada Widget de red Muestra la programación SNS o RSS 2 Panel de medios Now playing Muestra el título de la canción que se está reproducien...

Page 45: ...tes 1 Toque y mantenga pulsado el icono 2 Arrastre el icono hasta la posición deseada o hasta la Papelera de reciclaje Adición de un icono de acceso directo al panel de selección de fuentes 1 Toque en el panel de selección de fuentes 2 Toque y mantenga pulsado el icono para visualizar la pantalla del panel de selección de fuentes 3 Arrastre el icono hasta un espacio vacío Cómo usar el sistema de n...

Page 46: ...or magenta Según viaja su sistema de navegación le guiará hacia su destino con comandos de voz flechas en el mapa y direcciones en la parte superior del mapa Si se aparta de la ruta original su sistema de navegación recalculará la ruta 1 2 3 4 5 6 8 9 7 1 Visualiza la página del siguiente giro o la página de vista de intersecciones si la hay 2 Visualiza la página de lista de giros 3 Visualiza la p...

Page 47: ...Vaya a www garmin com Kenwood 2 Encuentre su modelo y seleccione Software Updates Download 3 Lea y acepte los términos del Acuerdo de Licencia de Software 4 Siga las instrucciones en la página Web para completar la instalación de la actualización de software Actualización de los mapas Puede adquirir datos actualizados para los mapas a través de Garmin o bien pedirlos a su distribuidor Kenwood o co...

Page 48: ...iones básicas desde esta pantalla L Inicia la reproducción o hace una pausa I Detiene la reproducción G Desconecta el dispositivo E F Busca el contenido anterior siguiente E F o mueva el cursor en la barra central Avance o rebobinado rápido sólo para discos de datos CD dispositivo USB tarjeta SD Repite el contenido actual Reproduce todo el contenido en orden aleatorio NOTA Para otras funciones con...

Page 49: ... Para detener el avance o rebobinado rápido toque el centro de la pantalla 1 1 Para iPod USB esta función podría no estar disponible en el formato de archivo de reproducción NOTA Para funciones en la pantalla de control de fuentes véase Cómo reproducir música P 47 No obstante la búsqueda por categoría enlace gráficos de álbum no está disponible Cómo escuchar la radio el sintonizador de HD Radio Si...

Page 50: ...instrucciones 1 Pulse el botón HOME dos veces en el panel de selección de fuentes 2 Toque en el panel de selección de fuentes 3 Toque STANDBY 4 Mantenga pulsado el botón 6 5 Toque 6 Toque Search Buscar Aparece la pantalla Searched Device List 7 Seleccione su teléfono móvil en la lista mostrada en la pantalla Searched Device List 8 Introduzca el código PIN del teléfono móvil El registro se ha compl...

Page 51: ...ergía debe conectarse a los cables por medio del fusible PRECAUCIÓN Instale esta unidad en la consola de su vehículo No toque la parte metálica de esta unidad durante e inmediatamente después del uso de la unidad Las partes metálicas tales como el disipador de calor o la carcasa pueden estar muy calientes Notas La instalación y el cableado de este producto requieren habilidad y experiencia Para ma...

Page 52: ...delantero no conecte el conector a un terminal de salida posterior Después de instalar la unidad compruebe que las luces de freno las luces intermitentes el limpiaparabrisas etc funcionan satisfactoriamente Instale la unidad en un ángulo de 30 o menos Esta unidad dispone de un ventilador P 56 para reducir la temperatura interior No monte la unidad en un lugar en el que el ventilador de refrigeraci...

Page 53: ...similar y fíjelo Automóviles japoneses 6 o 7 6 o 7 Soporte del vehículo NOTA Asegúrese de que la unidad esté firmemente instalada en su lugar Si la unidad está en una posición inestable es posible que no funcione correctamente por ejemplo el sonido puede interrumpirse Ñ Ñ Marco 1 Coloque el accesorio 8 a la unidad 8 Automóviles de General Motors DNN991HD 1 Corte el accesorio 4 para realizar la for...

Page 54: ... el interior Instale esta antena GPS en una zona alejada de cualquier otra antena utilizada para radios CB o televisiones vía satélite La antena GPS debería instalarse en una posición separada al menos 12 pulgadas 30 cm del teléfono móvil u otras antenas transmisoras Las señales del satélite GPS podrían interferir con estos tipos de comunicación Si se pinta la antena GPS con cualquier pintura metá...

Page 55: ...2 Después de extraer la parte inferior libere de la misma manera los dos lugares del lado superior Ñ Ñ Desmontaje de la unidad 1 Retire el marco según las indicaciones del paso 1 de Retirar el marco 2 Introduzca las dos llaves de extracción accesorio 3 profundamente en las ranuras de cada lado tal y como se muestra 3 3 Mueva la llave de extracción hacia abajo y extraiga la unidad hasta la mitad mi...

Page 56: ... teléfono o durante la conversación Para utilizar la función de silenciamiento es necesario conectar el cable al teléfono mediante el uso de un accesorio telefónico comercial Dependiendo de la antena que use conecte al terminal de control de la antena del motor o al terminal de alimentación del amplificador de refuerzo de la antena tipo pelicular Máx 300 mA 12 V Si utiliza el amplificador de poten...

Page 57: ...rcha atrás del vehículo cuando utilice una cámara de visión trasera opcional Accesorio 2 Entrada de antena FM AM Accesorio Micrófono Bluetooth Accesorio 9 Antena GPS Azul rojo A la caja de relés Si no se efectúan las conexiones no deje que el cable sobresalga de la lengüeta Receptor Wi Fi La recepción podría ser baja si existen objetos metálicos cerca de la antena Bluetooth y el receptor Wi Fi Ins...

Page 58: ... opcional iPod AV IN2 conmutable iPod terminal USB 0 8 m Corriente de alimentación máxima de iPod USB 5 V 1 A Terminal USB 0 8 m Corriente de alimentación máxima de USB 5 V 500 mA 3 2 4 Entrada HDM MHL Corriente de alimentación máxima de MHL 5 V 900 mA Al conectar el cable al terminal HDMI MHL retire la fijación Tras conectar el cable vuelva a colocar la fijación 1 Fijación Conector HDMI MHL 1 2 3...

Page 59: ...guración de vínculos con aplicaciones P 61 En la fuente APPS algunas funciones se pueden controlar desde esta unidad y dependen de las aplicaciones Consulte Función Apps P 82 en el manual de instrucciones No deje el cable ni el adaptador de otros fabricantes en el interior del coche Podría producirse una avería a causa del calor Ñ Ñ Conexión y ajuste de iPod iPhone iPod iPhone que pueden conectars...

Page 60: ...e esta unidad y dependen de las aplicaciones Consulte Función Apps P 82 en el manual de instrucciones Para el ajuste consulte Configuración de vínculos con aplicaciones P 61 No deje el cable ni el adaptador de otros fabricantes en el interior del coche Podría producirse una avería a causa del calor Configuración de la conexión de iPod iPhone Al seleccionar iPod como fuente por primera vez se mostr...

Page 61: ...se mostrará la pantalla de configuración para la conexión con el dispositivo donde estén instaladas las aplicaciones 1Pulse el botón HOME dos veces en el panel de selección de fuentes 2Toque en el panel de selección de fuentes 3Toque APPS Aparece la pantalla de configuración de vínculos con aplicaciones 4Toque CHANGE Cambiar 5Seleccione el dispositivo donde están instaladas las aplicaciones 6Selec...

Page 62: ...o is a trademark of Dolby Laboratories Made for iPod and Made for iPhone mean that an electronic accessory has been designed to connect specifically to iPod or iPhone respectively and has been certified by the developer to meet Apple performance standards Apple is not responsible for the operation of this device or its compliance with safety and regulatory standards Please note that the use of thi...

Page 63: ...MHL and the MHL logo are a trademark or registered trademark of MHL LLC Incorporates MHL 2 BlackBerry RIM Research In Motion and related trademarks names and logos are the property of Research In Motion Limited and are registered and or used in the U S and countries around the world Used under license from Research In Motion Limited ACERCA DE VÍDEO DIVX DivX es un formato de vídeo digital creado p...

Page 64: ... de este Contrato pueden ser revisadas o modificadas en función de las necesidades a nuestra elección y sin aviso previo En este caso los Usuarios deberán estar de acuerdo con la aplicación de estas revisiones o modificaciones como condición para el uso continuado del Servicio Asimismo los Usuarios serán los únicos responsables de la gestión y el uso de los nombres y contraseñas de las cuentas de ...

Page 65: ...u otro tipo de derechos de propiedad de la información el texto la imagen el programa la disposición el diseño la arquitectura y los demás derechos relacionados con el Servicio son de nuestra propiedad o se nos han suministrado bajo licencia por el titular de los derechos con excepción de los derechos realizados por el Usuario La copia alteración o la sublicencia no autorizadas de los derechos de ...

Page 66: ...ubject to the following two conditions 1 This device may not cause interference and 2 this device must accept any interference including interference that may cause undesired operation of the device The term IC before the certification registration number only signifies that the Industry Canada technical specification were met 2CAUTION This equipment complies with FCC IC radiation exposure limits ...

Page 67: ...da útil aplicable a los países que hayan adoptado sistemas independientes de recogida de residuos Los productos con el símbolo de un contenedor con ruedas tachado no podrán ser desechados como residuos domésticos Los equipos eléctricos y electrónicos al final de la vida útil deberán ser reciclados en instalaciones que puedan dar el tratamiento adecuado a estos productos y a sus subproductos residu...

Page 68: ......

Reviews: