background image

Connection/Installation

29

English

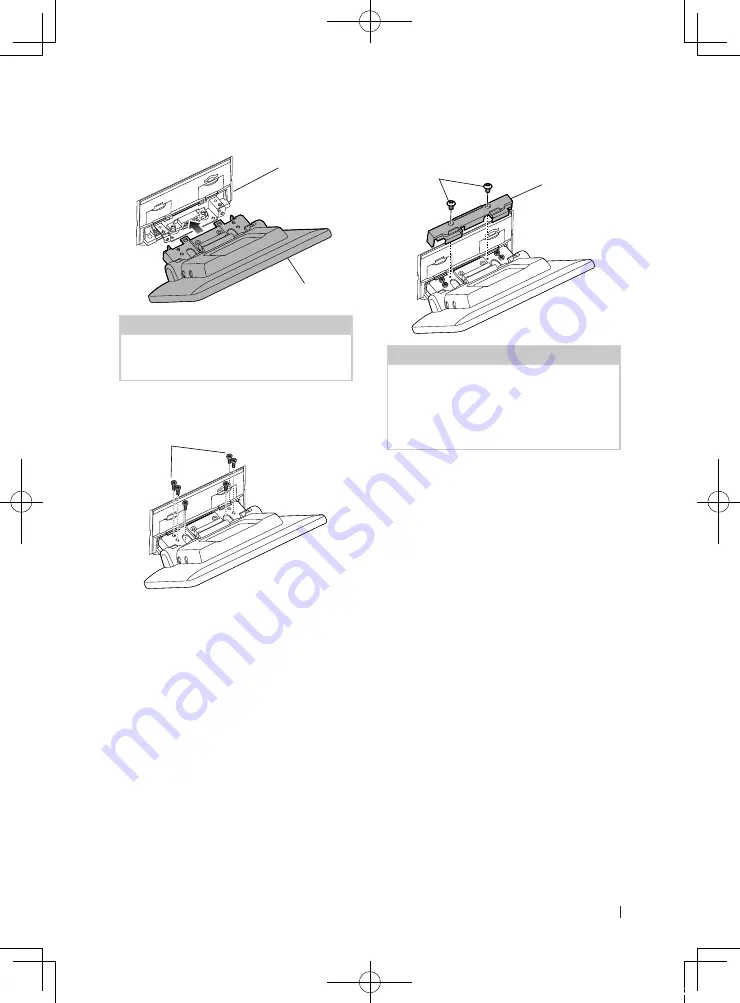
Install the display unit (accessory 

8

) to 

the main unit.

Main unit

8

NOTE

•  If the display unit hits a panel on the vehicle, 

adjust the display height by referring to 

Adjusting the display height (P.27)

.

Fix the display unit with six hexagon head 

screws (accessory 

-

).

-

Attach the protective cover (accessory 

=

to coupling part, and then fix it with two 

binding head screws (accessory 

~

).

~

=

NOTE

•  If the protective cover (accessory 

=

) is not 

attached, this unit will not turn on. Even if the 
unit is turned on, the power may be turned off 
halfway.
Be sure to attach the protective cover (accessory 

=

).

Raise the display manually.

!B5K-0761-00_20DDX_K_FP_QSG.indb   29

2020/07/02   14:26

Summary of Contents for DMX1057XR

Page 1: ...enwood com cs ce The Instruction manual is subject to change for modification of specifications and so forth Be sure to download the latest edition of the Instruction manual for reference https manual kenwood com edition im406 Des informations actualisées le dernier mode d emploi les mises à jour du système les nouvelles fonctions etc sont disponibles sur le site https www kenwood com cs ce Le mod...

Page 2: ...product are encouraged to read the terms of the corresponding license before use Because each individual license is prescribed by a third party other than JVCKENWOOD Corporation the original English of the license is presented EULA Ñ Ñ Software License Agreement JVCKENWOOD Corporation hereinafter called Licensor holds either the copyright to the embedded software or the right to sublicense it This...

Page 3: ...m Licensor Article 8 Cancellation of the Agreement Licensor reserves the right to cancel this agreement forthwith and claim compensation from User for the damages caused by such cancellation when User 1 Breaches any of the provisions of this agreement or 2 Has received a petition for seizure provisional seizure provisional disposition or any other kind of compulsory execution Article 9 Destruction...

Page 4: ...allic tools inside the unit Do not watch or fix your eyes on the unit s display when you are driving for any extended period If you experience problems during installation consult your KENWOOD dealer Ñ Ñ Precautions on using this unit When you purchase optional accessories check with your KENWOOD dealer to make sure that they work with your model and in your area Before Use 4 About the Quick start...

Page 5: ...cohol may scratch the surface or erase the screened print Ñ Ñ Acquiring GPS signal The first time you turn on this unit you must wait while the system acquires satellite signals for the first time This process could take up to several minutes Make sure your vehicle is outdoors in an open area away from tall buildings and trees for fastest acquisition After the system acquires satellites for the fi...

Page 6: ...splayed last is kept and the same camera view will be displayed the next time If its assignment setting is changed the rear camera view is displayed 4 MENU ATT Displays the popup menu screen Pressing for 1 second switches attenuation of the volume on off 5 Volume knob Adjusts the volume P 9 6 Displays the APP Apple CarPlay Android Auto Wireless Mirroring screen While the APP screen is displayed sw...

Page 7: ...ME button h h The unit is turned on To turn off the unit 1 Press the HOME button for 1 second NOTE If it is your first time to turn the unit on after installation it will be necessary to perform Initial SETUP P 8 B5K 0761 00_20DDX_K_FP_QSG indb 7 2020 07 02 14 25 ...

Page 8: ...k settings P 9 Display Button Set the button illumination color 1 Touch Display Button 2 Touch Button Illumination Color 3 Select the desired color 4 Touch For details see Display Button Setup P 63 in the Instruction Manual Camera Set the parameters for the camera 1 Touch Camera 2 Set each item and touch For details see Camera Setup P 56 in the Instruction Manual OEM SETUP This function requires a...

Page 9: ... time with the GPS Manual Set the clock manually Time Zone Select the time zone Clock Adjust If you select Manual for Clock adjust the date and time manually P 9 NOTE Please set the date and time If they are not set some functions may not work Adjust the date and time manually 1 Touch Clock Adjust in the System setting menu 2 Adjust the date then adjust the time 3 Touch Set Adjusting the volume Yo...

Page 10: ...splayed Flick Slide your finger quickly to the left or right on the screen to change the page You can scroll a list screen by flicking up down on the screen Swipe Slide your finger up or down on the screen to scroll the screen HOME screen descriptions Most functions can be performed from the HOME screen 4 3 2 1 1 Widget 2 Displays the source selection screen P 12 3 Displays the SETUP Menu screen 4...

Page 11: ... control screen of current source Icon feature differs depending on the source This icon is for USB source Close the popup menu Displays the Device List screen 1 Short cut source icons The source changes to the one you have set with a short cut For the short cut setting refer to Customize Short cut source icons P 12 Source selection screen description You can display icons of all playback sources ...

Page 12: ...put terminal 2 3 Puts the unit in standby P 12 1 When connecting as Apple CarPlay or Android Auto it works as a phone provided in Apple CarPlay or Android Auto If Apple CarPlay or Android Auto are connected during talking by the Bluetooth device or iDatalink phone the current call will be continued 2 You can use the AV IN source when a cable from a visual source except a camera is connected to the...

Page 13: ...Displays the current source condition and so on List screen There are some common function keys in the list screens of most sources Display the list screen 1 Touch 1 h h The list screen appears 4 1 3 2 1 Text scroll Scrolls the displayed text 2 etc Keys with various functions are displayed here Plays all tracks in the folder containing the current track Jumps to the letter you entered alphabetical...

Page 14: ...ation Connect an iPod iPhone with the KCA iP103 optional accessory while Apple CarPlay is not connected 1 Connect the iPod iPhone using the KCA iP103 P 33 To disconnect the iPod iPhone connected with the cable 1 Detach the iPod iPhone Bluetooth connection Pair the iPhone through Bluetooth Preparation To connect an iPhone via Bluetooth register it as a Bluetooth device and do the profile setting fo...

Page 15: ...h and hold to fast forward or fast backward It will be cancelled automatically after about 50 seconds DH Plays or pauses Displays the Graphic Equalizer screen P 21 Repeats the current track folder Randomly plays all tracks in the current folder 3 Content list Touch the left side of the screen to display the Content list Touch again to close the list Displays the playing list When you touch a track...

Page 16: ...ype Stores the information about the song being received Emergency Alerts Turn on or off the alert message Alert Message Log Displays the alert message received 3 Seek mode Band keys Touch to switch seek mode in the following sequence AUTO1 AUTO2 MANUAL AUTO1 Tunes in a station with good reception automatically AUTO2 Tunes in the memorized stations one after another MANUAL Switches to the next fre...

Page 17: ...mory starts Ñ Ñ Manual memory You can store the currently being received station or channel in the memory 1 Select the station or channel you wish to store in the memory 2 Touch FM 1 15 or AM 1 5 in which you want to store the station or channel for 2 seconds until a beep sounds Ñ Ñ Preset select 1 Touch on the left side of the screen Select a station or channel from the list B5K 0761 00_20DDX_K_F...

Page 18: ...tooth pairing waiting dialog appears 8 Search for the unit DMX from your smartphone cell phone Complete steps 8 to 10 within 30 seconds 9 Operate your smartphone cell phone according to the displayed messages Confirm the request both on the smartphone cell phone Input the PIN Code in your smartphone cell phone PIN Code is set to 0000 as the default 10Touch Yes When data transmission and connection...

Page 19: ...p to 1000 entries Up to 50 entries including dialed calls received calls and missed calls 4 Select a dialing method Call using call records Call using the phonebook Call using the preset number Call by entering a phone number Select the smartphone cell phone to use When you connect two smartphones cell phones 1 Touch to select the phone you want to use Call using call records 1 Touch 2 Select the ...

Page 20: ...even if a call comes in The portrait registered in the phonebook is displayed while making receiving calls and during a call If you edit the phonebook on the connected device side after downloading the phonebook the portrait may not be displayed depending on the edited content It is recommended that you download the phonebook whenever you edit it The image quality of a displayed portrait may depen...

Page 21: ... set the Graphic Equalizer as desired Gain level area in dotted frame Adjust the gain level by touching each frequency bar You can select a frequency bar and adjust its level by R S ALL SRC Apply the adjusted equalizer curve to all sources Touch ALL SRC and then touch OK on the confirmation screen Memory Saves the adjusted equalizer curve as User1 to User4 Initialize Initialize flatten the current...

Page 22: ...ot turned ON There is an error in the speaker wiring Please check the connections is displayed the speaker wire may have a short circuit or touched the chassis of the vehicle and the protection function may have been activated Therefore the speaker wire should be checked If your car s ignition does not have an ACC position connect the ignition wires to a power source that can be turned on and off ...

Page 23: ...river s forward and lateral fields of vision under normal conditions place a pole directly visible from the front or visible through the car rear view mirror as shown 1 2 0 3 m 0 3 m 0 3 m 2 m 2 m 1 m 0 7 m 0 9 m Pole height 1m diameter 0 3m Field of vision from steering position Exempted area pole size is subject to regulation For right hand drive vehicles standards are reversed 1 The pole must b...

Page 24: ... the speaker wires of the wiring harness 5 Connect wiring harness wires in the following order ground battery ignition 6 Determine the height of the display unit and position of the slider See Distance between the display unit and the main unit P 25 7 Connect the wiring harness connector to the unit 8 Install the main unit to the vehicle 9 Reinstall the vehicle parts 10 Install the display unit 11...

Page 25: ...4 3 2 1 4 3 2 1 4 3 2 1 4 3 2 1 b a c a a b b d d b c 4 3 2 1 a 4 3 2 1 4 3 2 1 4 3 2 1 4 3 2 1 4 3 2 1 b a c a a b b d d b c 10 a 10 b 38 1 50 9 63 8 76 5 0 a 26 7 b 34 7 47 7 60 7 73 7 45 c 5 7 14 4 24 1 33 4 d 55 4 46 3 37 1 27 8 Forward position 4 3 2 1 a 4 3 2 1 4 3 2 1 4 3 2 1 4 3 2 1 4 3 2 1 b a c a a b b d d b c 4 3 2 1 a 4 3 2 1 4 3 2 1 4 3 2 1 4 3 2 1 4 3 2 1 b a c a a b b d d b c 4 3 2 ...

Page 26: ... back position Hexagon head screw 4 Install the bracket for forward position accessory 0 each side so that its projections are aligned with the slots on the main unit Projection Projection 0 5 Fix the bracket for forward position to the slider block with the two hexagon head screws Push the slider block until it stops and then fix the bracket for forward position to the main unit with the two hexa...

Page 27: ...e the separator of the metal plate accessory 7 3 Press the metal plate accessory 7 down firmly on your dashboard or other mounting surface You can bend the metal plate accessory 7 to conform to a curved surface if necessary 4 Remove the separator of the GPS antenna accessory 6 and stick the antenna to the metal plate accessory 7 7 6 NOTE Use the supplied GPS antenna Using the GPS antenna other tha...

Page 28: ... Installing the main unit NOTE Determine the slider position before installing the main unit P 26 The slider position cannot be changed after installing to the vehicle Make sure that the unit is installed securely in place If the unit is unstable it may malfunction eg the sound may skip 1 Remove parts that interfere with installing such as a panel on the vehicle 2 Install the car bracket to the ma...

Page 29: ... display unit with six hexagon head screws accessory 8 Attach the protective cover accessory to coupling part and then fix it with two binding head screws accessory NOTE If the protective cover accessory is not attached this unit will not turn on Even if the unit is turned on the power may be turned off halfway Be sure to attach the protective cover accessory 9 Raise the display manually B5K 0761 ...

Page 30: ... the S SENS tag or failure may result Purple White Reverse sensor wire 2 m Light Blue Yellow Steering remote control wire Connect to vehicle s reverse lamp harness when using the optional rear view camera To steering remote To use the steering wheel remote control feature you need an exclusive remote adapter not supplied matched to your car If no connections are made do not let the cable come out ...

Page 31: ... For how to connect speaker wires to terminals other than speaker terminals and Preout terminals see Connecting the system and external components P 31 and Connecting wires to terminals P 30 Ñ Ñ 3 way speaker system setup DMX1057XR Ñ Ñ Connecting the system and external components 12 13 14 15 6 7 8 9 10 2 1 4 5 11 3 1 Accessory 3 Bluetooth Microphone 2 FM AM antenna input 3 AV Audio output ø3 5 mi...

Page 32: ...camera assignment settings P 34 12 Rear view camera input Yellow 1 13 Front view camera Dashboard camera input Yellow 2 See To set up the camera assignment settings P 34 14 Video output Yellow 15 Video input Yellow 1 Connect an HD camera to Rear view camera input terminal to use HD video 2 Connect an HD camera to Front view camera Dashboard camera input terminal to use HD video Ñ Ñ Securing the US...

Page 33: ...inal 1 Accessory 2 1 m 4 1 USB maximum power supply current DC 5 V 1 5 A 2 Sold separately 3 Optional accessory 4 See Securing the USB extension cable P 32 Ñ Ñ Connecting an Android smartphone USB terminal 1 Accessory 2 1 m 3 USB cable 2 Android smartphone 2 1 USB maximum power supply current DC 5 V 1 5 A 2 Sold separately 3 See Securing the USB extension cable P 32 B5K 0761 00_20DDX_K_FP_QSG indb...

Page 34: ... Front view camera Ñ Ñ To set up the camera assignment settings 1 Press the HOME button 2 Touch 3 Touch SETUP h h SETUP Menu screen appears 4 Touch Camera h h Camera setting menu appears 5 Touch Camera Assignment Settings 6 Select the item to set up REAR VIEW CAMERA Set the camera assignment from view camera connected to Rear view camera input terminal FRONT VIEW CAMERA DASH CAM Set the camera ass...

Page 35: ...andards Apple is not responsible for the operation of this device or its compliance with safety and regulatory standards Please note that the use of this accessory with an Apple product may affect wireless performance Apple iPhone iPod iPod touch and Lightning are trademarks of Apple Inc registered in the U S and other countries Apple Siri Apple CarPlay Apple Music and Apple CarPlay logo are trade...

Page 36: ...O LICENSE IS GRANTED OR SHALL BE IMPLIED FOR ANY OTHER USE ADDITIONAL INFORMATION MAY BE OBTAINED FROM MPEG LA L L C SEE HTTPS WWW MPEGLA COM libFLAC Copyright C 2000 2009 Josh Coalson Copyright C 2011 2013 Xiph Org Foundation Redistribution and use in source and binary forms with or without modification are permitted provided that the following conditions are met Redistributions of source code mu...

Page 37: ... following disclaimer Redistributions in binary form must reproduce the above copyright notice this list of conditions and the following disclaimer in the documentation and or other materials provided with the distribution Neither the name of the Xiph org Foundation nor the names of its contributors may be used to endorse or promote products derived from this software without specific prior writte...

Page 38: ...ur éviter un court circuit ne mettez ni ne laissez jamais d objets métalliques comme des pièces de monnaie ou des outils métalliques à l intérieur de l appareil Ne regardez pas ni ne fixez votre regard sur l affichage de l appareil trop longtemps pendant la conduite Si vous rencontrez des problèmes pendant l installation consultez votre revendeur KENWOOD Avant l utilisation 38 À propos du guide de...

Page 39: ...me un solvant ou de l alcool vous risquez d en rayer la surface ou d effacer les caractères sérigraphiés Ñ Ñ Réception du signal GPS Lors de la première mise sous tension de l appareil vous devez attendre que le système acquière les signaux satellite pour la première fois Ce processus peut durer quelques minutes Pour une acquisition rapide des signaux veillez à ce que votre véhicule se trouve à l ...

Page 40: ...a été affichée en dernier est conservée et la même vue sera affichée la prochaine fois Si ses paramètres d assignation sont modifiés la vue de la caméra arrière s affiche 4 MENU ATT Affiche l écran du menu contextuel Appuyer pendant 1 seconde commute l atténuation de la marche arrêt du volume 5 Boulon du volume Règle le volume p 43 6 Affiche l écran APP CarPlay Android Auto Wireless Mirroring Lors...

Page 41: ...ppareil se met en marche Pour éteindre l appareil 1 Appuyez sur la touche HOME pendant 1 seconde REMARQUE Si c est la première fois que vous mettez en marche l appareil après son installation il vous faut procéder à la configuration initiale p 42 B5K 0761 00_20DDX_K_FP_QSG indb 41 2020 07 02 14 26 ...

Page 42: ... 43 Display Button Configurez la couleur d éclairage des boutons 1 Touchez Display Button 2 Touchez Button Illumination Color 3 Sélectionnez la couleur désirée 4 Touchez Pour plus de détails voir Affichage et configuration des boutons p 63 dans le mode d emploi Camera Configurez les paramètres de caméra 1 Touchez Camera 2 Réglez chaque option et touchez Pour plus de détails voir Configuration des ...

Page 43: ...églez l horloge manuellement Time Zone Sélectionnez le fuseau horaire Clock Adjust Si vous sélectionnez Manual pour l horloge réglez la date et l heure manuellement p 43 REMARQUE Veuillez régler la date et l heure Si elles ne sont pas réglées certaines fonctions peuvent ne pas fonctionner Réglez la date et l heure manuellement 1 Touchez Clock Adjust dans le menu de configuration du système 2 Régle...

Page 44: ...t rapidement vers la gauche ou vers la droite sur l écran pour changer de page Vous pouvez faire défiler un écran de liste en faisant glisser votre doigt vers le haut bas sur l écran Défiler Faites glisser votre doigt vers le haut ou le bas pour faire défiler l écran Descriptions de l écran d ACCUEIL La plupart des fonctions sont accessibles depuis l écran ACCUEIL 4 3 2 1 1 Widget élément graphiqu...

Page 45: ...fonctionnalités attachées au pictogramme varient selon les sources Cette icône est pour la source USB Fermez le menu contextuel Affiche l écran de la liste des périphériques 1 Raccourcis des icônes de source La source change pour celle que vous avez définie avec un raccourci Pour le réglage du raccourci consultez Personnalisez les raccourcis des icônes de source p 46 Description de l écran de séle...

Page 46: ...ectez avec Apple CarPlay ou Android Auto le mode de fonctionnement est le même que sur un téléphone fourni dans Apple CarPlay ou Android Auto Si Apple CarPlay ou Android Auto est connecté au cours d une conversation avec le dispositif Bluetooth ou un téléphone iDatalink l appel en cours se poursuivra 2 Vous pouvez utiliser la source AV IN lorsqu un câble d une source visuelle à l exception d une c...

Page 47: ...e l état actuel de la source et ainsi de suite Écran des listes Certaines touches de fonction sont communes aux écrans de liste de la plupart des sources Afficher l écran de liste 1 Touchez 1 h h L écran de liste s affiche 4 1 3 2 1 Défilement du texte Fait défiler le texte affiché 2 etc Les touches ayant plusieurs fonctions s affichent ici Joue toutes les pistes dans le dossier contenant la piste...

Page 48: ...onnecté Connexion par fil Préparation Connectez un iPod iPhone avec le KCA iP103 accessoire en option lorsque CarPlay n est pas connecté 1 Connectez l iPod iPhone à l aide du KCA iP103 p 67 Pour débrancher l iPod iPhone connecté avec le câble 1 Débranchez l iPod l iPhone Connexion Bluetooth Appariez le périphérique iPhone par Bluetooth Préparation Pour connecter un iPhone via Bluetooth enregistrez...

Page 49: ...et maintenez enfoncé pour effectuer une avance ou un retour rapide Annulé automatiquement au bout d environ 50 secondes DH Lit ou met en pause Affiche l écran de l égaliseur graphique p 55 Répète la piste le dossier en cours Lit de manière aléatoire tous les morceaux du dossier en cours 3 Liste des contenus Touchez le côté gauche de l écran pour afficher la liste de Contenu Touchez de nouveau pour...

Page 50: ...rogramme par type de programme Enregistre les informations relatives à la chanson en cours de réception Emergency Alerts Activez ou désactivez le message d alerte Alert Message Log Affiche le message d alerte reçu 3 Touches mode bande Touchez pour changer de mode de recherche dans l ordre suivant AUTO1 AUTO2 MANUAL AUTO1 Syntonise automatiquement sur une station offrant une bonne réception AUTO2 S...

Page 51: ...automatique se lance Ñ Ñ Mémoire manuelle Vous pouvez enregistrer la station ou le canal en cours de réception dans la mémoire 1 Sélectionnez la station ou le canal que vous souhaitez mémoriser 2 Touchez FM 1 15 ou AM 1 5 à laquelle vous souhaitez associer la station ou le canal pendant 2 secondes jusqu à confirmation par un bip Ñ Ñ Sélection des présélections 1 Touchez sur le côté gauche de l écr...

Page 52: ...d Auto 7 Touchez h h La fenêtre de dialogue d attente d appariement Bluetooth apparaît 8 Recherchez l appareil DMX à partir de votre smartphone téléphone portable Complétez les étapes 8 à 10 dans un délai de 30 secondes 9 Utilisez votre smartphone téléphone portable en fonction des messages affichés Confirmez la requête sur le smartphone téléphone portable Entrez le code PIN sur votre smartphone t...

Page 53: ...es Jusqu à 50 entrées y compris appels composés appels reçus et appels manqués 4 Sélectionnez une méthode de numérotation Appel depuis l historique des appels Appel depuis le répertoire téléphonique Appel depuis un numéro présélectionné Appel en saisissant un numéro de téléphone Sélectionnez le smartphone téléphone portable à utiliser Lorsque vous connectez deux smartphones téléphones portables 1 ...

Page 54: ...eçu Le portrait enregistré dans le répertoire s affiche pendant l émission la réception d appels et pendant un appel Si vous modifiez le répertoire du côté de l appareil connecté après avoir téléchargé le répertoire le portrait peut ne pas s afficher en fonction du contenu modifié Il est recommandé de télécharger le répertoire à chaque fois que vous le modifiez La qualité d image d un portrait aff...

Page 55: ...e souhaitez Niveau de gain zone dans le cadre pointillé Réglez le niveau de gain en touchant chacune des barres de fréquences Vous pouvez sélectionner une barre de fréquence et ajuster son niveau en utilisant R S ALL SRC Appliquez la courbe de l égaliseur ajustée pour toutes les sources Appuyez sur ALL SRC puis appuyez sur OK sur l écran de confirmation Memory Enregistre la courbe d égaliseur ajus...

Page 56: ...ux ou susceptibles d être éclaboussés par de l eau N utilisez pas vos propres vis N utilisez que les vis fournies L utilisation de vis non appropriées risque d endommager l appareil Si l appareil n est pas sous tension There is an error in the speaker wiring Please check the connections Il y a un problème avec le câblage du haut parleur Veuillez vérifier les branchements s affiche le câble du haut...

Page 57: ...ule Cela risque de rayer la surface de l endommager ou d entraîner une défaillance Il se peut que la réception soit mauvaise si des objets métalliques se trouvent à proximité de l antenne Bluetooth Wi Fi Unité d antenne Bluetooth Wi Fi Champs de vision avant et latéral Pour déterminer les champs de vision avant et latéral du conducteur dans des conditions normales placez un poteau directement visi...

Page 58: ...xions des câbles d entrée et de sortie pour chaque appareil 4 Brancher les fils de haut parleur du faisceau de câblage 5 Brancher les fils du faisceau de câblage dans l ordre suivant masse batterie contact 6 Déterminez la hauteur de l unité d affichage et la position du curseur Voir Distance entre l unité d affichage et l appareil principal p 59 7 Branchez le connecteur du faisceau de fils sur l a...

Page 59: ... 3 2 1 4 3 2 1 4 3 2 1 4 3 2 1 b a c a a b b d d b c 4 3 2 1 a 4 3 2 1 4 3 2 1 4 3 2 1 4 3 2 1 4 3 2 1 b a c a a b b d d b c 4 3 2 1 a 4 3 2 1 4 3 2 1 4 3 2 1 4 3 2 1 4 3 2 1 b a c a a b b d d b c 10 a 10 b 38 1 50 9 63 8 76 5 0 a 26 7 b 34 7 47 7 60 7 73 7 45 c 5 7 14 4 24 1 33 4 d 55 4 46 3 37 1 27 8 Position avant 4 3 2 1 a 4 3 2 1 4 3 2 1 4 3 2 1 4 3 2 1 4 3 2 1 b a c a a b b d d b c 4 3 2 1 a...

Page 60: ... Vis à tête hexagonale 4 Installez le support pour la position avant accessoire 0 de chaque côté de manière à ce que ses saillies soient alignées avec les fentes situées sur l appareil principal Projection Projection 0 5 Fixez le support pour la position avant au bloc curseur avec les deux vis à tête hexagonale Poussez le bloc curseur jusqu à ce qu il s arrête puis fixez le support pour la positio...

Page 61: ...u de bord ou autre surface de montage 2 Retirez le séparateur de la plaque métallique accessoire 7 3 Appuyez fermement la plaque métallique accessoire 7 contre votre tableau de bord ou une autre surface de montage Vous pouvez courber la plaque de métal accessoire 7 pour l adapter à une surface incurvée si nécessaire 4 Retirez le séparateur de l antenne GPS accessoire 6 et fixez l antenne sur la pl...

Page 62: ... la position du curseur avant l installation de l appareil principal p 60 La position du curseur ne peut pas être modifiée après qu il ait été installé sur le véhicule Vérifiez que l appareil est correctement en place Si l appareil n est pas stable cela peut occasionner un dysfonctionnement le son peut par exemple sauter 1 Retirez les pièces qui gênent l installation telles qu un panneau sur le vé...

Page 63: ...chage avec six vis à tête hexagonale accessoire 8 Fixez le couvercle de protection accessoire sur la pièce de couplage puis fixez le à l aide de deux vis à tête cylindrique accessoire REMARQUE Si le couvercle de protection accessoire n est pas fixé cet appareil ne s allume pas Même si l appareil est mis sous tension l alimentation peut être coupée à mi course Assurez vous de fixer le couvercle de ...

Page 64: ...ntraîner une défaillance Violet Blanc câble du capteur de marche arrière 2 m Bleu ciel Jaune Câble de la télécommande au volant Connexion au faisceau du feu de marche arrière du véhicule lors de l utilisation de la vue arrière de la caméra Vers la télécommande au volant Pour utiliser la fonction de télécommande au volant vous avez besoin d un adaptateur de télécommande spécial non fourni qui corre...

Page 65: ...titeur p 68 dans le mode d emploi Pour connecter les fils des enceintes aux bornes autres que les bornes des enceintes ou les bornes de préamplification voir Connexion du système et des composants externes p 65 et Connexion des câbles sur les contacts électriques p 64 Ñ Ñ Configuration du système d enceinte à 3 voies DMX1057XR Ñ Ñ Connexion du système et des composants externes 12 13 14 15 6 7 8 9...

Page 66: ...ctation de la caméra p 68 12 Entrée de la caméra vue arrière jaune 1 13 Entrée de la caméra de vue avant caméra du tableau de bord jaune 2 Voir Pour configurer les réglages d affectation de la caméra p 68 14 Sortie vidéo jaune 15 Entrée vidéo jaune 1 Connectez une caméra HD à la borne d entrée de la caméra de vue arrière pour utiliser la vidéo HD 2 Connectez une caméra HD à la borne d entrée de la...

Page 67: ...ire 2 1 m 4 1 Tension d alimentation maximum pour USB DC 5 V 1 5 A 2 Vendu séparément 3 Accessoire proposé en option 4 Voir Fixation d un câble prolongateur USB p 66 Ñ Ñ Connecter un smartphone Android Borne USB 1 Accessoire 2 1 m 3 Câble USB 2 Smartphone Android 2 1 Tension d alimentation maximum pour USB DC 5 V 1 5 A 2 Vendu séparément 3 Voir Fixation d un câble prolongateur USB p 66 B5K 0761 00...

Page 68: ...s HD une caméra HD est également utilisée comme caméra de vue avant Ñ Ñ Pour configurer les réglages d affectation de la caméra 1 Appuyez sur la touche HOME 2 Touchez 3 Touchez SETUP h h L écran de menu de configuration s affiche 4 Touchez Camera h h Le menu des paramètres de la caméra s affiche 5 Touchez Camera Assignment Settings 6 Sélectionnez l élément à configurer REAR VIEW CAMERA Réglez l af...

Page 69: ...y to the Apple product s identified in the badge and has been certified by the developer to meet Apple performance standards Apple is not responsible for the operation of this device or its compliance with safety and regulatory standards Please note that the use of this accessory with an Apple product may affect wireless performance Apple iPhone iPod iPod touch and Lightning are trademarks of Appl...

Page 70: ... LICENSE IS GRANTED OR SHALL BE IMPLIED FOR ANY OTHER USE ADDITIONAL INFORMATION MAY BE OBTAINED FROM MPEG LA L L C SEE HTTPS WWW MPEGLA COM libFLAC Copyright C 2000 2009 Josh Coalson Copyright C 2011 2013 Xiph Org Foundation Redistribution and use in source and binary forms with or without modification are permitted provided that the following conditions are met Redistributions of source code mus...

Page 71: ... following disclaimer Redistributions in binary form must reproduce the above copyright notice this list of conditions and the following disclaimer in the documentation and or other materials provided with the distribution Neither the name of the Xiph org Foundation nor the names of its contributors may be used to endorse or promote products derived from this software without specific prior writte...

Page 72: ...uientes Para evitar un cortocircuito nunca coloque ni deje objetos metálicos como monedas o herramientas metálicas dentro de la unidad No mire fijamente la pantalla de la unidad mientras está conduciendo durante un periodo prolongado de tiempo Si tiene problemas durante la instalación consulte con su distribuidor KENWOOD Antes de la utilización 72 Acerca de la Guía de inicio rápido 72 Cómo leer es...

Page 73: ...ño áspero o con líquido volátil como disolvente o alcohol puede rayar la superficie o borrar los caracteres impresos Ñ Ñ Obtención de la señal GPS La primera vez que encienda esta unidad debe esperar a que el satélite reciba las señales de satélite por primera vez Este proceso podría durar varios minutos Asegúrese de que su vehículo está en el exterior en una zona abierta apartado de edificios o á...

Page 74: ...ó por última y la misma vista de la cámara se mostrará la próxima vez Si cambia su configuración de asignación se mostrará la vista de la cámara trasera 4 MENU ATT Muestra la pantalla de menú emergente Al pulsar durante 1 segundo se activa desactiva la atenuación del volumen 5 Mando del volumen Ajusta el volumen P 77 6 Muestra la pantalla APP Apple CarPlay Android Auto Wireless Mirroring Mientras ...

Page 75: ... botón HOME h h La unidad se pone en marcha Para apagar la unidad 1 Pulse el HOME durante 1 segundo NOTA La primera vez que se activa la unidad después de la instalación debe realizarse la configuración inicial P 76 B5K 0761 00_20DDX_K_FP_QSG indb 75 2020 07 02 14 26 ...

Page 76: ...e el color de iluminación de los botones 1 Toque Display Button 2 Toque Button Illumination Color 3 Seleccione el color deseado 4 Toque Para más detalles consulte Configuración de la pantalla y los botones P 63 en el Manual de instrucciones Camera Ajusta los parámetros de la cámara 1 Toque Camera 2 Ajuste cada uno de los elementos y toque Para más información consulte Configuración de la cámara P ...

Page 77: ...la hora del reloj con GPS Manual Ajuste el reloj manualmente Time Zone Seleccione el huso horario Clock Adjust Si selecciona Manual para Reloj ajuste manualmente la fecha y la hora P 77 NOTA Configure la fecha y la hora Si no se configuran algunas funciones podrían no funcionar Ajustar la fecha y la hora manualmente 1 Toque Clock Adjust en el menú de ajustes del sistema 2 Ajuste la fecha y a conti...

Page 78: ...acia la izquierda o hacia la derecha de la pantalla para cambiar de página Puede desplazar la pantalla de lista pasando el dedo hacia arriba abajo por la pantalla Deslizar Deslice el dedo hacia arriba o hacia abajo en la pantalla para desplazarse por la misma Descripciones de la pantalla INICIO La mayoría de las funciones pueden ejecutarse desde la pantalla INICIO 4 3 2 1 1 Widget 2 Muestra la pan...

Page 79: ... en función de la fuente Este icono es para la fuente USB Cierre el menú emergente Muestra la pantalla Lista de dispositivos 1 Iconos de fuentes de acceso directo La fuente cambia a una de las establecidas con un acceso directo Para el ajuste de los accesos directos consulte Personalizar los iconos de las fuentes de acceso directo P 80 Descripción de la pantalla de selección de fuente Puede visual...

Page 80: ...de vídeo 2 3 Pone la unidad en espera P 80 1 Al conectar como Apple CarPlay o Android Auto funciona como un teléfono proporcionado en Apple CarPlay o Android Auto Si Apple CarPlay o Android Auto están conectados una conversación a través del dispositivo Bluetooth o teléfono iDatalink continuará la llamada actual 2 Puede usar la fuente AV IN cuando haya conectado un cable desde una fuente de vídeo ...

Page 81: ...ntos del indicador Muestra el estado de la fuente actual etc Pantalla de lista Existen teclas de funciones comunes en las pantallas de listas de la mayoría de las fuentes Muestra la pantalla de lista 1 Toque 1 h h Aparecerá la pantalla de lista 4 1 3 2 1 Desplazar texto Desplaza el texto visualizado 2 etc Aquí se muestran teclas con varias funciones Reproduce todas las pistas de la carpeta que con...

Page 82: ...Phone Conexión alámbrica Preparativos Conecte un iPod iPhone con el KCA iP103 accesorio opcional mientras Apple CarPlay no esté conectado 1 Conecte el iPod iPhone usando el KCA iP103 P 101 Para desconectar el iPod iPhone conectado con el cable 1 Desconecte el iPod iPhone Conexión Bluetooth Empareje el iPhone a través de Bluetooth Preparativos Para conectar un iPhone mediante Bluetooth regístrelo c...

Page 83: ...roceder rápidamente Se cancelará automáticamente después de aproximadamente 50 segundos DH Inicia la reproducción o hace una pausa Muestra la pantalla Ecualizador gráfico P 89 Repite la pista carpeta actual Reproduce aleatoriamente todas las pistas de la carpeta actual 3 Lista de contenido Toque el lado izquierdo de la pantalla para visualizar la lista Contenidos Toque de nuevo para cerrar la list...

Page 84: ...solamente Busca un programa por tipo de programa Guarda la información de la canción que se está recibiendo Emergency Alerts Active o desactive el mensaje de alerta Alert Message Log Muestra el mensaje de alerta recibido 3 Teclas del modo de búsqueda banda Toque para cambiar al modo de búsqueda en la siguiente secuencia AUTO1 AUTO2 MANUAL AUTO1 Sintoniza automáticamente una emisora con buena recep...

Page 85: ...emoria automática Ñ Ñ Memoria manual La emisora o canal que se está recibiendo actualmente pueden almacenarse en la memoria 1 Seleccione la emisora o canal que desee almacenar en la memoria 2 Toque durante 2 segundos hasta oír un pitido la posición FM 1 15 o AM 1 5 en la que desee almacenar la emisora o canal Ñ Ñ Selección de preajustes 1 Toque en el lado izquierdo de la pantalla Seleccione una em...

Page 86: ...adro de diálogo de espera de emparejamiento Bluetooth 8 Busque la unidad DMX en su teléfono inteligente teléfono móvil Complete los pasos 8 a 10 en 30 segundos 9 Accione su smartphone teléfono móvil en conformidad con los mensajes visualizados Confirme la solicitud en el smartphone teléfono móvil Introduzca el código PIN en su teléfono inteligente teléfono móvil El código PIN está configurado como...

Page 87: ...s realizadas llamadas recibidas y llamadas perdidas 4 Seleccione un método de marcación Llamar usando los registros de llamada almacenados Llamar usando la agenda telefónica Llamar usando el número preseleccionado Llamar introduciendo un número telefónico Seleccionar el teléfono inteligente teléfono móvil que se desea utilizar Cuando conecte dos teléfonos inteligentes teléfonos móviles 1 Toque par...

Page 88: ...arece incluso si se recibe una llamada El retrato registrado en la agenda telefónica se muestra al hacer recibir llamadas y durante una llamada Si edita la agenda telefónica en el lado del dispositivo conectado después de descargarla es posible que el retrato no se muestre dependiendo del contenido editado Le recomendamos que descargue la agenda telefónica siempre que la edite La calidad de imagen...

Page 89: ...ea en el marco punteado Ajuste el nivel de ganancia tocando cada una de las barras de frecuencia Podrá seleccionar la barra de frecuencia y ajustar su nivel usando R S ALL SRC Aplique la curva del ecualizador ajustado a todas las fuentes Toque ALL SRC Todas las fuentes y a continuación toque OK Aceptar en la pantalla de confirmación Memory Guarda la curva del ecualizador ajustado como User1 a User...

Page 90: ...s El uso de tornillos diferentes podría causar daños en la unidad Si la alimentación no se enciende se visualiza There is an error in the speaker wiring Please check the connections Hay un error en el cableado del altavoz Por favor compruebe las conexiones puede que el cable del altavoz haya sufrido un cortocircuito o que haya tocado el chasis del vehículo y se haya activado la función de protecci...

Page 91: ...ión podría ser baja si existen objetos metálicos cerca de la antena Bluetooth Wi Fi Unidad de antena Bluetooth Wi Fi Campos de visión delanteros y laterales Para determinar los campos de visión laterales y delanteros del conductor en condiciones normales coloque un poste visible directamente desde la parte delantera o visible a través del espejo retrovisor tal y como se muestra 1 2 0 3 m 0 3 m 0 3...

Page 92: ...e los cables de entrada y salida para cada unidad 4 Conecte los cables del mazo de los altavoces 5 Conecte los cables del mazo de cables en el orden siguiente tierra batería encendido 6 Establezca la altura de la unidad de visualización y la posición del deslizador Consulte Distancia entre la unidad de visualización y la unidad principal P 93 7 Conecte el mazo de cables a la unidad 8 Instale la un...

Page 93: ...4 3 2 1 4 3 2 1 4 3 2 1 4 3 2 1 4 3 2 1 b a c a a b b d d b c 4 3 2 1 a 4 3 2 1 4 3 2 1 4 3 2 1 4 3 2 1 4 3 2 1 b a c a a b b d d b c 4 3 2 1 a 4 3 2 1 4 3 2 1 4 3 2 1 4 3 2 1 4 3 2 1 b a c a a b b d d b c 10 a 10 b 38 1 50 9 63 8 76 5 0 a 26 7 b 34 7 47 7 60 7 73 7 45 c 5 7 14 4 24 1 33 4 d 55 4 46 3 37 1 27 8 Posición delantera 4 3 2 1 a 4 3 2 1 4 3 2 1 4 3 2 1 4 3 2 1 4 3 2 1 b a c a a b b d d ...

Page 94: ... cabeza hexagonal 4 Instale el soporte de la posición delantera accesorio 0 en ambos lados de manera que sus salientes queden alineados con las ranuras de la unidad principal Saliente Saliente 0 5 Fije el soporte de la posición delantera en el bloqueo del deslizador con los dos tornillos de cabeza hexagonal Arrastre el bloqueo del deslizador hasta que se detenga y a continuación fije el soporte de...

Page 95: ... del vehículo 1 Limpie el salpicadero o la superficie en cuestión 2 Extraiga el separador de la placa metálica accesorio 7 3 Presione con fuerza la placa metálica accesorio 7 sobre el salpicadero o cualquier otra superficie de montaje Si fuera necesario puede doblar la placa metálica accesorio 7 para adaptarla a una superficie curva 4 Retire el separador de la antena del GPS accesorio 6 y pegue la...

Page 96: ... de instalar la unidad principal P 94 La posición del deslizador no se puede cambiar después de la instalación en el vehículo Asegúrese de que la unidad esté firmemente instalada en su lugar Si la unidad está en una posición inestable es posible que no funcione correctamente por ejemplo el sonido puede interrumpirse 1 Retire las piezas que interfieran con la instalación como el panel del vehículo ...

Page 97: ...e la unidad de visualización con seis tornillos de cabeza hexagonal accesorio 8 Coloque la cubierta protectora accesorio en la pieza de acople y a continuación fíjela con dos tornillos de fijación accesorio NOTA Si la cubierta protectora accesorio no está instalada esta unidad no se encenderá Aunque encienda la unidad la alimentación se apagará en mitad del proceso Asegúrese de instalar la cubiert...

Page 98: ...rcha atrás 2 m Azul claro Amarillo cable del mando a distancia de la dirección Conecte el mazo de la luz de marcha atrás del vehículo cuando utilice una cámara de visión trasera opcional Al mando a distancia de la dirección Para utilizar la función de mando a distancia en el volante es necesario un adaptador remoto exclusivo no suministrado apropiado para su vehículo Si no se efectúan las conexion...

Page 99: ...l de instrucciones Para más información sobre cómo conectar los cables de los altavoces a terminales que no sean los terminales para altavoz y los terminales de salida previa consulte Conexión del sistema y de los componentes externos P 99 y Conectar los cables a los terminales P 98 Ñ Ñ Configuración de sistema de altavoces de 3 vías DMX1057XR Ñ Ñ Conexión del sistema y de los componentes externos...

Page 100: ... 102 12 Entrada de la cámara de visión trasera amarillo 1 13 Entrada de la cámara de visión delantera cámara de salpicadero amarillo 2 Consulte Para configurar los ajustes de asignación de la cámara P 102 14 Salida de vídeo amarillo 15 Entrada de vídeo amarillo 1 Conecte una cámara HD al terminal de entrada de la cámara de visión trasera para usar video HD 2 Conecte una cámara HD a la cámara de vi...

Page 101: ... 1 Corriente de alimentación máxima USB CC 5 V 1 5 A 2 Se vende por separado 3 Accesorio opcional 4 Consulte Asegurar el cable de extensión USB P 100 Ñ Ñ Conexión de un teléfono inteligente Android Terminal USB 1 Accesorio 2 1 m 3 Cable USB 2 Smartphone Android 2 1 Corriente de alimentación máxima USB CC 5 V 1 5 A 2 Se vende por separado 3 Consulte Asegurar el cable de extensión USB P 100 B5K 0761...

Page 102: ...ara video HD también se usa una cámara HD como cámara de visión delantera Ñ Ñ Para configurar los ajustes de asignación de la cámara 1 Pulse el botón HOME 2 Toque 3 Toque SETUP h h Aparece la pantalla SETUP Menu 4 Toque Camera h h Aparece el menú de ajustes de la cámara 5 Toque Camera Assignment Settings 6 Seleccione el elemento a configurar REAR VIEW CAMERA Establezca la asignación de la vista de...

Page 103: ...entified in the badge and has been certified by the developer to meet Apple performance standards Apple is not responsible for the operation of this device or its compliance with safety and regulatory standards Please note that the use of this accessory with an Apple product may affect wireless performance Apple iPhone iPod iPod touch and Lightning are trademarks of Apple Inc registered in the U S...

Page 104: ...O LICENSE IS GRANTED OR SHALL BE IMPLIED FOR ANY OTHER USE ADDITIONAL INFORMATION MAY BE OBTAINED FROM MPEG LA L L C SEE HTTPS WWW MPEGLA COM libFLAC Copyright C 2000 2009 Josh Coalson Copyright C 2011 2013 Xiph Org Foundation Redistribution and use in source and binary forms with or without modification are permitted provided that the following conditions are met Redistributions of source code mu...

Page 105: ... following disclaimer Redistributions in binary form must reproduce the above copyright notice this list of conditions and the following disclaimer in the documentation and or other materials provided with the distribution Neither the name of the Xiph org Foundation nor the names of its contributors may be used to endorse or promote products derived from this software without specific prior writte...

Page 106: ... s receiver s that comply with Innovation Science and Economic Development Canada s licence exempt RSS s Operation is subject to the following two conditions 1 This device may not cause interference 2 This device must accept any interference including interference that may cause undesired operation of the device CAUTION This equipment complies with FCC ISED radiation exposure limits set forth for ...

Page 107: ...atamiento adecuado a estos productos y a sus subproductos residuales correspondientes Póngase en contacto con su administración local para obtener información sobre el punto de recogida más cercano Un tratamiento correcto del reciclaje y la eliminación de residuos ayuda a conservar los recursos y evita al mismo tiempo efectos perjudiciales en la salud y el medio ambiente Informação sobre a elimina...

Page 108: ...Hi Res Audio logo and Hi Res Audio Wireless logo are used under license from Japan Audio Society B5K 0761 00_20DDX_K_FP_QSG indb 108 2020 07 02 14 26 ...

Reviews: