background image

4

TABLE OF CONTENTS

SAFE INSTALLATION, USE AND SERVICE ...................................................................................................................................... 2
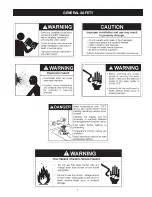
GENERAL SAFETY ............................................................................................................................................................................ 3
TABLE OF CONTENTS ...................................................................................................................................................................... 4
INTRODUCTION ................................................................................................................................................................................ 5
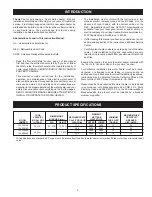
PRODUCT SPECIFICATIONS ........................................................................................................................................................... 5
MATERIALS AND BASIC TOOLS NEEDED ...................................................................................................................................... 6

Materials Needed ......................................................................................................................................................................... 6
Basic Tools ................................................................................................................................................................................... 6
Additional Tools Needed When Sweat Soldering ........................................................................................................................ 6

INSTALLATION  INSTRUCTIONS .................................................................................................................................................. 7-16

Removing the Old Water Heater .............................................................................................................................................. 7,8
Facts to Consider About the Location ......................................................................................................................................... 8
Insulation Blankets ....................................................................................................................................................................... 8
Facts to Consider About the Convertible Lower Element ......................................................................................................... 8,9
Water Piping ........................................................................................................................................................................... 9,10
T & P Valve and Pipe Insulation ................................................................................................................................................ 10
Temperature-Pressure Relief Valve ...................................................................................................................................... 10,11
Temperature-Pressure Relief Valve- Optional Location ....................................................................................................... 11,12
Filling the Water Heater ............................................................................................................................................................. 12
Converting the Lower Element ............................................................................................................................................. 12-14
Wiring .................................................................................................................................................................................... 14,15
Wiring Diagrams ........................................................................................................................................................................ 16

SERVICE AND ADJUSTMENT .................................................................................................................................................... 17-22

Temperature Regulation ............................................................................................................................................................. 17
Thermostat ................................................................................................................................................................................. 17
Temperature Settings ................................................................................................................................................................. 17
Upper and Lower Thermostat Adjustments .......................................................................................................................... 17,18
Anode Rod Inspection ................................................................................................................................................................ 18
Temperature-Pressure Relief Valve Operation .......................................................................................................................... 18
Draining ................................................................................................................................................................................. 18,19
Thermostat  Removal/Replacement ........................................................................................................................................... 19
Element Cleaning/Replacement ........................................................................................................................................... 19-22
Drain Valve Washer Replacement ............................................................................................................................................. 22
Service ....................................................................................................................................................................................... 22

TROUBLESHOOTING GUIDE .................................................................................................................................................... 23-26
        Start Up Conditions .................................................................................................................................................................. 23

   Thermal Expansion ............................................................................................................................................................ 23
   Strange Sounds ................................................................................................................................................................. 23

Operational Conditions ......................................................................................................................................................... 23-25

  Smelly Water ................................................................................................................................................................. 23,24
   “Air” in Hot Water Faucets ................................................................................................................................................. 24
  Rumbling Noise .................................................................................................................................................................. 24
  High Temperature Shut Off System .................................................................................................................................... 24
  Not Enough or No Hot Water ........................................................................................................................................ 24,25
  Water Is Too Hot ................................................................................................................................................................. 25

Leakage Checkpoints ............................................................................................................................................................ 25,26

REPAIR PARTS LIST ....................................................................................................................................................................... 27
WARRANTY ..................................................................................................................................................................................... 28

Summary of Contents for POWER MISER 153.326162

Page 1: ...llon Short 153 326265 38 Gallon Short POWER MISER 6 ELECTRIC WATER HEATER Sears Roebuck and Co Hoffman Estates IL 60179 U S A www sears com PRINTED 0707 185799 000 GAMA certification applies to all residential electric water heaters with capacities of 20 to 120 Gallons Input rating of 12kW or less Safety Instructions Installation Operation Care and Maintenance Troubleshooting Service Parts List ...

Page 2: ...oductive harm This appliance can cause low level exposure to some of the substances listed including formaldehyde IMPORTANT DEFINITIONS Sears Service Center The Sears Service Center has the ability equivalent to a licensed tradesman in the fields of plumbing and electrical work including a thorough understanding of the requirements of the National Electrical Code as it relates to the installation ...

Page 3: ...3 GENERALSAFETY ...
Page 4: ...on 11 12 Filling the Water Heater 12 Converting the Lower Element 12 14 Wiring 14 15 Wiring Diagrams 16 SERVICE AND ADJUSTMENT 17 22 Temperature Regulation 17 Thermostat 17 Temperature Settings 17 Upper and Lower Thermostat Adjustments 17 18 Anode Rod Inspection 18 Temperature Pressure Relief Valve Operation 18 Draining 18 19 Thermostat Removal Replacement 19 Element Cleaning Replacement 19 22 Dra...

Page 5: ...brary or electric company or by writing Underwriters Laboratories Inc 333 Pfingsten Road Northbrook IL 60062 If after reading this manual you have any questions or do not understand any portion of the instructions call Sears Service Center Carefully plan the place where you are going to put the water heater Correct electrical wiring and connections are very important in preventing death from possi...

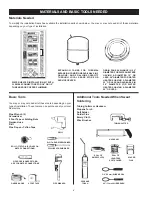
Page 6: ...T TAPE HACKSAW TUBING CUTTER PROPANE TORCH ROLL OF EMERY CLOTH 3 4 19 mm WIRE BRUSH 1 2 13 mm WIRE BRUSH ROLL OF LEAD FREE SOFT SOLDER SOLDER FLUX Materials Needed To simplify the installation Sears has available the installation parts shown below You may or may not need all of these materials depending on your type of installation EXPANSION TANKS FOR THERMAL EXPANSION CONDITIONS AVAILABLE IN 2 GA...

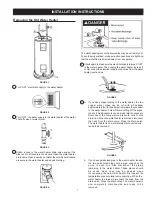
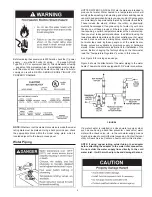
Page 7: ...unction box FIGURE 5 5 a If you have copper piping to the water heater the two copper water pipes can be cut with a hacksaw approximately four inches away from where they connect to the water heater This will avoid cutting off the pipes too short Additional cuts can be made later if necessary Disconnect the temperature pressure relief valve drain line When the water heater is drained disconnect th...

Page 8: ...on 240 volts See rating plate on the water heater The Lower Element of the water heater can be converted from operation at 3800 watts to 5500 watts on a 240 volt system Read and follow water heater warnings and instructions If after reading these instructions in this manual you do not understand any portion call Sears Service Center FIGURE 7 Mineral buildup or sediment may have accumulated in the ...

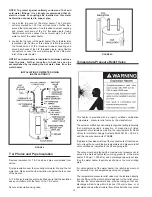
Page 9: ...cal code or state law requiring a certain temperature water at the hot water tap then you must take special precautions In addition to using the lowest possible temperature setting that satisfies your hot water needs a means such as a mixing valve should be used at the hot water taps used by these people or at the water heater Mixing valves are available at plumbing supply or hardware stores Follo...

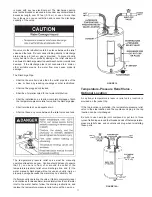
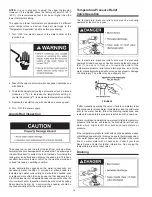
Page 10: ... against the top cover of the heater Fit T Pvalve insulation over valve Make sure that the insulation does not interfere with the lever of the T P valve Secure all insulation using tape FIGURE 9A Temperature Pressure Relief Valve This heater is provided with a properly certified combination temperature pressure relief valve by the manufacturer The valve is certified by a nationally recognized test...

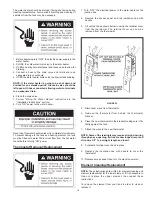
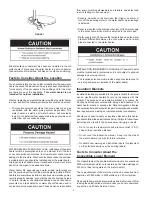
Page 11: ...he discharge pipe Shall terminate at an adequate drain Shall not have any valve between the relief valve and tank The temperature pressure relief valve must be manually operated at least once a year Caution should be taken to ensure that 1 no one is in front of or around the outlet of the temperature pressure relief valve discharge line and 2 the water manually discharged will not cause any bodily...

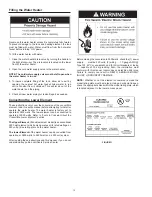
Page 12: ... water heater The water heater is factory set to operate at 3800 watts The lower element can be converted to operate at 5500 watts Refer to Facts to Consider About the Convertible Lower Element section The Upper Element if double element model is a conventional 3800 watt element which only operates at its rated wattage on 240 volts See rating plate on the water heater The lower Element of the wate...

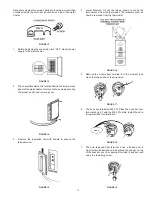
Page 13: ...e the terminal cover FIGURE 15 4 Lower Element Lift out the tab as shown to unclip the terminal cover from the thermostat The terminal cover can now be removed from the thermostat FIGURE 16 5 Remove the screws from terminal 2 of the element and move the looped end of the wire aside FIGURE 17 6 The buss bar is labeled 5500 W Place the buss bar over terminals 2 and 3 with the 5500 W visible Install ...

Page 14: ...DAMAGE 10 Replace the insulation cap with handle so that it completely covers the thermostat and element FIGURE 20 11 Replace the access panel FIGURE 21 12 Complete wiring to the water heater or if completed turn ON electric power to the water heater after filling the tank with water FIGURE 22 Never use this water heater unless it is completely full of water To prevent damage to the tank and heati...

Page 15: ... may be used for the grounding means if conduit or tubing is terminated in fittings approved for grounding C Flexible metal conduit or flexible metallic tubing shall be permitted for grounding if all the following conditions are met The length in any ground return path does not exceed 6 feet The circuit conductors contained therein are protected by overcurrent devices rated at 20 amperes or less T...

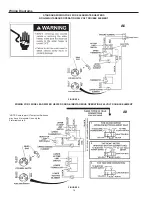
Page 16: ...TERS NON SIMULTANEOUS OPERATION 240 VOLT DOUBLE ELEMENT FIGURE 24 FIGURE 25 WIRING FOR 3 WIRE LEAD WATER HEATERS NON SIMULTANEOUS OPERATION 240 VOLT DOUBLE ELEMENT NOTE Some lower Hi Temp Limit Switches may have 4 terminals Use only the 2 terminals on left A6 A9 ...

Page 17: ...cally mentally handicapped If anyone using hot water in your home fits into one of these groups or if there is a local code or state law requiring a certain temperature water at the hot water tap then you must take special precautions In addition to using the lowest possible temperature setting that satisfies your hot water needs some type of tempering device such as a mixing valve should be used ...

Page 18: ... an anode rod that appears to be intact Replacement of a depleted anode rod can extend the life of your water heater Inspection should be conducted by calling Sears Service Center At a minimum the anode s should be checked annually after the warranty period Temperature Pressure Relief Valve Operation The temperature pressure relief valve must be manually operated at least once a year The temperatu...

Page 19: ...st flow from the hot water faucet before turning ON power Thermostat Removal Replacement 1 Turn OFF the electrical power to the water heater at the junction box 2 Remove the access panel and the insulation cap with handle 3 Lift out the tab as shown below to unclip the terminal cover from the thermostat The terminal cover can now be removed from the thermostat FIGURE 29 4 Disconnect wires from the...

Page 20: ...e water heater and speed draining FIGURE 32 The water passing out of the drain valve may be extremely hot To avoid being scalded make sure all connections are tight and that the water flow is directed away from any person 4 Remove the two screws securing the access panel and remove panel FIGURE 33 5 Remove the insulation cap with handle FIGURE 34 6 Lift out the tab as shown to unclip the terminal ...

Page 21: ...ter NOTE The cold water supply valve must be left open when the water heater is in use 13 To insure complete filling of the tank allow air to exit by opening the nearest hot water faucet Allow water to run until a constant flow is obtained This will let air out of the water heater and the piping Never use this water heater unless it is completely full of water To prevent damage to the tank and hea...

Page 22: ...he screw handle Remove the washer and put the new one in place Screw the handle and cap assembly back into the drain valve and retighten using a wrench DO NOT OVER TIGHTEN Follow Filling the Water Heater instructions in the Installation Instructions section Check for leaks Turn ON electric power to the water heater FIGURE 42 Service Before calling for repair service read the Start Up Conditions an...

Page 23: ...nsion Tank Specifications Tank Dimensions Pipe Model Capacity in Inches Fitting Number In Gallons Diameter Length On Tank 153 331020 2 8 203 mm 12 3 4 323 mm 3 4 Male 153 331050 5 11 279 mm 14 3 4 375 mm 3 4 Male Expansion Tank Sizing Chart Inlet Water Heater Capacity Gallons Water Pressure 30 40 50 66 82 Expansion 40psi 2 2 2 5 5 Tank 50psi 2 2 2 5 5 Capacity 60psi 2 2 5 5 5 Needed 70psi 2 2 5 5 ...

Page 24: ...s the hot water faucet is opened There must be no smoking or open flame near the faucet at the time it is open RUMBLING NOISE In some water areas scale or mineral deposits will build up on your heating elements This buildup will cause a rumbling noise Follow Element Cleaning Replacement instructions to clean and replace the elements HIGH TEMPERATURE SHUT OFF SYSTEM The water heater has a high limi...

Page 25: ...lectric service to your house has not been interrupted If this is the case contact the electric company 6 Is the thermostat set to the desired temperature See Temperature Regulation section 7 If you had experienced very hot water and now no hot water the problem may be due to the high temperature shut off system See High Temperature Shut Off System in the Troubleshooting section 8 During very cold...

Page 26: ...lve may be leaking at the tank fitting E The element may be leaking at the tank fitting Turn electrical power OFF remove access panel and insulation cap with handle If leaking around element follow proper draining instructions and remove element Reposition or replace gasket on element Place element into opening and tighten securely Then follow Filling the Water Heater instructions in the Installat...

Page 27: ...rd replacement element 9000049 If at the time of installation the water heater was converted to operate at 5500 watts order Super Limeguard replacement element 9000396 See model rating plate If Converted box NOTE B These water heaters are equipped with a Roto SwirlTM dip tube to retard a build up of dissolved solids Key Model No No Part Description 153 326162 153 326163 153 326264 153 326265 1 Bus...

Page 28: ...and manufactured for years of dependable operation But like all products it may require preventive maintenance or repair from time to time That s when having a Master Protection Agreement can save you money and aggravation Purchase a Master ProtectionAgreement now and protect yourself from unexpected hassle and expense The Master Protection Agreement also helps extend the life of your new product ...

Reviews: