


34
·
146.03358410
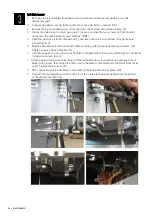
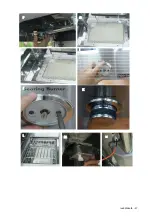
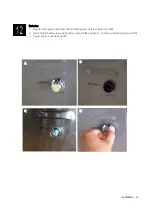
Rotisserie Kit Assembly (Rotisserie motor on left side as shown)
□
Remove warming rack from firebox. Insert motor support into motor support bracket
preassembled to left side of firebox (A).
□
Insert rotisserie motor onto motor support (B). Make sure to insert motor with power cord at
bottom.
□
Slide the shaft collar onto the rotisserie rod followed by the two forks (forks should be
pointing toward each other). Make sure that shaft collar is positioned near rounded end of
rotisserie rod. Tighten Wing Screw, Flat Head Set Screw on shaft collar and forks, but do not fully
tighten in this step. (C)
□
Insert the pointed end of the rotisserie rod into the hole for it in the motor. On the other end of the
rod, slide the shaft collar to the point where the groove in the collar will lay securely in the slot in
the firebox wall (D). Fully tighten the collar Wing Screw, Flat Head Set Screw with slotted
screwdriver.
□
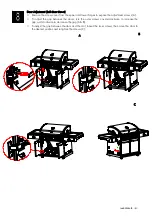
The rotisserie motor can be assembled on either the left and right side of firebox. If you need to
use the rotisserie and side burner at the same time, you may position the motor over the searing
burner side of the grill. Remove motor, motor support and motor support bracket and reassemble
to the other side of firebox. To detach bracket, remove the two screws and use them to attach the
bracket to the other side.
A
B
C
D
Summary of Contents for 146.03358410
Page 17: ...DIAGRAM PARTS LIST 146 03358410 17 ...
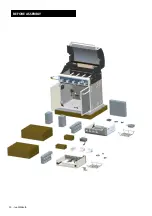
Page 19: ...146 03358410 19 BEFORE ASSEMBLY ...
Page 20: ...20 146 03358410 BEFORE ASSEMBLY ...
Page 25: ...146 03358410 25 G H I J K L I K L M N J ...
Page 27: ...146 03358410 27 F G H J K L M N I ...
Page 57: ...ESQUEMA PARTS LIST 146 03358410 57 ...
Page 59: ...146 03358410 59 ANTES DE ASAMBLEA ...
Page 60: ...60 146 03358410 ANTES DE ASAMBLEA ...
Page 65: ...146 03358410 65 G H I J K L I J K L M N ...


