7
Installation Instructions Kemlan Natural Draft Electronic Ignition Gas Fireplaces
Gas Installation
1
Check unit is suitable for intended gas supply.
2
Note position on gas appliance on drawing
specification on right hand side of appliance.
3
A gas cock has to be fitted prior to gas burner to
allow unit to be removed for servicing.
4 If material has been installed around firebox and
access panel below is not accessible the top plate
can be removed to gain access by removing four
screws and lifting out top plate.
5
Connection is half inch BSP fitting. Cut and debur
both ends of pipe. Fit end to gas supply point and
turn on for approximately 5 seconds to clear dirt
and grit out of pipe. Connect into gas valve.
6
Turn on the gas and check all connections for leaks
using approved method for testing. Fix any leaks.
Adjusting Pressure, Pilot
and Low Fire
1
All settings are set to operate at nominal pressure
(see data plate). Test points to measure inlet and
outlet pressure are located on gas valve. Unscrew
brass screw on test point pressure nipples and
attach manometer and read pressures with unit
running. Adjust pressure to data plate requirements.
2
Check low fire if adjusted correctly.
3
Note: Failure to set pressures correctly will void
warranty on the unit.
Lighting Instructions
Natural Draft Electronic Ignition Fireplaces are provided
with 240 volt electronic ignition systems.
An on/off wall switch is supplied and fitted with unit. The
fireplace is switched on from wall switch. Power is then
sent to valve to light pilot and main burner will then
ignite from pilot.
Burner is turned off by turning off wall switch. System
does not have a high low burner switch.
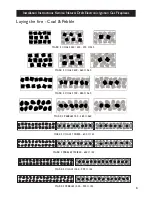
Laying the fire -
Coal & Pebble
•
Evenly spread a bag of Vermiculite into the burner
tray. Tray should be completely filled to the top with
Vermiculite to a depth of approximately 45mm.
•
Unpack the coals/pebbles contained in a clear
plastic bag and lay a row of coals/pebbles on the
vermiculite along the back of the burner tray leaving
approximately 12-15mm between them.
•
Leave spaces at the edges to allow free flow of gas.
•
Place a further row of coals/pebbles directly in front
of the first row but staggered so that the second row
of coals are behind the gaps of the first row leaving
approximately 12-15mm between the rows of each
coal/pebble.
•
Lay further rows of staggered coals/pebbles
depending on the size of the basket grate.
•
Once the bottom layer is completed, build up 2-3
tiers of coals in a honeycomb pattern to form an
elongated pyramid.
•
Lay the coals/pebbles so that some irregularity to
the pile through which the flames may lick, is created.
•
Your aim is to build “windows” into the fire through
which the radiant effect may show but at the same
time, not leaving such large gaps between the coals/
pebbles that excessive air may enter and “damp down”
the red glow.
•
After the fire has been alight for 15 minutes, you
may wish to add the odd coal/pebble or even relay the
fire completely. Allow to cool before touching the
coals/pebbles.
•
Experience will enable you to obtain a pleasing
appearance with suitable heat output, but please bear
in mind that it is important to maintain the general
pattern described above and indicated in illustrations.
SEE NEXT PAGE FOR COAL & PEBBLE DIAGRAMS

