


Service Bulletin
M3 and M5 Retrofit Leveler Installation
Parts and Tools Required
1. Leveler Kit, which includes
-
3 replacement glides and bolts
-
1 leveler glide
-
1 threaded insert
2. 3/16 Hex wrench
3. Power Drill with 11mm step bit
*Note – The step bit must have an 11 mm step and each step must be at least 3.5 mm deep.
4. Crimping Tool, Provided by Keiser
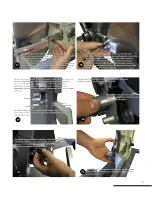
STEP 1.
Lower the handlebar to the lowest position and re-secure the handle
STEP 2.
Tilt the M3 or M5 onto its transport wheels and lower it down, resting it on the handlebar.
STEP 3.
Remove the four existing glides with 3/16 hex. Discard old glides and hardware.
STEP 4.
Install 3 new glides and bolts in existing holes in the front, and rear right of the frame.
STEP 5.
Expand the remaining tap hole to 11mm using the step drill bit and power drill.
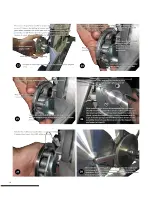
STEP 6.
Loosen the band on the crimping tool, and fully open the handles.
STEP 7.
Hand tighten the supplied threaded insert onto the mandrel of the crimping tool until it bottoms out.
STEP 8.
Place the threaded insert into the 11mm hole. Be sure the insert is square to the frame surface.
STEP 9.
With a partner stabilizing the machine, crimp the insert by fully closing, then fully opening the handles. This
will require a substantial amount of force.
STEP 10.
Pull the screw rod slowly to back out the screw mandrel from the threaded insert, then push screw rod back
STEP 11.
Screw in the provided leveler glide completely.
STEP 12.
Tilt the machine on to its right side, exposing the leveler glide. Adjust and re-check until it sits level with the
surface.
2470 S CHERRY AVE
FRESNO CA 93706
For any further questions contact:
TOLL FREE 1.800.888.7009 PHONE 559.256.8000 FAX 559.256.8100
www.keiser.com [email protected]
in completely to get ready for the next use.
Summary of Contents for M3
Page 1: ...M3 User and Service Manual...
Page 6: ...12 Calibrate The Computer See Next Section 4...
Page 7: ...5...
Page 12: ...Resistance Mechanism Removal 10...
Page 13: ...11...
Page 14: ...Resistance Mechanism Installation 12...
Page 15: ...13...
Page 16: ...14...
Page 17: ...Steps For Belt Removal 15...
Page 18: ...Steps for Belt Installation 16...
Page 19: ...Crank Arm and Axle Removal and Installation 17...
Page 20: ...18...
Page 21: ...19...
Page 25: ...23...
Page 26: ...24...
Page 27: ...25...