136
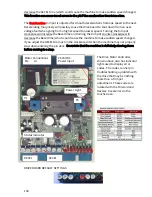
To adjust 10-pin Approach Drive Chain:
1. Loosen the three screws that secure the center compartment and hinge it back.
2. Locate the chain idler adjustment and loosen the main pivot and adjusting jam nut.
3. Adjust the idler until there is no play in the approach wheel. Make sure the sprockets
not come in contact with each other after the adjustment is made.
4. Tighten the jam nut and pivot and check for play in the wheel.
To adjust 7-pin Approach Drive Chain:
1. Loosen the three screws that secure the center compartment and hinge it back.
2. Loosen the motor mount from the outside of the panel.
3. Loosen the adjusting screw jam nut if one is used on the machine.
4. Turn the adjusting screw in or out so the chain has between 1/4 inch and 3/8 inch
(6.35mm to 9.53 mm) of movement, but no play in the approach wheel.
5. Re-tighten the motor mount and adjusting screw jam nut then check the buffer belt
tension and re-adjust if needed.
6. Hinge the PLC control plate into place and tighten the three screws.
Note: It is a good idea to inspect and clean everything in the center compartment when it is
open.
Rear Approach Wheel Chains
These chains should never be tight and the adjustment should last a long time due to the
light duty of these wheels. The plastic idler used to give chain tension is only removing the
excess slack in the chain. A little movement in the rear approach wheels is fine.
Approach Sensor Chains
The Approach Sensors located on each side of the machine use a #25 chain to drive the
target. This chain is small and should never be tight; it should always run a little loose. A
good adjustment would be to have 1/2 inch (1.27 cm) of total play in the chain. To make an
adjustment, loosen the two bolts on the bracket and move the assembly to achieve the
proper amount of play.
Summary of Contents for FLEX 17-5701
Page 1: ...OPERATORS MANUAL Edition 03 18...
Page 2: ......
Page 12: ......
Page 16: ...4 Wah lah I did them the same...
Page 51: ...39...
Page 171: ...159...
Page 172: ...160 CHAPTER 7 Miscellaneous Parts Stickers and Decals...
Page 173: ...161...
Page 174: ...162...
Page 176: ...164...
Page 178: ......
Page 181: ......
Page 183: ......
Page 185: ......
Page 187: ...7 7...
Page 189: ......
Page 191: ......
Page 193: ......
Page 195: ......
Page 197: ......
Page 199: ...14 15 16 17 18 19 5 4 7 6 13 8 9 10 2 12 11 9 3 8 10 9 1 3 9 10 12...
Page 201: ......
Page 203: ......
Page 205: ...7 7...
Page 207: ......
Page 209: ......
Page 211: ......
Page 213: ......
Page 215: ...7 5 7...
Page 217: ......
Page 219: ......
Page 221: ......
Page 223: ......
Page 225: ......
Page 227: ...7 7...
Page 229: ......
Page 231: ......
Page 233: ...7...
Page 235: ......
Page 237: ......
Page 239: ...3 2 9...
Page 241: ......
Page 243: ......
Page 245: ......
Page 246: ...235...
Page 248: ...230...
Page 249: ...231...
Page 250: ...232...
Page 251: ...233...
Page 252: ...234...
Page 253: ...235...
Page 254: ...236...
Page 255: ...237...
Page 256: ...238...
Page 257: ...239...
Page 258: ...240...
Page 259: ...241...
Page 260: ...242...
Page 261: ...243...
Page 262: ...244...
Page 263: ...245...
Page 264: ...246...
Page 265: ...247...
Page 266: ...248...
Page 267: ...249...
Page 268: ...250...
Page 269: ...251...
Page 270: ...252...
Page 271: ...253...
Page 272: ...254...
Page 273: ...255...
Page 274: ...261...
Page 276: ...257...
Page 277: ...258...
Page 278: ...259...
Page 279: ...260...
Page 280: ...261...
Page 281: ...262...
Page 282: ...263...
Page 283: ...264...
Page 284: ...265...
Page 285: ...266...
Page 286: ...267...
Page 287: ...268...
Page 288: ...269...
Page 289: ...270...
Page 290: ...271...
Page 291: ...272...
Page 292: ...273...
Page 293: ...274...
Page 294: ...275...
Page 295: ...276...
Page 296: ...277...
Page 297: ...278...
Page 298: ...279...
Page 299: ...280...
Page 300: ...281...
Page 301: ...282...
Page 302: ...283...
Page 303: ...290...

