


1.
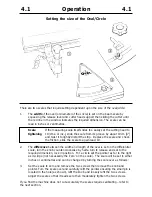
Setting the blade depth
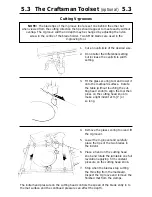
The blade should be set deep enough to penetrate the board being cut with a
clearance of approximately 1.5mm [
1
/
16
”] under the blade holder (thickness of
regular matboard).
a. Loosen the blade clamping knob and remove the old blade.
b. Place two thicknesses of matboard together on the turntable.
c. Lower the blade holder (by rotating the cutting head knob) leaving the blade
slots clear.
d. Fit the blade in the slot allowing it to drop so the tip touches the turntable
and tighten the blade.
NOTE: If the material being cut is thicker than regular matboard use a piece of the
material for the depth of cut and a piece of regular matboard to set the clearance.
2.
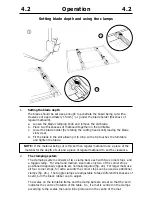
The clamping system
The clamping system consists of two clamp bars each with two corner stops and
a toggle clamp. For small and medium size mats only two of the corner stops
positioned diagonally opposite are normally required (fig. 2a). For larger mats use
all four corner stops, for extra security the corner stops can be used as additional
clamps (fig. 2b.). The toggle clamps are adjustable to take different thicknesses of
board, turn the black rubber cap to adjust.
The scales on the turntable frame and the clamp bars are all set so that the ‘zero’
indicates the centre of rotation of the table. So, if a mat is centred in the clamps
according to the scales the oval will be produced in the centre of the mat.
2b
2a
4.2
Operation
4.2
Setting blade depth and using the clamps


