1.
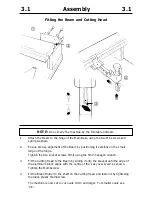
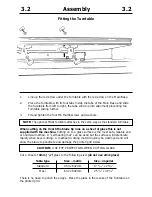
Line up the red arrow under the Turntable with the red arrow on the Main Base.
2.
Place the Turntable with its four tabs inside the tabs of the Main Base and slide
the Turntable from left to right, the tabs will drop into alignment preventing the
Turntable sliding further.
3.
Fit and tighten the four M6 thumbscrews and washers.
NOTE:
The optional MAXI Turntable attaches in the same way as the standard Turntable.
When cutting on the Oval 6 the blade tip runs on a sheet of glass this is not
supplied with the machine. Cutting on to a glass surface is the most safe, reliable and
economical method. A “self healing mat” can be used but the surface will deteriorate
rapidly when bevel cutting. A matboard cutting mat will quickly be destroyed and will
allow the blade to penetrate and damage the printed grid below.
CAUTION: USE EYE PROTECTION WHEN CUTTING GLASS
Cut a sheet of 3mm (
1
/
8
”) glass to the following size: (do not use 2mm glass)
Table type
Size – metric
Size – imperial
Standard
453 x 642mm
17
13
/
16
” x 25
1
/
4
”
Maxi
642 x 802mm
25
1
/
4
” x 31
9
/
16
”
There is no need to polish the edges. Place the glass in the recess of the Turntable on
the printed grid.
3.2
Assembly
3.2
Fitting the Turntable


