background image

36

Au

Au

Au

Au

di

di

di

di

o

o

o

o

se

se

se

se

le

le

le

le

ct

ct

ct

ct

io

io

io

io

n

n

n

n

Press the 

 (yellow) button, use the 



 buttons to select “Select Audio track” and press the 

 button to con

fi

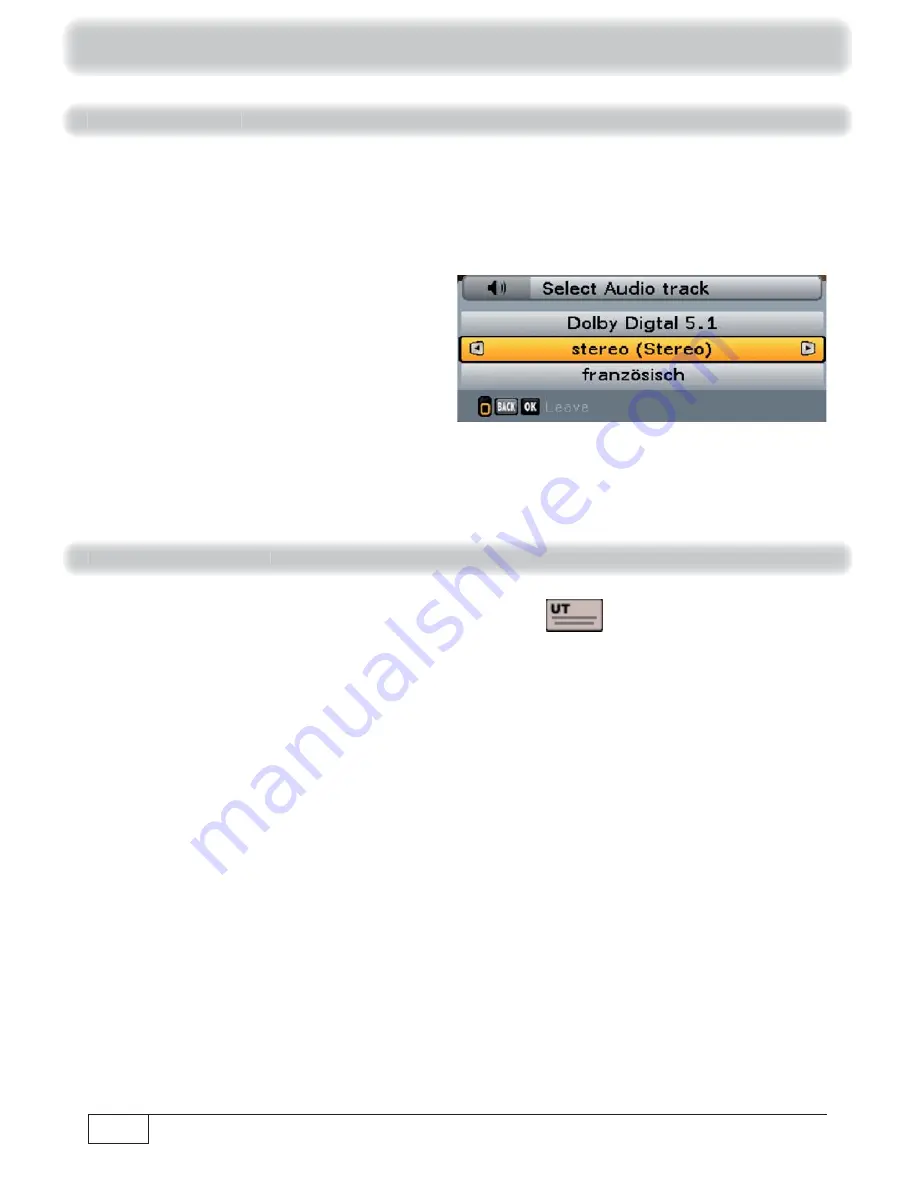
 rm your selection. The following on-screen display then appears (example):

Use the cursor (

) buttons to select your desired soundtrack option, and press the 

 button to 

con

fi

 rm your selection.

Su

Su

Su

Su

bt

bt

bt

bt

it

it

it

it

le

le

le

le

s

s

s

se

se

se

se

le

le

le

le

ct

ct

ct

ct

io

io

io

io

n

n

n

n

If the channel OSD includes the following symbol for subtitles 

, you can call up the “Subtitle” 

function as follows: Press the 

 (yellow) button, use the 



 buttons to select “Subtitle” and press 

the 

 button to con

fi

 rm your selection.

Use the 



 buttons to select the desired subtitles and con

fi

 rm by pressing the 

 button. 

The receiver will automatically return to the TV picture.

Basic functions

Summary of Contents for UFS 80si

Page 1: ...Operating manual Englisch UFS 80si sw HDTV Satellite receiver ...

Page 2: ...Program guide 41 Current view 42 Timer list view 42 Recording settings programming the timer 43 Recording once 44 Recording daily 45 Recording weekly 45 Timer list 46 Timer overlap 46 MediaCenter 47 General multimedia information UFS 80 47 Playing media files selecting source directory 47 Picture playback 48 MP3 playback 49 Main Menu 50 Calling up the main menu and introduction 50 Menu overview 51...

Page 3: ... Troubleshooting 75 Technical appendix 76 Alphanumeric entries 76 Advanced connection example 77 Technical Specifications 78 Sat IF connection examples 79 Individual reception systems 79 Community antenna network systems 4 x Sat IF 79 Community antenna network systems 8 x Sat IF multi feed 80 Community antenna network systems 16 x Sat IF multi feed 80 One Cable Systems 81 Short Technical Glossary ...

Page 4: ...terms that cannot be translated we have added a short glossary at the end of the manual The power switch is an environmentally friendly feature If you will not be using your receiver for an extended period you should use the on off switch to disconnect it from the power supply and save energy For shorter breaks you can use the remote control to switch the receiver to standby which uses only a mini...

Page 5: ...e rear of the unit or on the external power supply unit The unit may only be connected to the mains and turned on once it has been connected to the Moisture direct sunlight heat naked flames Protect the unit against moisture dripping and splashed water do not place any filled objects such as vases on top of the unit Do not place the unit close to a heater or expose it to direct sunlight and do not...

Page 6: ...on a suitable stable and flat base Repairs Ensure that any repairs to your unit are carried out by qualified personnel Opening the unit and attempting to repair it yourself will void all warranty claims Improper work on the unit may jeopardise the electrical safety of the unit The manufacturer accepts no liability for accidents caused by the user opening the casing of the unit Connections Incorrec...

Page 7: ... tu turn rn rn rn o o o ori ri ri rigi gi gi gi g g g g g g na na na nal l l l pa pa pa pa p p p p p ck ck ck ckag ag ag ag g g g g g gin in in ing g g g g g g g g g Please keep the original packaging in case you need to return the product at any time The receivers are fragile due to their construction and are only adequately protected by the original packaging If the receiver is not shipped corre...

Page 8: ...eleased for your receiver and this affects the information in the operating manual e g changes to the menus and or functions if we believe it necessary we will make available a new operating manual for download under www kathrein de Make a note of the receiver s basic settings these are set during first installation so you can restore them if necessary Included in the software for this receiver is...

Page 9: ...ear of the remote control Insert the two batteries supplied into the remote control Ensure correct polarity of the batteries the and markings are indicated inside the battery compartment Slide the cover back onto the housing until it locks in place In In In Inse se se sert rt rt rtin in in ing g g g g g g g g g ba ba ba batt tt tt tter er er erie ie ie ies s s s in in in into to to to t t t the he...

Page 10: ...ata stream output S PDIF Sony Philips Digital Interface Format for Dolby Digital AC 3 audio 12 Video output CVBS 13 Audio outputs L R cinch sockets 14 Mains power cable 4 4 4 4 4 4 4 4 4 3 3 3 3 3 3 3 3 3 3 1 1 1 1 1 1 1 1 1 1 1 1 1 1 10 0 0 0 0 0 0 0 0 0 0 1 1 1 1 1 1 1 1 1 1 1 1 1 11 1 1 1 1 1 1 1 1 1 1 1 1 1 1 1 1 1 1 1 1 1 1 14 4 4 4 4 4 4 4 4 4 4 6 6 6 6 6 6 6 6 6 6 7 7 7 7 7 7 7 7 7 1 This d...

Page 11: ...your satellite reception system contact your specialist dealer Co Co Co Conn nn nn nnec ec ec ecti ti ti ting ng ng ng g g g g g g t t t the he he he r r r rec ec ec ecei ei ei eive ve ve ver r r r Connect the Sat IF input on the receiver to the satellite reception system Use coaxial cable with an F standard connector see illustration on right HDMI TV Scart Conventional DiSEqC system ...

Page 12: ...ital output The S PDIF output is intended for the connection of a Dolby Digital system see Advanced connection example in the technical appendix Connect the S PDIF output and the Dolby Digital system using an appropriate cable TV TV TV TV a a a and nd nd nd v v v vid id id ideo eo eo eo r r r rec ec ec ecor or or orde de de der r r r co co co conn nn nn nnec ec ec ecti ti ti tion on on on Au Au Au...

Page 13: ...ic entry Cancel entry go back red Go back one step in the first installation green Proceed to the next step in the first installation Select change individual menu parameters navigation Confirm the changed values setting First switch your TV set on and select the AV HDMI input you have used to connect the receiver to your TV set Switch on the receiver at the power switch on the front of the unit N...

Page 14: ...refer to use the factory pre programmed channel list choose No under Restore Channellist Press the green button to move to the next menu The following on screen display appears Use the buttons here to select the basic settings for the video and audio output from the receiver to the TV set During this process refer to the operating manual for your TV set and take care to select only those settings ...

Page 15: ...PDIF format Show 4 3 event Here you can select the type of screen display mode for 4 3 broadcasts on a 16 9 TV set normal Pillarbox Stretched full screen or Zoom in Pan Scan TV aspect ratio Here you can select the TV picture format Either 4 3 or 16 9 Picture format Select the type of screen display depending on your setting for the TV aspect ratio TV format 4 3 Pan Scan or Letterbox TV format 16 9...

Page 16: ...lays during the first installation using the green button This process cannot damage your reception system If there is no TV picture at the end of the first installation contact your specialist dealer Tip Tip The following on screen display appears You can set up the antenna tuner configuration for the following types of reception systems LNB only DiSEqC 1 0 One Cable System Continue as described ...

Page 17: ...ns to select the LNB types that are used in your reception system You can choose from the following LNB types Universal or Single LNB Low Frequency You only need to specify this data if your LNB type is not Universal For this refer to the documentation supplied with your LNB Enter the LNB low frequency using the number pad or the buttons LNB High Frequency You only need to specify this data if you...

Page 18: ...d by the receiver Test transponder Select the selection field Test Transponder Here you can select a transponder for checking whether your settings are correct using the signal strength bar and signal quality bar When you have completed all settings press the green button The receiver will automatically display the screen for the channel search Continue the first installation with the Channel Sear...

Page 19: ...EqC qC qC q q q 1 1 1 0 0 0 Number of Satellites Use the buttons to select how many satellites max 4 you would like to receive with your reception system Satellite selection setting Then use the buttons to select the first satellite slot Press the button to open the menu for the satellite settings The following on screen display appears example Satellite Use the buttons to set the desired satellit...

Page 20: ...ed with your LNB LNB Power This is factory set to On but must be changed if your LNB has its own power supply In most cases the LNB power supply is provided by the receiver Test transponder To check whether the settings that you have made are correct use the buttons to move to the Test transponder field Use the buttons to select the required transponder from the various ones listed If your setting...

Page 21: ... you require to access submenus they can be called up using the button Changes to the current settings can be made using the buttons or the number pad If you use a UAS 481 one cable LNB in your reception system you are only allowed to select one satellite Now use the buttons to select the New registration line and press the button to confirm Individual items are selected using the buttons Changes ...

Page 22: ...equipment Use the buttons to select the single cable system used in your reception system Either KATHREIN UAS 481 one cable LNB KATHREIN EXR 551 KATHREIN EXR 552 KATHREIN EXR 4 Kathrein single cable matrices for four subscribers KATHREIN EXR 8 Kathrein single cable matrices for eight subscribers KATHREIN EXU 908 or User defined for all one cable systems not covered by any of the above specificatio...

Page 23: ...connection Press the button to test the connection The following on screen display appears Press the button to confirm the displayed message If no connection can be established to the one cable system check your settings transmission channel and if necessary call for expert help Press the button to confirm the displayed message Then press the button to return to the Antenna Configuration menu Use ...

Page 24: ...e made are correct use the buttons to move to the Test transponder field Use the buttons to select the required transponder from the various ones listed If your settings are correct you will see at the top right of the screen the live signal of a channel from the currently selected transponder If you do not receive a signal check your settings again and if necessary call for expert help You have n...

Page 25: ...ry stored transponders of the satellite s you previously selected will be searched for new as yet unlisted channels If you set the network scan to On the transponder network enables additional transponders that have not yet been stored to be located They are then stored and scanned for new channels in the same way as the existing transponders When you have completed all settings press the green bu...

Page 26: ...26 Connection and set up After completion of the search you will see the following on screen display example Press the button The newly found channels are added at the end of the existing overall list ...

Page 27: ...ffset in 1 hour steps The maximum offset is 12 hours and Automatic clock change Summer time Here you can select whether the receiver should automatically change over to and from summer and winter time Either On or Off If you select Off Summertime will be displayed in the line below Here you manually set the time of the receiver to summer time selection Yes If Summertime No is selected winter time ...

Page 28: ...er pad Call up main menu Mute Channel selection Call up channel information info banner and detailed information Call up options menu Switch between TV radio mode Call up EPG Electronic Programme Guide Currently not used Navigation channel or change channel option Call up channel list confirmation call up selection Call up the MediaCenter red Record in EPG edit in channel list Stop recording Chang...

Page 29: ...ress to increase and decrease the volume Press to switch channels Press to display and hide additional channel information Press to mute the sound Press to enter the channel number directly Press to call up the channel list Press to select a channel Press twice to call up a channel and close the channel list ...

Page 30: ...increase and decrease the volume Press to switch channels Press to display and hide additional channel information Press to mute the sound Press to enter the channel number directly Press to call up the channel list Press to select a channel Press twice to call up a channel and close the channel list Press blue to change to radio mode Press blue to change back to TV mode ...

Page 31: ...t nt nt t t t to o o o ac ac ac acce ce ce cess ss ss ss t t t tel el el elet et et etex ex ex ext t t t Press to enter the required page directly or Press browse forward backward page by page Press to call up teletext Press or to return to TV ...

Page 32: ...ation represents a specific view selection The table below shows which colours are assigned to which buttons Where the functions of these buttons are assigned for the current menu view they are also shown in the line at the bottom of the on screen display In many menus all the editing and selection options for that menu are shown at the bottom of the on screen display Where a specific remote contr...

Page 33: ...on Sy Sy y y ymb mbol ol r rat ate e C C C Ca Ca Ca Ca Call ll ll ll ll u u up p p l l al al al h h ph ph ph b b ab ab ab t t et et etic ic ic ic ic sorting y y y y y y y y y y yel el el el el ello lo lo lo lo low w w w w w bu bu bu bu bu butt tt tt tt tt tton on on on on on C C C Ca Call ll ll ll ll u up p th th th th the e favourites lists r r r r red ed ed ed ed b b b b but ut ut ut utto to to ...

Page 34: ...orted by individual letters green button Call up the category Complete List Contains the following channel lists Complete list Channel lists sorted by satellite Basic functions Channel list selection Use the buttons to scroll through the currently available channel lists Select the channel After selecting the desired channel list the desired channel is selected using the cursor buttons and called ...

Page 35: ...t ites es l lis ist t t I I In Indi di di dica cati ti ti tion on o of f f f th th th the e se se se se s s le le le lect ct ct cted ed ed ed s s s sou ou ou ound nd nd ndtr tr tr trac ac ac ack k k k k k Start time for the current programme top and for the next t t pr prog gramme b ottom m Current programme top and next programme bottom C C C Cu Curr rren ent t t t ti ti ti ti time me me me me Th...

Page 36: ...d press the button to confirm your selection Su Su Su Subt bt bt btit it it itle le le les s s s se se se sele le le lect ct ct ctio io io ion n n n If the channel OSD includes the following symbol for subtitles you can call up the Subtitle function as follows Press the yellow button use the buttons to select Subtitle and press the button to confirm your selection Use the buttons to select the des...

Page 37: ...ing searched for is displayed in the top left hand corner with the time and date displayed at the top right When the search is finished the teletext broadcast by the relevant encrypted channel provider appears There are several options for opening the desired pages Entry using the number pad Scroll backwards and forwards using the buttons Scroll up and down in the sub pages e g 1 2 and 2 2 using t...

Page 38: ...rms you up to a week in advance However this programme information must be broadcast by the related channel provider If no EPG data is available the receiver shows the message no data available instead of showing information on the current programme EPG data update The EPG data for the currently selected channel is updated automatically in the background while you are watching a TV channel Electro...

Page 39: ...d d d nd nd nd nd ndar r ar ar ar ar ar for the programme pr pr pr pr pr pr pr p p p p p ev ev ev ev ev ev evi ie ie ie ie ie ie iew w w w w w w Date and time of the highlighted programme with genre and duration A At At At At At At At t t t t t t thi hi hi hi hi hi hi his s s s po po po poi i i i in in in int t t t t t t yo yo yo you u u u i i i i wi wi wi will ll ll ll ll ll ll ll b b b b b b b b...

Page 40: ... selected list Press the or the button to exit the EPG and return to the TV picture red button Call up the timer list displays all pre programmed recordings buttons Navigation in the individual views e g 15 minutes skip forward in the Current view yellow button Call up a preview of the currently selected channel Program guide Press the button P skip forwards 24 hours in the EPG P skip backwards 24...

Page 41: ... by the channel provider the receiver displays the programme lists for one week in advance You can use the cursor buttons to select the desired programme and if available you can use the button to open further information on the desired programme You can use the buttons to scroll through the programmes in the order of the complete list of programmes you remain however in the preview The button all...

Page 42: ...an use the button to call up further information on the desired programme If you wish to view the programme currently being shown on a channel you need not exit the EPG just select the desired channel At the top right of the screen you will see the current TV picture for the selected channel You can use the button to display the next following programme the button takes you back to the current pro...

Page 43: ...wing on screen display appears see example screenshot on the right Use the buttons to select the desired recording mode The following recording mode options are available once The recording will be performed once daily The recording will be performed daily at the time you specify weekly The recording will be performed once a week on the same day and at the same time Use the cursor buttons to selec...

Page 44: ...ng g g g g g o o onc nc nce e e Use the buttons to select the once recording mode see screenshot on the right Use the buttons to switch to the Date field and use the buttons to select the desired recording day Then use the buttons to switch to the selection field Start and use the buttons or the number pad to select the desired recording start time Then use the buttons to switch to the selection f...

Page 45: ...d time for the recording to the duration you have selected When all settings have been made press the button to save the recording settings Re Re Reco co cord rd rdin in ing g g g g g g w w wee ee eekl kl kly y y y y y y Use the buttons to select the weekly recording mode see screenshot above Then use the buttons to switch to the selection field Start and use the buttons or the number pad to selec...

Page 46: ...ule the recordings until you have first resolved the timer overlap Ti Ti Time me mer r r ov ov over er erla la lap p p p p p The timer list view can be called up at any time in the EPG by pressing the red button The following on screen display appears example The Timer list view shows you all the recordings that are scheduled The buttons allow the recordings to be sorted into once or repeated reco...

Page 47: ...on UF UF UF UFS S S S 80 80 80 80 The receiver can read only USB storage media that are formatted either as FAT32 or EXT2 Use the buttons to select the source directory Call this up using the button Media data from the following connected devices can be played back USB storage media FAT32 or EXT2 formatted Pl Pl Pl Play ay ay ay ay y y y y yin in in ing g g g g g g g g g me me me me edi di di di d...

Page 48: ...y ay y y y yba ba back ck ck During playback you have the following control options Pause Start playback after pause Next previous picture Slide show is cancelled Use the buttons to select the first picture in your slide show Press the button to start the slide show ...

Page 49: ...s the button to start the MP3 player MP MP MP3 3 3 pl pl pl p p p ay ay ay y y y yba ba back ck ck Information about the currently selected MP3 file title artist album genre This information must be contained in the MP3 file ID3Tag information MediaCenter After the start of the playback you receive the following additional display Pause Start the playback and start the playback after a pause Start...

Page 50: ... g g g g g g g g up up up up p p p p p t t t the he he he m m m mai ai ai ain n n n me me me menu nu nu nu a a a and nd nd nd i i i int nt nt ntro ro ro rodu du du duct ct ct ctio io io ion n n n The main menu is called up by pressing the button The following on screen display appears The programme showing on the currently selected channel always appears in the top right hand corner of the main me...

Page 51: ...rch Channels Parental Control Settings Service Menu Language Setting Automatic Channel Search First Installation see the section Connection and Set Up First installation Software update Manual Channel Search TV Video and Audio Load factory settings Search with service ID Suit screen menu Display device status Date and time Antenna Confi guration ...

Page 52: ... Channel data button Channel list C C Call ll ll up a alphabetic c sorting yellow bu bu butt tt tton on on Call up the favourites lists red button C C C Ca Call ll ll ll ll u up p h th th th the e complete list gr gr gr gr gr g g g g ee ee ee ee een n n n n bu bu bu bu butt tt tt tt tton on on on on C Ca Call ll ll up p th th the e en enti ti tire re list sorting by satellite and new channels S S ...

Page 53: ...e right To select several channels that are listed directly following each other in the selected channel list you can start block highlighting see Edit channels Start Blockselection Mo Mo Move ve ve After selecting the channel s to be edited press the red dot button The following on screen display appears see screenshot on the right Use the buttons to select Move and confirm your selection with th...

Page 54: ... in the complete list the deletion only applies to the selected favourites list Sk Sk Skip ip ip p p p p After selecting the channel s to be edited press the red dot button Use the buttons to select Skip and confirm your selection with the button The following on screen display appears see example screenshot on the right The channel that is to be skipped in future is shown in grey in the channel l...

Page 55: ...with a padlock on the right hand side and can in future be viewed only by entering the four digit PIN code factory setting 0000 This function can be restored again using the edit menu select Unlock To To To f f fav av avou ou ouri ri rite te tes s s li li list st st After selecting the channel s to be edited press the red dot button Use the buttons to select To Favourite Now use the buttons to sel...

Page 56: ...desired action Move Delete Skip Lock or To Favourite using the buttons and confirm your selection with the button You can find an explanation of the individual edit options under Edit channels channel lists in this section Ed Ed Ed Edit it it itin in in ing g g g g g g g g g ch ch ch chan an an anne ne ne nels ls ls ls fa fa fa favo vo vo vour ur ur urit it it ites es es es l l l lis is is ists ts...

Page 57: ...he channel s to be edited press the red dot button Use the buttons to select Rename favouritelist and confirm your selection with the button You can now rename the favourites list you selected The following on screen display appears see example screenshot on the right Alphanumeric characters are input as described in Technical Appendix Alphanumeric entries Confirm the name you have entered for the...

Page 58: ...hed Make sure your reception system is aligned to the selected satellite You can search only one satellite at a time If you are connected Main Menu Search Channels Automatic Channel Search All transponders for the satellite you selected will be searched Manual Channel Search Only the selected transponder for the satellite you selected will be searched Search with Service ID Search for a specific c...

Page 59: ...ected is performed Channel Search Mode Only free to air channels can be searched for Network Search Use the buttons On Off to select whether a network search should be performed If you set the network search to Off only the factory stored transponders of the satellites you previously selected will be searched for new as yet unlisted channels If you set the network scan to On the transponder networ...

Page 60: ...saved or the number pad transponder frequency not yet saved to select the transponder frequency on which the channel being sought is transmitted At the bottom right of the screen display the receiver shows the current signal strength and signal quality of the selected transponder The Polarisation and Symbol Rate options only need to be specified if the transponder has yet to be saved Polarisation ...

Page 61: ...dentical to those for an automatic search Main Menu Search Channels Se Se Se Sear ar ar arch ch ch ch w w w wit it it ith h h h se se se serv rv rv rvic ic ic ice e e e ID ID ID ID After calling up the menu you will see the following on screen display The buttons allow you to select different sets of parameters for the search Satellite Use the buttons to select the satellite that is transmitting t...

Page 62: ... search Polarisation Press the buttons to select the correct polarisation horizontal or vertical Symbol Rate Use the button or the number pad to enter the applicable symbol rate Service ID Use the number pad to enter the service ID of the channel to be searched for Once you have performed all the settings use the buttons to switch to the Start Search selection field and confirm the start of the se...

Page 63: ...t PIN code will be requested when it is called up Without the four digit PIN code factory setting 0000 and no changes can be made to the receiver settings Either On or Off Lock Set Top Box Select here whether the receiver should be locked If the receiver is locked the four digit PIN code will be requested when it is switched on Without the four digit PIN code factory setting 0000 Either On or Off ...

Page 64: ...four digit PIN code in a safe place so that you always have access to your channels should you ever forget it If you have forgotten your device PIN code you must contact your dealer who will be able to unlock your receiver for you Main Menu Parental Control ...

Page 65: ... calling up the menu you will see the following on screen display Individual items are selected using the buttons The changes to the current settings can be made using the buttons or the number pad TV TV TV TV Vi Vi Vi Vide de de deo o o o an an an and d d d Au Au Au Audi di di dio o o o Use the buttons here to select the settings for your TV set When doing this refer to the operating instructions...

Page 66: ...type of screen display mode for 4 3 broadcasts on a 16 9 TV set normal Pillarbox Stretched full screen or Zoom in Pan Scan TV aspect ratio Here you can select the TV picture format Either 4 3 or 16 9 Picture format Select the type of screen display depending on your setting for the TV aspect ratio TV format 4 3 Pan Scan or Letterbox TV format 16 9 Always 16 9 or Automatic TV Scart signal output Se...

Page 67: ...reen display Individual items are selected using the buttons The changes to the current settings can be made using the buttons or the number pad button red button yellow button blue button Complete Favourites selection Options selection TV Radio Channel list Basic Not assigned Not assigned Not assigned Programme Guide Middle Favourites selection Options selection TV Radio Programme Guide Channel O...

Page 68: ... the offset in 1 hour steps The maximum offset is 12 hours and Automatic clock change Summer Time Here you can select whether the receiver should automatically change over to and from summer and winter time Either On or Off If you select Off Summertime will be displayed in the line below Here you manually set the time of the receiver to summer time selection Yes If Summertime No is selected winter...

Page 69: ...at ate e e ov ov over er er a a air ir ir After calling up the menu you will first see the following on screen display The loading process may take up to 60 minutes All available modules components for your receiver will be loaded and then displayed Under the USB Device Management selection the following additional information is displayed Operating software version currently in use on the receive...

Page 70: ...nu Software update Software Update over USB Show infotext Press the button to display the info text for the available downloads This indicates the main features of the new operating software on the basis of which you can decide whether you want to install the new software on your receiver Update Software Select Yes here if you wish to install new software select No if you are satisfied with your o...

Page 71: ...eiver UFS 80 Press the button and the button to select the software channel list to be installed The following on screen display appears Press the button to start the installation procedure The following on screen display appears The receiver then starts the installation automatically After the update of the channel list you must perform a factory reset see Main menu Service menu Restore Factory D...

Page 72: ...lay for the first installation After a factory reset you must undertake the first installation see section Connection and Set Up First installation Re Re Re Rest st st stor or or ore e e e fa fa fa fact ct ct ctor or or ory y y y y y y y y y se se se sett tt tt ttin in in ings gs gs gs g g g g g g After you have called up this menu you need to input the four digit PIN code factory setting 0000 to ...

Page 73: ...u will see the following on screen display Use the buttons to select the desired menu language and confirm your selection using the button The following languages are available for selection German English French Italian Spanish Czech Dutch and Turkish ...

Page 74: ...d channel list Channel up This button allows you to start the receiver and also to switch to the next channel up in the currently selected channel list Ba Ba Ba Back ck ck ckup up up up p p p p p o o o ope pe pe pe p p p p p ra ra ra rati ti ti tion on on on Operation Without the Remote Control Because there is no number pad no password PIN protected functions can be displayed On Off switch 1 1 Th...

Page 75: ... menu and change them if necessary Remote control no longer responds Batteries may be discharged Check the batteries Remote control code has been changed inadvertently By simultaneously pressing the Back button in conjunction with buttons on the number pad 1 8 the remote control code can be changed Your receiver requires the remote control code 1 For this purpose simultaneously press the Back and ...

Page 76: ...nshot example The letters assigned to the number pad also apply to your remote control They are used very similarly to a mobile phone The following buttons can be used for entry or to select an action Button Assigned character action Press 1 x 2 x 3 x 4 x 5 x ß 1 a b c 2 ä d e f 3 g h i 4 j k l 5 m n o 6 ö p q r s 7 t u v 8 ü w x y z 9 1 x space 2 x 0 Last character is deleted Switch between upper...

Page 77: ...on press the button in order to load the name search expression or the button to abort the entry Ad Ad Ad Ad dva va va vanc nc nc nced ed ed ed ed c c c con on on onne ne ne nect ct ct ct ctio io io io on n n n ex ex ex exam am am ampl pl pl pl p p p p p p e e e e HDMI Scart Cinch Cinch TV HiFi system Dolby Digital system ...

Page 78: ... S2 8PSK S N dB 53 TV system audio Decryption AC 3 MPEG 1 Layer 1 2 and 3 Sampling rate kHz 32 44 1 48 S N dB 65 Power Supply Power supply voltage V Hz 230 10 50 60 Power consumption max typ operation standby W 20 10 0 8 LNB supply horiz vert V mA 14 18 Max 400 control signal kHz 22 DiSEqCTM 1 0 and SCR one cable system Connections Sat IF input output 2 x F sockets TV VCR connection 1 x Scart sock...

Page 79: ... es In In Indi di divi vi vidu du dual al al r r rec ec ecep ep ep p p pti ti tion on on s s sys ys ys y y y y te te tems ms ms Co Co Comm mm mmun un unit it ity y y y y y y an an ante te tenn nn nna a a ne ne netw tw twor or ork k k sy sy sy y y y yst st stem em ems s s 4 4 4 x x x S S Sat at at I I IF F F KAZ 11 KAZ 12 overvoltage protector Sat IF Sat IF Sat IF ...

Page 80: ...t at at I I IF F F mu mu mult lt lti i i fe fe feed ed ed Co Co Comm mm mmun un unit it ity y y y y y y an an ante te tenn nn nna a a ne ne netw tw twor or ork k k sy sy sy y y y yst st stem em ems s s 1 1 1 6 6 6 x x x Sa Sa Sat t t IF IF IF m m mul ul ulti ti ti f f fee ee eed d d Technical appendix KAZ 11 KAZ 12 overvoltage protector Sat IF Sat IF Sat IF Sat IF ...

Page 81: ...81 On On One e e Ca Ca Cabl bl ble e e Sy Sy Sy y y y yst st stem em ems s s Technical appendix KAZ 11 KAZ 12 overvoltage protector Sat IF ...

Page 82: ...82 Technical appendix KAZ 11 KAZ 12 overvoltage protector Sat IF Sat IF ...

Page 83: ...system All activities start from the master DiSEqC components If DiSEqC switching matrices are cascaded the master receiver must transmit the DiSEqC signal several times so that all DiSEqC multi switches in the cascade receive their commands These days DiSEqC components slaves must be downwards compatible i e respond to the analogue switching criteria from receivers that are equipped only with H V...

Page 84: ...twork ID or NIT NTFS File system for storage media OSD On Screen Display Displays by the receiver on the TV screen e g main menu PAL Analogue TV standard Pay TV Television channels available on subscription e g Sky Encrypted channels which can be decrypted only by using the appropriate Smartcard As a rule these services are subscription only PID The PID Packet IDentification number is an identific...

Page 85: ...andard can be installed in a satellite system Smart card Card from Pay TV provider to decrypt its channels Stand by Standby mode Symbol Rate The symbol rate describes the quantity of data that is transmitted per second The symbol rate is measured in MSymbols s and is equal to the number of symbols received per second Timeshift function Time shifted playback Transponder A transponder is a frequency...

Page 86: ... If despite studying this operating manual you still have questions about getting started with the unit or using it correctly or if unexpected problems occur please contact your specialist dealer Service ...

Page 87: ...87 For your notes ...

Page 88: ...Internet www kathrein de KATHREIN Werke KG Anton Kathrein Straße 1 3 P O Box 100 444 83004 Rosenheim GERMANY 936 4295 1111 ZWT Technical data subject to change ...

Reviews: