background image

8

STEAM IRON

INSTRUCTION MANUAL

TECHNICAL DATA

Power supply: 220-240V ~ 50/60Hz 
Power: 2000W

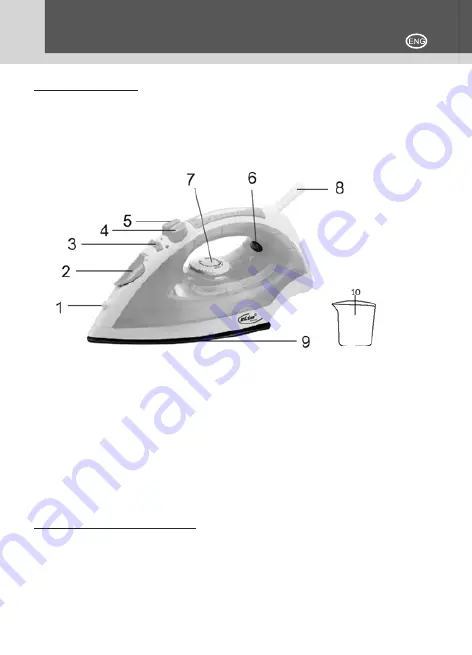
1. Spray jet

2. Water input opening

3. Button steam/steam dry

4. Press-button “short steam burst”

5. Press-button “water spray”

6. Pilot light

7. Temperature control

8. Cable with plug

9. Ceramic soleplate

10. Measuring cup

IMPORTANT SAFEGUARDS:

- Plug the steam iron into a correctly installed mains socket. Make sure that 

the voltage of your power supply complies with the voltage requirements of 

your steam iron.

- Never put the appliance or its plug in water or any other liquid. If the ap-

pliance 

accidentally falls into water, unplug the appliance immediately and have it 

checked by a qualified person before you use it again. Failure to comply 

could leads to a fatal electric shock!

- Never attempt to open the housing yourself.

- Do not place any object into the housing.

- Do not use the appliance with wet hands, or on a damp floor, or when the 

appliance itself is wet.

- Do not touch the plug with wet or damp hands.

- Check the power cable and the plug regularly for any possible damage. If 

the cable or plug is damaged, it must to be replaced by the manufacturer or a 

qualified person in order to avoid hazards.

- Do not use the appliance if it has been dropped or otherwise damaged, or 

if the cable or plug are damaged. If damage occurs, take the appliance to an 

electrical repair shop for examination and, if necessary, repair.

- Never attempt to repair the appliance yourself. This could lead to an electric 

shock.  

- Do not allow the power cable to hang aver sharp edges. Also, keep the 

cable well away from hot objects and naked flames. When unplugging the 

device from the mains socket, only pull on the plug itself.  

- For extra protection, consider fitting the household electrical installation with 

a circuit breaker that has a rated breaking current of not more than 30mA. 

Ask your electrician for advice.  

- Make sure there is no danger that the power cable or any extension cable 

can 

inadvertently be pulled or cause anyone to trip.  

- lf an extension cable is used, it must be suited to the power consumption of 

the 

appliance, otherwise overheating of the extension cable and/or plug may 

occur.  

- This appliance is not suitable for commerciai use, nor for use in the open air.  

- Never leave the appliance unattended while it is in use.  

- Children do not recognize the dangers associated with the incorrect use of 

electrical appliances. Consequently, you should never allow children to use 

household appliances without supervision.

- Always remove the plug from the mains socket when the appliance is not in 

use, and before each occasion when the appliance is cleaned.  

- Danger! Nominai voltage is present in the appliance for as long as it is 

Summary of Contents for WEE000001

Page 1: ...FERRO DA STIRO A VAPORE STEAM IRON DAMPFB GELEISEN FER REPASSER VAPEUR PLANCHA DE VAPOR INSTRUCTION MANUAL HANDLEIDING MANUEL D INSTRUCTION MANUAL DE INSTRUCCIONES MANUALE DI ISTRUZIONI WEE000001...

Page 2: ...serbatoio 3 Pulsante selezione stiratura a vapore o a secco 4 Pulsante COLPO DI VAPORE 5 Pulsante Spray acqua 6 Indicatore luminoso 7 Manopola di controllo temperatura 8 Proteggi cavo 9 Piastra 10 Do...

Page 3: ...NON utilizzare l apparecchio per scopi diversi da quelli a cui destinato Prodotto destinato al solo uso domestico NON utilizzare l apparecchio in caso presenti danni al cavo o alla spina elet trica No...

Page 4: ...nza 1 Scegli l ACQUA PER IL SERBATOIO Puoi utilizzare comune acqua di rubinetto oppure acqua distillata o deminera lizzata NON utilizzare altri liquidi 2 Riempi il serbatoio 1 Presta attenzione affinc...

Page 5: ...emperatura Premere il pulsante Spray 5 per spruzzare acqua sulla zona da stirare ATTENZIONE Il vapore che fuoriesce dall apparecchio bollente Non indirizzare il vapore verso persone o animali Non prem...

Page 6: ...i calcare con oggetti appuntiti ma non affilati ad esempio stuzzicadenti 4 Pulisci frequentemente l interno del serbatoio versando acqua all interno e svuotando il serbatoio pi volte 5 Non utilizzare...

Page 7: ...me buon cittadino avrai l obbligo di smaltire questo prodotto non come rifiuto urbano ma di effettuare una raccolta separata Il simbolo sopra indicato e riportato sull apparecchiatura indica che il ri...

Page 8: ...l 8 Cable with plug 9 Ceramic soleplate 10 Measuring cup IMPORTANT SAFEGUARDS Plug the steam iron into a correctly installed mains socket Make sure that the voltage of your power supply complies with...

Page 9: ...le well away from hot objects and naked flames When unplugging the device from the mains socket only pull on the plug itself For extra protection consider fitting the household electrical installation...

Page 10: ...must be handed aver tao Attention Risk of burns The sole of the iron will become very hot during use Hot steam emerges from the iron during steam ironing Only touch the unit on its handle Unplug the i...

Page 11: ...eservoir as previously described 2 Steam ironing can be used in the temperature range MAX For reliable functioning of teh steam iron the water reservoir must be at least filled 3 Spraying function Pre...

Page 12: ...own completely Clean the outside of the appliance with a soft moist colth and if necessary with a mild detergent INFORMATION FOR USERS OF DOMESTIC APPLIANCES This marking indicates that this product s...

Page 13: ...13 STEAM IRON INSTRUCTION MANUAL NOTE...

Page 14: ...Water Spray 6 Kontrollleuchte 7 Temperaturregelung 8 Kabel mit Stecker 9 Keramiksohle 10 Messbecher WICHTIGE SICHERHEITSMASSNAHMEN Stecken Sie das Dampfb geleisen in eine korrekt installierte Steckdo...

Page 15: ...der Stecker besch digt sind Im Schadensfall bringen Sie das Ger t zur berpr fung in eine Elektrowerkstatt und reparieren Sie es gegebenenfalls Versuchen Sie niemals das Ger t selbst zu reparieren Dies...

Page 16: ...Erfahrungen und Kenntnissen bestimmt es sei denn eine Person die f r ihre Sicherheit verantwortlich ist hat ihnen eine Aufsicht oder Anleitung zur Benutzung des Ger ts gegeben Kinder sollten beaufsich...

Page 17: ...er Geruch oder Rauch auftreten Dies ist harmlos und dauert nur kurze Zeit Stellen Sie sicher dass eine ausreichende Bel ftung vorhanden ist Benutzung TROCKENB GELN Bevor Sie die Temperatur w hlen lese...

Page 18: ...Taste nicht fter als dreimal hintereinander 7 Drehen Sie das Ger t um und gie en Sie vorsichtig das restliche Wasser aus dem Wasserbeh lter Sch tteln Sie das Ger t vorsichtig 8 Dr cken Sie die Spr ht...

Page 19: ...rt au erhalb der Reichweite von Kindern auf UMWELTGERECHTE ENTSORGUNG Helfen Sie mit beim Umweltschutz Bitte denken Sie an ihre rtlichen Umweltschutzauflagen Geben Sie elektrische Ger te zur Entsorgun...

Page 20: ...le bouton pulv risation d eau 6 T moin lumineux 7 Contr le de la temp rature 8 C ble avec prise 9 Semelle en c ramique 10 Doseur GARANTIES IMPORTANTES Branchez le fer vapeur dans une prise secteur co...

Page 21: ...miner et si n cessaire le r parer N essayez jamais de r parer vous m me l appareil Cela pourrait entra ner un choc lectrique Ne laissez pas le c ble d alimentation pendre par dessus des bords tran cha...

Page 22: ...tre surveill s pour s assurer qu ils ne jouent pas avec l appareil Le fer doit reposer sur une surface stable Veuillez garder le c ble loign de la semelle chaude Laissez le fer repasser compl tement...

Page 23: ...lisez le mode d emploi du fer repas ser ou le conseil d entretien sur l tiquette dans le v tement Remarque s il n y a pas de conseils d entretien sur le v tement vous devriez commencer repasser la tem...

Page 24: ...ournez l appareil et versez avec pr caution l eau restante dans le r s ervoir d eau Secouer soigneusement l appareil 8 Appuyez sur le bouton de pulv risation pour permettre l eau restante de sortir pl...

Page 25: ...CTION APPAREIL RESPECTUEUX DE L ENVIRONNEMENT Vous pouvez aider prot ger l environnement Veuillez vous rappeler de respecter les r gulations locales disposez des appareils lectriques qui ne fonctionne...

Page 26: ...ontrol de temperatura 8 Cable con enchufe 9 Placa base de cer mica 10 Taza de medir ADVERTENCIAS DE SEGURIDAD IMPORTANTES Enchufe la plancha de vapor en una toma de corriente correctamente insta lada...

Page 27: ...si es necesario repararlo Nunca intente reparar el aparato usted mismo Esto podr a provocar una descarga el ctrica No permita que el cable de alimentaci n cuelgue de bordes filosos Adem s mantenga el...

Page 28: ...nto a menos que una persona responsable por su seguridad les haya dado supervisi n o instrucci n sobre el uso del aparato Los ni os deben ser supervisados para asegurarse de que no jueguen con el apar...

Page 29: ...a vez que el indicador se haya encendido ajuste el bot n de secado vapor en su posici n de vapor y planche una pieza vieja de tela para eliminar cualquier residuo del dispositivo Durante el primer uso...

Page 30: ...ci n presione el bot n de pulverizaci n para hume decer un rea de la prenda de vestir que se quiere plancar El agua se roc a desde la boquilla 4 Funci n Seco Vapor Seleccione el planchado en seco o a...

Page 31: ...do y si es necesario con un detergente suave Nunca use detergente abrasivo o utensilios de mano limpie la suela con un pa o h medo Si la plancha debe almacenarse siempre deje que se enfr e por complet...

Page 32: ...Istruzione Instruction manual Prodotto importato da Kasanova S p A Importato da imported by importiert aus import de importado de Viale Monterosa 91 20862 Arcore MB ITALY MADE IN P R C AC220 240V 50 6...

Reviews: