


14
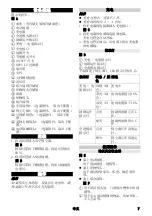
繁體中文
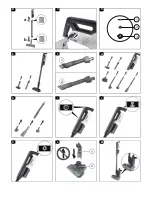
安裝車用扁吸。
用於清潔車內的污垢/灰塵等
您可以使用可伸縮軟管延長長度。
圖H
安裝吸塵毛刷。
用於清潔牆面、窗簾、家具縫隙等
可以使用可伸縮軟管延長長度。
圖H
裝上組合扁吸。
圖F
1
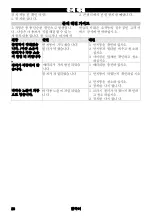
用於清洗接頭、門窗堵塞點、小縫等。
2
用於仔細清洗精緻物品,如書櫃、工藝
品等
接上織物吸頭。
用於清洗軟墊家具、床墊、窗簾等。
連接電動除蟎吸頭。
於清潔床墊和枕頭中的塵蟎/灰塵等。
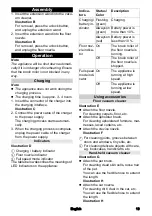
操作
1. 將真空吸塵器放在待清潔的表面。
2. 按ON / OFF 開關開始吸塵。
電器高速運作中。
圖I
3. 按節能模式開關。
電器低速運作中。
圖J
4. 按下地刷開關以打開或關閉電動地刷。
圖K
調整抽吸力
您可透過以下兩種方式在吸塵時調整吸力。
圖J
節能模式關閉:電器以高速運行,全速
模式指示燈開啟。
節能模式開啟:電器以低速運行,全速
模式指示燈關閉。
儲存
提示
將設備存放在乾燥的室內。
存放時考慮設備的重量。
不可拆卸存儲支架。
1. 將存儲支架插入存儲底座。
圖L
1
存儲支架
2
存儲底座
2. 將電器插入底座。
圖M
3. 將充電器、組合扁吸和織物吸頭放入存
儲架。
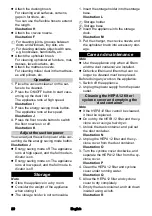
維修保養
提示
使用此設備前應安裝完所有過濾器和塵
杯。
必須更換有缺陷的過濾器以及無法再清
洗的過濾器。
操作此設備之前:
1. 關閉設備。
2. 從電源插座上拔下電源線。
清潔 HEPA 12 過濾器 / 旋風蓋並清空
塵杯
提示
如果 HEPA 12 過濾器無法清洗,則必須
更換。
不要使用吹風機乾燥 HEPA 12 過濾器和
旋風罩。
1. 解開塵杯並拉出來。
圖N
2. 從塵杯上拔下 HEPA 12 過濾器和旋風
罩。
圖O
3. 順時針旋轉旋風罩,將 HEPA 12 過濾器
與旋風罩分開。
圖P
4. 在流水下清洗 HEPA 12 過濾器和旋流器
蓋。
圖Q
5. 讓 HEPA 12 過濾器和旋風罩完全乾燥。
6. 清空塵杯,內部用布往下擦。
圖R
清潔 / 更換滾刷
1. 用硬幣或一字螺絲起子取下滾刷。
圖S
2. 清潔 / 更換滾刷。
3. 將已清潔或新滾刷插入電動地刷中,然
後將滾刷固定到位。
確保滾刷正確安裝。
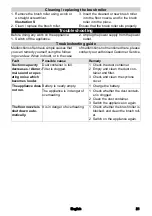
疑難排解
操作此設備之前:
1. 關閉設備。
2. 從電源插座上拔下電源線。
疑難排解指南
故障原因通常較為簡單,可參照以下概述
部分自行處理。如有疑問,或遇到此處未
提及的故障,請聯絡授權的客服中心。
Summary of Contents for VC 4i Cordless
Page 2: ...2...
Page 3: ...10 9 8 6 5 4 15 16 17 11 12 13 14 22 21 20 19 1 10 7 2 23 3 18 24 25 A...
Page 4: ...a b B C 1 2 3 D E 1 2 F G H I J K 1 2 L M...
Page 5: ...5 REACH www kaercher com REACH www kaercher com 5 5 5 5 5 5 5 7 7 7 8 8 9 10...
Page 9: ...9 1 S 2 3 1 2 1 2 3 1 1 2 3 1 2...
Page 11: ...11 REACH www kaercher com REACH www kaercher com 11 11 11 11 11 11 11 13 13 13 14 14 14 15...
Page 23: ...23 REACH www kaercher com REACH www kaercher com 23 23 23 23 23 23 23 25 25 26 27 27 28 29...
Page 24: ...24 8 30mA K RCHER IEC 60364 1...
Page 26: ...26 3 4 1 C 2 3 D 1 2 3 LED E F 1 2 G H H H F 1 2 10 10...
Page 28: ...28 1 2 1 2 3 1 1 2 3 1 2...
Page 52: ...52 REACH www kaercher de REACH www kaercher com 52 52 52 52 52 52 53 55 55 55 56 56 57 58...
Page 53: ...53 8 30 mA...
Page 56: ...56 E F 1 2 G H H H F 1 2 1 2 I 3 J 4 K J 1 L 1 2 2 M 3 1 2...
Page 61: ...3 4 1 C 2 3 D 1 2 3 LED E F 1 2 G H H H F 1 2 10 10 61...
Page 63: ...8 30 K RCHER IEC 60364 1 63...
Page 64: ...64 REACH www kaercher com REACH www kaercher com 64 64 64 64 64 62 62 62 60 60 59 64 64 60...
Page 65: ......
Page 66: ...a b b b N O a b P Q R a b S...
Page 67: ......


