background image

English

 3

To reduce the risk of fire, electric shock, or 
injury:
– Do not leave appliance when plugged in. 

Unplug from outlet when not in use and 
before servicing.

– TO REDUCE THE RISK OF ELECTRIC 

SHOCK-USE INDOORS ONLY

– Do not allow to be used as a toy. Close 

attention is necessary when used by or 
near children.

– Use only as discribed in this manual. Use 

only manufacturer`s recommended 
attachments.

– Do not use with damaged cord or plug. If 

appliance is not working as it should, has 
been dropped, damaged, left outdoors, 
or dropprd into water, return it to a 
service center.

– Do not pull or carry by cord, use cord as 

a handle, close a door on cord, or pull 
cord around sharp edges or corners. Do 
not run appliance over cord. Keep cord 
away from heated surfaces.

– Do not unplug by pulling on cord. To 

unplug, grasp the plug, not the cord.

– Do not handle plug or appliance with wet 

hands.

– Do not put any object into openings. Do 

not use with any opening blocked; keep 
free of dust, lint, hair, and anything that 
may reduce air flow.

– Keep hair, loose clothing, fingers, and all 

parts of body away from openings and 
moving parts.

– Turn off all controls before unplugging.
– Use extra care when cleaning on stairs.

– Do not use to pick up flammable or 

combustible liquids, such as gasoline, or 
use in areas where they may be present.

– Connect to a properly grounded outlet 

only. See Grounding Instruction.

This appliance must be grounded. If it 
should malfunction or breakdown, ground-
ing provides a path of least resistance for 
electric current to reduce the risk of electric 
shock. This appliance is equipped with a 
cord having an equipment-grounding con-
ductor and a grounding plug. The plug must 
be inserted into an appropriate outlet that is 
properly installed and grounded in accor-
dance with all local codes and ordinances.

Improper connection of the equipment 
grounding conductor can result in a risk of 
electric shock. Check with a qualified electri-
cian or service person if you are in doubt as 
to whether the outlet is properly grounded. 
Do not modify the plug provided with the ap-
pliance-if it will not fit the outlet, have a prop-
er outlet installed by a qualified electrician.
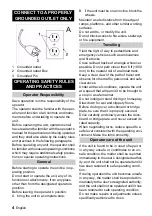
This appliance is for use on a nominal 120-
volt circuit and has a grounding attachment 
plug that looks like the plug illustrated in 
sketchpicture A. Make sure that the 
appliance is connected to an outlet having 
the same configuration as the plug. No 
adaptor should be used with this appliance.

IMPORTANT SAFETY IN-

STRUCTIONS

READ ALL INSTRUCTIONS 

BEFORE USING.

WARNING

WARNING

SAVE THESE INSTRUCTIONS

GROUNDING INSTRUCTIONS

WARNING

Summary of Contents for Tornado BR 4735 ESC

Page 1: ...English E BR 4735 ESC 5 961 740 2011369 09 05...

Page 2: ...o pick up flammable or combustible liquids such as gasoline or use in areas where they may be present Connect to a properly grounded outlet only See Grounding Instruction This appliance must be ground...

Page 3: ...ucks Cross railroad tracks at an angle wherever possible Do not park closer than 6 ft 1800 mm to the nearest rail of a railroad track Keep a clear view of the path of travel and observe for other traf...

Page 4: ...fire protection equipment present in the work area Do not use open pans of fuel or flammable cleaning fluids for cleaning parts Any unit not in safe operating condition shall be removed from service...

Page 5: ...vices serve to protect the user and must not be rendered inoperational or their functions bypassed The appliance can only be started when you press the foot pedal fully downwards The machine stops whe...

Page 6: ...Please do not throw pack aging in the domestic waste but pass it on for recycling Old units contain valuable recy clable materials Batteries oil and similar substances may not be re leased into the en...

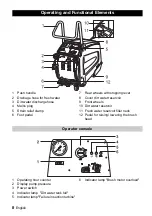
Page 7: ...irt water reservoir 9 Front wheels 10 Dirt water reservoir 11 Fresh water reservoir filler neck 12 Pedal for raising lowering the brush head 1 Operating hour counter 2 Display pump pressure 3 Power sw...

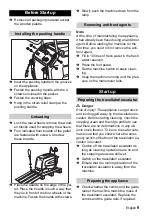
Page 8: ...in the fresh water reservoir Press the foot pedal Set the machine switch to basic clean ing Keep the machine running until the pres sure on the manometer falls Danger Risk of injury The appliance can...

Page 9: ...eaned Cleaning slighly dirty travellators escalators normally at short regular intervals At this setting the appliance works with reduced quantity of water The water pump works with regular strokes Cl...

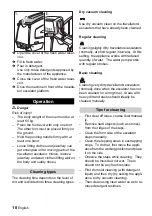
Page 10: ...anger Risk of injury Do not push the appliance onto the escalator any further than the indi cations given below Otherwise the ma chine will get dragged off by the escalator In case of danger immediate...

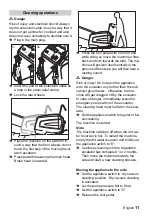
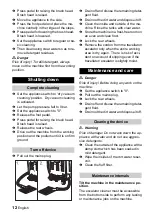
Page 11: ...f Clean the inside and outside of the ma chine Rinse the tanks with clear water Store the machine in a frost free room on an even and clean floor Lock the rear wheels Remove the cordon from the travel...

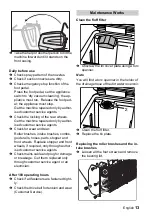
Page 12: ...es intake brushes combs guide rails hoses pads stopper and front wheels Replace stopper and front wheels if required only through author ised customer service agents Check mains cable and plug for dam...

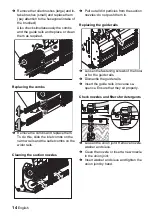
Page 13: ...n the wider rails Pull out all dirt particles from the suction nozzles do not push them in Loosen the fastening screws of the hold er for the guide rails Dismantle the guide rails Insert the guide rai...

Page 14: ...ace it Danger Risk of injury Do not drive over slopes great er than 5 Never transport the machine over the travellator escalator Lock the rear wheels Secure the machine with clamping belts and ropes s...

Page 15: ...t water reservoir for damages replace if required Check the intake brushes for wear replace if required Check suction nozzles and hose for blockages clean if required Washed steps are not clean Check...

Page 16: ...res that the ap pliance can be operated safely and trouble free At the end of the operating instructions you will find a selected list of spare parts that are often required For additional information...

Page 17: ...e travellator escalator brand set with 2 pieces Outlet combs blue Kone 6 369 519 Inlet combs black OTIS 6 369 510 Outlet combs black OTIS 6 369 520 Inlet combs green Schindler 6 369 511 Outlet combs g...

Page 18: ......

Reviews: