– 3
NOTICE
The shorter the hose length and the larger the hose di-
ameter, the higher the pump capacity.
To prevent clogging of the pump, use a prefilter with
hose diameters of less than 1¼ “ (see special accesso-
ries).
The pump connection is equipped with a plug system
(Quick-Connect).
The unmounted connection nozzle is enclosed in the
device.
Illustration
To remove the connection nozzle, press the Quick-
Connect (grey button).
Illustration
Slide the hose clamp onto the hose.
If a ¾“ or 1“ hose is used:
Screw pump connecting piece (see special acces-
sory) onto the connection nozzle.
Slide the hose onto the pump connecting piece and
secure it by means of a hose clamp.
Slide the connection nozzle into the Quick-Connect.
If a 1¼ “ hose is used:
Slide the hose onto the connection nozzle and se-
cure by means of a hose clamp.
Slide the connection nozzle into the Quick-Connect.
Illustration
Folding the support legs in and out (SP 2 Flat - see
operation).
Safely place the pump on a stable surface in the
feed fluid or immerse it using a rope tied to the car-
rying handle.
NOTICE
The suction area must not be blocked by soiling.
In case of muddy ground, place the pump on a brick or
the like.
Ensure that the pump is level.
Do not carry the pump on the cable or the hose.
몇
DANGER
Risk of mortal danger on account of electric shock!
Do not touch feed fluids, the rope attached to the carry-
ing handle as well as objects that are in contact with the
feed fluid (e.g. pipelines extending into the water, rail-
ings, etc.).
Illustration
With a low fluid level, possibly drawn air or air that is
present in the pump escapes via the automatic venting
device. In addition, fluid may leak at this spot.
If the pump has suction problems with a low fluid level,
unplug and plug in the mains plug repeatedly in order to
support the suction process.
Illustration
Fold out the support legs (SP 2 Flat) for the pump
start if necessary.
NOTICE
It is not mandatory to fold out the support legs; a higher
pump capacity is achieved by folding out the support legs.
Illustration
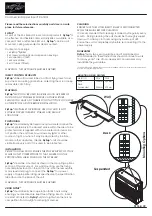
NOTICE
In the automatic mode, the float switch controls the
pumping operations automatically .
The pump switches on as soon as the float switch has
reached the switch-on height due to the rising fluid level.
The pump switches off as soon as the float switch has
reached the switch-off height due to the falling fluid level.
Ensure that the float switch is not obstructed in any way.
For switch-on height / switch-off height see the following
table:
*The switching height can vary depending on the posi-
tion of the float switch.
Insert the mains plug into the socket.
Illustration
Fold in the support legs (SP 2 Flat) for the pump
start.
NOTICE
By folding in the support legs the flat vacuuming of the
fluid up to a residual fluid height of 1 mm becomes pos-
sible in manual operation.
Illustration
Secure the float switch pointing upwards in the
lock.
NOTICE
In manual operation the pump remains switched on
continuously.
In order that the pump draws independently in manual
operation, the fluid level must be at least 60 mm (SP 1
and 3 Dirt) or 7 mm (SP 2 Flat).
The pump can pump up to a residual fluid height of
25 mm (SP 1 and 3 Dirt) or 1 mm (SP 2 Flat).
The stated residual fluid height is only achieved in man-
ual operation.
Insert the mains plug into the socket.
ATTENTION
Risk of damage! Dry running leads to increased wear;
never leave the pump unattended during manual oper-
ation. Switch off immediately in case of dry running.
NOTICE
Soiling can deposit and lead to malfunctions.
Pump clear water or thoroughly rinse the pump af-
ter every use.
This especially applies after pumping chlorinated
water or other liquids that leave residue.
Disconnect the main plug from the socket.
Start up
Operation
Automatic venting device
Automatic operation
Min / Max
SP 1 Dirt SP 2 Flat SP 3 Dirt
Switch-on height
cm*
43 / 50
36 / 44
43 / 50
Switch-off height
cm*
18 / 30
15 / 24
18 / 30
Manual operation
Finish operation
7
EN