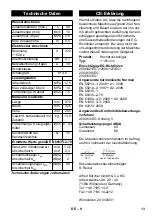


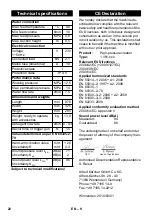


– 7
Caution
Only separate the high-pressure hose from
the trigger gun or the appliance while there
is no pressure in the system.
Remove the detergent reservoir from
the intake and close it with the lid. To
store, place into the intake rotated by
180°.
Release the lever on the trigger gun.
Turn off the appliance "0/OFF".
Turn off tap.
Detach the appliance from the water
supply.
Caution
: When disconnecting the sup-
ply or high pressure hose, warm water
may leak from the connections after op-
eration.
Press the lever on the trigger gun to re-
lease any remaining pressure in the
system.
Lock the lever on the trigger gun.
Pull out the mains plug.
Caution
In order to prevent accidents or injuries,
keep in mind the weight of the appliance
during transport (see Specifications).
Lift appliance by the carrying handle
and carry it.
Pull the appliance by its transport han-
dle.
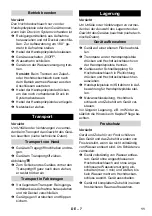
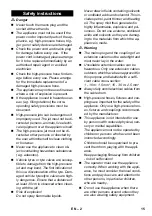
Illustration
To push the appliance, the transport
handle must be pulled all the way up; it
will lock into place audibly.
Prior to horizontal transport: Remove
the detergent reservoir from the intake
and close it with the lid.
Secure the appliance against shifting
and tipping over.
Caution
In order to prevent accidents or injuries,
keep in mind the weight of the appliance
when selecting a storage location for it (see
Specifications).
Park the machine on an even surface.
Press the disconnect on the hand spray
gun and remove the high pressure hose
from the hand spray gun.
Push the casing of the quick coupling
for the high pressure hose toward the
rear and disconnect the high pressure
hose from the appliance.
Insert the hand spray gun with the spray
lance into the holder for the hand spray
gun.
Stow away the mains cable, the high-
pressure hose and accessory at the ap-
pliance.
Prior to extended storage periods, as dur-
ing the winter, also observe the instructions
in the Care section.
Caution
Protect the appliance and its accessories
against frost.
The appliance and its accessories can get
destroyed through frost if there are any wa-
ter residues in them. To avoid damage to
them:
Completely drain all water from the ap-
pliance: Switch the appliance on with
detached high-pressure hose and de-
tached water supply (max. 1 minute)
and wait, until no more water exits at the
high-pressure connection. Turn off the
appliance.
Store the appliance and the entire ac-
cessories in a frost-safe room.
Finish operation
Transport
When transporting by hand
When transporting in vehicles
Storage
Storing the Appliance
Frost protection
20
EN
Summary of Contents for K 5.640
Page 2: ...2...
Page 3: ...3...
Page 4: ...4...
Page 105: ...2 30cm 1 10 m 1 5 mm2 10 30 m 2 5 mm2 105 EL...
Page 106: ...3 0 C 30 cm IEC 60364 30 mA 106 EL...
Page 109: ...6 Min Max Mix KARCHER KARCHER KARCHER Vario Power Mix 5 0 OFF Vario Power 109 EL...
Page 110: ...7 180 0 OFF 1 110 EL...
Page 111: ...8 KARCHER 2 I ON Vario Power Mix 111 EL...
Page 123: ...2 30 1 10 1 5 2 10 30 2 5 2 123 RU...
Page 124: ...3 0 C 30 IEC 60364 30 124 RU...
Page 127: ...6 2 2 90 I ON I Min Max Mix KARCHER KARCHER Vario Power 127 RU...
Page 128: ...7 KARCHER Vario Power Mix 5 0 OFF 0 180 0 OFF 0 128 RU...
Page 129: ...8 1 KARCHER 129 RU...
Page 130: ...9 2 I ON I Vario Power Mix 130 RU...
Page 204: ...2 30 1 10 1 5 2 10 30 2 5 2 204 BG...
Page 205: ...3 0 C 30 IEC 60364 30 mA 205 BG...
Page 208: ...6 Min Max Mix KARCHER KARCHER KARCHER Vario Power Mix Vario Power 208 BG...
Page 209: ...7 5 0 OFF 180 0 OFF 1 T o 209 BG...
Page 210: ...8 KARCHER 2 I ON Vario Power Mix 210 BG...
Page 240: ...2 30 1 10 1 5 2 10 30 2 5 2 240 UK...
Page 241: ...3 0 C 30 IEC 60364 30 241 UK...
Page 244: ...6 90 I ON I Mix KARCHER KARCHER K rcher Vario Power Mix Vario Power 244 UK...
Page 245: ...7 5 0 OFF 0 180 0 OFF 0 245 UK...
Page 246: ...8 1 KARCHER 2 I ON I 246 UK...
Page 249: ......