background image

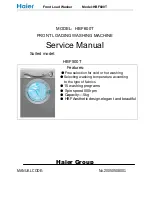
Read the oil level indicator with the 

device stopped. The oil level must be 

above both needles.

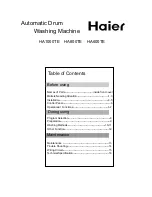
Remove the machine cover mounting 

screw and remove the cover.

Cut off the tip of the oil

container cover.

Secure the machine’s cover.

Mount the nozzle on the spray lance 

(the mark on the support ring must be 

on top).
Connect the spray lance with the 

manual spray gun. 
Release the push bar lock.
Adjust the push bar to the

desired temperature. 
Tighten the push bar lock. 
Screw the high-pressure hose onto the 

high-pressure connection.

Oil level control

Turn on the oil tank fan

Assembling the accessories

14

Danger

Risk of injury from electrical discharge. 

Connect the device to AC power only.

The device may only be connected to an 

electrical connection that has been

installed by an electrician in accordance 

with IEC 60364-1.

The power supply must match the voltage 

indicated on the machine’s nameplate.

Minimum fuse protection of the power 

outlet (see technical data).

The maximum permissible mains 

impedance at the electrical connection 

point (see technical data) must not be 

exceeded. In case of confusion about the 

existing mains impedance at your 

connection point, contact your power 

Start-up

Electrical connection

Warning

Follow the water

supplycompany’s regulations. 

In accordance with current 

regulations, use of the machine 

is prohibited without a system

separator in the drinking water network.

A suitable system separator from 

KÄRCHER should be used or, 

alternatively, a system separator 

complying with

EN 12729 type BA.

The water that has passed through a 

system separator will be classified

as non-potable.

Water connection

Water inlet connection

Attention

Always connect the system separator

to the water supply, never directly to

the device!

supply company. It is crucial for the device 

to be connected with a plug to the mains. 

Establishing a non-separable connection 

to the power grid is prohibited. The plug is 

used to disconnect from the mains. Before 

each start-up, check the power cord and 

mains plug for damage. If the power cord 

is damaged, it must be replaced 

immediately by a qualified electrician from 

authorized customer service.

The plug and coupling of the extension 

cord used must be waterproof.

Use an extension cord with sufficient 

cross-section (see “Technical Data”) and 

wind from the front of the cord drum.

Unsuitable extension cords can be 

dangerous. For outdoor use, use only 

extension cords that are expressly 

approved for this purpose, properly 

marked and with sufficient cross-section:

Connection values: see 

nameplate/technical data.

Summary of Contents for HD 6/15 C

Page 1: ...9 356 435 0 Rev 0 HD 6 15 C...

Page 2: ...4 5 6 7 8 9 10 11 14 15 16 17 18 19 20 2 21 22 23 24 12 13...

Page 3: ...a el matenimiento y el servicio son de color gris claro ndice de contenidos Identificaci n por colores Elementos del aparato 1 Comprobar en la primera p gina 1 Soporte para lanza y accesorios 2 Asider...

Page 4: ...terrazas herramientas de jardiner a Recomendamos que use la boquilla turbo opcional para la suciedad m s resistente Cuando se suelta la palanca de la pistola pulverizadora manual un presostato desco...

Page 5: ...exi n el ctrica Advertencia Tenga en cuenta las normas de la empresa suministradora de agua De acuerdo con las normativas vigentes est prohibido utilizar el aparato sin un separador de sistema en la r...

Page 6: ...ieza con presi n reducida Pone la boquilla deseada en el acoplamiento de rosca e atornille en la lanza pulverizadora Advertencia Todos aquellos detergentes inadecuados podr n da ar el aparato y el obj...

Page 7: ...c os Desconexi n del aparato Almacenamiento del aparato Protecci n antiheladas Si no es posible el almacenamiento libre de heladas Peligro Peligro de lesiones y da os Respetar el peso del aparato para...

Page 8: ...r cualquier trabajo en el aparato hay que desconectar de la red el ctrica En caso de aver a la reparaci n de las piezas el ctricas s lo debe efectuarla el servicio t cnico autorizado En caso de aver a...

Page 9: ...evise el aparato Comprobar la estanqueidad de las tuber as de absorci n de agua y detergente Cerrar la v lvula dosi cadora para detergentes cuando se trabaje sin detergentes Purgar el aparato v ase Pu...

Page 10: ...ectar el plug de 3 pasadores en un enchufe en desacuerdo con la norma de cada pa s Conecte el plug solo en enchufes correcta mente aterrados Antes de conectar el aparato a la red el ctrica certif ques...

Page 11: ...si n de trabajo Sobrepresi n de servicio m xima Tama o de la boquilla Caudal Aspiraci n de detergente Fuerza de retrocesso de la pistola pulverizadora manual m x Valores calculados conforme a la norma...

Page 12: ...Surquillo Lima Per 511 706 1150 COLOMBIA K rcher SAS Av Calle 116 No 15 B 39 Bogot Colombia 57 01 8000 423686 ECUADOR Karcher Ecuador S A Av Juan Tanca Marengo Km 3 Ciudadela Urdenor 2 Esquina Guayaqu...

Page 13: ...4 5 6 7 8 9 10 11 14 15 16 17 18 19 20 2 21 22 23 24 12 13...

Page 14: ...the cleaning process are in yellow The control elements for maintenance and service are in light grey Table of Contents Identification by colors Machine elements 12 Check on the first page 1 Lance and...

Page 15: ...uch as for cleaning facades terraces gardening tools We recommend using the turbo nozzle optional for more stubborn dirt When the lever of the manual spray gun is released a pressure switch disengages...

Page 16: ...er Start up Electrical connection Warning Follow the water supplycompany s regulations In accordance with current regulations use of the machine is prohibited without a system separator in the drinkin...

Page 17: ...or cleaning with lower pressure Put the desired nozzle on the threaded coupling and screw it onto the spray lance Warning Any unsuitable detergents could damage the device and the object to be washed...

Page 18: ...toring the device Frost protection If storage free of frost is not possible Danger Risk of injury and damage Observe the machine s weight for transport To move the device long distances pull it by the...

Page 19: ...rrying out any work on the device disconnect it from the mains In case of damage only authorized technical service personnel should perform repairs on electrical parts For malfunctions not mentioned i...

Page 20: ...t up If necessary contact customer service Fit the golden nozzle Check or clean the detergent hose with filter Open or check or clean the detergent dispensing valve If necessary contact customer servi...

Page 21: ...in this manual Do not attempt to connect the 3 pin plug to an outlet that does not comply with the standard of each country Only connect the plug to properly grounded outlets Before connecting the mac...

Page 22: ...sure min max Performance data Working pressure Maximum operating overpressure Nozzle size Flow rate Detergent suction Manual spray gun recoil force max Values determined as per EN 60355 2 79 Hand arm...

Page 23: ...be repaired free of charge within the warranty period provided they are due to material or manufacturing defects In a warranty case please contact the dealer where you purchased the machine or your n...

Page 24: ...IL POR MADE IN BRAZIL BY K RCHER IND STRIA E COM RCIO LTDA VIA MIGUEL MELHADO CAMPOS 600 VINHEDO SP BRASIL CEP 13 288 003 ZIP CODE 13 288 003 CENTRAL DE ATENDIMENTO 08000 176111 www karcher com br www...

Reviews: