Karaoke Night KN355BTB User Manual Download Page 10


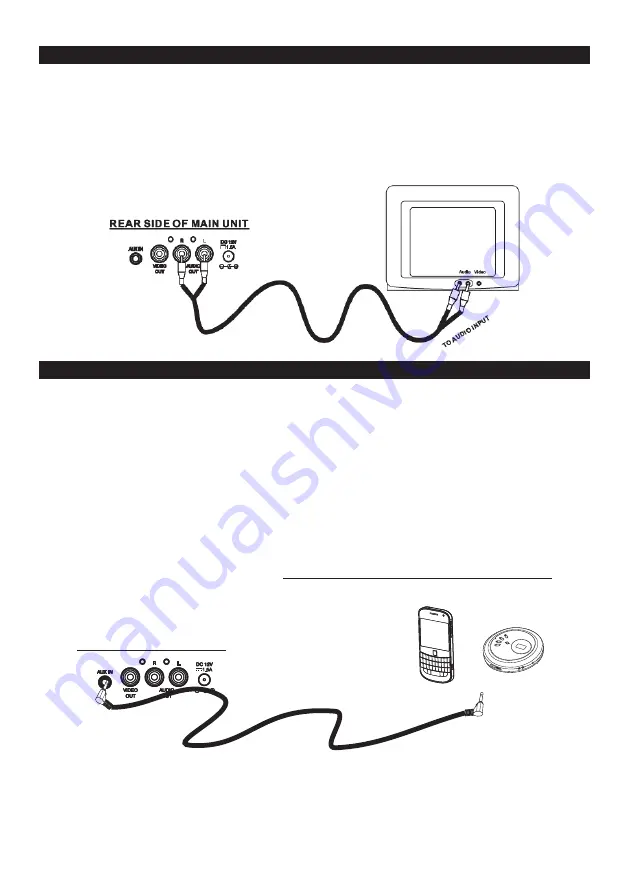
CONNECTING AUDIO TO TV OR HOME STEREO 

Connect the unit to your TV or home stereo system using the White and Red connections on 

the supplied patch cord. Plug the white end of the patch cord into the white AUDIO OUT jack 

on the unit. Plug the red end of the patch cord into the red AUDIO OUT jack on the unit. Now 

connect the other end of the cable's white (left channel) and red (right channel) plugs to your 

TV or home stereo system's ‘AUDIO INPUT’, 'LINE IN' or 'AUX IN' jacks. After connecting, 

you  should  be  able  to  play  music  from  a  CD/CD-R/CD-RW/CD+G  disc  through  the 

connected TV or home stereo system. 


USING AUX IN FUNCTION 

This feature allows you to listen to an external audio source through the speaker of this unit. 

1.  Plug  a  3.5mm  audio  cable  (included)  into  the  headphone  jack  of  your  external  audio 

player (not included) and connect the other end (3.5mm plug) into the AUX IN jack on 

the rear side of this unit. 

2. 


3.  Play a song on your external audio player. 

4.  Adjust  the  volume  control  of  your  audio  player  and  then  the  MASTER  VOLUME 

CONTROL of the unit to obtain the desired audio sound level. 


5.  Turn off both the external audio player and this unit after use. Unplug the audio cable 

from AUX IN jack. 


1.5A

REAR SIDE OF MAIN UNIT

1.5A

REAR SIDE OF MAIN UNIT

TO 

HEAD

PH

ONE

 IN

PUT

or

EXAMPLE OF EXTERNAL AUDIO PLAYER

Make sure both units are turned on. Tap the SOURCE button of KN355BTB repeatedly 

to select AUX mode, AUX IN message will show in TFT color monitor. 

Summary of Contents for KN355BTB

Page 1: ...USER MANUAL For further information on this model and the entire lineup of Karaoke Night products please visit www karaokenightusa com PLEASE READ THIS USER MANUAL COMPLETELY BEFORE OPERATING THIS UN...

Page 2: ...e In order to disconnect the apparatus from the mains completely the AC adapter should be disconnected form the mains socket outlet completely 10 Only use attachments accessories specified by the manu...

Page 3: ...rols that are covered by the operating instructions as an improper adjustment of other controls may result in damage and will often require extensive work by a qualified technician to restore the prod...

Page 4: ...ation inside the unit the unit may not function normally If condensation occurs let unit stand for 1 to 2 hours before turning the power on or gradually heat the room up and dry the unit before use En...

Page 5: ...a safe level Start your volume control at a low setting Slowly increase the sound until you can hear it comfortably and clearly and without distortion Once you have established a comfortable sound lev...

Page 6: ...the sections of the manual that describe their operations Next go to the section for the specific operation you wish to perform For your easy reference listed here are some of the main features of th...

Page 7: ...CE BUTTON 7 LIGHT SHOW BUTTON 8 ECHO KNOB 9 AVC KNOB 10 BALANCE KNOB 11 CD DOOR LATCH 12 BLUETOOTH PAIR BUTTON PLAY PAUSE 13 STOP BUTTON 14 PLAY MODE PROGRAM BUTTON 15 USB PORT 16 DIGITAL KEY CONTROLS...

Page 8: ...25 21 20 CD T 005 050 00 00 01 001 002 003 004 001 002 003 004 Track01 Track02 Track03 Track04 TFT DSIPLAY ICON MP3 FOLDER LIST MP3 TRACK FILE LIST PLAY TIME OR REPEAT STATUS 1 A REPEAT 1 TRACK REPEA...

Page 9: ...l digital TV sets and home music systems are usually equipped with corresponding color coded RCA jacks to assist correct connections Make sure that you have a CD G disc in the karaoke system playing w...

Page 10: ...ature allows you to listen to an external audio source through the speaker of this unit 1 Plug a 3 5mm audio cable included into the headphone jack of your external audio player not included and conne...

Page 11: ...tivity and loudness can be adjusted as required by turning the corresponding MIC VOLUME control and or MASTER VOLUME control 4 Turn off the unit after use by pressing the POWER ON STANDBY button again...

Page 12: ...oke system begins to read the disc The TFT color monitor will briefly show Disc Reading message and then total number of tracks 5 Tap the PLAY PAUSE button to play disc If no disc is recognized No Dis...

Page 13: ...ton again The REPEAT OFF indicator will show in the monitor CD CD G MP3 DISC PROGRAM OPERATION In CD CD G or MP3 disc stop mode use the PLAY MODE PROGRAM button to program and play back songs in a pre...

Page 14: ...h the face up make sure it is inserted completely Note Connecting the USB upside down or backwards could damage the audio system or the storage media of USB thumb drive Check to be sure the direction...

Page 15: ...t guarantee this unit can support all USB thumb drives from every brand USB thumb drives are supported FAT 32 format 1 GB 64 GB maximum TRACKS PROGRAMMING Up to 20 tracks can be programmed for MP3 or...

Page 16: ...ollow step 3 to complete the process 5 After successfully pairing and connecting your device with KN355BTB the unit will emit a short beep and the LCD display will change to show Bluetooth Connected m...

Page 17: ...eive an incoming call on your mobile phone the music will stop and the ring tone will sound from your mobile phone When you end the call the music will play again automatically LED LIGHT SHOW To turn...

Page 18: ...to let it dry out Karaoke system needs to be reset Disconnect the machine from power source for about 5 minutes Cannot pair with a new Bluetooth enabled device An active paired Bluetooth device is al...

Page 19: ...MIC 2 jack of the unit properly SPECIFICATIONS Built in Monitor 4 3 inch TFT color monitor Audio Output Power 5W RMS USB port Supports FAT 32 format 1 GB 64 GB maximum USB thumb drives Speaker 1 x 4...

Page 20: ...placement or refund When returning the unit please remove all batteries to prevent damage to the unit in transit and or from possible leakage We are not responsible for batteries returned with the pro...

Reviews: