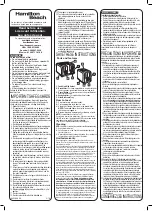
background image

8

Before First Use

Before first use, remove any 

packaging material and promotional 

labels before using your toaster for the 

first time.
1.  Place the toaster on a dry, level 

heat resistant surface.

2.  Fully unwind the power cord and 

insert power cord into a 230V or 

240V power outlet and switch on 

at the power outlet.

3.  Place 1 slice of bread into each 

toasting slot.

4.  Select the desired browning 

setting using the variable 

browning control dial. Settings 

range from ‘1’ being the lightest 

to ‘7’ being the darkest. It is 

recommended for first time use, 

that the control is to be set to 

setting number ‘3’. If toasting 

less than 2 slices of bread, the 

browning setting may need to  

be reduced to avoid burning  

the toast.

5.  Press the carriage control lever 

down, ensuring it is locked  

in position.

6.  Once the browning process is 

complete and desired toast  

colour is achieved, the carriage 

control lever will automatically 

raise the toast.

NOTE:

 The toasting process 

can be stopped at any time by 

pressing the CANCEL button or 

switching off at the power outlet.

Using Your Kambrook Toaster

NOTE:

 Depending on personal 

preference and bread types, a 

different browning setting may be 

required. For light-textured breads 

such as raisin toast and white 

breads this may require a lighter 

setting, whilst heavier textured 

breads such as rye bread may 

require a darker setting.

WARNING:

 The toaster is 

electronically controlled 

and will not lock down in 

the toasting positon until 

the toaster is plugged 

into a 230V or 240V 

power outlet, switched 

on and the control lever 

is latched down in the 

locked position.

Cancel Button

The CANCEL button can be selected 

during operation to cancel the 

toasting process. The CANCEL button 

illuminates when the carriage control 

lever is locked down into position and 

the toasting process is in operation.
Pressing the CANCEL button any 

time during operation will cause the 

carriage lever to raise the toast and 

cancel the toasting process.

Defrost Button

The DEFROST button is used to  

toast frozen bread. Place the  

frozen bread into the bread slots, 

select the desired browning setting 

and press the carriage control lever  

down and lock into position, then 

press the DEFROST button. The 

DEFROST button illuminates during  

the toasting process.

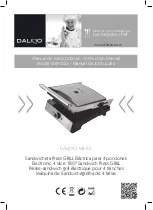
Summary of Contents for KAM-KT260

Page 1: ...rivate Bag 94411 Botany Manukau Auckland 2163 New Zealand Customer Service Line Spare Parts 0800 273 845 Customer Service Fax 0800 288 513 www kambrook co nz Kambrook Australia Ground Floor Suite 2 170 180 Bourke Rd Alexandria NSW 2015 Australia Locked Bag 2000 Botany NSW 1455 Customer Service Line 1300 139 798 Customer Service Fax 1800 621 337 www kambrook com au ...

Page 2: ...INSTRUCTION BOOKLET Suits all KT260 KTA265 models ...

Page 3: ...use In the event that you need some assistance with your Kambrook appliance please contact our Customer Service Department on 1300 139 798 Australia or 0800 2738 45 New Zealand Alternatively visit us on our website at www kambrook com au or www kambrook co nz ...

Page 4: ...Contents Kambrook Recommends p4 Safety First Your Kambrook 2 Slice Toaster p7 Using Your Kambrook Toaster p8 Care Cleaning and Storage p10 ...

Page 5: ...ch a heated oven Keep the toaster clear of walls and other heat sensitive materials such as cloths and curtains Always ensure the toaster is properly assembled before use Follow the instructions provided in this book The toaster is not intended to be operated by means of an external timer or separate remote control system Bread may burn therefore this toaster must not be used near or below curtain...

Page 6: ... than cleaning should be performed at an authorised Kambrook Service Centre Do not operate the toaster without the removable crumb tray in place The crumb tray should be regularly cleaned Do not allow breadcrumbs to accumulate in the bottom of the toaster Failure to clean the crumb tray regularly may result in a fire hazard To clean any additional crumbs turn the toaster upside down over a sink an...

Page 7: ...ster is plugged into a 230V or 240V power point switched on and the lever latched down WARNING Never operate toaster on its side Never add any food substance to the bread muffins or crumpets as this can lead to electrocution or fire This toaster is for toasting bread crumpets and muffins only Placing other items in the toaster can lead to electrocution or fire ...

Page 8: ...ylish stainless steel design 3 Carriage control lever with extra lift making it easy to remove toasted items 4 7 stage browning control 5 Cancel reheat and defrost settings Not Shown Removable crumb tray rear side of base Cord wrap under base Sturdy non slip feet Model KT260 shown ...

Page 9: ... at the power outlet Using Your Kambrook Toaster NOTE Depending on personal preference and bread types a different browning setting may be required For light textured breads such as raisin toast and white breads this may require a lighter setting whilst heavier textured breads such as rye bread may require a darker setting WARNING The toaster is electronically controlled and will not lock down in ...

Page 10: ...trol lever features EXTRA LIFT EXTRA LIFT is ideal for removing smaller items such as crumpets or English muffins Once the browning process is complete the lever will automatically raise the toast For easier removal of toasted items lift carriage control lever upwards approximately 10mm from the lever starting position WARNING Do not leave toaster unattended when in use as toast may jam or wedge i...

Page 11: ...over a sink or bin and shake crumbs free 6 Ensure crumb tray is dried thoroughly Place crumb tray back into position by sliding the tray back and push in until completely locked into place 7 The stainless exterior of the toaster can be wiped over with a soft damp cloth and dried thoroughly 8 To store the toaster always switch off at the power outlet remove the power plug from the outlet and allow ...

Page 12: ...11 Notes ...

Reviews: