background image


Copies  of  the  I/B.  Please  reproduce  them  without  any 
changes  except  under  special  instruction  from  Team 
International USA. The pages must be reproduced and folded 
in order to obtain a booklet A5 (+/- 148.5 mm width x 210 mm 
height).  When  folding,  make  sure  you  keep  the  good 
numbering when you turn the pages of the I/B. Don’t change 
the  page  numbering.  Keep  the  language  integrity. 

Print  only 

what is inside the frame.


CM 38933 - 120501 


Assembly page 5/26 


Fax +1 305 430 9692 

BEFORE FIRST USE


When you use your appliance for the first time, pour fresh water into the 
water tank (without coffee) and switch on the appliance.  


Once all the water has passed through, switch off the appliance and let 
it cool down. When it is cold enough repeat the process 3 times with 
fresh water. 


SETTING THE CLOCK 


To set the digital clock, press the PROG button (10). “CLOCK” is displayed 
on the screen. Press the “H” button (5) until the clock displays the desired 
hour. Press the “M” button (6) until the clock displays the desired number of 
minutes. Press “PROG” button twice to exit the clock setting program. 

 
PREPARATION OF COFFEE 


Open the lid (1) of the water tank (2) and pour the desired volume of 
water in it. The water level can be read off the water level indicator. 
Never exceed the maximum level indicated, corresponding to 12 cups 
of coffee. 


Insert a paper filter, or the permanent filter supplied, into the filter holder; 
place the removable filter holder in the cavity (3) and add the desired 
quantity of ground coffee using the provided scoop. 


Never forget to close the water tank lid before switching on the coffee 
maker. 


Put the carafe (7) with its lid closed on the heating plate. 


Plug in the coffee maker on a wall outlet.  


Press the ON/OFF button (11) once. The red light “BREW” (13) will 
illuminate, indicating that your appliance is in use, along with the LCD 
display of the clock (12). The screen will remain backlit during the whole 
brewing process. 


Thanks to the electronic keep warm function, your coffee will be kept 
warm for 2 hours, unless the coffee maker gets switched off (see below). 


Your coffee maker is equipped with a “Pause-and-Serve” aka drip stop 
function (9), which means that when you remove the carafe from the 
appliance, a non-drip valve will automatically operate to stop any 
drops of coffee falling onto the heating plate (8). When you put the 
carafe back into place, the non-drip valve opens automatically and 
allows the remaining coffee to filter through, into the jug. 


Wait until the brewing process is finished and the filter is empty of water 
before removing the carafe. 


Summary of Contents for CM 38933

Page 1: ...ain a booklet A5 148 5 mm width x 210 mm height When folding make sure you keep the good numbering when you turn the pages of the I B Don t change the page numbering Keep the language integrity Print only what is inside the frame Front cover page first page Assembly page 1 26 Fax 1 305 430 9692 Coffee maker Cafetera Machine à Café CM 38933 120V 60Hz 1000W 8 3A www KALORIK com ...

Page 2: ...een given supervision or instruction concerning the use of the product by a person responsible for their safety Extra caution is always necessary when using this product 6 Close supervision is necessary when any appliance is used by or near children 7 Unplug from outlet when not in use and before cleaning Allow to cool before putting on or taking off parts 8 Do not operate any appliance with a dam...

Page 3: ... water in it If you have a programmable coffee maker make sure to fill it with water before programming it Important never put the jug in a microwave oven to warm up the coffee We will not take any responsibility if you do so SAVE THESE INSTRUCTIONS HOUSEHOLD USE ONLY POLARIZED PLUG INSTRUCTIONS This appliance is equipped with a polarized plug one blade is wider than the other To reduce the risk o...

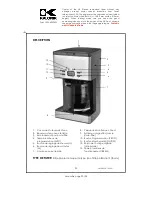
Page 4: ...language integrity Print only what is inside the frame 4 CM 38933 120501 Assembly page 4 26 Fax 1 305 430 9692 PART DESCRIPTION 1 Water reservoir lid 2 Water reservoir with window 3 Cavity for filter holder 4 AUTO light 5 Hour adjustment button H 6 Minute adjustment button M 7 Tempered glass carafe 8 Heating plate 9 Drip stop mechanism under filter holder 10 PROG button 11 On Off button 12 Digital...

Page 5: ...The water level can be read off the water level indicator Never exceed the maximum level indicated corresponding to 12 cups of coffee Insert a paper filter or the permanent filter supplied into the filter holder place the removable filter holder in the cavity 3 and add the desired quantity of ground coffee using the provided scoop Never forget to close the water tank lid before switching on the co...

Page 6: ... steps 1 to 4 in the PREPARATION OF COFFEE section Make sure the coffee maker s clock is set to the right time Press the PROG button twice 10 The clock will now display 12 00 with the word TIMER in the upper left corner Use the H and M buttons to set the desired brew time Press PROG again to validate the timer setting Press the ON OFF button 11 twice to activate the preset brew cycle The green AUT...

Page 7: ...ucts especially formulated for the descaling of coffee makers and follow their instruction manual carefully Do not use vinegar as it may damage the internal pipes Never put any part of the appliance in the dishwasher Clean the carafe with soapy water and rinse it with clear water PRACTICAL HINTS Problem You notice that the coffee making process is longer than it should be Solution It is probably t...

Page 8: ...roduct upon inspection by KALORIK is proven defective it will be repaired or replaced at Kalorik s option without charge to the customer If a replacement product is sent it will carry the remaining warranty of the original product This warranty does not apply to any defect arising from a buyer s or user s misuse of the product negligence failure to follow KALORIK instructions noted in the user s m...

Page 9: ...nt back to the warranty center along with proof of purchase and a return authorization number indicated on the outer package given by our Customer Service Representatives Send to the authorized KALORIK Service Center please visit our website at www KALORIK com or call our Customer Service Department for the address of our authorized KALORIK Service Center When sending the product please include a ...

Page 10: ... sean supervisados o instruidos acerca del uso del producto por una persona responsable de su seguridad Cuando se utiliza este producto siempre es necesaria una precaución extrema 6 Es siempre necesaria la supervisión cercana cuando se utiliza este aparato cerca de niños Este aparato no debe ser usado por niños 7 Desconecte el aparato de la toma de corriente cuando la unidad no se encuentra en uso...

Page 11: ...dispositivo de control remoto 22 No haga funcionar la cafetera sin agua Si su cafetera es programable no olvide ponerle agua antes de la programación Importante nunca ponga la jarra en un microondas para calentar el café Rehusamos cualquier responsabilidad si no respete esta instrucción GUARDE ESTAS INSTRUCCIONES SOLAMENTE PARA USO DOMESTICO INFORMACIÓN SOBRE EL ENCHUFE POLARIZADO Para reducir el ...

Page 12: ...g Keep the language integrity Print only what is inside the frame 12 CM 38933 120501 Assembly page 12 26 Fax 1 305 430 9692 PARTES 1 Tapa del depósito de agua con bisagras 2 Depósito de agua 3 Cavidad para el porta filtro 4 Luz AUTO 5 Botón de las horas H 6 Botón de las minutas M 7 Jarra de cristal 8 Placa calentadora antiadherente 9 Función Pausa y Servicio bajo el porta filtro 10 Botón PROG 11 B...

Page 13: ...rogramación del reloj PARA HACER CAFÉ Abra la tapa 1 del depósito 2 y eche la cantidad de agua deseada El nivel del agua está indicado en el depósito Nunca sobrepase el nivel máximo correspondiente a 12 tazas Coloque un filtro de papel o el filtro permanente suministrado en el porta filtro Coloque el porta filtro amovible en la cavidad correspondiente 3 y llénelo con la cantidad deseada de café mo...

Page 14: ...ntalla LCD se apaguen PROGRAMAR SU CAFETIERA Para programar su aparato para que pase el café a un momento predefinido siga las etapas 1 a 4 del párrafo PARA HACER CAFÉ Asegúrese que el reloj del aparato esté bien ajustado Pulse el botón PROG dos veces El reloj está ahora en las 12 00 con la palabra TIMER en el rincón superior izquierdo Utilice los botones HOUR y MINUTE para ajustar el momento en q...

Page 15: ...var la cafetera en buen estado Para ello utilice un desincrustante para cafeteras eléctricas que venden en el mercado y siga sus instrucciones No introduzca ninguna parte del aparato en el lavavajillas Limpie la jarra con agua caliente jabonosa y enjuáguelo con agua clara CONSEJOS PRÁCTICOS Problema Cuando empiece a notar que el café tarda en pasar más tiempo de lo habitual Solución Decalcifique s...

Page 16: ...plicación de la garantía Durante este período si el producto KALORIK después de una inspección por parte de KALORIK se manifiesta defectuoso será reparado o remplazado según lo que decida KALORIK sin gastos para el consumidor Si se envía un producto de remplazo se aplicará la garantía que queda del producto original Esta garantía no se aplica a los defectos causados por una mala utilización por pa...

Page 17: ... al servicio post venta más próximo Si fuera el caso traiga el producto o envíelo correctamente franqueado con la prueba de compra que mencione el número de autorización de devolución indicado por nuestro Servicio al Consumidor al servicio post venta KALORIK más próximo Visite nuestra web www KALORIK com o llame al Servicio al Consumidor para obtener la dirección del Servicio post venta KALORIK ex...

Page 18: ...personne responsable pour leur sécurité leur donne des instructions ou les supervise pour l utilisation de l appareil Faites extrêmement attention lors de l utilisation de cet appareil 6 Faites particulièrement attention lorsque l appareil est utilisé par ou en présence d enfants 7 Débranchez l appareil de la prise murale lorsqu il n est pas utilisé ou avant de le nettoyer Laissez l appareil refro...

Page 19: ...2 Ne faites pas fonctionner votre cafetière sans eau Si votre cafetière est programmable veillez à ne pas oublier de mettre de l eau avant la programmation Important votre verseuse ne peut en aucun cas être placée dans un four à micro ondes pour réchauffer le café Nous ne saurions être tenus comme responsables des dégâts causés par le non respect de cette consigne CONSERVEZ CES INSTRUCTIONS USAGE ...

Page 20: ... 38933 120501 Assembly page 20 26 Fax 1 305 430 9692 DESCRIPTION 1 Couvercle du réservoir d eau 2 Réservoir d eau avec fenêtre 3 Emplacement pour porte filtre 4 Témoin lumineux de programmation AUTO 5 Bouton de réglage des heures H 6 Bouton de réglage des minutes M 7 Carafe en verre trempé 8 Plaque de maintien au chaud 9 Système anti gouttes sous le porte filtre 10 Bouton Programmation PROG 11 Bou...

Page 21: ...AFÉ Soulevez le couvercle 1 du réservoir d eau 2 Versez la quantité d eau désirée dans le réservoir en utilisant la verseuse Ne dépassez pas le niveau maximal indiqué car le café déborderait de la verseuse Placez le porte filtre dans la cafetière Mettez un filtre en papier ou le filtre permanent dans le porte filtre positionnez le porte filtre dans l appareil et ajoutez la quantité de café moulu d...

Page 22: ...les étapes 1 à 4 du paragraphe POUR FAIRE LE CAFÉ Assurez vous que l horloge de la cafetière est réglée à la bonne heure Appuyez deux fois sur le bouton PROG 10 L horloge affichera 12 00 et le mot TIMER dans le coin supérieur gauche Utilisez les boutons H et M pour régler le moment précis où vous voulez que la cafetière passe le café Appuyez de nouveau sur PROG pour valider Appuyez deux fois sur l...

Page 23: ...sensiblement sa durée de vie Pour le détartrage n utilisez que des produits spécialement conçus pour le détartrage des cafetières Ne mettez jamais votre verseuse dans le lave vaisselle Nettoyez la dans de l eau chaude savonneuse et rincez la soigneusement CONSEILS PRATIQUES Problème Lorsque vous constatez une augmentation du temps de passage du café Solution effectuez un détartrage complet de votr...

Page 24: ...Une preuve d achat est exigée pour obtenir l application de la garantie Durant cette période le produit KALORIK qui après inspection par KALORIK s avère défectueux sera réparé ou remplacé au choix de KALORIK sans frais pour le consommateur Si un produit de remplacement est envoyé c est la garantie restante du produit originel qui s appliquera La présente garantie ne s applique pas aux défauts dus ...

Page 25: ...notre centre de réparation Le cas échéant ramenez le produit ou envoyez le dûment affranchi ainsi qu une preuve d achat en mentionnant le numéro d autorisation de retour indiqué par notre service clientèle au service après vente KALORIK agrée visitez notre site internet www KALORIK com ou appelez notre département Service Clientèle pour obtenir l adresse du service après vente KALORIK agréé Si vou...

Page 26: ...ced and folded in order to obtain a booklet A5 148 5 mm width x 210 mm height When folding make sure you keep the good numbering when you turn the pages of the I B Don t change the page numbering Keep the language integrity Print only what is inside the frame Back cover page last page Assembly page 26 26 Fax 1 305 430 9692 K120501 www KALORIK com ...

Reviews: