background image

Piccolo

13

rev.A

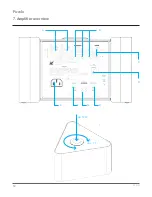
A) 


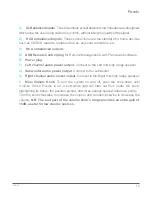
XLR balanced inputs

.  These two inputs accept balanced, low impedance audio signals 

which allow the use of long cable runs (>10mt), without losing the quality of the signal.

B) 


RCA unbalanced inputs

. These connections are the standard for home devices 

such as CD/DVD readers, portable devices, personal computers, etc.

C) 


RCA unbalanced outputs

.

D) 

USB Remote Control plug

 for Remote Management via K-Framework software.

E) 

Power plug

F) 

Left channel audio power output

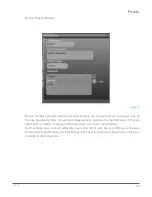
. Connect to the Left mid-high range speaker.

G) 

Subwoofer audio power output

. Connect to the subwoofer.

H) 

Right channel audio power output

. Connect to the Right mid-high range speaker.

I) 

Main Volume Knob

. To turn the system on and off, push the knob down until 

it  clicks.  When  Piccolo  is  on,  a  soft  white  light  will  filter  out  from  under  the  knob, 
highlighting its frame, the position pointer, and three equally spaced reference points. 
Turn the knob clockwise to increase the volume and counterclockwise to decrease the 
volume. 

N.B.


The last part of the volume knob’s range provides an extra gain of 

10dB, useful for low volume sources.

Summary of Contents for Piccolo

Page 1: ...Piccolo USER S MANUAL English ...

Page 2: ...Manual issued on 09 01 2012 ...

Page 3: ... 5 Physical 10 6 Power and voltage requirements 11 7 Amplifier overview 12 8 Setup and Operation 14 Wall mounting 14 Table or shelf mounting 14 9 K Framework 16 9 1 System requirements 16 9 2 Installation and set up 16 9 3 Getting started 19 10 Service 24 11 Warranty 24 12 Declaration of conformity 25 13 Specifications 27 ...

Page 4: ...4 rev A Piccolo ...

Page 5: ...mpliance with the applicable CE standards and regulations Before putting the device into operation please observe the respective country specific regulations WEEE This device complies with the Restriction of Hazardous Substances Directive SYMBOLS Please dispose of this product at the end of its operational lifetime by bringing it to your local collection point or recycling centre for such equipmen...

Page 6: ...ty years of research and development experience in acoustics and digital audio signal processing design and production of professional sound systems for live theatre and concert performances When we put our minds to our first home system we were intent on developing a product that would have the power to fill your living room or study with concert hall sound and crystal clear definition in a perfe...

Page 7: ...ke the installation quick and easy for any use Use The Piccolo audio system is a perfect example of K Array s design focus on user friendly operation One control on the top of the amplifier turns the system on and off and sets the volume Signal inputs connect to balanced XLR and standard RCA connectors K Framework PC software interfaces via USB providing an intuitive 10 band equalizer which allows...

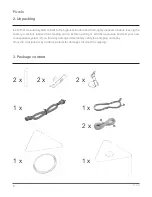
Page 8: ...ly inspected before leaving the factory Carefully inspect the shipping carton before opening it and then examine and test your new loudspeaker system If you find any damage immediately notify the shipping company Only the consignee may institute a claim for damages incurred in shipping 2 x 2 x 2 x 2 x 1 x 1 x 1 x 1 x ...

Page 9: ... on again Do not attempt to dry Piccolo with an external heat source such as a microwave oven or hair dryer A Piccolo that has been damaged as a result of exposure to liquids could be not serviceable Keeping the Outside of Piccolo Clean Handle your Piccolo with care to maintain its appearance To clean Piccolo unplug all cables and turn off it Then use a soft dry or slighty damp cloth Avoid getting...

Page 10: ...e sure that the supplied voltage stays between the specified range Piccolo operates safely and without audio discontinuity if the AC voltage stays within both 85 132 V and 170 264 V at 50 or 60 Hz Verify that your mains connection satisfies the power ratings of the device Only connect the power supply to an appropriate power adapter Warning connecting the system to an AC power mains with a voltage...

Page 11: ...inuity if the AC voltage stays within both 85 132 V and 170 264 V at 50 or 60 Hz Verify that your mains connection satisfies the power ratings of the device CAUTION Connecting the system to an AC power mains with a voltage exceeding 270V will cause significant damage to the device and create a serious risk for users ...

Page 12: ...12 rev A Piccolo A B C E F G H I D 7 Amplifier overview on off vol ...

Page 13: ...hannel audio power output Connect to the Left mid high range speaker G Subwoofer audio power output Connect to the subwoofer H Right channel audio power output Connect to the Right mid high range speaker I Main Volume Knob To turn the system on and off push the knob down until it clicks When Piccolo is on a soft white light will filter out from under the knob highlighting its frame the position po...

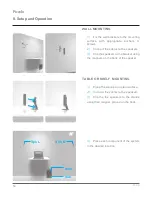
Page 14: ...ers 3 Clip the speakers to the bracket using the magnets on the back of the speaker 1 Place the stands on a plain surface 2 Connect the cables to the speakers 3 Clip the the speakers to the stands using their magnet placed on the back 4 Place each component of the system in the desired location WALL MOUNTING TABLE OR SHELF MOUNTING 8 Setup and Operation ...

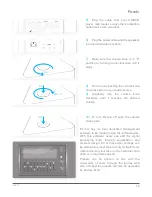
Page 15: ...ume knob clockwise until it reaches the desired volume 10 To turn Piccolo off push the volume knob again Piccolo has its own dedicated management software to be loaded inside the K Framework With this software users can edit the signal processing both through equalization and ambient design All of these user settings can be stored into preset files not only on the Piccolo internal memory but also ...

Page 16: ...s aspx id 5555 Microsoft Visual C 2010 Redistributable Package x64 http www microsoft com download en details aspx id 14632 To download your free K Framework license please go to the Software Download page of the Blueline website http www kblueline com Once the zip file is decompressed it will show a folder containing the file K Framework setup Users of Windows Vista and 7 can install the software...

Page 17: ...e online search select the Not now option and click on Next 5 When asked for the drivers location select the Install from a list or specific location option 6 In the search and installation options window select the Search for the best driver in this location option and check the Include this location in the search checkbox then browse for the drivers containing folder The path should read C Progr...

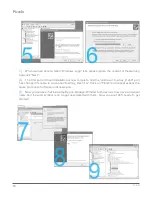
Page 18: ...s now complete and the unknown K Array_Dsp01 port has changed its name to a univocal K Array_Dsp01 A Click on Finish and repeat exactly the same procedure for the still unknown port 9 Now you can see that inside the Device Manager Window both devices now have a univocal name and the alert symbol is no longer associated with them Now you are 100 ready to get started ...

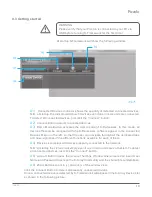
Page 19: ...A4 Device List displays all devices presently connected to the network N B at startup the List will look empty even if one or more units are connected To detect all connected devices just click the Connect button A5 Account Button opens the Account Settings Window where users can insert User Name and Password to access the K Array Community and the shared preset database A6 Zoom Buttons zoom in an...

Page 20: ...v A Piccolo B1 Connected Device Name B2 Device Menu Button shows and hides the device menu B3 Device Menu displays the basic information about the device and the shortcuts to open all available Editing Tabs ...

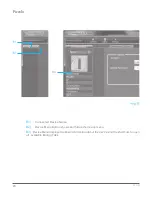
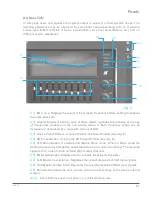
Page 21: ...e can be increased or decreased by a maximum amount of 6dB C3 Device Preset Buttoon It opens the Device Preset Window see img E C4 EQ Preset Button It opens the EQ Preset Window see img D C5 XLR Mono Button It enables and disable Mono mode When in Mono mode the XLR input are summed together and rescaled to avoid occasional clipping The resulting signal is then routed to both Left and Right output ...

Page 22: ...e set as creator name D4 Preset List displays all the presets available to the system D5 Delete Preset button deletes the preset currently selected D6 Refresh List button updates the list of currently available presets D7 Load Preset button loads the preset currently selected in the Preset List to the selected channel D8 Save as button opens the New Preset Pop Up Window EQ Presets are proprietary ...

Page 23: ...eam or selected cooperators to optimize the performance of Piccolo itself with no relation to any specific musical genre or room characteristic Such settings may not be modified by users and that is why the only difference between the Device Preset Window and the EQ Preset Window is the Save as New button that is not included in the former one ...

Page 24: ...hts 11 Warranty 10 Service To obtain service 1 Contact the official K array distributor in your country They will direct you to the service centre 2 If you are calling for service have the serial number s of the unit s at hand for reference Ask for Customer Service and be prepared to describe the problem clearly and completely 3 If the problem cannot be resolved over the phone you must return the ...

Page 25: ...anufacturing drawings which form part of this declaration Assessment of compliance of the product with the requirements relating to electromagnetic compatibility was based on the following standards Safety EN60065 1998 EMC EN55103 1 1997 Emission 1 EN55103 2 1997 Immunity 2 1 This device may not cause harmful interference 2 This device must accept any interference received including interference t...

Page 26: ...26 rev A Piccolo ...

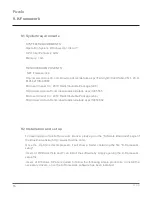
Page 27: ...Neodymium cone driver with 0 5 voice coil Subwoofer 1 x 6 Neodymium magnet with double 1 5 voice coil 1 x 6 passive radiator AC Power Operating range 85 132 Vac 50 Hz Auto switching 170 264 Vac 60 Hz Auto switching I nominal 2 A 115 Vac 1 A 230 Vac Peak power 2 x 220 W 120 ms max Max power conumption 150 W Physical Dimensions 9 2 x 2 1 x 1 6 cm mid high 13 x 22 5 x 20 2 cm subwoofer 20 5 x 22 5 x ...

Page 28: ...K array s r l unipersonale Via Paolina Romagnoli 50037 San Piero a Sieve Firenze Italy tel 39 055 8487222 fax 39 0558487238 e mail info k array com www k array com UMC038AA01ENA ...

Reviews: