background image

29

XV-N412S/GNT0044-017A/English

A

d

d

it

io

n

a

in

fo

rm

a

ti

o

n

AV COMPU LINK remote control 
system

The JVC AV COMPU LINK system allows you to enjoy video or 
audio with the simplest operation. If your video/audio player (such 
as a DVD player, CD player and  VCR) and television or/and 
amplifier/receiver support the JVC AV COMPU LINK system and 
are tied with the JVC AV COMPU LINK cable(s), simply starting 
the player will automatically make all necessary settings on the 
television and/or amplifier/receiver to allow you to enjoy the 
playback.

Connection and setup

Using an AV COMPU LINK cable, connect the AV COMPU LINK 
terminals of each component to one another.
• The player’s AV COMPU LINK setting is controlled using the 

OTHERS menu in the preference display. See page 26.

• For information on the connection between a TV and a receiver, 

refer to the receiver’s instructions.

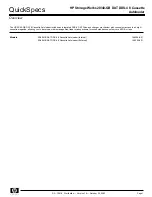
• If you connect the player to a television via AV COMPU LINK, 

set the player’s AV COMPU LINK setting as follows.
- When connecting to the VIDEO-1 input terminal of the 

television: DVD2

- When connecting to the VIDEO-2 input terminal of the 

television: DVD3

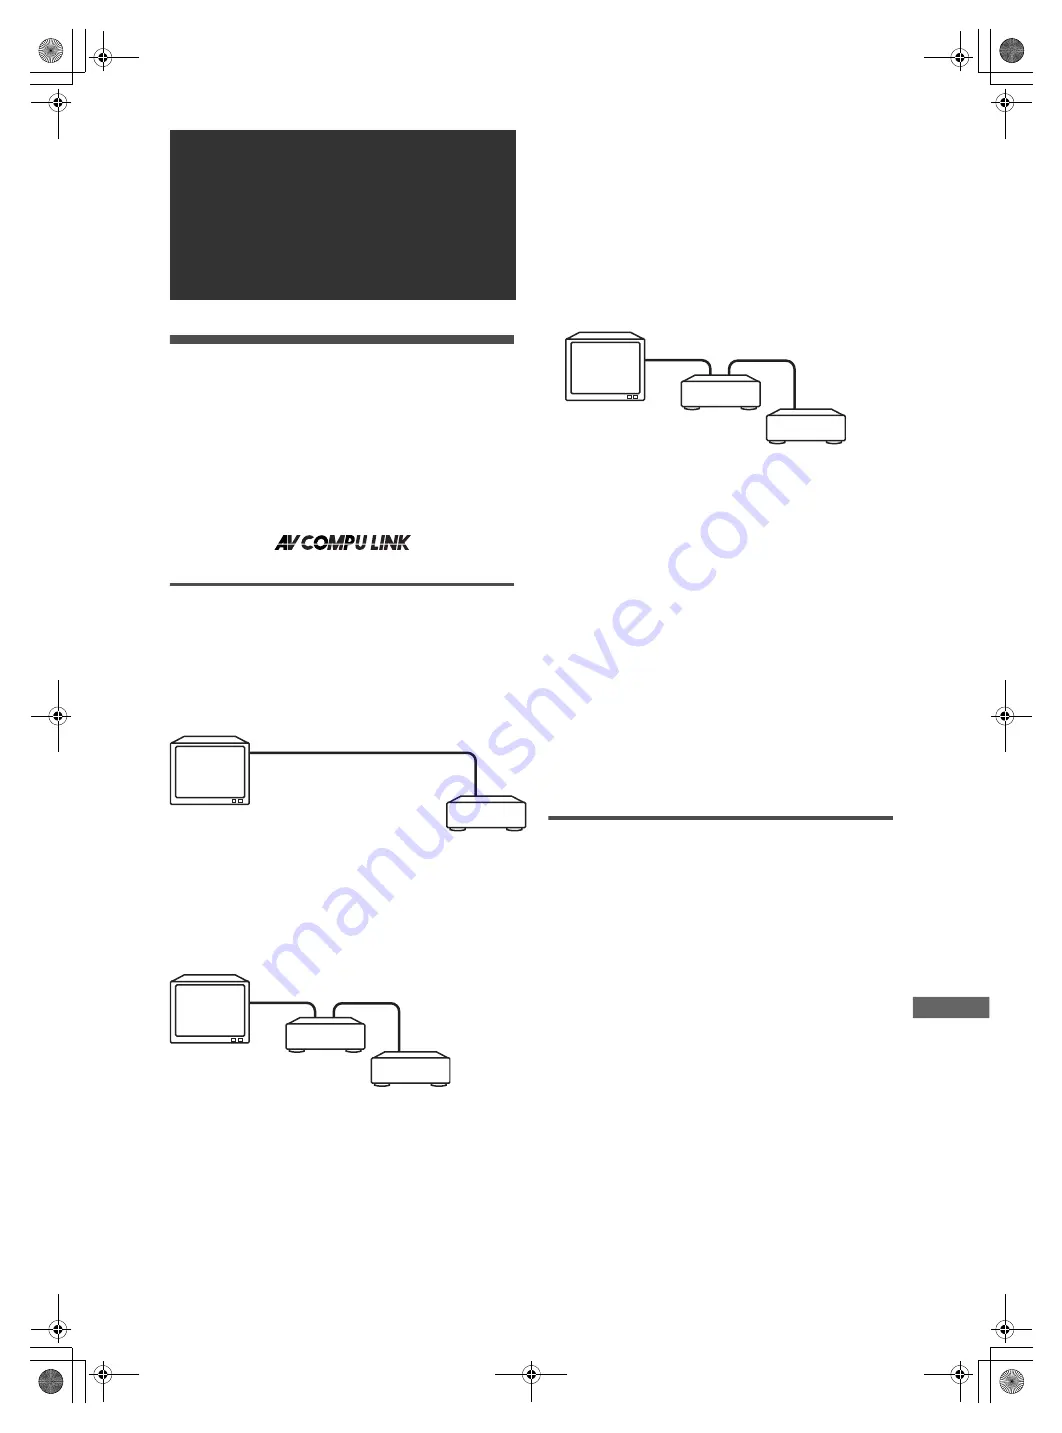
• If you connect the player to a television and VCR via AV 

COMPU LINK, set the VCR’s Remote Control Code and the 
player’s AV COMPU LINK setting as follows.
- When connecting to the VIDEO-1 input terminal of the 

television:
The player’s AV COMPU LINK setting: DVD2
VCR’s Remote Control Code: B

- When connecting to the VIDEO-2 input terminal of the 

television:
The player’s AV COMPU LINK setting: DVD3
VCR’s Remote Control Code: A

• If you connect the player to a television and receiver via AV 

COMPU LINK, set the player’s AV COMPU LINK setting to 
DVD1.

IMPORTANT!

When you make video connection between the player and 
another device (such as a receiver and TV) via the composite, S-
video or component jacks, as well as AV COMPU LINK 
connection, see also the instruction manual of the other device.

Notes for connection

• If you connect the player to a receiver via AV COMPU LINK in a 

system including a Dolby Digital decoder, some functions may 
not be performed automatically.

• Connect the AUDIO OUT jacks of the player to the audio input 

jacks of a receiver indicating “DVD.” Otherwise, the system will 
not work correctly.

• There may be no description about connections to the player in 

the instruction manual of a television or VCR. However, a 
television or VCR with AV COMPU LINK terminals indicating 
“II,” “EX” or “III” can be connected to the player.

Operation

The JVC AV COMPU LINK system allows you to enjoy video and/
or audio by simply pressing Play on the source component (the 
component which plays back the video or audio, such as a DVD 
player or VCR). You do not even have to switch on power on the 
TV or receiver.

1

Turn on the main power of the television.

2

Insert a disc (or tape) into the source 
component.

3

Press 

3

 of the source component.

The following actions are performed automatically:
• Turning on the television power.
• Setting the source of the television to the external input 

(VIDEO-1 or VIDEO-2).

• Turning on receiver power.
• Setting the source of the receiver to the component which has 

started playback.

Additional 
information

TV

The player

To AV COMPU LINK (ll, EX or lll)

TV

To AV COMPU LINK 
(ll, EX or lll)

The player

To AV COMPU LINK

VCR

TV

The player

To AV COMPU LINK 
(ll, EX or lll)

To AV COMPU 
LINK

Receiver

XV-N412S(USUBUGUXUWA).book  Page 29  Monday, April 5, 2004  7:40 PM

Summary of Contents for XV-N412

Page 1: ...information 29 INSTRUCTIONS V I D E O Region code of DVD VIDEO DVD players and DVD VIDEO discs have their own Region Code numbers This player can play back DVD VIDEO discs whose Region Code numbers include the player s Region Code which is indicated on the region code symbol on the rear panel Example of playable DVD VIDEO discs when the player s Region Code is 2 ALL 2 5 2 4 2 3 1 3 2 1 6 5 4 XV N4...

Page 2: ...tions in 15 cm from the back Bottom No obstructions place on the level surface IMPORTANT FOR LASER PRODUCTS 1 CLASS 1 LASER PRODUCT 2 CAUTION Do not open the top cover There are no user serviceable parts inside the unit leave all servicing to qualified service personnel 3 CAUTION Visible and invisible laser radiation when open and interlock failed or defeated Avoid direct exposure to beam 4 REPROD...

Page 3: ...o prevent malfunction of the unit There are no user serviceable parts inside If anything goes wrong unplug the power cord and consult your dealer Do not insert any metallic objects such as wires hairpins coins etc into the player Do not block the vents Blocking the vents may damage the player To clean the cabinet Use a soft cloth Follow the relevant instructions on the use of chemically coated clo...

Page 4: ...ports the following digital audio formats see page 33 Glossary for descriptions of each audio format Linear PCM Dolby Digital DTS Digital Theater Systems MPEG Multichannel NOTE Depending on the player s DIGITAL AUDIO OUTPUT setting digital audio signals may not be output as they are recorded on the disc See DIGITAL AUDIO OUTPUT on page 26 for details Notes on discs With some DVD VIDEO discs the pl...

Page 5: ...abets such as the player s current status READ OPEN etc or currently played DVD s title and chapter number Remote control unit 1 DISPLAY button 9 2 OPEN CLOSE button 9 3 Numeric buttons 4 RETURN button 12 5 TOP MENU button 12 6 Cursor selection 5 Up Down buttons 7 Cursor selection 2 Left 3 Right buttons 8 SET UP button 9 24 9 4 PREVIOUS button 11 12 22 23 0 7 CLEAR button 9 10 14 15 20 21 22 23 3 ...

Page 6: ...nput of the TV to the VIDEO jack of the player NOTE To obtain correct signals from the S VIDEO output do not connect cables to the VIDEO jack and COMPONENT VIDEO OUT jacks of the player Preparations In the following description TV may be substituted with monitor or projector Terminal names used for other components may be different from those used in the following description RIGHT LEFT AUDIO VIDE...

Page 7: ...tly output as they are from the player Depending on the PICTURE SOURCE preference display and whether the current DVD VIDEO disc is film source or video source the indicator that lights up in the display window differs as shown in the table below Progressive scan video playback available In the Progressive scanning mode you can enjoy high quality picture with less flickers when the COMPONENT VIDEO...

Page 8: ...gital or DTS decoder or an amplifier with a built in decoder you can enjoy high quality surround sound NOTES Connect the player and the digital audio device by using either an optical digital cable or a coaxial digital cable It is not recommended to use the digital jacks for dubbing When recording the sounds DVD VIDEO SVCD Video CD or Audio CD played back on the player record them through the anal...

Page 9: ...he remote control unit according to the polarity markings and inside the compartment Then replace the cover The batteries will last about six months with normal use If the functions of the remote control unit become erratic replace the batteries Precautions of the safe use of batteries Observe the following precautions for the safe use of batteries If they are used improperly their lives will be s...

Page 10: ...language for the preference displays etc from among ENGLISH CHINESE and SPANISH 3 Press ENTER The second page is shown in which the pull down menu of the MONITOR TYPE is already open 4 Press 5 to select the desired monitor type For a normal conventional TV select 4 3 LB or 4 3 PS For a wide screen TV select 16 9 NORMAL or 16 9 AUTO For a multi format TV select 16 9 MULTI NORMAL 16 9 MULTI AUTO 4 3...

Page 11: ...insert an unplayable disc See page 2 When inserting a disc on the disc tray be sure to position the disc inside the recess Otherwise the disc may be damaged when the disc tray is closed or you may not be able to remove the disc from the player To check the playback status You can see the current selection number the title chapter number for DVD VIDEO or track number for SVCD Video CD Audio CD time...

Page 12: ... which an interrupted position has already been stored the memory will be updated with the new interrupted position For a double sided DVD VIDEO disc the player regards each side as a different disc Therefore to resume playback of such a disc the disc must be inserted with the same side down When the player memorizes an interrupted point for a disc it also memorizes Audio Subtitle and Angle settin...

Page 13: ... switch from rapid reverse playback to x1 5 Quick Playback first press 3 SELECT then press once To advance a still picture frame by frame While paused press 8 Each time you press 8 the still picture advances to the next frame Pressing 3 SELECT returns to normal playback To play back in slow motion You can select from 1 32 times 1 16 times 1 4 times and 1 2 times normal speed During playback press ...

Page 14: ... on the TV screen 2 Press 5 2 3 to select a desired item then press ENTER or 3 SELECT The player starts playback of the selected item Hints Some DVD VIDEO discs may also have a different menu which appears when MENU is pressed See the instructions of each DVD VIDEO disc for its particular menu With some discs you can select items by entering the corresponding number using the numeric buttons which...

Page 15: ...To correct a mistake Press 2 repeatedly to move back to the digit where you entered a wrong number and reenter the correct one 4 Press ENTER The player starts playback from the specified time To dismiss the menu bar Press ON SCREEN Hint 10 and 10 buttons are not used with this function NOTES Some DVD VIDEO discs do not contain time information and the time search function cannot be used The time s...

Page 16: ...Press 7 To clear the program While stopped and the program table is shown press 7 To exit the program mode After clearing the program press ON SCREEN NOTE When the disc tray is opened or the player is turned off the program is cleared To play back in random order Random play 1 In stop mode press ON SCREEN twice The menu bar appears on the TV screen 2 Press 2 3 to move to Screen example for Audio C...

Page 17: ...k with PBC 1 Press ON SCREEN twice The menu bar appears on the TV screen 2 Press 2 3 to move to then press ENTER The pull down menu for repeat mode selection appears 3 Press 5 to select A B 4 Press ENTER at the beginning of the part you want to repeat point A The pull down menu disappears The repeat icon shows 5 Press ENTER at the end of the part you want to repeat point B The repeat icon shows Th...

Page 18: ...CREEN GUIDE preference is set to OFF 1 During playback press ANGLE The angle selection window appears on the TV screen 2 Press 5 or ANGLE to select the desired angle Each time you press 5 or ANGLE the angle changes 3 Press ENTER You can see the picture from the selected angle The angle selection window is dismissed NOTE The angle selection window will automatically disappear if you do not change t...

Page 19: ... window for setting parameters appears 5 Press 5 to adjust the level of the parameter The higher value enhances the effect 6 Press ENTER Repeat steps 3 to 6 if you want to set other parameters To dismiss the VFP mode selection window Press VFP PROGRESSIVE SCAN NOTE The window for VFP mode selection and parameter setting disappear if no operation is made for about 10 seconds To simulate surround so...

Page 20: ... procedure 1 Press 2 3 to select the icon you want to work with The selected icon is pointed by 2 Press ENTER With many icons an appropriate pull down window appears however there are some exceptions NOTES A mark or text on the menu icon for the function or mode currently selected is shown in green Some functions are not available during playback You cannot move to the associated icon when it is n...

Page 21: ...layback with the selected subtitle Angle selection See also page 16 During playback selects a desired scene angle in a multi angle part 1 Open the pull down window 2 Press 5 to select a scene angle 3 Press ENTER to begin playback with the selected scene angle Menu bar functions for SVCD Video CD Audio CD Time mode selection Selects the time mode shown in the display window and in the status bar Pr...

Page 22: ... stop playback followed by 3 SELECT the player starts playback from the beginning of the current track NOTES The player does not support packet writing UDF file discs The player does not support the ID3 tag and WMA tag The player supports discs recorded with multiple sessions Some discs may not play due to disc characteristics or recording conditions Programmed and random playback functions do not...

Page 23: ...3 To select 40 press 10 10 10 then 10 The player starts playback from the specified track Repeat playback During playback or while stopped press REPEAT Each time you press REPEAT the repeat mode changes as follows If you press REPEAT while stopped you need to press ENTER or 3 SELECT to start repeat playback To stop repeat playback Press 7 Note that the repeat mode remains active To quit repeat pla...

Page 24: ...fter the disc contents are read the JPEG CONTROL display automatically appears on the TV screen You can select a desired file for playback via this display 1 Make sure that the black cursor bar is in the left group column If it is in the right column press 2 to move it to the left column 2 Press 5 to move the bar to a desired group On the right column files in the selected group are shown 3 Press ...

Page 25: ...ow playback from the last picture displayed To keep showing the current picture Press 8 or ENTER Pressing 3 SELECT resumes the slide show playback To select the start point of the slide show From the JPEG CONTROL display 1 Make sure that the black cursor bar is in the left group column If it is in the right column press 2 to move it to the left column 2 Press 5 to move the bar to a desired group 3...

Page 26: ...e the following To dismiss a preference display Press SET UP NOTES While an MP3 WMA or JPEG disc is inserted you cannot bring up any preference display When a preference display is shown on a wide TV screen the upper and lower parts of the preference display sometimes may be cut off If this happens adjust the picture size control of the TV Changing the initial settings ENTER SET UP 5 2 3 SELECT EN...

Page 27: ...ect ratio is fixed to 16 9 the player automatically adjusts the screen width of the output signal correctly when playing back a 4 3 source If you play a 4 3 DVD VIDEO source using the 16 9 NORMAL mode the picture character changes slightly due to the process for converting the picture width 16 9 AUTO Wide television screen select when you connect the player to a wide screen 16 9 TV 4 3 LB Letter B...

Page 28: ... Setting options DOLBY SURROUND STEREO DOLBY SURROUND select when listening to multichannel surround audio with the player s analog AUDIO OUT terminals connected to a surround decoder STEREO select when listening to conventional two channel stereo audio with the player s AUDIO OUT terminals connected to a stereo amplifier receiver or television set or in case you want to record the audio from a DV...

Page 29: ...ess ENTER to bring up the pull down menu In the pull down menu NONE and levels 8 to 1 are available NONE does not restrict playback Level 1 is the strictest level Discs rated higher than the selected level are restricted 7 Press 5 to select a desired parental lock level then press ENTER moves to PASSWORD 8 Press the numeric buttons 0 to 9 to enter a 4 digit password 9 Press ENTER The parental lock...

Page 30: ... in this step becomes the new password If you want to keep the same password as before enter the same password 7 Press ENTER moves to EXIT Pressing ENTER again returns to the OTHERS menu of the preference display NOTE If you enter the wrong password more than 3 times in step 3 above moves to EXIT automatically and 5 do not work To temporarily release the Parental Lock If the parental level is set ...

Page 31: ...eceiver via AV COMPU LINK set the player s AV COMPU LINK setting to DVD1 IMPORTANT When you make video connection between the player and another device such as a receiver and TV via the composite S video or component jacks as well as AV COMPU LINK connection see also the instruction manual of the other device Notes for connection If you connect the player to a receiver via AV COMPU LINK in a syste...

Page 32: ...r is connected to a VCR directly and the copyguard function is activated Connect the player so that the picture signal flows directly to the TV With some discs the picture may be blurred when PICTURE SOURCE is set to FILM or AUTO Set PICTURE SOURCE to VIDEO NORMAL or VIDEO ACTIVE Correct picture cannot be obtained Connect only one type of cable to the jack s you want to use on this player either t...

Page 33: ...e D symbol are trademarks of Dolby Laboratories DTS and DTS 2 0 Digital Out are trademarks of Digital Theater Systems Inc This product incorporates copyright protection technology that is protected by U S patents and other intellectual property rights Use of this copyright protection technology must be authorized by Macrovision and is intended for home and other limited viewing uses only unless ot...

Page 34: ... French Polynesia PG Papua New Guinea PH Philippines PK Pakistan PL Poland PM Saint Pierre and Miquelon PN Pitcairn PR Puerto Rico PT Portugal PW Palau PY Paraguay QA Qatar RE Réunion RO Romania RU Russian Federation RW Rwanda SA Saudi Arabia SB Solomon Islands SC Seychelles SD Sudan SE Sweden SG Singapore SH Saint Helena SI Slovenia SJ Svalbard and Jan Mayen SK Slovakia SL Sierra Leone SM San Mar...

Page 35: ...eater Systems Not all DTS discs contain six 5 1 channels of information Dynamic range The difference between the loudest and softest sounds Interlaced scanning In a conventional video system a picture is shown on the display monitor in between lines of two halves The Interlaced scanning system places lines of the second half of the picture in between lines of the first half of the picture JPEG A p...

Page 36: ...XV N412S GNT0044 017A English VICTOR COMPANY OF JAPAN LIMITED EN 2004 VICTOR COMPANY OF JAPAN LIMITED 0404KTYBICJSC XV N412S DVD PLAYER XV N412S USUBUGUXUWA book Page 34 Monday April 5 2004 7 40 PM ...

Reviews: