background image

47

E

nglish

Engli

s

h

Troubleshooting

If the unit fails to operate properly even when the remedial action suggested above has been taken:

This unit uses a microcomputer to perform a large number of operations. If it fails to operate no matter which button is pressed, disconnect the
power cord, and then wait a few moments before re-connecting it. Then set the time and re-program the timer.

Notes

If something important is going to be recorded, always test-record first to check that the recording turns out properly before proceeding
with the actual recording.

The manufacturer assumes no liability whatsoever for any damages resulting from missed opportunities or accidental erasure that occurs
while conducting recording or play operations due to malfunctioning of or trouble in the unit, or for any incidental damage.
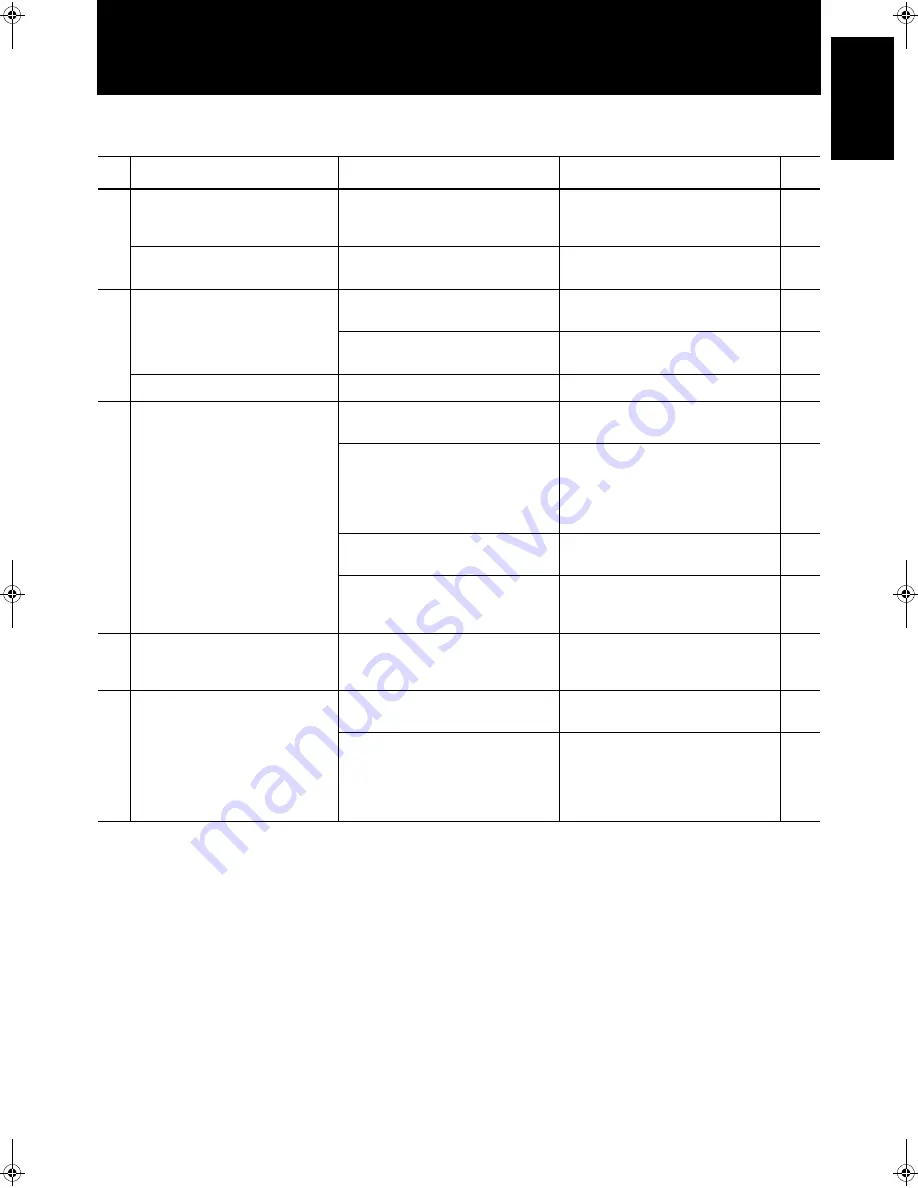
Symptom

Cause

Remedial action/check

Ref

COM

M

ON

No sound.

• A CD-R or CD-RW with nothing 

recorded on it has been inserted. 
(“BLANK DISC” is displayed.)

Replace the disc with one on which 
tracks have been recorded.

The time display flashes in the dis-
play window. 

• A power failure has occurred or the 

power cord has been disconnected.

Set the clock and re-program the 
timer.

38

CD P

L

A

Y

ER

Play fails to start

• The CD has been inserted upside 

down.

Insert it properly with the label side 
facing up.

11

• Condensation has formed on the 

lens.

Turn on the power and wait for a 
couple of hours.

2

Specific parts are not played properly.

• The CD is scratched.

Replace the CD.

11

CDR

Recording is not possible

• The CD-R or CD-RW was loaded in 

the tray upside-down.

Load the disc with the label side up.

12

• The CD-R or CD-RW is already 

finalized.

• Further recording on a finalized CD-

RW is only possible if the Unfinalize 
function is used.

Replace with a disc that can be 
recorded on.

35

• The source being copied is already a 

digital copy itself.

Perform analog recording of the 
source.

21

• There is dust or scratches on the sur-

face of the disc.

Clean the disc using a commercially 
available disc cleaner. If this is not 
effective, replace the disc.

20

TIME

R

Timer fails to start.

• Present time is not correct.
• The timer display fails to appear.

Set the time properly.

Set the timer properly.

38

REMO

TE C

O

NT

R

O

L

No remote control operations.

• The dry batteries in the remote con-

trol have discharged.

Replace them with two fresh batter-
ies (AA (15F), R6, SUM-3).

9

• The remote control sensor is 

exposed to direct sunlight or some 
other intense source of light.

Move the unit so that the sensor is 
not exposed to direct sunlight, a 
lighting fixture or some other intense 
source of light.

9

XL-R5010BK.book  Page 47  Monday, June 4, 2001  11:40 AM

Summary of Contents for XL-R5010BK

Page 1: ... not be played correctly 1 Load CDs into the trays of the 3 CD changer Only tracks on the CDs loaded in the 3 CD changer can be reg istered into the program i e tracks on a CD loaded in the CDR cannot be selected for playback CD READ DISC will be shown in the information display as the unit reads the information from each disc 1 Load CDs into the trays of the 3 CD changer Only tracks on the CDs lo...

Page 2: ... Additionally should there be a power black out that lasts for longer than one hour or if the AC power cord of the unit is unplugged from the wall socket for longer than one hour please check to see if the clock needs to be reset again before using any other operation Set the timer immediately after turning on the power to the main unit for the first time Additionally should there be a power black...

Page 3: ... EDIT FINALIZE DISPLAY 1 2 4 5 7 8 3 6 9 10 10 FADE SYNCHRO C O N T RO L STANDBY STANDBY ON PLAY EXCHANGE 3 CD MAX MIN PHONES PLAY MODE PHONES LEVEL EJECT REC SOURCE SELECTOR XL R5010 CD CDR MULTIPLE COMPACT DISC RECORDER MIX BLANCE CD LINE LINE MIC MULTI JOG REC LEVEL MIC CANCEL SET MENU PAUSE REC REC MUTING PLAY STOP SYNCHRO CD EDIT CD REC STOP PLAY PAUSE FINALIZE MIC LINE CD DIGITAL CD CDR MULT...

Page 4: ...URE INFORMATION This equipment has been tested and found to com ply with the limits for a Class B digital device pursu ant to Part 15 of the FCC Rules These limits are designed to provide reasonable protection against harmful interference in a residential installation This equipment generates uses and can radiate radio frequency energy and if not installed and used in accordance with the instructi...

Page 5: ... BUTTON Disconnect the mains plug to shut the power off com pletely The STANDBY ON button in any position does not disconnect the mains line The power can be remote controlled Attention Commutateur STANDBY ON Déconnecter la fiche de secteur pour couper complète ment le courant Le commutateur STANDBY ON ne coupe jamais complètement la ligne de secteur quelle que soit sa position Le courant peut êtr...

Page 6: ...tion as illustrated Attention Ventilation Correcte Pour éviter les chocs électriques l incendie et tout autre dégât Disposer l appareil en tenant compte des impératifs suivants Avant Rien ne doit gêner le dégagement Flancs Laisser 3 cm de dégagement latéral Dessus Laisser 5 cm de dégagement supérieur Arrière Laisser 15 cm de dégagement arrière Dessous Rien ne doit obstruer par dessous poser l appa...

Page 7: ...ubbing 25 Listening Edit Recording 26 Program Edit Recording 27 3 CD Changer to CDR Recording Options 28 Setting the Unit for High speed Recording 29 Setting the Auto Track Spacing Function 29 Synchronized Recording from External Sources 30 Mixed Input Recording 31 Special Recording Edit Operations 33 Skipping a Recorded Track on a CD R or CD RW Track Skip 33 Erasing a Track or Tracks Erase Functi...

Page 8: ...ger and CDR assured High speed recording from source discs in the 3 CD changer to the target disc in the CDR unit 4x for CD R 2x for CD RW Digital optical and coaxial I O input output terminals analog I O termi nals and a microphone jack are provided for external audio signal source connections Sampling frequency converter capable of converting digital signals with sampling frequency of 32 kHz and...

Page 9: ...PU LINK 4 feature is only supported by other JVC products also equipped with the COMPU LINK feature Please check the manual s of your JVC product for compatibility Before selecting the COMPU LINK 4 MODE switch position CDR or TD turn off the power and disconnect the power cord from the wall socket The function cannot be reset while the power is on Alternatively if the COMPU LINK 4 MODE switch posi...

Page 10: ...amplifier or receiver to this unit The sound from an external device cannot be digitally output from this unit To listen to the sound from the external device connect an amplifier or receiver to the LINE OUT PLAY ter minal on this unit Digital Connections LINE COMPU LINK 4 SYNCHRO DIGITAL IN COAXIAL OPTICAL DIGITAL OUT MODE CDR TD IN REC OUT PLAY LEFT LEFT RIGHT RIGHT COAXIAL OPTICAL Optical digit...

Page 11: ...rward backward through tracks on a CD etc Also use it to adjust the level of the source signal when record ing discs MIX BALANCE Control Use the MIX BALANCE control to adjust the mixing levels of independent signals being recorded simultaneously see page 32 MIC Microphone Jack Use this jack to connect a microphone not supplied to the unit for recording CDR Control Operation Buttons SYNCHRO Press t...

Page 12: ...ted disc in the 3 CD changer see page 11 PHONES Headphones Jack Use this jack to connect headphones not supplied to the unit PHONES LEVEL Volume Control Use this to adjust the volume being output to headphones con nected to the unit Note In this manual procedures using buttons on the front panel of the unit are depicted by the name of the button in capital letters with the button illustration imme...

Page 13: ...rding type indicators and sampling frequency indicators Light to indicate whether the recording is analog or digital During digital recording the appropriate frequency indicator lights to indi cate the sampling frequency of the source being played back Timer operation indicators Indicate that a Timer play or recording function has been set and whether it is set for everyday or one time operation M...

Page 14: ...Control menu Button Press to select menu operations Pitch 0 Button Press to restore playback speed of the CD player to normal STANDBY ON Button Press to turn the power of this unit on or to put it in the standby mode see page 10 DISPLAY Button Press to change the type of information that is shown in the infor mation display see page 24 FINALIZE Button Press to start finalization of a CD R or CD RW...

Page 15: ...that is not directly in front or on the same level as the main unit When the distance over which the remote control can be oper ated starts to drop it means that the batteries are nearing the end of their service life Replace both R6P SUM 3 AA 15F batteries with new batter ies The dry cell batteries provided with the unit are for the purpose of checking system operations only Replace them with new...

Page 16: ... control is pressed the power is turned on the last selected function 3 CD changer or CDR is recalled and the corresponding tray is selected If a disc is loaded in the selected tray playback begins If the power cord is unplugged from the wall socket for more than a few seconds the internal clock program etc of the main unit may require resetting When this occurs please set the clock and timer func...

Page 17: ...is in the standby mode continuous play will start from the tray selected when the power is turned on When play starts from CD2 The CDs are played in the sequence of CD2 CD3 CD1 and then playback stops automatically When play starts from CD3 The CDs are played in the sequence of CD3 CD1 CD2 and then playback stops automatically If one of the trays does not contain a CD play skips to the CD in the n...

Page 18: ...r not a CD has been loaded into each of the CD trays as well as the play status of the CD The CDR can play general audio CDs CD R and CD RW media 1 Press the CDR EJECT 0 button to open the CDR disc tray 2 Load a disc in position and close the tray by pressing the CDR EJECT 0 button again When a CD R or CD RW is loaded in the CDR the unit deter mines the format of the disc and whether it is finaliz...

Page 19: ...k time does not always match total playback time time shown in the information display exactly because the playback time includes lead in and lead out spaces as well The buttons on the remote control can be used to control 3 CD changer playback and CDR recording and playback When using the remote control be sure to point it directly at the front lefthand side of the main unit facing you when press...

Page 20: ...h one of the other number buttons 1 through 10 This function is not possible when either program or random play mode is in use The 1 reverse and forward buttons on the remote control can be used to find a particular location on the CD being played 1 Press the CD and CDR Deck Selection button CD or CDR corresponding to the tray holding the CD currently playing 2 Press the 1 reverse or forward butto...

Page 21: ...ay window Setting the repeat play mode Press the REPEAT button on the remote control The REPEAT indicator will be shown in the PLAY MODE section of the display window Press the button repeatedly to choose the desired setting The selection in the information display changes in the following order REPEAT ALL Repeat playback of all of the CDs loaded in the 3 CD changer 3 CD changer only REPEAT 1CD Re...

Page 22: ...recording functions such as mixed recording Even if the pitch has been adjusted when digital synchronized recording is performed the pitch is automatically restored to 0 before recording begins The amount of pitch adjustment 0 is shown in the informa tion display when one of the pitch buttons is pressed When the speed of CD playback is changed using the pitch con trol buttons there is no signal ou...

Page 23: ...play will show the following and disc source columns will flash 4 Select the disc source CD tray by turning the MULTI JOG control and then press the SET but ton When the SET button is pressed next the programming step and track number columns will flash 5 Select and enter a track number 1 99 by turning the MULTI JOG control and then press the SET button The following is an example of track 2 on th...

Page 24: ...ULTI JOG Control to review the programmed tracks The program steps PG S and track numbers will be shown in the information display one at a time as you toggle through the program S Step step number To return to continuous playback In the CD stop mode repeatedly press the PLAY MODE button on the main unit until the total playing time is shown in the informa tion display If you want to program and r...

Page 25: ...de press the 4 reverse skip or forward skip buttons until the track you want to erase is shown in the information display Press the CANCEL button to erase the track from the program The step number for each track following the one erased is automatically reduced by one i e steps are renumbered To erase the entire pro gram press the CANCEL button until PG NO PROGRAM is shown in the information disp...

Page 26: ... or CD RW disc Listening Edit recording see page 26 Select tracks to be recorded from one or all of the CDs in the 3 CD changer while listening to them New to this feature is an automatic disc finalization function that can be set before recording begins High speed recording CD R 4x CD RW 2x Program Edit recording see page 27 Program tracks to be recorded from one or all of the CDs loaded in the 3...

Page 27: ...z of the signal from the source Microphone connections Use a microphone equipped with a standard plug to connect to the MIC jack on this unit 1 Insert a recordable CD R or CD RW 2 Select a recording source Use the REC SOURCE SELECTOR button to select the recording source Press the button repeatedly to toggle between sources The source type will appear in the display window and a lamp DIGITAL CD LI...

Page 28: ...he REC REC MUTING button as long as you want Notes Four seconds of silence will be recorded regardless of whether or not the button is held down for fewer or more than four sec onds After the four seconds of silence the unit stops in the recording pause mode after the button is released The REC MUTING function cannot be used at the beginning of recording started from the recording pause mode Fade ...

Page 29: ...main unit remote control to insert a track mark Notes Even if automatic track marking is turned off automatic track marking will be performed during synchronized one button recording When this occurs manual track marking is tempo rarily disabled Tracks must be at least four seconds in length Pressing the SET button less than four seconds after the previous track mark cre ates a new track mark once...

Page 30: ...signal If the source CD being recorded from the 3 CD changer is itself a first generation digital copy digital recording cannot be per formed When this occurs the recording type will switch from digital to analog automatically This type of recording cannot be started during CD playback It must start from the beginning of the first track of the CD When the CD REC button is pressed the function is a...

Page 31: ...l when recording a digital signal If the source CD being recorded from the 3 CD changer is itself a first generation digital copy digital recording cannot be per formed When this occurs the recording type will switch from digital to analog automatically Upon completion of recording STOP DUBBING is shown in the information display Always wait for the STOP DUBBING message to be cleared before procee...

Page 32: ...ack to the program or the CANCEL button main unit remote control to skip the track a When the track now playing is to be recorded b When the track is not to be recorded When the first track has been stored in memory After making the last programming choice START TO DUB is shown in the information display Press the SET button main unit remote control to continue or the CANCEL button main unit remot...

Page 33: ...the information display Notes There is no need to adjust the recording level when recording a digital signal The last program information the most recently created pro gram still stored in the unit s memory will be erased if the trays of the 3 CD changer are opened This type of recording allows you to make a program of your favor ite tracks on any of the CDs loaded in the 3 CD changer in any order...

Page 34: ...te con trol to confirm that finalization is to be done Press the CANCEL button main unit remote control to keep the disc unfinalized Note This message will not be shown if the menu FINALIZE func tion setting is OFF The default setting is ON When a blank dick is in the CDR tray UPDATE OPC is shown following ADD FINALIZE The recording process starts Only the tracks selected from the CDs in the 3 CD ...

Page 35: ...f each track when performing synchronized one button recording or using the listening edit or program edit modes to record from the 3 CD changer to the CDR 1 When the unit is in the stop mode press the MENU button main unit remote control 2 Turn the MULTI JOG control or press the 2 3 menu button on the remote control until TRACK SPACE is shown in the information display 3 Press the SET button main...

Page 36: ... IN or LINE IN If DIGITAL IN or COAXIAL IN is selected the LED lamp under DIGITAL IN selection to the left of the REC SOURCE SELECTOR will light 3 Press the SYNCHRO button main unit remote control The CDR is put into the synchronized recording pause mode The source device must be stopped cannot be playing at this time 4 Start playing of the source unit Note When recording with the SYNCHRO button r...

Page 37: ...r recording single songs from external digital CD or MD players This function is only for use with externally connected digital audio equipment It cannot be used with the 3 CD changer CAUTION When performing synchronized start recording from an external component it is possible that part of the signal at the beginning of the first track will not be recorded If this should occur please per form man...

Page 38: ... for mixed recording the pitch con trols may be used to adjust the speed of CD playback for mixing and recording purposes If the microphone level is set too high a loud howling sound may be emitted from the speakers If this occurs turn down the volume of the microphone by turning down the volume of the amplifier receiver powering the speakers you are using to moni tor the sound When you have finis...

Page 39: ...ng playback on this unit and other CD players that support the track skip function You cannot use the track skip function when recording to unfi nalized CD R discs or CD RW discs from the 3 CD changer 1 Load the unfinalized CD RW to be edited in the CDR disc tray The number of tracks and play time are shown in the informa tion display 2 When the unit is in the stop mode press the MENU button main ...

Page 40: ...C Table of Contents ERASE DISC flashes in the information display during the eras ing process Please refer to the Glossary for a brief definition of acronyms see page 46 Caution If the disc is damaged or there is disc related trouble this function may not be possible 1 Load the CD RW to be erased in the CDR disc tray The number of tracks and play time are shown in the informa tion display 2 When t...

Page 41: ...D RW disc even after they have been finalized During the finalization process it will not be possible to remove or load discs in the 3 CD changer nor is playback of CDs loaded in the 3 CD changer possible Once a CD R disc has been finalized further recording on that disc cannot be performed However if you erase the TOC Table of Contents on a CD RW disc the disc can be recorded on again 1 Load a fi...

Page 42: ... trademark of Digital Theater Systems Inc 2HDCD is a registered trademark of Pacific Microsonic Inc Note When recording from the 3 CD changer the sampling rate con verter is always turned off 1 When the unit is in the stop mode press the MENU button main unit remote control 2 Turn the MULTI JOG control on the main unit or press the 2 3 menu button on the remote control until CONVERTER is shown in ...

Page 43: ...ed in the unit are cleared and the unit is reset to the factory default settings 1 When the unit is in stop mode press the MENU button main unit remote control 2 Turn the MULTI JOG control on the main unit or press the 2 3 menu button on the remote control until SET DEFAULT is shown in the information display 3 Press the SET button main unit remote control SET DEFAULT is shown in the information d...

Page 44: ...ce 5 Turn the MULTI JOG control on the main unit the hour column reads PM 1 6 Press the SET button main unit The hour column stops flashing and the minutes column starts flashing 7 Turn the MULTI JOG control on the main unit until the minutes column reads 15 8 Press the SET button The current time PM 1 15 is shown in the information dis play If the CANCEL button is pressed while setting the minute...

Page 45: ...ER Press the SET button Press the MENU button twice The present time is shown in the information dis play Follow the instructions for Steps 5 8 above For instructions on how to use the daily timer and one time timer please refer to the following pages To ascertain the correct time In most areas there is a telephone number you can call for the cor rect time consult your telephone directory for assi...

Page 46: ... AM 7 8 Press the SET button The hour column stops flashing and the minute column starts flashing 9 Turn the MULTI JOG control on the main unit to set the minutes column to 15 10 Press the SET button The off time of the timer is shown and the hour column flashes 11 Turn the MULTI JOG control on the main unit to set the hour column to AM 8 12 Press the SET button The hour column stops flashing and ...

Page 47: ...tched to the standby mode at the programmed end time Clearing a timer operation From Standby Mode 1 Press the MENU button to display DAILY TIMER or ONCE TIMER 2 Press the CANCEL button main unit remote control DAILY OFF or ONCE OFF is shown in the information display the DAILY 3 or ONCE 3 indicator is cleared from the display window and the timer operation is canceled With Unit Power Turned On 1 F...

Page 48: ...n an operation is completed once using the Once Timer mode the timer program is cleared If digital signals are not received when timed recording starts using the DIGITAL IN setting UNLOCK is shown in the information display and no signals will be recorded When using the timer to record a digital satellite broadcast pro gram for instance check to see if the broadcast station with the program you wa...

Page 49: ...y turns the amplifier receiver on Automatic Source Selection Selecting a source on the connected amplifier receiver automati cally starts its operation Similarly starting operation of a linked component will automatically selects the relevant source on the amplifier receiver When this unit is selected as the source a selected tray 3CD or CDR will start to play Notes The type of interactive peratio...

Page 50: ... full preventing fur ther recording and erasing playback is possible Recording is possible if the disc has been recorded to by another unit and the adjustment information has been maintained Replace the disc with a CD R or CD RW that can be recorded on CDR NO DISC A CD CD R or CD RW has not been inserted Insert a CD CD R or CD RW BLANK DISC A CD R or CD RW with nothing recorded on it has been inse...

Page 51: ...the analog connections and perform analog recording NOT AUDIO IN The digital signal is not an audio format Set the source component to output a digital audio signal For example if a data track on a CD is selected switch to a track that con tains audio data NOT REC MUTE The REC REC MUTING button has been pressed at a time when the function cannot be performed See page 22 for information on when the...

Page 52: ... is changed Glossary The following is a brief description of some of the acronyms used in this manual ATIP Absolute Time in Pregroove The reflected light returned from the pregroove of a CD R disc generates a carrier signal providing tracking motor control and focus signals Additional information including the Recommended Optimum Recording Power value is also encoded in a frequency modulation of t...

Page 53: ...timer 38 CD PLAYER Play fails to start The CD has been inserted upside down Insert it properly with the label side facing up 11 Condensation has formed on the lens Turn on the power and wait for a couple of hours 2 Specific parts are not played properly The CD is scratched Replace the CD 11 CDR Recording is not possible The CD R or CD RW was loaded in the tray upside down Load the disc with the la...

Page 54: ... 600Ω 10kΩ matching imped ance Signal to noise ratio 94dB during playback Dynamic range 1 kHz 91dB during playback Wow and flutter Less than measurable limit Total harmonic distortion 0 0063 during playback Timer Section Timer system DAILY TIMER operation ON OFF timer ONCE TIMER operation ON OFF timer Clock display 12 hour display Common Specifications Output terminals Analog LINE x 1 set 2V 5kΩ F...

Reviews: