background image

13

Connections

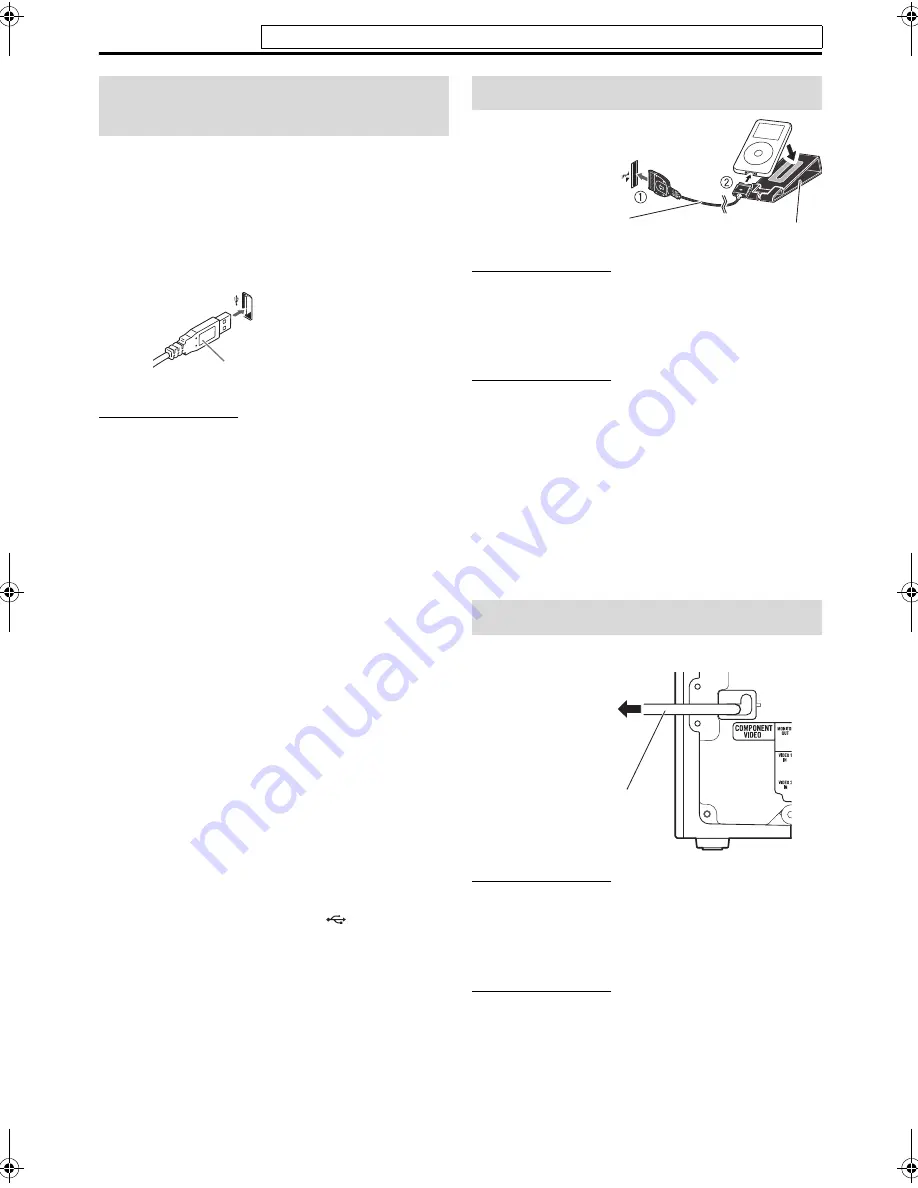
You can connect a USB mass storage class device such as a 
USB flash memory device, hard disk drive, multimedia card 
reader, digital camera, etc. to this system.
• After connecting a USB mass storage class device to this 

system and selecting USB MEMORY as the source, the 
file control display appears on the TV screen. (See page 
24.)

NOTE

• Connect one USB mass storage class device to the system at a 

time. Do not use a USB hub.

• While playing back a file in a USB mass storage class device, 

do not disconnect the device. It may cause a malfunction of 
both the system and the device.

• JVC bears no responsibility for any loss of data in the USB 

mass storage class device while using this system.

• When connecting with a USB cable, use a cable less than 1 m 

in length.

• This system is compatible with USB 2.0 Full Speed. 
• You can play back the following types of files in a USB mass 

storage class device (maximum data transfer rate: 2 Mbps):
– Music:  MP3,  WMA,  WAV
– Picture:  JPEG
– Movie: MPEG-1, MPEG-2, ASF

• To view a picture/movie files in a USB mass storage class 

device on the TV, connect the system to the TV via the 
composite, S-video or component jacks. 

(See page 9.)

• You cannot play back a file larger than 2 GB.
• When playing a file which has a large transfer rate, frames or 

sounds may be dropped during playback.

• This system cannot recognize a USB mass storage class 

device whose rating exceeds 5 V/500 mA.

• This system may not recognize some USB mass storage class 

devices and does not support DRM (Digital Rights 
Management).

• This system may not play back some files even though their 

formats are listed above.

• The battery of a USB mass storage class device is charged 

while “USB MEMORY” is selected as the source.

• You cannot connect a computer to the 

 (USB MEMORY) 

terminal of the system.

• When connecting a USB mass storage device, refer also to its 

manual.

• An iPod does not play on the USB MEMORY terminal.

CAUTION

• Be sure to reduce the volume on the system to the minimum 

level before connecting an iPod. Adjust the volume after 
playback has started.

• DO NOT connect or disconnect the iPod when the system is 

turned on.

NOTE

• To disconnect the connection cable from the iPod, hold the 

buttons on the sides of the plug then pull it out.

• You cannot send any data to your iPod from the system.
• Do not carry the System with iPod connected. You might 

drop it or it might cause damages to the connector part.

• Do not touch or hit the iPod terminal pins or connector pins 

directly. It might cause damages to the connector part.

• The 

iPod

 indicator lights up during iPod connectivity.

• To view a video/picture from the iPod on the TV, connect the 

system to the TV via the composite or S-video jacks. 

(See 

page 9.)

• iPod does not correspond to the component video output.

CAUTION

• Disconnect the power cord before cleaning or moving the 

system.

• Do not pull on the power cord to unplug the cord. When 

unplugging the cord, always grasp and pull the plug so as not 
to damage the cord.

NOTE

• If the wall outlet does not match the AC plug, use the 

supplied AC plug adapter (not supplied for Hong Kong, the 
countries of the Middle East, and Australia).

Connecting a USB mass 
storage class device

Center unit (on the front panel)

USB cable (not supplied)

Connecting the iPod

Connecting the power cord

Center unit (on the front panel)

Connection cable for iPod

(supplied)

Stand for iPod (supplied)

Turn the arrow-mark

side left when

connecting the plug.

Center unit

Power cord

Plug into an AC outlet.

Do not connect the power cord until all other connections have been made.

TH-L1[U].book  Page 13  Friday, June 1, 2007  9:34 AM

Summary of Contents for TH-L1

Page 1: ...GVT0206 006A US UN UG UJ UB A DIGITAL MEDIA SYSTEM INSTRUCTIONS TH L1 Consists of AX THL1 SP THL1W SP THL1F SP THL1C and SP THL1S ...

Page 2: ...wspaper or cloth etc the heat may not be able to get out Do not place any naked flame sources such as lighted candles on the apparatus When discarding batteries environmental problems must be considered and local rules or laws governing the disposal of these batteries must be followed strictly Do not expose this apparatus to rain moisture dripping or splashing and that no objects filled with liqui...

Page 3: ... and DVD player 14 Operating the TV 14 Operating the DVD player 15 Basic operations 16 Turning the system on off 16 Selecting the source to play 16 Adjusting the volume VOLUME 17 Listening with headphones not supplied 17 Turning off the sound temporarily MUTING 17 Adjusting the brightness of the indications DIMMER 17 Sleep Timer SLEEP 17 Adjusting the output level of the speakers and subwoofer 18 ...

Page 4: ...ime If water gets inside the system Turn the system off and disconnect the power cord plug from the wall outlet then call the store where you made your purchase Using the system in this condition may cause a fire or electrical shock Check to be sure you have all of the supplied accessories The number in parentheses is the quantity of the pieces supplied If anything is missing contact your dealer i...

Page 5: ...trol display on the TV screen See page 24 It is recommended that you make each MP3 WMA WAV files at the following conditions MP3 WMA At a sample rate of 44 1 kHz and bit rate of 128 kbps WAV 44 1 kHz 16 bit Linear PCM For JPEG files It is recommended that you record a file at 640 x 480 resolution If a file has been recorded at a resolution of more than 640 x 480 it will take a longer time to be di...

Page 6: ... The numbers in the figures indicate the pages where the details of the parts are described Front panel center unit Display window 28 17 22 28 18 13 12 12 26 20 12 12 Remote sensor 6 13 17 16 16 16 17 16 20 22 25 20 23 22 20 23 16 ...

Page 7: ...5 Index of parts and controls Rear panel center unit 11 7 13 9 10 11 9 10 11 10 11 10 9 10 11 ...

Page 8: ...ol Aim the remote control directly to the remote sensor of the center unit If you operate it from a diagonal position the operating range approx 5 m may be shorter Do not block the remote sensor Remote control Number buttons 14 15 23 16 15 16 15 22 29 16 20 15 20 23 24 15 22 26 16 22 25 14 15 18 15 14 17 31 24 28 15 20 22 25 15 25 15 17 18 25 17 14 18 14 15 23 14 15 18 24 25 29 31 23 15 22 14 17 1...

Page 9: ...electing a location for speaker installation on a wall Injury to personnel or damage to equipment may result if the speakers installed interfere with daily activities Precautions for daily use When moving the speakers do not pull the speaker cords otherwise the speakers may fall over causing damage or injury Do not reproduce sounds at so high a volume that the sound is distorted otherwise the spea...

Page 10: ...o the following when installing the speakers When placing the speakers near a TV set turn off the TV s main power switch or unplug it before installing the speakers Then wait at least 30 minutes before turning on the TV s main power switch again Some TVs may still be affected even though you have followed the above If this happens move the speakers away from the TV The surround speakers are not ma...

Page 11: ... source S VIDEO MONITOR OUT terminal passes through the signal from the S VIDEO input terminal VIDEO 1 VIDEO 2 and VIDEO 3 selected as the source VIDEO MONITOR OUT terminal passes through the signal from the VIDEO input terminal VIDEO 1 VIDEO 2 and VIDEO 3 selected as the source Use an HDMI cable shorter than 5 m When you are playing HDCP High Bandwidth Digital Content Protection content the sound...

Page 12: ...d to convert the pin plugs to BNC plugs When shipped from the factory the source of VIDEO 1 have been set for use with the AUDIO VIDEO 1 IN terminal for the audio connection If you connect the components with digital optical audio cord change the audio input VIDEO 1 setting to DIGITAL See page 31 Before connecting a digital optical cable unplug the protective plug from DIGITAL IN VIDEO 1 terminal ...

Page 13: ...ents of the BNC type use a plug adapter not supplied to convert the pin plugs to BNC plugs When shipped from the factory the source of VIDEO 2 have been set for use with the AUDIO VIDEO 2 IN terminal for the audio connection If you connect the components with digital coaxial audio cord change the audio input VIDEO 2 setting to DIGITAL See page 31 If you connect a sound enhancing device such as a g...

Page 14: ...ce components and this system the sound output through this system may be distorted When shipped from the factory the source of VIDEO 3 have been set for use with the VIDEO 3 AUDIO L R audio terminal for the audio connection If you connect the components with digital optical audio cord change the audio input VIDEO 3 setting to DIGITAL See page 31 Connecting the video components for the source of V...

Page 15: ...d while USB MEMORY is selected as the source You cannot connect a computer to the USB MEMORY terminal of the system When connecting a USB mass storage device refer also to its manual An iPod does not play on the USB MEMORY terminal CAUTION Be sure to reduce the volume on the system to the minimum level before connecting an iPod Adjust the volume after playback has started DO NOT connect or disconn...

Page 16: ...unit but also JVC and other manufacturers TV and DVD player Refer also to the manuals supplied for the TV and DVD player To operate the equipment aim the remote control directly at the remote sensor on the target equipment The buttons described below are used on pages 14 to 15 Operating the TV Number buttons JVC 01 PHILIPS 29 AKAI 02 17 PIONEER 42 DAEWOO 08 09 29 RCA 02 20 46 47 48 49 FISHER 17 SA...

Page 17: ...nding on manufacturers Operating the DVD player JVC 01 PIONEER 11 KENWOOD 03 04 PROSCAN 12 MAGNAVOX 05 RCA 12 MARANTZ 06 SAMSUNG 13 MITSUBISHI 07 SONY 14 ONKYO 08 09 TOSHIBA 05 PANASONIC 10 YAMAHA 15 PHILIPS 06 ZENITH 05 16 DVD Turn on or off the DVD player DVD 3 Play back a disc DVD 8 Pause playback To release it press DVD 3 1 9 0 while pressing SHIFT Select a desired chapter number TOP MENU Disp...

Page 18: ...e control Press one of the source selecting buttons VIDEO1 3 USB MEMORY 6 or iPod 6 USB MEMORY 6 To play back a file in a USB mass storage class device See page 21 iPod 6 To start play back a connected iPod See page 19 VIDEO1 3 To select the external components connected to the VIDEO 1 3 terminals on the center unit See pages 10 to 12 On the center unit Press INPUT SELECTOR 9 8 repeatedly until th...

Page 19: ...d right channel signals are come out from the headphones Multi channel signals are downmixed and come out from the headphones Press MUTING To restore the sound Perform one of the following Press MUTING again Press AUDIO VOLUME Press VOLUME on the center unit Press DIMMER Each time you press the button you can change the brightness level in 3 steps The system turns off automatically when the specif...

Page 20: ...supports the PAL progressive video input NTSC Select when your TV supports the NTSC interlaced video input only NTSC PRG Select when your TV equipped with component jacks supports the NTSC progressive video input You can get better picture quality in PAL PRG NTSC PRG mode than in PAL NTSC mode 3 Press ENTER while the selected mode is displayed When PAL PRG or NTSC PRG is selected the PROGRESSIVE i...

Page 21: ...rn ON OFF the charge mode on page 20 with iPod selected as source NOTE Sound distortion may occur when playing back audio sources with high recording levels When distortion occurs it is recommended to turn off the equalizer of the iPod For information on operating the iPod see the iPod instruction manual The buttons described below are used on page 20 1 This button does not function as a stop butt...

Page 22: ...e system See page 16 3 Select iPod as the source See page 16 iPod CONNECT appears on the display If an iPod is not connected firmly iPod NO CONNECT appears The iPod indicator lights up on the display 4 Start playing on the iPod On the remote control Press iPod 6 On the center unit Press iPod USB MEMORY CONTROL 8 Press above button again if iPod does not start playback To pause playback On the remo...

Page 23: ...ting the other equipment You cannot send any data to your USB mass storage class device from this system The buttons described below are used on pages 22 to 26 Number buttons Basic operations for USB MEMORY NOW READING Appears when the system is reading the file information NO USB DEVICE Appears when no USB mass storage class device is connected CANNOT PLAY THIS DEVICE Appears when unplayable USB ...

Page 24: ... setup menu see page 30 7 To stop Press 7 7 To pause On the remote control Press USB MEMORY 6 during playback On the center unit Press iPod USB MEMORY CONTROL 8 during playback To continue playback press the button again 7 Playback information on the display window MP3 WMA WAV MPEG 1 MPEG 2 ASF file Example When an MP3 file is played back Each time you press DISPLAY the elapsed playing time and th...

Page 25: ...e the number buttons below To locate a desired group 1 Press GROUP during playback is shown in the group number area see page 22 on the display window 2 While the display window shows use number buttons 0 10 h10 to enter the desired title or group number The system starts playback from the first file of the selected group For details on using the number buttons see How to use the number buttons on...

Page 26: ...o select the desired group track file while playback is stopped 2 Press USB MEMORY 6 or ENTER Track playback slide show starts from the selected track file When you press ENTER for JPEG only the selected file is played back To skip the file during playback Press x 4 or 5 Y NOTE You can also check playback information on the display window See page 22 Some group track and file names may not be disp...

Page 27: ...g the VFP setting The VFP Video Fine Processor function enables you to adjust the picture character according to the type of programming picture tone or personal preference 7During playback 1 Press VFP The current VFP settings appear on the TV screen 2 Press 2 3 repeatedly to select the VFP mode NORMAL Normally select this CINEMA Suitable for movies When you select NORMAL or CINEMA press VFP to co...

Page 28: ... REPEAT the Repeat mode changes Display window TV screen Meanings 1 Repeats the current track files REPEAT TRACK Repeats the current group REPEAT GROUP ALL Repeats all tracks files REPEAT ALL No indication Repeat mode is off The system plays back the file normally Repeat mode indicator See page 21 for button locations ...

Page 29: ... introduced by Dolby Laboratories such as Dolby Digital EX 7 DTS Digital Surround 2 Used to reproduce multichannel soundtracks of the software encoded with DTS Digital Surround or DTS Digital Surround dts SURROUND is another discrete multi channel digital audio format available on CD and DVD software There are other encoding formats of multi channel digital surround introduced by Digital Theater S...

Page 30: ...comes in Always lights The channel with shows that the corresponding speakers are reproducing the channels sound If the channels sound decoded into 5 1 channel is reproduced only lights Selecting the surround mode The system is set up to automatically select the optimal surround mode for input signal from digital multichannel software When playing back a 2 channel source you can select the desired...

Page 31: ...ional TV While viewing a wide screen picture the black bars do not appear however the left and right edges of the pictures will not be shown on the screen NOTE Even if 4 3 PS or 4 3 MULTI PS is selected the screen size may become 4 3 LB or 4 3 MULTI LB with some files This depends on how files are recorded When selecting MULTI options as the monitor type for the multi color system TV the system ou...

Page 32: ...r s Surround right speaker s Surround left speaker s back to the beginning NOTE No test tone comes out of the subwoofer 7 Delay menu DELAY Example Set to 0 ms for the furthest speaker from your position as the basis for the delay time setting In this case set the delay time of each speaker as follows Delay time of front speakers 0 ms Delay time of center speaker 1 ms Delay time of surround speaker...

Page 33: ...s SETTING Example 3 Press 5 Y to select the source you want to set V1 A D For the source of VIDEO 1 V2 A D For the source of VIDEO 2 V3 A D For the source of VIDEO 3 4 Press 2 3 to select the audio input terminal you want to use for the source selected in the above step Example ANALOG Signal from AUDIO jacks comes out of the speakers see pages 10 to 12 DIGITAL Signal from DIGITAL IN terminal comes...

Page 34: ...yed on the TV screen the picture is blurred or the picture is divided into two parts The scanning mode is set to PAL PRG or NTSC PRG though the center unit is connected to the TV which does not support the progressive video input Change the scanning mode to PAL or NTSC See page 18 The picture does not fit the TV screen The monitor type is not set correctly Set MONITOR TYPE properly See page 29 PLA...

Page 35: ...ply to iPod 5 V 500 mA Power Consumption 50 W at operation 1 5 W in standby mode Dimensions W M H M D 118 mm M 276 mm M 246 mm Mass 2 9 kg Corresponding to Linear PCM Dolby Digital and DTS Digital Surround with sampling frequency 32 kHz 44 1 kHz 48 kHz 7 Subwoofer SP THL1W Type 1 way Bass Reflex Type Magnetically Shielded Type Speaker 16 cm cone M 1 Power Handling Capacity 100 W Impedance 4 Ω Freq...

Page 36: ...EN 0607JSKMDCJMM 2007 Victor Company of Japan Limited TH L1 DIGITAL MEDIA SYSTEM ...

Reviews: