background image

27

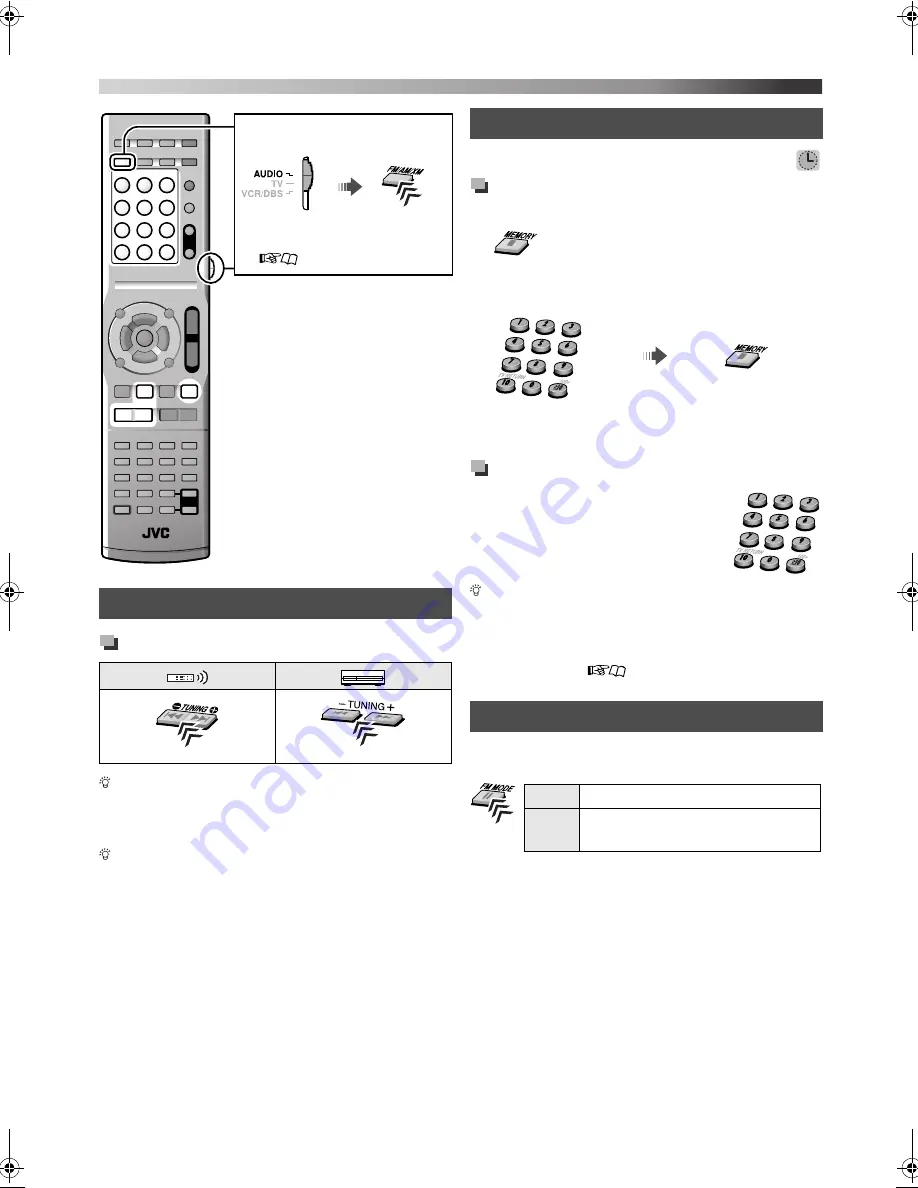
Tuning in to a station

You can also tune in to a station automatically. Press 
and hold TUNING

9

/TUNING

(

 until the station 

search starts. The system tunes in the first station of 
sufficient signal strength found automatically.
You can also tune in to the station by pressing cursor 

5

/

Y

.

You can preset 30 FM stations and 15 AM stations.

Storing the preset stations

1

Tune in to the station you want to preset.

2

3

Select a preset number, then store the station to 
that number.

• “STORED” appears on the display.

Tuning in to a preset station

Select a preset number.

*

You can also select a preset number 
by pressing PRESET(/CAT) UP or PRESET(/CAT) 
DOWN.

*

For details on using the number buttons, see “How to use the 
number buttons” (

10). 

When the stereo FM program currently tuned in is noisy, you 
can change the FM reception mode to improve the reception.

Manual tuning

Set the remote control mode 
before operation.

• Select the desired source (“FM” 

or “AM”) you want to listen to. 
(

11)

Preset tuning

Selecting the FM reception mode

“_ _” flashes on the display. Perform the next 

step while “_ _” is flashing.

Enter a preset number

*

Store

AUTO Normally select this.

MONO

Select to improve reception. (You 
will lose the stereo effect.)

FM/AM tuner operations

TH_D60WM[J].book  Page 27  Friday, February 23, 2007  3:19 PM

Summary of Contents for SP-THD5C

Page 1: ...his information for future reference Model No Serial No TH D60 Consists of XV THD60 SP THD6W SP THD6F SP THD6C and SP THD6S TH D50 Consists of XV THD50 SP THD5W SP THD5F SP THD5C and SP THD5S TH D5 Consists of XV THD5 SP THD5W SP THD5F SP THD5C and SP THD5S TH D4 Consists of XV THD4 SP THD5W SP THD5F SP THD5C and SP THD5S DVD DIGITAL THEATER SYSTEM TH D60 only ...

Page 2: ...lled ATTENTION Touche Déconnectez la fiche d alimentation secteur pour couper l alimentation complètement le témoin STANDBY s éteint Lors de l installation de l appareil assurez vous que la fiche soit facilement accessible La touche dans n importe quelle position ne déconnecte pas le système du secteur Quand le système est en attente le témoin STANDBY est allumé en rouge Quand le système est sous ...

Page 3: ...tions However there is no guarantee that interference will not occur in a particular installation If this equipment does cause harmful interference to radio or television reception which can be determined by turning the equipment off and on the user is encouraged to try to correct the interference by one or more of the following measures Reorient or relocate the receiving antenna Increase the sepa...

Page 4: ...cs devices files 3 Playable disc types 3 Playable digital devices 3 Playable file types 4 Getting started 5 Checking the supplied accessories 5 Putting batteries into the remote control 5 Connecting the speakers and subwoofer 5 Speaker layout 6 Connecting the antennas 7 Connecting a TV 7 Connecting external components 8 Connecting the AC power cord 9 Basic and common operations 10 Sound and monito...

Page 5: ...ay occur Notes on installing and using the speakers Place the speakers and subwoofer on a flat and level surface The speakers are magnetically shielded to avoid color distortions on TVs If the color on a TV is distorted perform the following procedure Turn off the TV s main power switch or unplug it before installing the speakers Then wait at least 30 minutes before turning on the TV s main power ...

Page 6: ...sh memory device hard disk drive multimedia card reader digital camera etc can be used with this System through a USB connection This System is compatible with USB 2 0 Full Speed This System cannot recognize a USB mass storage class device whose rating exceeds 5 V 500 mA Some discs files may require operations that differ from those explained in this manual Some discs devices files may not be reco...

Page 7: ...recorded at a resolution of more than 640 x 480 it will take a longer time to be displayed This System can only play baseline JPEG files ASF files The System supports MPEG 4 files with the following conditions File format ASF Visual profile MPEG 4 SP Simple Profile Audio CODEC G 726 Max picture size 352 x 288 CIF Max bit rate 384 kbps MPEG1 MPEG2 files The stream format should conform to the MPEG ...

Page 8: ...rs of the same speaker impedance SPEAKER IMPEDANCE indicated on the rear of the center unit DO NOT connect more than one speaker to one speaker terminal Checking the supplied accessories Putting batteries into the remote control R03 UM 4 AAA 24F type dry cell batteries supplied Connecting the speakers and subwoofer Connecting the speaker cords Connect the speaker cords both to the center unit and ...

Page 9: ... the JVC logos are positioned as illustrated below TH D50 TH D5 TH D4 only you can also lay the front speakers as illustrated below TH D60 Do not lay down the front speakers horizontally You can turn the JVC logos to make them legible Attaching the base plates required for the SP THD6F only Speaker layout Connect the speaker cord Route the speaker cord This side should face the front Use the suppl...

Page 10: ...d HDMI DVI COLOR 23 HDMI OUT 23 HDMI AUDIO OUT 24 DOWN MIX 24 Use a certified HDMI cable which has the HDMI logo You can use a monitor with a DVI terminal by connecting with a DVI HDMI conversion cable When you play HDCP High Bandwidth Digital Content Protection source allow a few seconds for the sound and picture to be transmitted to the speakers and TV while the confirmation process is completed...

Page 11: ...peakers by following Speaker layout A 6 Select S SPK R as the speaker position mode 12 Select 5 1CH as the audio input setting before playing back 14 Connecting external components From component video input TV Component video cord not supplied Green Blue Red TV Composite video cord supplied or S video cord not supplied A From Composite video input B From S video input Align the 5 marks DVD player...

Page 12: ...ect 2CH as the audio input setting before playing back 14 Plug in the System only after all the connections have been completed Composite video cord not supplied or S video cord not supplied A From composite video output B From S video output Align the 5 marks VCR etc DBS Direct Broadcasting Satellite tuner etc Digital coaxial cable not supplied A From digital coaxial output B From digital optical...

Page 13: ...surround left surround right monaural surround Light when the signal comes in for the digital input or when the System is ready to receive the signal for the analog input SW subwoofer Always lights _ Lights while reproducing the channel s sound through the corresponding speaker G Speaker position mode indicators 12 H Lights when both the System and the TV with HDMI connection are ready to communic...

Page 14: ...r adjust the volume level Prohibiting disc ejection 1 Turn off the System 2 Lock the disc tray To unlock the disc tray perform the above procedure again UNLOCKED appears on the display To do Indication Play back a disc DVD 15 Play back a file on a USB mass storage class device USB 15 Play back an iPod IPod 28 Listen to an XM Satellite Radio 1 FM or AM station XM 1 FM or AM 25 1 27 Play back an ext...

Page 15: ...IPod VIDEO TH D60 FM AM and VIDEO1 2 TH D50 TH D5 TH D4 FM and AM TH D60 only When the source is XM this adjustment is not available You can also make adjustments from the LEVEL menu 24 when the speaker position mode is S SPK R 1 With COAX or OPT selected as the audio input setting 14 2With 5 1CH selected as the audio input setting 14 Sound settings and adjustments Set the remote control mode befo...

Page 16: ... right column AUTO SUR MOVIE MUSIC STADIUM ALL ST OFF back to the beginning When the source is FM or AM you can only select ALL ST AUTO SUR currently selected mode OFF back to the beginning When AUTO SUR is selected the System automatically selects a proper multi channel surround mode such as DOLBY D Dolby Digital or DTS DTS Digital Surround AUTO SUR MOVIE WIDE 2CH SUPER W OFF back to the beginnin...

Page 17: ...gressive mode connect the TV to the HDMI MONITOR OUT terminal or COMPONENT jacks 1 7 1 Select DVD or USB as the source 11 2 3 Select an appropriate scanning mode then confirm the selection You can get better picture quality in the following orders 1080I 720P 480P 480I When the picture is not shown correctly change the scanning mode to the interlaced mode When the TV is connected through S VIDEO or...

Page 18: ...k discs files Scanning mode 14 MONITOR TYPE 23 ON SCREEN LANGUAGE 23 If a still picture is displayed for about 5 minutes the System automatically dims the screen screen saver function You can deactivate the screen saver function 23 When several types of files music picture or movie are recorded on a disc or device select the file type you want to play 23 For messages and icons appearing on the dis...

Page 19: ...yed To do Start playback Stop playback Pause playback Fast forward fast reverse search 1 Resume function The System memorizes the position where the playback has been interrupted by one of the following operations Pressing 7 once Turning off the power 11 Changing the source 11 To resume playback press 3 play button or the corresponding source button To clear the memorized position press 7 twice Op...

Page 20: ...ing the number buttons see How to use the number buttons 10 Selecting the beginning of a desired scene or song 1 For DVD Video DVD VR VCD and SVCD discs this function is not available while playback is stopped 2For DVD Video and DVD VR discs you can select a title program while playback is stopped 3 For details on using the number buttons see How to use the number buttons 10 4 When selecting the c...

Page 21: ...at play You can repeat the desired part from the on screen bar A B repeat 21 This function is not available when playing back a VCD SVCD disc with PBC 17 For DVD Video and DVD VR discs this function is not available while playback is stopped Changing the playback mode Program play and random play cannot be used for a USB mass storage class device Press the button repeatedly until both the program ...

Page 22: ...e select OFF by pressing ZOOM repeatedly while holding SHIFT For DVD Audio the functions take effect for the moving picture part only 1 For DVD Video and DVD Audio reverse slow motion is also available by pressing SLOW repeatedly 2To zoom in JPEG files pause the playback first 3On some files using cursor 3 2 K 5 cannot move the zoomed in area during playback Advanced operations To do Disc file Sel...

Page 23: ...irm the entry To clear the key number entry Selecting browsable still pictures While playing back a track linked to browsable still pictures B S P you can select the still pictures turn the page If a track is linked to browsable still pictures they are usually shown automatically during playback Select the desired still picture NORMAL Normally select this CINEMA Suitable for movies USER1 USER2 You...

Page 24: ...available for DVD VR discs 4During playback of DVD Video or DVD VR discs A B repeat play is available only within the same title program 5A B repeat play is not available during program and random playback Operation from the TV screen Status bar Function bar 2 Ex 1 1 Select Confirm Ex Ex 1 Selects the time information mode shown on the display and the status bar TIME 3 Elapsed time of chapter trac...

Page 25: ...or DVD VR Program list Playlist The title may not be displayed depending on the recording equipment To play back the desired item 1 The System starts playing the first item 2 Select the desired item 3 TH D50 TH D5 TH D4 The TOP MENU PG button is used instead of TOP MENU PG DIRECT Current group total group number 1 Playback mode 18 Playback status 31 Elapsed playing time of current track except JPE...

Page 26: ...e screen playback to fit your monitor PICTURE SOURCE Select the source type of the disc file contents when selecting the progressive scanning mode 14 AUTO Normally select this FILM For a film source movie VIDEO For a video source movie SCREEN SAVER Activate ON or deactivate OFF the screen saver function FILE TYPE Select the file type to play when several types of files are recorded on a disc devic...

Page 27: ... FRONT LEFT RIGHT SPEAKER CENTER SPEAKER SURROUND RIGHT LEFT SPEAKER Select the speaker then adjust the distance from the listening position to the speakers 1 ms increase or decrease in delay time corresponds to about 30 cm 1 ft decrease or increase in distance Set to 0 ms for the furthest speaker from your position as the basis for the delay time setting SUBWOOFER Make the subwoofer setting LEVEL...

Page 28: ... Tune in to Channel 0 to check your XM Satellite Radio ID code The 8 digit alphanumeric ID code is displayed To cancel the ID code display select any channel other than Channel 0 Finding the best position for the XM Mini Tuner Home Dock antenna You can place the XM Mini Tuner Home Dock antenna optimally by checking the signal strength shown on the display 1 2 Aim the XM Mini Tuner Home Dock antenn...

Page 29: ...mber You can also select a preset number by pressing PRESET CAT UP or PRESET CAT DOWN when the System is not in the category search mode the CAT indicator is turned off To exit from the category search mode see the left column For details on using the number buttons see How to use the number buttons 10 You can change the type of channel information which appears on the display If you turn off the ...

Page 30: ...ct a preset number You can also select a preset number by pressing PRESET CAT UP or PRESET CAT DOWN For details on using the number buttons see How to use the number buttons 10 When the stereo FM program currently tuned in is noisy you can change the FM reception mode to improve the reception Manual tuning Set the remote control mode before operation Select the desired source FM or AM you want to ...

Page 31: ...qualizer on your iPod To view a video picture from the iPod on the TV connect the System to the TV via the composite or S video jacks 8 You cannot send any data to your iPod from the System TH D5 TH D4 only To disconnect the iPod cable from the iPod press the buttons on the sides then pull it out The iPod battery is charged only when IPod is selected as the source If the iPod which is not listed i...

Page 32: ...CATV converter For VCR Set the remote control mode before operation For TV For DBS tuner or CATV converter For VCR Preparation Make the audio input setting before operation 14 Hold Hold Operating external components TV Turns the power on and off TV VOL Adjusts the volume TV VIDEO Selects the input mode either TV or VIDEO CH Changes the channels 1 10 0 h10 100 Selects the channels TV RETURN Alterna...

Page 33: ...r KO Korean KOR SL Slovenian BE Byelorussian SM Samoan BG Bulgarian KS Kashmiri SN Shona BH Bihari KU Kurdish SO Somali BI Bislama KY Kirghiz SQ Albanian BN Bengali Bangla LA Latin SR Serbian LN Lingala SS Siswati BO Tibetan LO Laothian ST Sesotho BR Breton LT Lithuanian SU Sundanese CA Catalan LV Latvian Lettish SV Swedish CO Corsican SW Swahili CY Welsh MG Malagasy TA Tamil DA Danish MI Maori TE...

Page 34: ...OSE Opening or closing the disc tray NOW READING Reading the disc file information READING INDEX Reading the DivX file REGION CODE ERROR The Region Code of the DVD Video disc does not match the code the System supports 3 NO DISC No disc or an unfinalized disc is loaded NO USB DEVICE No USB mass storage class device is loaded CANNOT PLAY THIS DISC An unplayable disc is loaded CANNOT PLAY THIS DEVIC...

Page 35: ...her limited viewing uses only unless otherwise authorized by Macrovision Reverse engineering or disassembly is prohibited USE OF THIS PRODUCT IN ANY MANNER THAT COMPLIES WITH THE MPEG 4 VISUAL STANDARD IS PROHIBITED EXCEPT FOR USE BY A CONSUMER ENGAGING IN PERSONAL AND NON COMMERCIAL ACTIVITIES DivX DivX Ultra Certified and associated logos are trademarks of DivX Inc and are used under license Off...

Page 36: ...edance VIDEO IN Composite 1 0 V p p 75 Ω S video Y 1 0 V p p 75 Ω C 0 286 V p p 75 Ω HDMI HDMI Input VIDEO 1 IN 2 PASS THROUGH up to 225 MHz HDMI Output MONITOR OUT 480p 720p 1080i USB storage USB Specification Compatible with USB 2 0 Full Speed Compatible Device Mass Storage Class Compatible File System FAT16 FAT32 Bus Power Supply Max 500 mA Tuner section Tuner Range FM 87 5 MHz to 108 0 MHz AM ...

Page 37: ...kg 1 9 lbs each Satellite speakers For TH D50 TH D5 TH D4 Front speakers SP THD5F Type 1 Way Bass Reflex Type Magnetically Shielded Type Speaker 8 cm 3 3 16 inches cone 1 Power Handling Capacity 200 W Impedance 3 Ω Frequency Range 90 Hz to 20 000 Hz Sound Pressure Level 79 dB W m Dimensions W H D 98 5 mm 214 5 mm 93 5 mm 3 15 16 inches 8 1 2 inches 3 11 16 inches Mass 1 0 kg 2 2 lbs each Center sp...

Page 38: ......

Page 39: ......

Page 40: ...DVD DIGITAL THEATER SYSTEM 0107RYMMDWJEM EN 2007 Victor Company of Japan Limited TH D60 TH D50 TH D5 TH D4 ...

Page 41: ...the Model No and Serial No which are located either on the rear bottom or side of the cabinet Retain this information for future reference Model No Serial No TH D60WM Consists of XV THD60WM SP THD60WMW SP THD6F SP THD6C and SP THD6S DVD DIGITAL THEATER SYSTEM ...

Page 42: ...lled ATTENTION Touche Déconnectez la fiche d alimentation secteur pour couper l alimentation complètement le témoin STANDBY s éteint Lors de l installation de l appareil assurez vous que la fiche soit facilement accessible La touche dans n importe quelle position ne déconnecte pas le système du secteur Quand le système est en attente le témoin STANDBY est allumé en rouge Quand le système est sous ...

Page 43: ...e to radio communications However there is no guarantee that interference will not occur in a particular installation If this equipment does cause harmful interference to radio or television reception which can be determined by turning the equipment off and on the user is encouraged to try to correct the interference by one or more of the following measures Reorient or relocate the receiving anten...

Page 44: ... 3 Playable digital devices 3 Playable file types 4 Getting started 5 Checking the supplied accessories 5 Putting batteries into the remote control 5 Connecting the speakers and subwoofer 5 Speaker layout 6 Connecting the antennas 7 Connecting a TV 7 Connecting external components 8 Connecting the AC power cord 9 Basic and common operations 10 Sound and monitor settings 12 Sound settings and adjus...

Page 45: ...ay occur Notes on installing and using the speakers Place the speakers and subwoofer on a flat and level surface The speakers are magnetically shielded to avoid color distortions on TVs If the color on a TV is distorted perform the following procedure Turn off the TV s main power switch or unplug it before installing the speakers Then wait at least 30 minutes before turning on the TV s main power ...

Page 46: ...sh memory device hard disk drive multimedia card reader digital camera etc can be used with this System through a USB connection This System is compatible with USB 2 0 Full Speed This System cannot recognize a USB mass storage class device whose rating exceeds 5 V 500 mA Some discs files may require operations that differ from those explained in this manual Some discs devices files may not be reco...

Page 47: ...recorded at a resolution of more than 640 x 480 it will take a longer time to be displayed This System can only play baseline JPEG files ASF files The System supports MPEG 4 files with the following conditions File format ASF Visual profile MPEG 4 SP Simple Profile Audio CODEC G 726 Max picture size 352 x 288 CIF Max bit rate 384 kbps MPEG1 MPEG2 files The stream format should conform to the MPEG ...

Page 48: ...d on the rear of the center unit DO NOT connect more than one speaker to one speaker terminal Checking the supplied accessories Putting batteries into the remote control R03 UM 4 AAA 24F type dry cell batteries supplied Connecting the speakers and subwoofer Connecting the speaker cords Connect the speaker cords both to the center unit and to each speaker On the center unit On the speaker Connect t...

Page 49: ...rround speakers horizontally see below When placing the surround speakers horizontally Lay the surround speakers horizontally so that the JVC logos are positioned as illustrated below You can turn the JVC logos to make them legible Attaching the base plates required for the front speakers SP THD6F only Speaker layout Connect the speaker cord Route the speaker cord This side should face the front U...

Page 50: ... DVI COLOR 23 HDMI OUT 23 HDMI AUDIO OUT 24 DOWN MIX 24 Use a certified HDMI cable which has the HDMI logo You can use a monitor with a DVI terminal by connecting with a DVI HDMI conversion cable When you play HDCP High Bandwidth Digital Content Protection source allow a few seconds for the sound and picture to be transmitted to the speakers and TV while the confirmation process is completed On so...

Page 51: ...yout A 6 Select S SPK R as the speaker position mode 12 Select 5 1CH as the audio input setting before playing back 14 Connecting external components From component video input TV Component video cord not supplied Green Blue Red TV Composite video cord supplied or S video cord not supplied A From composite video input B From S video input Align the 5 marks DVD player etc HDMI cable not supplied Fr...

Page 52: ...er all the connections have been completed Composite video cord not supplied or S video cord not supplied A From composite video output B From S video output Align the 5 marks VCR etc DBS Direct Broadcasting Satellite tuner etc Digital coaxial cable not supplied A From digital coaxial output B From digital optical output Digital optical cable not supplied Connecting the AC power cord From audio ou...

Page 53: ...nd left surround right monaural surround Light when the signal comes in for the digital input or when the System is ready to receive the signal for the analog input SW subwoofer Always lights _ Lights while reproducing the channel s sound through the corresponding speaker G Speaker position mode indicators 12 H Lights when both the System and the TV with HDMI connection are ready to communicate ea...

Page 54: ...the volume level Prohibiting disc ejection 1 Turn off the System 2 Lock the disc tray To unlock the disc tray perform the above procedure again UNLOCKED appears on the display To do Indication Play back a disc DVD 15 Play back a file on a USB mass storage class device USB 15 Play back an iPod IPod 28 Listen to an XM Satellite Radio FM or AM station XM FM or AM 25 27 Play back an external component...

Page 55: ...EO1 1 VIDEO2 FM AM and VIDEO1 2 When the source is XM this adjustment is not available You can also make adjustments from the LEVEL menu 24 when the speaker position mode is S SPK R 1With COAX or OPT selected as the audio input setting 14 2With 5 1CH selected as the audio input setting 14 Sound settings and adjustments Set the remote control mode before operation Hold S SPK R For speaker layout A ...

Page 56: ...column AUTO SUR MOVIE MUSIC STADIUM ALL ST OFF back to the beginning When the source is FM or AM you can only select ALL ST AUTO SUR currently selected mode OFF back to the beginning When AUTO SUR is selected the System automatically selects a proper multi channel surround mode such as DOLBY D Dolby Digital or DTS DTS Digital Surround AUTO SUR MOVIE WIDE 2CH SUPER W OFF back to the beginning When ...

Page 57: ...Select an appropriate scanning mode then confirm the selection You can get better picture quality in the following orders 1080I 720P 480P 480I When the picture is not shown correctly change the scanning mode to the interlaced mode When the TV is connected through S VIDEO or VIDEO jack the scanning mode setting has no effect 1Activate progressive mode only when your TV supports progressive video si...

Page 58: ...k discs files Scanning mode 14 MONITOR TYPE 23 ON SCREEN LANGUAGE 23 If a still picture is displayed for about 5 minutes the System automatically dims the screen screen saver function You can deactivate the screen saver function 23 When several types of files music picture or movie are recorded on a disc or device select the file type you want to play 23 For messages and icons appearing on the dis...

Page 59: ...ayed To do Start playback Stop playback Pause playback Fast forward fast reverse search 1 Resume function The System memorizes the position where the playback has been interrupted by one of the following operations Pressing 7 once Turning off the power 11 Changing the source 11 To resume playback press 3 play button or the corresponding source button To clear the memorized position press 7 twice O...

Page 60: ...e number buttons 10 Selecting the beginning of a desired scene or song 1 For DVD Video DVD VR VCD and SVCD discs this function is not available while playback is stopped 2For DVD Video and DVD VR discs you can select a title program while playback is stopped 3 For details on using the number buttons see How to use the number buttons 10 4 When selecting the chapter track file number from the on scr...

Page 61: ...at play You can repeat the desired part from the on screen bar A B repeat 21 This function is not available when playing back a VCD SVCD disc with PBC 17 For DVD Video and DVD VR discs this function is not available while playback is stopped Changing the playback mode Program play and random play cannot be used for a USB mass storage class device Press the button repeatedly until both the program ...

Page 62: ...e select OFF by pressing ZOOM repeatedly while holding SHIFT For DVD Audio the functions take effect for the moving picture part only 1 For DVD Video and DVD Audio reverse slow motion is also available by pressing SLOW repeatedly 2To zoom in JPEG files pause the playback first 3On some files using cursor 3 2 K 5 cannot move the zoomed in area during playback Advanced operations To do Disc file Sel...

Page 63: ...irm the entry To clear the key number entry Selecting browsable still pictures While playing back a track linked to browsable still pictures B S P you can select the still pictures turn the page If a track is linked to browsable still pictures they are usually shown automatically during playback Select the desired still picture NORMAL Normally select this CINEMA Suitable for movies USER1 USER2 You...

Page 64: ...or DVD VR discs 2During playback of DVD Video or DVD VR discs A B repeat play is available only within the same title program 3A B repeat play is not available during program and random playback Operation from the TV screen Status bar Function bar Ex Select Confirm Ex Ex Selects the time information mode shown on the display and the status bar 1 Elapsed time of chapter track 1 Remaining time of ch...

Page 65: ...V only Using the program list playlist for DVD VR Program list Playlist The title may not be displayed depending on the recording equipment To play back the desired item 1 The System starts playing the first item 2 Select the desired item 3 Current group total group number 1 Playback mode 18 Playback status 31 Elapsed playing time of current track except JPEG Current group Track information 2 Curr...

Page 66: ...e screen playback to fit your monitor PICTURE SOURCE Select the source type of the disc file contents when selecting the progressive scanning mode 14 AUTO Normally select this FILM For a film source movie VIDEO For a video source movie SCREEN SAVER Activate ON or deactivate OFF the screen saver function FILE TYPE Select the file type to play when several types of files are recorded on a disc devic...

Page 67: ... FRONT LEFT RIGHT SPEAKER CENTER SPEAKER SURROUND RIGHT LEFT SPEAKER Select the speaker then adjust the distance from the listening position to the speakers 1 ms increase or decrease in delay time corresponds to about 30 cm 1 ft decrease or increase in distance Set to 0 ms for the furthest speaker from your position as the basis for the delay time setting SUBWOOFER Make the subwoofer setting LEVEL...

Page 68: ...s are available without subscription Channel 0 For checking the XM Satellite Radio ID code Channel 1 XM Preview channel Select XM as the source before starting subscription and keep the source XM until subscribing is completed How to find the XM Satellite Radio ID code Tune in to Channel 0 to check your XM Satellite Radio ID code The 8 digit alphanumeric ID code is displayed To cancel the ID code ...

Page 69: ...mber You can also select a preset number by pressing PRESET CAT UP or PRESET CAT DOWN when the System is not in the category search mode the CAT indicator is turned off To exit from the category search mode see the left column For details on using the number buttons see How to use the number buttons 10 You can change the type of channel information which appears on the display If you turn off the ...

Page 70: ...ning in to a preset station Select a preset number You can also select a preset number by pressing PRESET CAT UP or PRESET CAT DOWN For details on using the number buttons see How to use the number buttons 10 When the stereo FM program currently tuned in is noisy you can change the FM reception mode to improve the reception Manual tuning Set the remote control mode before operation Select the desi...

Page 71: ...when audio sources with high recording levels are played you are recommended to deactivate the equalizer on your iPod To view a video picture from the iPod on the TV connect the System to the TV via the composite or S video jacks 8 You cannot send any data to your iPod from the System The iPod battery is charged only when IPod is selected as the source If the iPod which is not listed in Playable d...

Page 72: ...CATV converter For VCR Set the remote control mode before operation For TV For DBS tuner or CATV converter For VCR Preparation Make the audio input setting before operation 14 Hold Hold Operating external components TV Turns the power on and off TV VOL Adjusts the volume TV VIDEO Selects the input mode either TV or VIDEO CH Changes the channels 1 10 0 h10 100 Selects the channels TV RETURN Alterna...

Page 73: ...r KO Korean KOR SL Slovenian BE Byelorussian SM Samoan BG Bulgarian KS Kashmiri SN Shona BH Bihari KU Kurdish SO Somali BI Bislama KY Kirghiz SQ Albanian BN Bengali Bangla LA Latin SR Serbian LN Lingala SS Siswati BO Tibetan LO Laothian ST Sesotho BR Breton LT Lithuanian SU Sundanese CA Catalan LV Latvian Lettish SV Swedish CO Corsican SW Swahili CY Welsh MG Malagasy TA Tamil DA Danish MI Maori TE...

Page 74: ...OSE Opening or closing the disc tray NOW READING Reading the disc file information READING INDEX Reading the DivX file REGION CODE ERROR The Region Code of the DVD Video disc does not match the code the System supports 3 NO DISC No disc or an unfinalized disc is loaded NO USB DEVICE No USB mass storage class device is loaded CANNOT PLAY THIS DISC An unplayable disc is loaded CANNOT PLAY THIS DEVIC...

Page 75: ...her limited viewing uses only unless otherwise authorized by Macrovision Reverse engineering or disassembly is prohibited USE OF THIS PRODUCT IN ANY MANNER THAT COMPLIES WITH THE MPEG 4 VISUAL STANDARD IS PROHIBITED EXCEPT FOR USE BY A CONSUMER ENGAGING IN PERSONAL AND NON COMMERCIAL ACTIVITIES DivX DivX Ultra Certified and associated logos are trademarks of DivX Inc and are used under license Off...

Page 76: ...y Impedance VIDEO IN Composite 1 0 V p p 75 Ω S video Y 1 0 V p p 75 Ω C 0 286 V p p 75 Ω HDMI HDMI Input VIDEO 1 IN PASS THROUGH up to 225 MHz HDMI Output MONITOR OUT 480p 720p 1080i USB storage USB Specification Compatible with USB 2 0 Full Speed Compatible Device Mass Storage Class Compatible File System FAT16 FAT32 Bus Power Supply Max 500 mA Tuner section Tuner Range FM 87 5 MHz to 108 0 MHz ...

Page 77: ...andling Capacity 200 W Impedance 3 Ω Frequency Range 90 Hz to 20 000 Hz Sound Pressure Level 83 dB W m Dimensions W H D 435 mm 99 mm 93 5 mm 17 3 16 inches 3 15 16 inches 3 11 16 inches Mass 2 0 kg 4 5 lbs Surround speakers SP THD6S Type 1 Way Bass Reflex Type Magnetically Shielded Type Speaker 8 cm 3 3 16 inches cone 1 Power Handling Capacity 200 W Impedance 3 Ω Frequency Range 90 Hz to 20 000 Hz...

Page 78: ......

Page 79: ......

Page 80: ...DVD DIGITAL THEATER SYSTEM 0207RYMMDWJEM EN 2007 Victor Company of Japan Limited TH D60WM ...

Reviews: