background image

Advanced operations

43

When playing back a DVD (or SVCD) containing subtitles in 
several languages, you can select the subtitle language to be 
displayed on the TV screen.
When a DVD contains audio (sound track) in several languages, 
you can also select the language (sound track) to listen to.
• You can also select specific audio channel(s) on Video CDs/

SVCDs.

Selecting the subtitle language

7

During playback

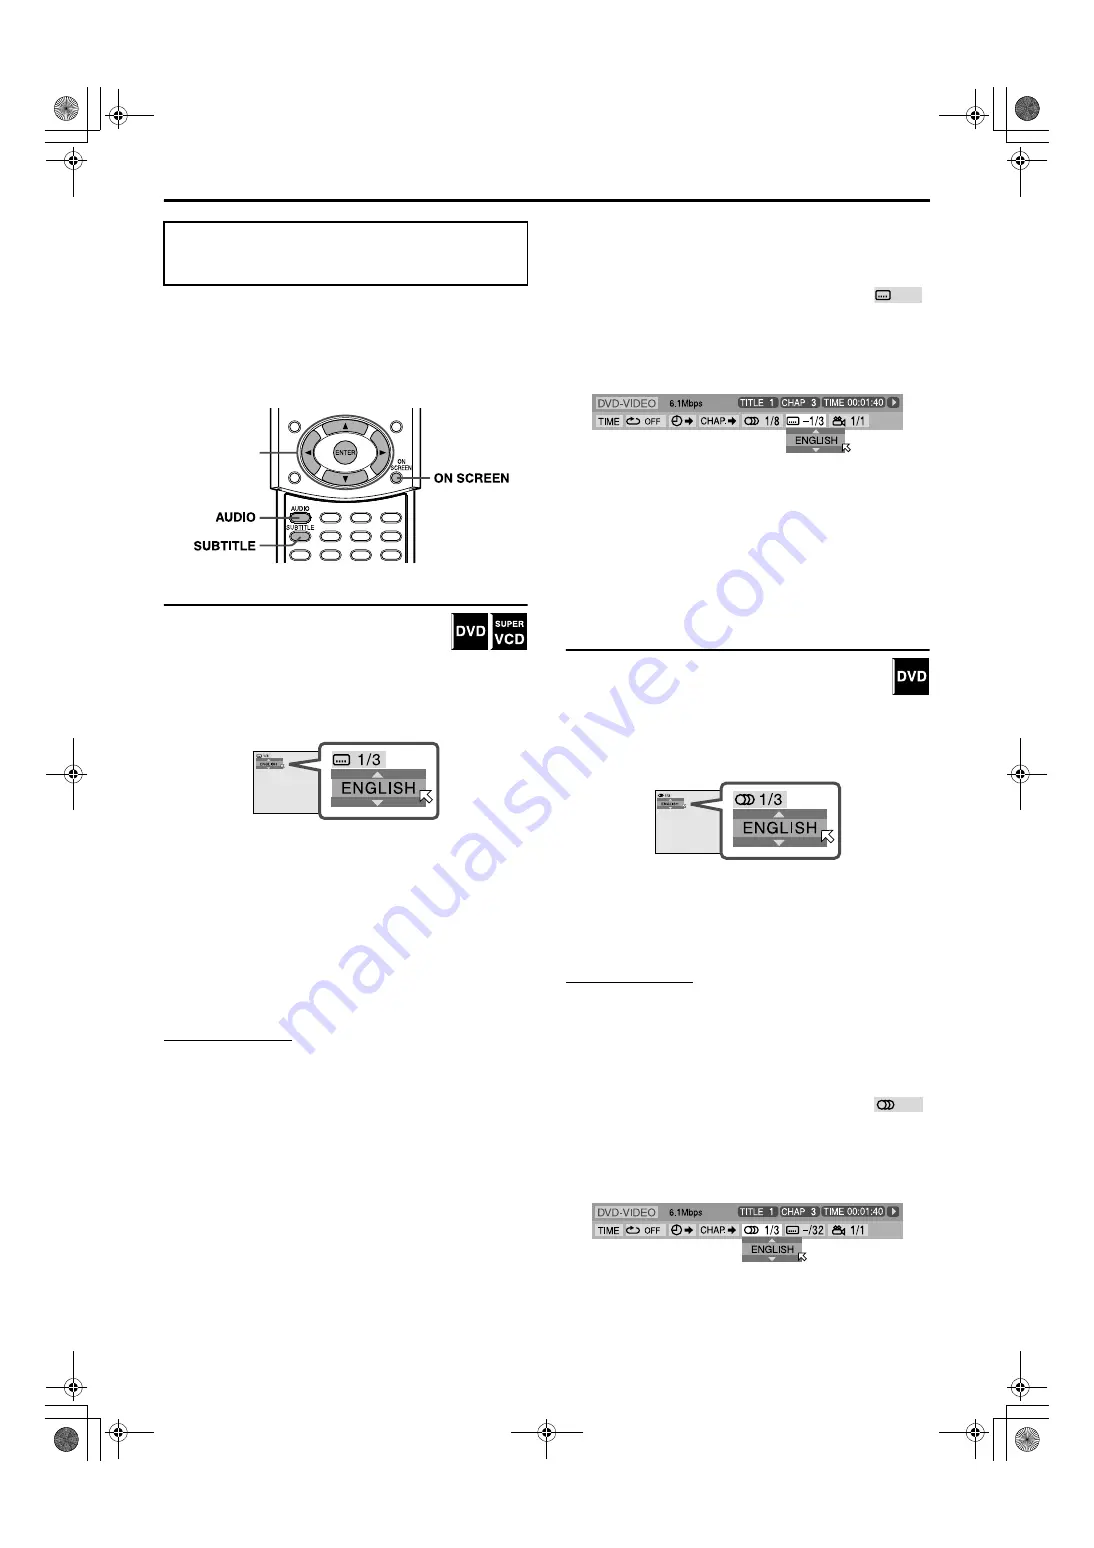
When using the SUBTITLE button:

1

Press SUBTITLE.

The following pop-up window appears on the TV screen.

Example (DVD):“ENGLISH” is selected out of 3 subtitle 

languages recorded.

2

Press SUBTITLE repeatedly to select 
the desired subtitle language.

Each time you press the button, the subtitle language changes.

For SVCD
• An SVCD can contain up to four subtitles. Pressing 

SUBTITLE

 changes the subtitles regardless of whether the 

subtitles are recorded or not. (Subtitles will not change if no 
subtitle is recorded.)

The pop-up window disappears if no operation is done for 
about 5 seconds.

NOTE

• Some subtitle languages are abbreviated in the pop-up window. See 

“The language codes list” (

A

pg. 52).

When using the on-screen bar:

1

Press ON SCREEN twice.

The on-screen bar appears on the TV screen.

2

Press Cursor 

3

/

2

 to move 

H

 to 

.

3

Press ENTER.

The following pop-up window appears under the selected item.

Example (DVD):“ENGLISH” is selected out of 3 subtitle 

languages recorded.

4

Press Cursor 

/

/

5

 repeatedly to select 

the desired subtitle language.

Each time you press the button, the subtitle language changes.

5

Press ENTER.

The pop-up window disappears.

To turn off the on-screen bar

Press 

ON SCREEN

.

Selecting the audio language

7

During playback

When using the AUDIO button:

1

Press AUDIO.

The following pop-up window appears on the TV screen.

Example: “ENGLISH” is selected out of 3 audio languages 

recorded.

2

Press AUDIO repeatedly to select the 
desired audio language.

Each time you press the button, the audio languages change.
The pop-up window disappears if no operation is done for 
about 5 seconds.

NOTE

• Some audio languages are abbreviated in the pop-up window. See 

“The language codes list” (

A

pg. 52).

When using the on-screen bar:

1

Press ON SCREEN twice.

The on-screen bar appears on the TV screen.

2

Press Cursor 

3

/

2

 to move 

H

 to 

.

3

Press ENTER.

The following pop-up window appears under the selected item.

Example: “ENGLISH” is selected out of 3 audio languages 

recorded.

Selecting the subtitle/
audio languages

Cursor

(

3

/

2

/

/

/

5

)

/ENTER

TH-A85-55[B].book  Page 43  Friday, March 28, 2003  12:01 PM

Summary of Contents for SP-PWA55

Page 1: ...TH A55 DVD DIGITAL CINEMA SYSTEM INSTRUCTIONS Consists of XV THA85 SP PWA85 SP THA85C and SP THA85F Consists of XV THA55 SP PWA55 SP THA55C SP THA55F and SP THA55S TH A85 55 B 01Cov1 fm Page 1 Thursday April 10 2003 2 44 PM ...

Page 2: ...ith the letter L or coloured red IF IN DOUBT CONSULT A COMPETENT ELECTRICIAN CAUTION To reduce the risk of electrical shocks fire etc 1 Do not remove screws covers or cabinet 2 Do not expose this appliance to rain or moisture CAUTION F button XV THA85 XV THA55 Disconnect the mains plug to shut the power off completely the STANDBY lamp goes off The F button in any position does not disconnect the m...

Page 3: ...ins plug and consult your dealer DON T remove any fixed cover as this may expose dangerous voltages DON T leave equipment switched on when it is unattended unless it is specifically stated that it is designed for unattended operation or has a standby mode Switch off using the switch on the equipment and make sure that your family know how to do this Special arrangements may need to be made for inf...

Page 4: ... Tuner operations 27 Manual tuning 27 Preset tuning 27 Selecting the FM reception mode 28 Reducing the noise of AM MW broadcast 28 Using the RDS Radio Data System when receiving FM stations 29 Creating realistic sound fields 33 Using the surround mode 35 Adjusting the sound 36 Advanced operations 37 Using the on screen bar 37 Playing from a specified position on a disc 38 Using the MP3 control dis...

Page 5: ...n you are away When away on travel or for other reasons for an extended period of time disconnect the power cord plug from the wall outlet Do not block the vents Blocking the vents may damage the system Care of the cabinet When cleaning the system use a soft cloth and follow the relevant instructions on the use of chemically coated cloths Do not use benzene thinner or other organic solvents includ...

Page 6: ...er than that of regular CDs About MP3 discs MP3 is an abbreviation for Motion Picture Experts Group 1 or MPEG 1 Audio Layer 3 MP3 is simply a compressed data file format By using MP3 format one CD R or CD RW can contain 10 times as much data as one regular CD About JPEG discs A still picture data compression system proposed by the Joint Photographic Expert Group which features small decrease in im...

Page 7: ...der those files are also counted in the total number of 150 The Playback Control function allows you to enjoy menu driven operation and high resolution still images which have a resolution four times greater than moving pictures High resolution still image display You can display high quality images which are four times clearer than moving pictures Menu driven playback A selection menu is displaye...

Page 8: ... button A pg 26 J Standby lamp STANDBY A pg 19 K Standby on button F A pg 19 L Display window A pg 6 24 M Remote sensor A pg 16 N Headphones jack PHONES A pg 20 O Open close button 0 A pg 23 Rear panel center unit A System cord connector A pg 10 B Audio input jacks AUX IN A pg 14 C Digital input jack DIGITAL IN A pg 14 D AV SCART connector AV A pg 8 E Video output jacks OUT VIDEO S VIDEO A pg 8 F ...

Page 9: ... abcdghi A pg 34 Subwoofer indicator f A pg 34 Sound reproducing speaker indicator A pg 34 I Surround indicator SURROUND A pg 35 J DSP indicator A pg 33 35 K Resume indicator RESUME A pg 24 L Repeat mode indicators A pg 48 M RDS reception mode indicators A pg 29 32 RDS TA News Info Powered subwoofer A System cord connector A pg 10 B Front speaker terminals FRONT SPEAKERS A pg 12 13 C Center speake...

Page 10: ...UBTITLE A pg 43 N Angle button ANGLE A pg 42 O Setting button SETTING A pg 58 P Choice menu button CHOICE A pg 50 Q Group title button GROUP TITLE A pg 39 R Repeat button REPEAT A pg 48 S A B repeat button A B REPEAT A pg 49 T Effect button EFFECT A pg 36 U Sleep button SLEEP A pg 21 V Decode mode button DECODE A pg 22 W Test tone button TEST A pg 36 X Subwoofer adjustment buttons S WFR A pg 22 Y ...

Page 11: ...ctor to RGB Some TV s SCART connectors output audio signal In such a case you can enjoy the TV sound through this system NOTE No sound comes out from AV SCART connector 7 To connect a TV through the composite or S video jacks Connect the TV using the composite video cord not supplied or an S video cord not supplied If your TV has an S video Y C separation jack you can get better picture quality th...

Page 12: ...outdoor FM antenna with standard type 75 C coaxial connector NOTE Disconnect the supplied FM antenna before attaching a 75 C coaxial connector the kind with a round wire going to an outdoor antenna We recommend that you use coaxial cable for the FM antenna as it is well shielded against interference If the antenna cord is covered with the insulation coat twist and pull the insulation coat off and ...

Page 13: ...creen may appear mottled In this case keep the distance between them to the TV to over 10 cm For safety reasons always ensure that there is sufficient space behind the powered subwoofer When you position the satellite speakers in a relatively high place such as the top of your bookshelf place them on a flat and level surface Speaker grilles are not removable except SP THA55C SP THA55F and SP THA55...

Page 14: ...elf 1 Connect the speaker connectors to the stand connectors Be sure to connect the speaker connectors by matching their sizes 2 Join the stand to the speaker section 3 Fix the stand to the speaker section Be sure to tighten the screws firmly Repeat the procedure from step 1 to assemble the other satellite speakers NOTE Use the speaker after assembly is fully and correctly done It is recommended t...

Page 15: ...THA85F Center speaker SP THA85C Front speakers SP THA85F White Black Black White Red Black Black Red Powered subwoofer Press and hold the clamp Insert the bare end of the speaker cord into the terminal Release the clamp Connect the white cords to the red ª terminals and black cords to the black terminals Route the speaker cord as shown at right Be sure to remove all slack from the cord so that the...

Page 16: ... daily activities Before installing the satellite speakers on the wall be sure to detach the speaker stands equipped with the satellite speakers by removing the tilt adjustment screws NOTE You can attach the satellite speakers to the separately sold TV stand instead of the stands attached to them at your purchase For assembling the TV stand and speakers be sure to use the screws supplied with the ...

Page 17: ...put mode on the TV Connecting to a digital component You can enjoy the sound of a digital component such as a DBS Direct Broadcast Satellite tuner or MD recorder with this system Use digital optical cord not supplied for connection NOTE When playing a video component such as a DBS tuner To listen to the sound select AUX DIGITAL as the source to play A pg 20 To see the picture connect the video out...

Page 18: ...ch as preset stations and surround mode adjustment may be erased in a few days in the following cases If you unplug the power cord of the center unit If a power failure occurs The speakers will not produce any sound if the power cord of the powered subwoofer is removed from the AC outlet while the center unit is turned on In this case press FAUDIO on the remote control or F on the center unit to t...

Page 19: ...batteries Use two R6P SUM 3 AA 15F type dry cell batteries CAUTION Follow these precautions to avoid leaking or cracking batteries Use the correct type of batteries Batteries that look similar may differ in voltage Always replace both batteries at the same time Do not expose batteries to heat or flame Operating the system from the remote control Aim the remote control directly at the remote sensor...

Page 20: ...s remote control cannot operate the equipment Set the codes again after replacing the batteries of the remote control 7 Operation IMPORTANT Before using the remote control to operate a TV Set the remote control mode selector to TV The following buttons are available F TV Turns TV on and off TV VOL Adjusts the volume TV VIDEO Selects the input mode either TV or VIDEO CHANNEL Changes the channels 1 ...

Page 21: ...ntrol cannot operate the equipment Set the codes again after replacing the batteries of the remote control 7 Operation IMPORTANT Before using the remote control to operate a VCR Set the remote control mode selector to VCR The following buttons are available F VCR Turns VCR on and off 3 play button Starts playback 7 Stops operation 8 Pauses playback Fast forwards video tape 4 Rewinds video tape REC...

Page 22: ...ports The DVD cannot be played back NO DISC Appears when no disc is loaded to the disc tray 7 To turn the power off On the remote control Press F AUDIO again On the center unit Press F again The STANDBY lamp lights NOTE The power supply to the subwoofer is linked to the center unit The POWER ON lamp on the subwoofer lights green when the power is turned on A small amount of the power is consumed e...

Page 23: ...ess to increase volume Press to decrease volume The volume level appears on the display window CAUTION Be sure to turn down the volume Before connecting or putting on headphones as high volume may damage both the headphones and your hearing Before disconnecting headphones as high volume may be suddenly output from the speakers Connect a pair of headphones to the PHONES jack on the center unit This...

Page 24: ...20min 30min 60min 90min 120min 150min back to the beginning To check the remaining time until the shut off time Press SLEEP once The remaining time until the shut off time appears on the display window for a while To change the remaining time until the shut off time Press SLEEP repeatedly Each time you press the button the shut off time changes To cancel the Sleep Timer Press SLEEP repeatedly unti...

Page 25: ... pressing BASS When you play a disc or software encoded with Dolby Digital or DTS Digital Surround the following symptoms may occur Sound does not come out at the beginning of playback Noise comes out while searching for or skipping chapters or tracks In these cases change the decode mode to DOLBY D for Dolby Digital or DTS for DTS Digital Surround 7 When DVD or AUX DIGITAL is selected as the sour...

Page 26: ...een and playback starts from the first track in the first group after pressing 3 play button in step 3 When all tracks in a group have been played the system starts playback of tracks in the next group When loading a JPEG disc The slide show playback starts from the first file in the first group after pressing 3 play button in step 3 When stopping playback of a JPEG disc the JPEG control display A...

Page 27: ... any button will cancel the screen saver function If you do not want to use the screen saver function see page 53 7 On screen guide icons During DVD playback the following guide icons may appear for a while on the TV screen appears at the beginning of a scene containing multi subtitle languages appears at the beginning of a scene containing multi audio languages appears at the beginning of a scene...

Page 28: ...To unlock the tray When the system is turned off press and hold 7 then press 0 The system turns on and UNLOCKED appears on the display window IMPORTANT Before using the remote control for the following operation 1 Set the remote control mode selector to AUDIO 2 Press DVD One Touch Replay You can move back the playback position by 10 seconds from the current position 7 During playback On the remote...

Page 29: ...iles backward Press 4 as many times as required NOTE This function may not work for some DVDs When playing a Video CD or SVCD with the PBC function and 4 may be used for the operations of menu driven playback A pg 4 39 When playing back an MP3 JPEG disc you can make operations using the MP3 JPEG control display A pg 40 41 Locating a desired selection using number buttons You can locate the desired...

Page 30: ...al strength is tuned in to TUNING ª Increases frequency TUNING Decreases frequency NOTE When a station of sufficient signal strength is tuned in the TUNED indicator lights on the display window When an FM stereo program is received the ST indicator lights on the display window Once a station is assigned to a channel number the station can be quickly tuned in You can preset 30 FM and 15 AM MW stati...

Page 31: ...rrently tuned in is noisy you can change the FM reception mode to improve the reception You can store the FM reception mode for each preset station See Preset tuning A pg 27 7 While listening to an FM station On the remote control Press FM MODE The FM reception mode appears on the display window Each time you press the button the FM reception mode alternates between AUTO MUTING and MONO AUTO MUTIN...

Page 32: ...ow the RDS signals information On the remote control Press RDS DISPLAY while listening to an FM station Each time you press the button the indication on the display window changes to show you the following information PS PTY RT Frequency Normal indication back to the beginning PS Program Service While searching PS appears and then the station names will be displayed NO PS appears if no signal is s...

Page 33: ...T flashes on the display window While PTY SELECT is flashing 2 Press PTY ª or PTY until the PTY code you want appears on the display window For details see Description of the PTY codes A pg 31 While the PTY code selected in step 2 is still on the display window 3 Press PTY SEARCH again While searching SEARCH and the selected PTY code alternate on the display window The system searches 30 preset FM...

Page 34: ...rograms concerning any aspect of national or regional culture including language theater etc Science Programs about natural sciences and technology Varied Used for mainly speech based programs such as quizzes panel games and personality interviews Pop M Commercial music of current popular appeal Rock M Rock music Easy M Current contemporary music considered to be easy listening Light M Instrumenta...

Page 35: ...tation starts broadcasting the program you have selected the system automatically switches to the station The indicator of received PTY code starts flashing When the program is over the system goes back to the previously tuned station but the Enhanced Other Network function still remains activated Case 2 If the FM station you are listening to is broadcasting the program you have selected The syste...

Page 36: ...rouped into two categories multichannel up to 5 1 channel and 2 channel software To enjoy surround sounds while playing Dolby Digital 2 ch software you can use Dolby Pro Logic II 7 DTS Digital Surround Used to reproduce multichannel soundtracks of the software encoded with DTS Digital Surround DTS Digital Surround DTS is another discrete multichannel digital audio format available on CD LD and DVD...

Page 37: ... Lights when the LFE channel signal comes in g Lights when the surround left channel signal comes in i Lights when the surround right channel signal comes in h Lights when the monaural surround channel signal or 2 channel Dolby Surround signal comes in f Always lights The channel with shows that the corresponding speakers are reproducing the channels sound If the channels sound decoded into 5 1 ch...

Page 38: ... the button the surround mode changes as follows PL II MOVIE PL II MUSIC LIVE CLUB DANCE CLUB HALL PAVILION ALL CH ST back to the beginning For details on each mode see pages 33 and 34 To turn off the surround mode Press SURR ON OFF Each time you press the button the surround mode turns on and off alternately SURR OFF surround off O current selected mode surround on NOTE When selecting PL II MUSIC...

Page 39: ...or the surround right speaker 3 Press TEST again to stop the test tone 7 For DAP modes A pg 33 only 4 Press EFFECT to select the effect level 1 to 5 you want Each time you press the button the effect level changes as follows DSP EFFECT 1 DSP EFFECT 2 DSP EFFECT 3 DSP EFFECT 4 DSP EFFECT 5 back to the beginning As the number increases the selected mode will be more effective Normally set the level ...

Page 40: ... the on screen bar during playback DVD Video CD SVCD CD A Shows disc type B Shows current transfer rate Megabits per second C Shows current title for DVD D Shows current chapter number for DVD or track number for other type of discs E Shows time information A pg 38 F Shows playback status appears during playback appears during fast forward reverse appears during playback in forward slow motion rev...

Page 41: ...nt chapter track TOTAL Elapsed time of disc T REM Remaining time of disc To turn off the on screen bar Press ON SCREEN NOTE While playing a Video CD SVCD or Audio CD the hour digit indication does not appear You can start playing a title chapter or track you specify You can also play a disc from specified time Locating a desired scene from the DVD menu DVDs generally have their own menus which sho...

Page 42: ...m any of the following Press TOP MENU or MENU Press 7 twice to stop playback then press 3 play button Locating a desired chapter using the on screen bar When playing back a DVD you can locate the chapter number to be played using the on screen bar 7 During playback 1 Press ON SCREEN twice The on screen bar appears on the TV screen 2 Press Cursor 3 2 to move H to 3 Press ENTER The following pop up ...

Page 43: ...ess Cursor 2 repeatedly until the wrong number is erased then press number buttons to enter the correct numbers 5 Press ENTER The system starts playback from the specified time To turn off the on screen bar Press ON SCREEN NOTE You can also use the 10 button to enter 0 The 10 button is not used by this function You can specify time in hours minutes seconds for DVD and in minutes seconds for Video ...

Page 44: ...ess Cursor 3 to select the file list 3 Press Cursor 5 to select the desired file 4 Press 3 play button to start the slide show playback from the selected file To show only the selected file Press ENTER When a still picture is completely shown on the TV screen you can zoom in on areas in the still picture A pg 45 To select the other group Press Cursor 2 to return to the group list then press Cursor...

Page 45: ... to the beginning The pop up window disappears if no operation is done for about 5 seconds When using the on screen bar 1 Press ON SCREEN twice The on screen bar appears on the TV screen 2 Press Cursor 3 2 to move H to 3 Press ENTER The following pop up window appears under the selected item Example The first view angle is selected out of 3 view angles recorded 4 Press Cursor 5 repeatedly to selec...

Page 46: ...EN twice The on screen bar appears on the TV screen 2 Press Cursor 3 2 to move H to 3 Press ENTER The following pop up window appears under the selected item Example DVD ENGLISH is selected out of 3 subtitle languages recorded 4 Press Cursor 5 repeatedly to select the desired subtitle language Each time you press the button the subtitle language changes 5 Press ENTER The pop up window disappears T...

Page 47: ...nel changes Example for Video CD ST L R back to the beginning ST To listen to normal stereo playback L To listen to L left audio channel only R To listen to R right audio channel only Example for SVCD ST 1 ST 2 L 1 R 1 L 2 R 2 back to the beginning ST 1 ST 2 To listen to normal stereo playback of ST 1 or 2 channel L 1 L 2 To listen to L left 1 or 2 audio channel R 1 R 2 To listen to R right 1 or 2...

Page 48: ...erse slow motion press 1 Each time you press the button the playback speed become faster and on screen guide icon changes as follows Forward Reverse To pause slow motion playback Press 8 To return to normal playback Press 3 play button NOTE Sound cannot be heard during slow motion playback Zooming in 7 During playback or while paused 1 Press ZOOM Each time you press ZOOM scene magnification change...

Page 49: ...and CINEMA Press VFP to return to normal screen 7 To adjust picture appearance manually 3 Press Cursor 3 2 repeatedly to select USER 1 or USER 2 4 Press Cursor 5 repeatedly to select a parameter you want to adjust Adjust gradually and confirm picture appearance results are as preferred GAMMA 4 to 4 Controls brightness of neutral tints while maintaining brightness of dark and bright portions BRIGHT...

Page 50: ...program menu appears To bring up the menu without stopping playback carry out steps 1 to 3 You can also check playback status in the on screen bar by pressing ON SCREEN To stop Program Playback Press 7 Note that program setting remains To clear the program While stopped and the program menu is shown on the TV screen press 7 All of the programmed tracks are erased You can also clear the program by ...

Page 51: ...he TV screen To stop Repeat Playback Press 7 When a disc except DVD is selected the system stops playback but does not quit the Repeat mode When a DVD is set the system stops playback and quits the Repeat mode To quit the Repeat mode Press REPEAT until the Repeat mode indicator goes off from the display window You can also clear the Repeat mode by changing the disc NOTE If you press REPEAT while s...

Page 52: ...part you want to repeat point B The repeat mode indicator on the display window changes to and A B Repeat Playback starts The selected part of the disc between point A and B is played repeatedly To cancel A B Repeat Playback Press A B REPEAT during A B Repeat Playback When using the on screen bar 1 Press ON SCREEN twice The on screen bar appears on the TV screen 2 Press Cursor 3 2 to move H to 3 P...

Page 53: ...can select the initial languages for the disc menu audio and subtitles You can also select the language used on the TV screen while operating this system Picture menu PICTURE A pg 53 You can select the desired options concerning a picture or monitor screen Audio menu AUDIO A pg 53 You can adjust sound settings Speaker setting menu SPK SETTING A pg 53 You can make speaker settings according to the ...

Page 54: ...mple When PICTURE SOURCE is selected 4 Press ENTER The pop up window listing the selectable options appears on the choice menu 5 Press Cursor 5 repeatedly to select the desired option Example When FILM is selected 6 Press ENTER Your choice is stored To set other items on the same choice menu Repeat steps 3 to 6 To move to another choice menu Press Cursor 3 2 repeatedly to select a choice menu you ...

Page 55: ...garian AZ Azerbaijani HY Armenian BA Bashkir IA Interlingua BE Byelorussian IE Interlingue BG Bulgarian IK Inupiak BH Bihari IN Indonesian BI Bislama IS Icelandic BN Bengali Bangla IW Hebrew BO Tibetan JI Yiddish BR Breton JW Javanese CA Catalan KA Georgian CO Corsican KK Kazakh CS Czech KL Greenlandic CY Welsh KM Cambodian DA Danish KN Kannada DZ Bhutani KO Korean KOR EL Greek KS Kashmiri EO Espe...

Page 56: ... a disc you can select which files to play MP3 Select this to play MP3 files JPEG Select this to play JPEG files Audio menu AUDIO 7 L R BALANCE You can adjust the balance between the front left and front right speakers L 21 to L 1 O CENTER O R 1 to R 21 by 1 step CENTER The levels of the front left and right speakers are identical L 21 to L 1 and R 1 to R 21 As the number increases the level from ...

Page 57: ... the speaker is larger than 12 cm in diameter SMALL Select this when using the supplied speakers Select this when the cone speaker unit in the speaker is smaller than 12 cm in diameter SUB WOOFER USE This item is fixed to USE RETURN Returns to the SPK SETTING menu 7 Level menu LEVEL CENTER SPEAKER SURROUND LEFT SPEAKER SURROUND RIGHT SPEAKER SUB WOOFER Adjust the output level of related speakers W...

Page 58: ...controls shut off time 7 PARENTAL LOCK You can restrict playback of a DVD containing violent scenes that is not suitable for your other family members Accesses the PARENTAL LOCK sub menu See following Parental Lock Using this function you can restrict playback of a DVD containing violent scenes or scenes not suitable for your other family members Nobody can play such a disc unless this function is...

Page 59: ...et the Parental Lock before you set your password If you go out of the PARENTAL LOCK sub menu before setting your password in step 6 the new country code and parental lock level will not become effective The old country code and parental level will remain in effect When you enter wrong passwords more than three times the H moves to EXIT automatically and Cursor 5 do not work Press ENTER to exit fr...

Page 60: ... BR Brazil GW Guinea Bissau MW Malawi TN Tunisia BS Bahamas GY Guyana MX Mexico TO Tonga BT Bhutan HK Hong Kong MY Malaysia TP East Timor BV Bouvet Island HM Heard Island and McDonald Islands MZ Mozambique TR Turkey BW Botswana NA Namibia TT Trinidad and Tobago BY Belarus HN Honduras NC New Caledonia TV Tuvalu BZ Belize HR Croatia NE Niger TW Taiwan CA Canada HT Haiti NF Norfolk Island TZ Tanzania...

Page 61: ... to the speakers A pg 54 CROSS Select the cutoff frequency of the subwoofer A pg 54 LFE ATT Diminish the distortion of the bass sound from the subwoofer while playing back a disc with Dolby Digital or DTS Digital Surround A pg 53 BAL You can adjust the balance between the front left and front right speakers A pg 53 D COMP Dynamic Range Compression You can enjoy low level recorded sound clearly at ...

Page 62: ...ectly A pg 16 The remote control is not set to operate the DVD player or tuner FM AM MW For the DVD player press DVD before you perform the operations A pg 23 For the tuner press FM AM before you perform the operations A pg 27 Sunlight is falling directly on the remote sensor Hide the remote sensor from direct sunlight The remote control signals are not set correctly Enter the correct manufacturer...

Page 63: ...input on the TV The disc is not playable Use a playable disc A pg 3 A disc cannot be played The center unit s and disc s Region Code numbers are incompatible Replace the disc A pg 3 Parental Lock is in use Enter password to change the Parental Lock level A pg 55 A disc cannot be played and 0 00 is displayed on the display window The disc is loaded with its label and data sides inverted Load the di...

Page 64: ...ed to the disc Replace the disc JPEG files do not have the correct file extension in their file names Add correct file extension jpg jpeg JPG JPEG or any uppercase and lowercase combination such as Jpg to their file names A pg 3 JPEG files are not recorded in a format compliant with ISO 9660 Level 1 or 2 Replace the disc Record JPEG files using a compliant application Not JPEG files but MP3 files ...

Page 65: ...ction Multichannel DVD is specified to have each sound track constitute one sound field Multichannel refers to a structure of sound tracks having three or more channels Multilanguage When a title is created to cope with multiple languages it is generally called a multilanguage title Parental Lock A feature of this system to automatically determine whether or not to reproduce particular DVD softwar...

Page 66: ...RESSION 53 58 E Enhanced Other Network EON 31 F Frame by frame playback 45 G Group 4 J JPEG 3 4 41 L Left Right speaker balance L R BALANCE 53 58 Low frequency effect attenuater LFE ATT 53 58 M Menu language MENU LANGUAGE 52 Monitor type MONITOR TYPE 53 16 9 AUTO 53 16 9 NORMAL 53 4 3 LB 53 4 3 PS 53 MP3 3 4 40 Muting 20 O On screen bar 37 On screen guide icons ON SCREEN GUIDE 24 55 On screen lang...

Page 67: ... 7 Satellite Speakers SP THA85F Speakers 5 5 cm M 2 Bass reflex Magnetically Shielded Power Handling Capacity 80 W Impedance 6 C Frequency Range 90 Hz to 20 kHz Dimensions W M H M D 250 mm M 1 103 mm M 250 mm Mass 3 77 kg 7 Center Speaker SP THA85C Speakers 5 5 cm M 2 Bass reflex Magnetically Shielded Power Handling Capacity 80 W Impedance 6 C Frequency Range 90 Hz to 20 kHz Dimensions W M H M D 2...

Page 68: ...EN 0403SKMIDEJEM 2003 VICTOR COMPANY OF JAPAN LIMITED TH A85 TH A55 DVD DIGITAL CINEMA SYSTEM TH A85 55 B book Page 68 Friday March 28 2003 12 01 PM ...

Reviews: