background image

33

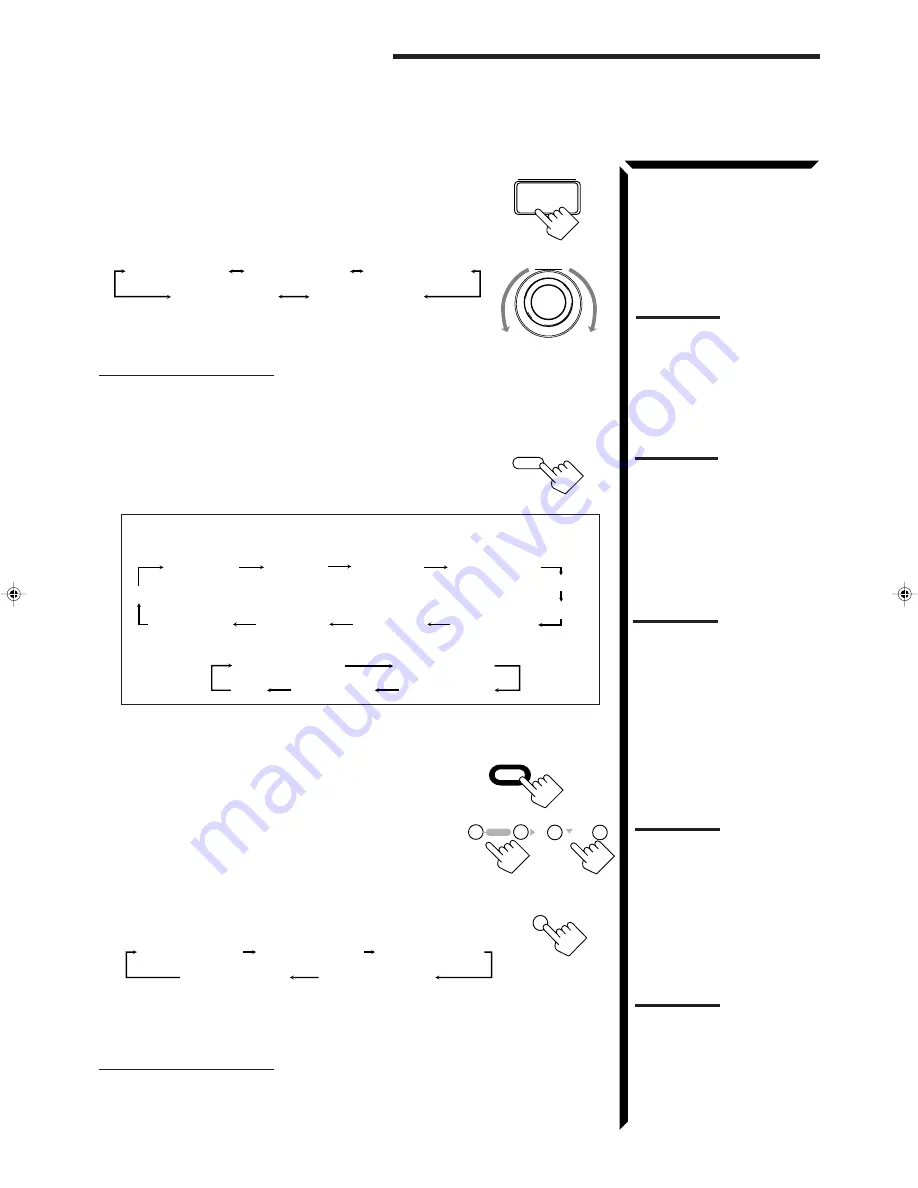
4. Adjust the effect level.

1) Press BALANCE/SURROUND ADJUST repeatedly

until “DSP EFFECT” appears on the display.

2) Turn MULTI JOG to select the effect level, while the

indication of the previous step is still on the display.
As you turn it, the effect level changes as follows:

As the number increases, the selected DAP mode
becomes stronger.

To cancel the DAP mode

Turn MULTI JOG until “DSP OFF” appears in step 2.
The DSP indicator goes off from the display.

From the remote control:

1. Press SURROUND MODE repeatedly until the mode you

want appears on the display.
The DSP indicator also lights up on the display.

Each time you press the button, the DSP modes change as follows (the indicator
of the selected DSP mode also lights up on the display):

When the digital input is selected to play the source encoded with Dolby
Digital:

If you need to make any adjustment, go to the following steps.

2. Press SOUND.

10 keys are activated for sound adjustments.

3. Adjust the speaker output levels as follows:

• To adjust the left rear speaker level, press REAR•L +/–.
• To adjust the right rear speaker level, press REAR•R +/–.

4. Press EFFECT to select the effect level.

Each time you press the button, the effect level changes as
follows:

As the number increases, the selected DAP mode becomes
stronger.

To cancel the DAP mode

Press SURROUND MODE repeatedly until “OFF” appears.
The DSP indicator goes off from the display.

BALANCE/

SURROUND

ADJUST

Note:

Once you have adjusted the
DAP modes, the adjustment is
memorized for each DAP mode.

Note:

The DAP mode is not used with
the other DSP modes such as
the 3D-PHONIC mode and the
Surround mode. When the DAP
mode is turned on, the other
DSP mode, if used, will be
turned off.

MULTI  JOG

DSP EFFECT 1

DSP EFFECT 2

DSP EFFECT 4

DSP EFFECT 3

DSP EFFECT 5

HALL

DANCE CLUB

LIVE CLUB

THEATER

PRO LOGIC

3D ACTION

HEADPHONE

3D DRAMA

PAVILION

3D THEATER

OFF

Note:

Once you have adjusted the
DAP modes, the adjustment is
memorized for each DAP mode.

DSP EFFECT 1

DSP EFFECT 2

DSP EFFECT 4

DSP EFFECT 3

DSP EFFECT 5

Using the DSP Modes

DOLBY DIGITAL

DIG-THEATER

HEADPHONE

3D DIGITAL

OFF

Note:

When you select
“HEADPHONE,” you cannot go
to the following steps. No
adjustments can be made for
“HEADPHONE.”

Note:

You cannot adjust the rear
speaker levels when “REAR
SPK” is set to “NONE” (see
page 19).

MODE

SURROUND

SOUND

REAR · L

+

5

6

ENTER

REAR · R

+

8

9

EFFECT

7

/P

EN28_40.RX-1024V[J]/1.PM5

98.5.12, 0:26 PM

33

Summary of Contents for RX-1024VBK

Page 1: ... DIGITAL INPUT FM AM TUNING TUNER PRESET TUNER SEA MEMORY FM MODE DVD TV SOUND DBS PHONO TAPE MD VCR 1 VCR 2 FM AM VIDEO CD SOUND SELECT INPUT ATT LOUDNESS ONETOUCHOPERATION SOURCENAME COMPULINK Remote D I G I T A L D I G I T A L TV CATV DBS VCR 1 POWER VCR 1 VCR 2 VIDEO CD TAPE MD PHONO TV DBS AM MODE SURROUND CNTR TONE CNTR DIGITAL ANALOG INPUT CHANNEL VOLUME DISC MUTE 10 100 10 FM 1 SLEEP POWER...

Page 2: ...within the product s enclosure that may be of sufficient magnitude to constitute a risk of electric shock to persons The exclamation point within an equilateral triangle is intended to alert the user to the presence of important operating and maintenance servicing instructions in the literature accompanying the appliance CAUTION WARNING TO REDUCE THE RISK OF FIRE OR ELECTRIC SHOCK DO NOT EXPOSE TH...

Page 3: ... procedures see pages 19 to 21 Speakers Setting Front Speakers LARGE SMALL Center Speaker LARGE SMALL NONE Rear Speaker LARGE SMALL NONE Center Delay Set to msec Select from 0 to 5 msec Rear Delay Set to msec Select from 0 to 15 msec Crossover Frequency 80 Hz 100 Hz 120 Hz LFE Attenuator 0 dB 10 dB Dynamic Range Compression OFF MID MAX Note If the power cord is unplugged or a power failure occurs ...

Page 4: ...Input Signal 16 Adjusting the Subwoofer Output Level 16 Recording a Source 16 Basic Settings 17 Changing the Source Name 17 Selecting the Input Mode 17 Adjusting the Front Speaker Output Balance 18 Setting the Subwoofer Information 18 Listening at Low Volume Loudness 18 Digital Input DIGITAL IN Terminal Setting 19 Setting the Speakers for the DSP Modes 19 One Touch Operation 22 About the One Touch...

Page 5: ...Level 43 Adjusting the DSP Modes 43 Selecting Your Favorite SEA Mode 44 Creating Your Own SEA Mode 45 Basic Settings 45 Operating the Tuner 46 Storing the Preset Stations 46 Assigning Names to the Preset Stations 47 COMPU LINK Remote Control System 48 TEXT COMPU LINK Remote Control System 49 Showing the Disc Information on the TV Screen 50 Searching a Disc Only for the CD Player 51 Using the User ...

Page 6: ...ed with SOURCE SELECTOR control 13 _ VIDEO input jacks 10 Remote Control TV CATV DBS POWER and VCR1 POWER buttons 60 61 Source selecting buttons 14 SURROUND MODE button 31 DIGITAL ANALOG INPUT button 17 SOUND button 26 31 58 DISC button 59 CHANNEL buttons 60 62 MUTE button 15 VCR1 CONTROL button 60 64 ª LIGHT button º AUDIO POWER button 13 SLEEP button 15 10 keys for selecting preset channel 24 10...

Page 7: ...een 23 and 95 F 5 and 35 C Make sure there is good ventilation around the receiver Poor ventilation could cause overheating and damage the receiver Handling the receiver Do not insert any metal object into the receiver Do not disassemble the receiver or remove screws covers or cabinet Do not expose the receiver to rain or moisture Checking the Supplied Accessories Check to be sure you have all of ...

Page 8: ...M Antenna Connections AM Loop Antenna Turn the loop until you have the best reception Snap the tabs on the loop into the slots of the base to assemble the AM loop How to strip the 75Ω coaxial cable and connect it to the FM terminals 1 Strip back the outside covering of the 75Ω coaxial cable to expose the braided metallic mesh about 13 16 inches 20 mm 2 Pull the mesh back and twist it into a single...

Page 9: ...cting the front speakers Connect the front speakers to the FRONT SPEAKERS terminals You can connect two pairs of front speakers one pair to the FRONT SPEAKERS 1 terminals and another pair to the FRONT SPEAKERS 2 terminals RIG HT 1 RIG HT 1 1 3 4 RIG HT 1 2 CAUTION Use speakers with the SPEAKER IMPEDANCE indicated by the speaker terminals Note To obtain the best possible output power from the recei...

Page 10: ...le output power from the receiver and to prevent the receiver from being overheated the receiver has the SPEAKER LOAD SELECTOR which has to be set as follows Set it to the HIGH position when the impedance of the speakers connected is within the range of 8 ohms to 16 ohms Set it to the LOW position when the impedance of the speakers connected is within the range of 4 ohms to 6 ohms Set it to the LO...

Page 11: ...t either a cassette deck or an MD recorder to the TAPE MD jacks When connecting an MD recorder to the TAPE MD jacks change the source name which will be shown on the display when selected as the source to MD See page 17 for details Audio Components Video Components Turntable DVD player CD player TV Cassette deck or MD recorder DBS tuner VCRs Video camera You can connect these components using the ...

Page 12: ...e recording component In addition if the TV and a playing video component are connected to the receiver through the different video terminals you cannot view the playback picture from the playing component on the TV To view and record the playback picture from the video component connected to the VCR 2 jacks you must connect the TV and the recording video component through the composite video term...

Page 13: ...O RIGHT LEFT AUDIO TV SOUND DBS DVD DVD To audio video output DVD player Connecting VCRs RIGHT VIDEO VIDEO S VIDEO RIGHT LEFT AUDIO MONITOR OUT VCR 1 IN PLAY OUT REC IN PLAY OUT REC TV SOUND DBS DVD VCR 2 S VHS VHS S VHS or VHS VCR To audio video output To audio video input To audio video output To audio video input To audio video output Video camera Note To enjoy Dolby Digital with the DVD player...

Page 14: ...g a digital optical cable unplug the protective plug IMPORTANT When connecting the DVD player or the DBS tuner using the digital terminal you also need to connect it to the video jack either composite video terminal or S video terminal on the rear Without connecting it to the video jack you can view no playback picture After connecting the above components using the DIGITAL IN terminals set the fo...

Page 15: ...recommend that you use a coaxial cable to connect the antenna since it is well shielded against interference Putting Batteries in the Remote Control Before using the remote control put two supplied batteries first When using the remote control aim the remote control directly at the remote sensor on the receiver 1 On the back of the remote control remove the battery cover as illustrated 2 Insert ba...

Page 16: ... the display As you turn the selector the source changes as follows The selected source lamp also lights up AUDIO TV VCR CATV DBS What are the following indicators When you select the source encoded with Dolby Digital and start playback the following indicators light up on the display to show the signal being input to this receiver Only the indicators for the received signals light up L Left front...

Page 17: ...ol Press one of the audio source selecting buttons CD TAPE MD PHONO FM AM while viewing the picture from a video component such as the VCR or DVD player etc Adjusting the Volume On the front panel To increase the volume turn MASTER VOLUME clockwise To decrease the volume turn it counterclockwise When you turn MASTER VOLUME rapidly the volume level also changes rapidly When you turn MASTER VOLUME s...

Page 18: ... off by itself rather than play all night From the remote control only Press SLEEP repeatedly The SLEEP indicator lights up on the display and the shut off time on the display changes as follows SLEEP 10min SLEEP 20min SLEEP 30min SLEEP 40min SLEEP 50min SLEEP 60min SLEEP 70min SLEEP 80min SLEEP 90min SLEEP 00min Canceled back to the beginning When the shut off time comes The receiver turns off au...

Page 19: ...isplay changes to show the current setting 2 Turn MULTI JOG to adjust the subwoofer output level 10 dB to 10 dB while the indication of the previous step is still on the display From the remote control 1 Press SOUND 10 keys are activated for sound adjustments 2 Press SUBWOOFER to adjust the subwoofer output level 10 dB to 10 dB Recording a Source You can record any source playing through the recei...

Page 20: ...ital terminals see page 11 you need to change the input mode for these components to the digital input On the front panel 1 Turn SOURCE SELECTOR until the source CD MD DBS or DVD for which you want to change the input mode from analog input to digital input 2 Press DIGITAL INPUT to change the input mode Each time you press the button the input mode alternates between the digital input and analog i...

Page 21: ...FER appears on the display The display changes to show the current setting 2 Turn MULTI JOG to register whether you have connected a subwoofer or not while the indication of the previous step is still on the display As you turn it the subwoofer setting alternates between YES and NO YES Select this when you use a subwoofer NO Select this when you do not use a subwoofer Listening at Low Volume Loudn...

Page 22: ... SPK Center Speaker or REAR SPK Rear Speaker appears on the display The display changes to show the current setting 2 Turn MULTI JOG to select the appropriate item about your front center and rear speakers while the indication of the previous step is still on the display As you turn it the display changes to show the following LARGE Select this when the speaker size is relatively large SMALL Selec...

Page 23: ...e delay time of the rear speaker output while the indication of the previous step is still on the display Turn it clockwise to increase the delay time from 0 msec R DELAY 0ms to 15 msec R DELAY 15ms Turn it counterclockwise to decrease the delay time from 15 msec R DELAY 15ms to 0 msec R DELAY 0ms Crossover Frequency Setting Small speaker cannot reproduce the bass sound very well So if you have us...

Page 24: ...atedly until LFE ATT Low Frequency Effect Attenuator appears on the display The display changes to show the current setting 2 Turn MULTI JOG to select the low frequency effect attenuator level while the indication of the previous step is still on the display As you turn it the display changes to show the following LFE ATT 0dB Normally select this LFE ATT 10dB Select this when the bass sound is dis...

Page 25: ... PHONIC mode settings see page 29 DAP mode settings see page 32 Surround mode settings see page 34 and 37 Using the One Touch Operation On the front panel only To store the sound settings 1 Press ONE TOUCH OPERATION The ONE TOUCH OPERATION lamp lights up then the previously memorized settings are recalled 2 Adjust the sound using the functions listed above The newly adjusted settings are memorized...

Page 26: ...el only 1 Tune in the station you want to preset see above If you want to store the FM reception mode for this station select the FM reception mode you want See page 24 for details 2 Press TUNER SEA MEMORY CH appears and the channel number position starts flashing on the display for about 5 seconds 3 Turn MULTI JOG to select a channel number while the channel number position is flashing 4 Press TU...

Page 27: ... the remote control Each time you press the button the FM reception mode alternates between AUTO and MONO AUTO When a program is broadcast in stereo you will hear stereo sound when in monaural you will hear monaural sounds This mode is also useful to suppress static noise between stations The MUTE AUTO indicator lights up on the display MONO Reception will be improved although you will lose the st...

Page 28: ...cter you want is flashing The next or previous character position starts flashing 6 Repeat steps 4 and 5 to enter up to four characters 7 Press TUNER SEA MEMORY while the last selected character is flashing after you have assigned a name To erase the input characters Insert spaces using the same procedure described above CH Available characters Space C B A D E G F H I J K L M N O S R Q T U W V X Y...

Page 29: ...ling of a live atmosphere Good for acoustic music SEA USERMODE Your original SEA adjustment see page 27 SEA OFF No SEA mode is applied see below To cancel the SEA mode Turn MULTI JOG until SEA OFF appears in step 2 above The SEA indicator goes off from the display From the remote control 1 Press SOUND 10 keys are activated for sound adjustments 2 Press SEA MODE repeatedly until the SEA mode you wa...

Page 30: ...l on the display Turning it clockwise increases the level Turning it counterclockwise decreases the level 3 Repeat step 1 and 2 to adjust other frequency ranges if necessary 4 Press TUNER SEA MEMORY while the indication of the previous step is still on the display Your adjustment is stored into the SEA USERMODE To recall your own SEA adjustment See page 26 To erase a stored adjustment Storing a ne...

Page 31: ...nd gives you a real being there feeling On Surround mode With this receiver you can use two types of the surround mode Dolby Surround Dolby Digital and Dolby Pro Logic Used to watch the soundtracks of software encoded with Dolby Digital bearing the mark D I G I T A L or with Dolby Surround bearing the mark DOLBY SURROUND Dolby Digital and Dolby Pro Logic can be selected automatically according to ...

Page 32: ...ion and war movies where the action is fast and explosive 3D DRAMA Best for dramas and romantic movies where the action is slow and soft 3D THEATER Reproduces the sound field of a theater 3D DIGITAL Reproduces multi sound source encoded with Dolby Digital DSP OFF No DSP mode is applied For the other modes see pages 32 and 37 If you need to make any adjustment go to the following steps MULTI JOG DS...

Page 33: ...ay As you turn it the effect level changes as follows As the number increases the selected 3D PHONIC mode becomes stronger To cancel the 3D PHONIC mode Turn MULTI JOG until DSP OFF appears in step 3 The 3D PHONIC and DSP indicators go off from the display Note Once you have adjusted the 3D PHONIC modes it is memorized for each 3D PHONIC mode BALANCE SURROUND ADJUST MULTI JOG DSP EFFECT 1 DSP EFFEC...

Page 34: ... appears The 3D PHONIC and DSP indicators go off from the display HALL DANCE CLUB LIVE CLUB THEATER PRO LOGIC 3D ACTION HEADPHONE 3D DRAMA PAVILION 3D THEATER OFF DSP EFFECT 1 DSP EFFECT 2 DSP EFFECT 4 DSP EFFECT 3 DSP EFFECT 5 Using the DSP Modes DOLBY DIGITAL DIG THEATER HEADPHONE 3D DIGITAL OFF Note The 3D PHONIC mode is not used with the other DSP modes such as the DAP mode and the Surround mo...

Page 35: ...n listening with headphones DSP OFF No DSP mode is applied For the other modes see pages 29 and 37 If you need to make any adjustment go to the following steps 3 Adjust the speaker output levels as follows 1 Press BALANCE SURROUND ADJUST repeatedly until one of the indications appears on the display REAR L LEVEL To adjust the left speaker level REAR R LEVEL To adjust the right speaker level 2 Turn...

Page 36: ...peaker level press REAR R 4 Press EFFECT to select the effect level Each time you press the button the effect level changes as follows As the number increases the selected DAP mode becomes stronger To cancel the DAP mode Press SURROUND MODE repeatedly until OFF appears The DSP indicator goes off from the display BALANCE SURROUND ADJUST Note Once you have adjusted the DAP modes the adjustment is me...

Page 37: ...olby Digital For other sources If you need to make any adjustment go to the following steps 3 Press SOUND 10 keys are activated for sound adjustments Notes To enjoy the software encoded with Dolby Digital you must connect the source component using the digital terminal on the rear of this receiver When the signals come into this receiver through the analog connection from the source component PRO ...

Page 38: ... Using the DSP Modes Left front speaker Center speaker Right front speaker Left rear speaker Right rear speaker TEST TONE L TEST TONE C TEST TONE R TEST TONE RS TEST TONE LS The speaker indicators also light on the display while the test tone comes out of the speakers L Lights when the test tone comes out of the left front speaker C Lights when the test tone comes out of the center speaker R Light...

Page 39: ...ENTER LEVEL To adjust the center speaker level REAR L LEVEL To adjust the left speaker level REAR R LEVEL To adjust the right speaker level 2 Turn MULTI JOG to adjust the selected speaker output level from 10 dB to 10 dB while the indicator of the previous step is still on the display 3 Repeat 1 and 2 to adjust the other speaker output levels 4 Press BALANCE SURROUND ADJUST repeatedly until CENTER...

Page 40: ...eiver is activated The Dolby Pro Logic decoder is used not only for the analog sources but also for the sources encoded with Dolby Digital in the following cases When only front channel signals are encoded When front channel and monaural rear channel signals are encoded While the Dolby Pro Logic is activated for this type of Dolby Digital source the Ÿ DIGITAL indicator goes off DOLBY DIGITAL DIG T...

Page 41: ...press the button the effect level changes as follows As the number increases the surround effect becomes stronger To cancel the Theater Surround mode Press SURROUND MODE repeatedly until OFF appears The DSP and THEATER indicators goes off Notes You can adjust the speaker output levels and center tone without outputting the test tone You cannot adjust the center speaker level when CENTER SPK is set...

Page 42: ...olby Digital For other sources If you need to make any adjustment go to the following steps 4 Adjust the speaker output levels as follows 1 Press BALANCE SURROUND ADJUST repeatedly until one of the indications appears on the display CENTER LEVEL To adjust the center speaker level REAR L LEVEL To adjust the left speaker level REAR R LEVEL To adjust the right speaker level 2 Turn MULTI JOG to adjust...

Page 43: ...SP EFFECT appears on the display The display changes to show the current setting 8 Turn MULTI JOG to select the effect level while the indication of the previous step is still on the display As you turn it the effect level changes as follows As the number increases the surround effect becomes stronger To cancel the Theater Surround mode Turn MULTI JOG until DSP OFF appears in step 3 The DSP and TH...

Page 44: ...ss any button of ON SCREEN CONTROL fi once The MAIN MENU appears on the TV 2 Press ON SCREEN CONTROL fi to move to VISUAL 3 Press ON SCREEN CONTROL to select a different video source When you select OSD see page 49 4 When you finish press EXIT The menu disappears from the TV Using the DSP Modes Also see pages 29 32 34 37 1 Press any button of ON SCREEN CONTROL fi once The MAIN MENU appears on the ...

Page 45: ...Attenuating the Input Signal Also see page 15 This function is available only for the sources connected using the analog terminals and takes effect only when the DSP mode is in use 1 Press any button of ON SCREEN CONTROL fi once The MAIN MENU appears on the TV 2 Press ON SCREEN CONTROL fi to move to SOUND CONTROL then press The SOUND CONTROL menu appears on the TV 3 Press ON SCREEN CONTROL fi to m...

Page 46: ...XIT repeatedly until the menu disappears from the TV Adjusting the DSP Modes Also see pages 29 32 34 37 1 Press any button of ON SCREEN CONTROL fi once The MAIN MENU appears on the TV 2 Press ON SCREEN CONTROL fi to move to MODE 3 Press ON SCREEN CONTROL to select the DSP mode you want to adjust 4 Press ON SCREEN CONTROL fi to move to SOUND CONTROL then press The SOUND CONTROL menu appears 5 Press...

Page 47: ...enu disappears from the TV Selecting Your Favorite SEA Mode Also see page 26 1 Press any button of ON SCREEN CONTROL fi once The MAIN MENU appears on the TV 2 Press ON SCREEN CONTROL fi to move to SOUND CONTROL then press The SOUND CONTROL menu appears 3 Press ON SCREEN CONTROL fi to move to SEA then press The SEA menu appears 4 Press ON SCREEN CONTROL fi to move to SEA MODE 5 Press ON SCREEN CONT...

Page 48: ...SEA menu The adjustment you have made is active but not stored 7 When you finish press EXIT repeatedly until the menu disappears from the TV Basic Settings 1 Press any button of ON SCREEN CONTROL fi once The MAIN MENU appears on the TV 2 Press ON SCREEN CONTROL fi to move to SETTING then press The SETTING 1 or SETTING 2 menu appears 3 Press ON SCREEN CONTROL fi to the setting item you want to adju...

Page 49: ...om the TV Storing the Preset Stations Also see page 23 1 Press any button of ON SCREEN CONTROL fi once The MAIN MENU appears on the TV 2 Press ON SCREEN CONTROL fi to move to TUNER CONTROL then press The TUNER CONTROL menu appears 3 Tune into a station on the TUNER CONTROL menu referring to Operating the Tuner above 4 Press ON SCREEN CONTROL fi to move to PRESET MEMORY then press The PRESET MEMORY...

Page 50: ... 8 Press SET to enter the selected character 9 Repeat steps 7 and 8 to enter up to four characters 10 Press ON SCREEN CONTROL fi to move to PRESET NAME then press SET to store the setting The TUNER CONTROL menu appears again 11 When you finish press EXIT repeatedly until the menu disappears from the TV MAIN MENU PRESET MEMORY menu Character entry screen PRESET MEMORY SET MEMORY OPERATE FM 107 9 MH...

Page 51: ...cassette deck or MD recorder will turn off standby Synchronized Recording Synchronized recording means the cassette deck or MD recorder starts recording as soon as a CD or a record begins playing To use synchronized recording follow these steps 1 Put a tape in the cassette deck or an MD in the MD recorder and a disc in the CD player or a record on the turntable 2 Press the record button and the pa...

Page 52: ...control system allows you to use the functions listed below Displaying the Disc Information on the TV screen Disc information such as its performer and disc title and track titles only when a CD Text is selected is shown on the TV screen Disc Search Only for CD Player This remote control system can allow you to search discs by the performer disc title and music genre With this disc search you can ...

Page 53: ...er and music genre When this is selected in front you can change the disc information by pressing Each time you press the button the disc information see the note changes 8 Select or then press SET to change the track 9 Usable buttons and their functions for the current selection Indication here will be changed according to what is currently selected in front on the screen 6 When you finish press ...

Page 54: ...s between its performer and its disc title Going to the Disc Information screen see page 50 Press ON SCREEN CONTROL fi to move to a searched disc then press SET Showing unseen disc information if more than 5 discs are listed as a result of the search Press ON SCREEN CONTROL fi to move to or then press SET Going back to the PERFORMER SEARCH screen Press EXIT Search a disc by its disc title 1 Displa...

Page 55: ...SC SEARCH screen appears on the TV 3 Press ON SCREEN CONTROL fi to move to GENRE then press SET The GENRE SEARCH screen appears 4 Press ON SCREEN CONTROL fi to move to the genre you want to search then press SET To show the unseen genres press ON SCREEN CONTROL fi until they appear Disc search starts then the SEARCH RESULT screen showing the disc titles appears 5 On the SEARCH RESULT screen you ca...

Page 56: ... the User File you want then press SET The selected User File screen appears on the TV The disc information shown will be the disc title If no disc title information is recorded for the discs only the disc numbers will be shown 4 On this selected User File screen you can do the following Changing the indication of the disc information Press ON SCREEN CONTROL fi to move to a disc then press Each ti...

Page 57: ... ON SCREEN CONTROL fi to move in front of a character you want then press SET to enter the character If the current CD is a CD Text go to step 5 without entering the performer To use the lower case letters press ON SCREEN CONTROL fi to move to SHIFT then press SET To use the upper case letters again press ON SCREEN CONTROL fi to move to SHIFT then press SET 4 Repeat step 3 until you finish putting...

Page 58: ...llowing the procedure on page 50 2 Press ON SCREEN CONTROL fi to move to TITLE INPUT then press SET The DISC TITLE INPUT screen appears on the TV 3 Enter the disc title referring to steps 3 and 4 on page 54 You can enter up to 32 character for the disc title 4 Press ON SCREEN CONTROL fi to move to the disc title you have just entered then press SET The disc title is stored into the memory and the ...

Page 59: ... COMPU LINK connection turn the TV volume to the minimum using the TV volume control on the TV Note When connecting either the VCR or DVD player to this receiver connect it directly to the receiver using cable with the monaural mini plugs DVD player VCR AV COMPU LINK RECEIVER AMP AV COMPU LINK AV COMPU LINK VHS AV COMPU LINK AV COMPU LINK EX RECEIVER AMP VCR EX DVD If the AV COMPU LINK terminal on...

Page 60: ...you can view the playback picture Automatic Selection of TV s Input Mode When you select TV SOUND as the source to play on the receiver the TV automatically changes the input mode to the TV tuner so that you can watch TV When you select VCR2 as the source to play on the receiver the TV automatically changes the input mode to the Video Input 2 so that you can watch the playback picture When you sel...

Page 61: ... the following operations on a CD player PLAY Starts playing 4 4 4 4 4 Returns to the beginning of the current or previous track Skips to the beginning of the next track STOP Stops playing PAUSE Pauses playing To release it press PLAY 1 10 10 Selects a track number directly For track number 5 press 5 For track number 15 press 10 then 5 For track number 20 press 10 then 10 For track number 30 press...

Page 62: ... press the PLAY button REC Press this button with the PLAY button to start recording Press this button with the PAUSE button to enter recording pause MD recorder After pressing TAPE MD or TAPE CONTROL with the remote control mode selector set to AUDIO TV VCR you can perform the following operations on the MD recorder PLAY Starts playing 4 4 4 4 4 Returns to the beginning of the current or previous...

Page 63: ...hannels on the VCR For channel 5 press 5 For channel 10 press 1 then 0 DVD player After pressing DVD with the remote control mode selector set to AUDIO TV VCR you can perform the following operations on a DVD player PLAY Starts playing 4 4 4 4 4 Returns to the beginning of the current or previous track Skips to the beginning of the next track STOP Stops playing PAUSE Stops playing temporarily To r...

Page 64: ...NALOG INPUT CHANNEL VOLUME DISC MUTE 10 100 10 FM 1 SLEEP POWER POWER AUDIO 2 3 TEST REAR L AUDIO TV VCR CATV DBS REAR R 4 5 6 EFFECT SEA MODE RETURN FM MODE MUTE SUBWOOFER 8 0 9 ENTER MENU MENU SET EXIT VCR1 REW PLAY TAPE ON SCREEN CONTROL CONTROL LIGHT FF DOWN TUNING UP TV VIDEO REC STOP PAUSE RM SR1024U REMOTE CONTROL SOUND DVD 7 P Note When you turn off the receiver with the TV kept turned on ...

Page 65: ...the remote control mode selector set to AUDIO TV VCR you can perform the following operations on the TV CHANNEL Changes the channels 1 10 0 100 10 Selects the TV channels 100 10 button will function as the ENTER button if your TV requires pressing ENTER after selecting a channel number 6 Try to operate your TV by pressing TV CATV DBS POWER When your TV turns on or off you have entered the correct ...

Page 66: ... converter or DBS tuner requires pressing ENTER after selecting a channel number 6 Try to operate your CATV converter or DBS tuner by pressing TV CATV DBS POWER When your CATV converter or DBS tuner turns on or off you have entered the correct code 7 If there are more than one code listed for your brand of CATV converter or DBS tuner try each one until the correct one is entered Note Refer also to...

Page 67: ... PAUSE Pauses REW Rewinds a tape FF Fast winds a tape REC Starts recording or enters recording pause 6 Try to operate your VCR by pressing VCR1 POWER When your VCR turns on or off you have entered the correct code 7 If there are more than one code listed for your brand of VCR try each one until the correct one is entered Notes You can use either the VCR1 button or the VCR1 CONTROL button to activa...

Page 68: ... Motorola 055 093 MTC 019 030 056 060 Multitech 180 NAD 156 166 178 NEC 019 030 056 Nikko 030 092 178 Noshi 018 NTC 092 Onwa 180 Optimus 154 166 250 Optonica 093 165 Orion 236 Panasonic 051 055 250 Penney 018 019 021 030 039 047 051 060 156 178 Philco 019 030 054 Philips 054 Pilot 019 030 039 Pioneer 166 Portland 019 039 092 Prism 051 Proscan 047 Proton 178 Pulsar 017 019 Quasar 051 055 165 250 Ra...

Page 69: ... Hughes Network Systems 749 Jerrold 627 Panasonic 701 Primestar 627 RCA 566 Sony 639 Manufacturers codes for VCR Admiral 048 Adventura 000 Aiko 278 Aiwa 000 037 Akai 041 American High 035 Asha 240 Audiovox 037 Beaumark 240 Bell Howell 104 Broksonic 121 184 211 Calix 037 Canon 035 Capehart 020 Carver 081 CCE 072 278 Citizen 037 278 Colt 072 Craig 037 047 072 240 Curtis Mathes 035 041 060 Cybernex 2...

Page 70: ...o 046 047 104 240 Scott 043 045 121 184 211 212 Sears 035 037 042 046 047 054 104 Sharp 048 Shintom 072 Shogun 240 Singer 072 Sony 032 033 034 035 STS 042 Sylvania 000 035 043 081 Symphonic 000 Tatung 041 Teac 000 041 Technics 035 162 Teknika 000 035 037 TMK 240 Toshiba 043 045 212 Totevision 037 240 Unitech 240 Vector 045 Vector Research 038 Video Concepts 045 Videosonic 240 Wards 000 035 042 047...

Page 71: ...ounterclockwise three or four times then press POWER on the front panel If OVERLOAD does not disappear unplug the AC power cord then plug it back again Press POWER on the front panel then check the speaker wiring If OVERLOAD does not disappear unplug the AC power cord then plug it back again If speaker wiring is not short circuited contact your dealer Set the selector correctly either to AUDIO TV ...

Page 72: ... Audio Input DIGITAL IN Coaxial DIGITAL 1 DBS 0 5 Vp p 75 ohms Optical DIGITAL 2 DVD DIGITAL 3 CD 21 dBm to 15 dBm 660 nm 30 nm Audio Output Level TAPE MD VCR1 VCR2 200 mV PRE OUT FRONT 1V Signal to Noise Ratio 66 IHF 78 IHF PHONO 70 dB 78 dB at REC OUT CD TAPE MD TV SOUND DBS VCR1 VCR2 VIDEO DVD 87 dB 80 dB Frequency Response 8 ohms PHONO 20 Hz to 20 kHz 1 dB CD TAPE MD TV SOUND DBS VCR1 VCR2 VID...

Page 73: ...n Monaural 0 15 at 1 kHz Stereo 0 2 at 1 kHz Stereo Separation at REC OUT 40 dB at 1 kHz Capture Ratio 1 5 dB at 85 dBf Alternate Channel Selectivity 60 dB 400 kHz Frequency Response 30 Hz to 15 kHz 0 5 dB 3 dB AM tuner Tuning Range 530 kHz to 1 710 kHz Usable Sensitivity Loop antenna 300 µV m Signal to Noise Ratio 50 dB 100 mV m General Power Requirements AC 120V 60 Hz Power Consumption 310 watts...

Page 74: ...ORIES To purchase accessories for your JVC product you may contact your local JVC Dealer Or from the 48 Continental United States call toll free 800 882 2345 QUALITY SERVICE HOW TO LOCATE YOUR JVC SERVICE CENTER TOLL FREE 1 800 537 5722 Dear customer In order to receive the most satisfaction from your purchase read the instruction booklet before operating the unit In the event that repairisnecessa...

Page 75: ...rvice or if affixed to any attachment not provided with the products or if the model or serial number has been altered tampered with defaced or removed 2 Initial installation and installation and removal for repair 3 Operational adjustments covered in the Owner s Manual normal maintenance video and audio head cleaning 4 Damage that occurs in shipment due to act of God and cosmetic damage 5 Signal ...

Page 76: ...VICTOR COMPANY OF JAPAN LIMITED 0598OFMMDWJEM EN J VC ...

Reviews: