background image


14

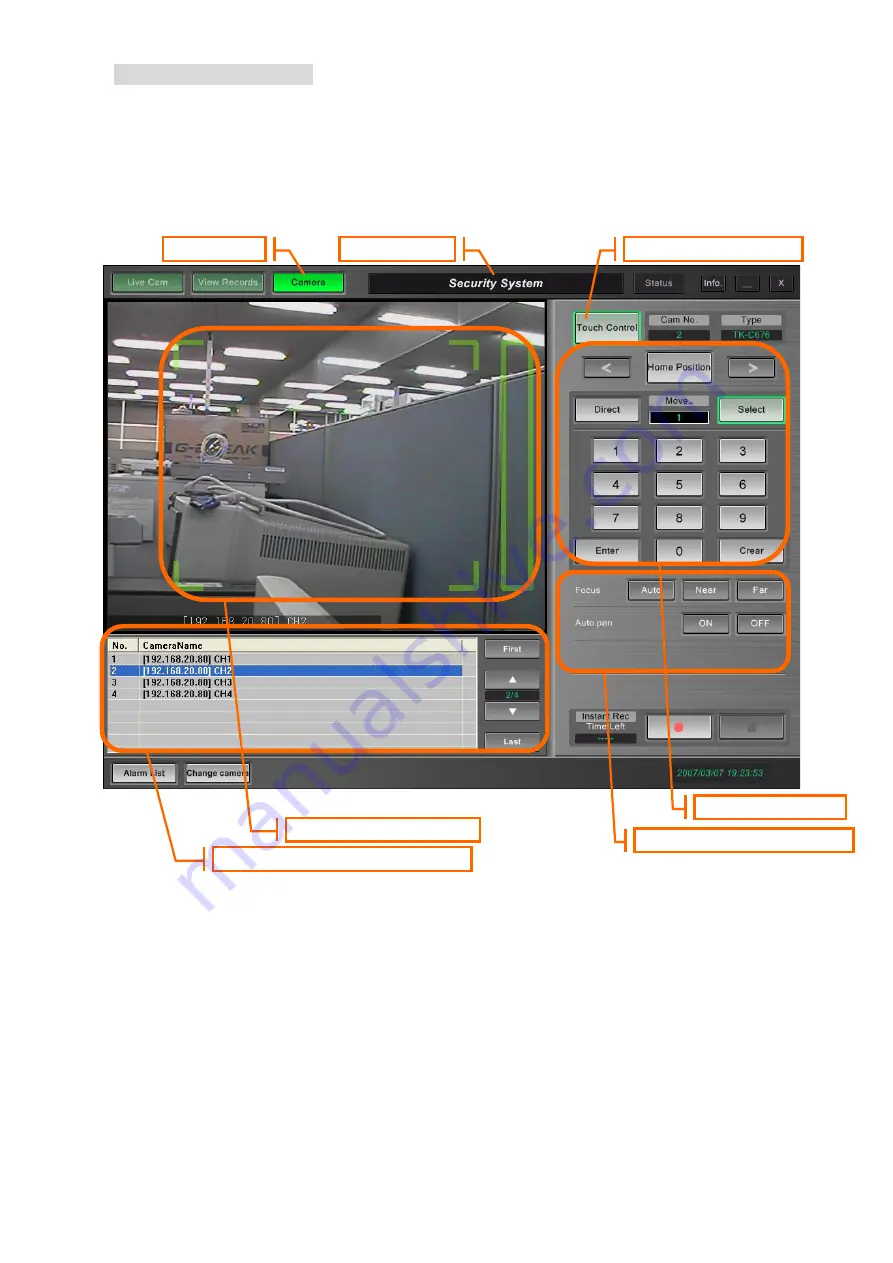
4.   Controlling the Camera 


4.1.  Camera Control 

Click the [Camera] button on the top left of the screen to switch to the [Camera Control Mode]. The 
[Camera] button can be clicked only when a camera is selected. 
 
* Note: Functions that are controllable vary with the camera type of the selected camera. 


Camera Button


Touch Control Button


Position Selection Area

Camera Control Mode Screen

Touch Control Area


Other Control Functions Area


Alarm Button


Change Camera/Alarm List Area


Summary of Contents for RECORDING SOFTWARE VN-RS800U

Page 1: ...Recording Server Software VN RS800U Viewer User s Guide LST0574 001C ...

Page 2: ...00 video recording server Playing back video images of the VN RS800 video recording server Controlling the camera of the VN RS800 video recording server Precautions Specifications of this product may be revised for improvement without prior notice This product includes software developed by the Apache Software Foundation http www apache org This product includes software written by Tim Hudson tjh ...

Page 3: ...not copy or use Software in whole or in part other than as expressly specified in this Agreement 3 You have no right to grant a license to use the Software and may not sell lease or rent the Software to any other person for any purpose 4 Limited Warranty THE SOFTWARE IS PROVIDED AS IS WITHOUT WARRANTY OF ANY KIND JVC MAKES NO WARRANTIES EXPRESS OR IMPLIED INCLUDING BUT NOT LIMITED TO WARRANTIES OF...

Page 4: ...writing and signed by an authorized representative of JVC 2 To the maximum extent permitted by the applicable law where the Software was acquired any conditions or warranties imposed or implied by law are hereby excluded You may nevertheless have the benefit of certain rights or remedies pursuant to the applicable law in respect of which liability may not be excluded In any case however JVC s enti...

Page 5: ...ion Selection 16 4 4 Other Controls 17 4 5 Switching Camera Selection 17 5 Emergency Recording 18 5 1 Emergency Recording 18 6 Receiving Alarms 19 6 1 Alarm Reception 19 6 2 Alarm Display 19 6 3 Alarm Search 20 6 4 Alarm Playback 21 7 Saving Video Images 21 7 1 Saving Export of AVI 21 7 2 Saving of Still Images 21 Trademarks Microsoft and Windows are the registered trademarks or trademarks of Micr...

Page 6: ...the password To use this screen make sure to set a password using numerals only Note It is possible to start without verifying the user by Windows authentication 1 2 User Authorization User authorization restricts the operations after starting up the application Control not authorized Unable to switch to the Camera Control Mode Playback not authorized Unable to switch to the Play Mode Emergency re...

Page 7: ... the Recording mark can be displayed on the images Clicking the Info button on the top right of the screen switches display of the information in the following order Display Recording mark only Display Recording mark and camera name Display all Recording Mark Time Camera Name Details displayed on live images Info Button Live Cam Button Live Mode Screen Video Layout Selection Area Page Control Area...

Page 8: ...ected by clicking the 1 Screen button clicking on the video image does not restore the display to the previous layout 2 3 Page Control When the number of registered cameras is larger than the number of video images of the layout images of all cameras can be displayed via page control The total number of pages is No of registered cameras No of images of layout For the zoom areas in the 5 screen or ...

Page 9: ...y Mode The Play button can be clicked only when a camera is selected Clicking the button plays back video images recorded in the selected camera View Records Button Playback Start Time Specification Area Playback Range Specification Area Playback Control Area Alarm Button Change Camera Alarm Search Area Play Mode Screen AVI Saving Area JPEG Saving Area ...

Page 10: ...he system time Click the Specified Time button to display the Specify Playback Start Time Screen Enter the time and click the OK button to start playback from the specified time Playback Start Time Specification Area Specified Time Button Present Time Button Present Time Button Today Button Current Time Button Clear All Button Clear Sel Button Specify Playback Start Time Screen ...

Page 11: ...t buttons are used to slide to the previous or next seek bar range For example when the seek bar range is at 9 00 10 00 clicking the Skip Range Next button shifts the seek bar to the 10 00 11 00 range Sliding the seek bar changes the playback time Playback will start from the time where you stopped sliding Playback Range 1 Day Button Playback Range 1 Hour Button Playback Range 10 min Button Skip R...

Page 12: ... playback Click the Next Previous Frame button to display and pause the next image Note When there are no recorded images over an interval of a few seconds a message indicating that there is no image will appear on the screen Note Refer to 7 Saving Video Images on procedures to save recorded video images in the AVI format Playback Speed Slider Play Button Next Frame Button Pause Button Previous Fr...

Page 13: ...y a time followed by performing the playback operation When the Camera Search List button is displayed as Camera List the search list is displayed in the list display area Refer to 6 3 Alarm Search on procedures to use the search list Note Clicking the Search List button switches the list display area to the search list Note Clicking the Camera List button restores the list display area to the cam...

Page 14: ...l Mode The Camera button can be clicked only when a camera is selected Note Functions that are controllable vary with the camera type of the selected camera Camera Button Touch Control Button Position Selection Area Camera Control Mode Screen Touch Control Area Other Control Functions Area Alarm Button Change Camera Alarm List Area ...

Page 15: ...turns vertically continuously when the Tilt Button is pushed while it is pushing Zoom Drag within the Zoom area the camera will zoom out when dragging it for above and the camera will zoom in when dragging it for below The camera zooms in continuously when the Zoom In Button is pushed while it is pushing The camera zooms out continuously when the Zoom Out Button is pushed while it is pushing The c...

Page 16: ... this method for specifying a position between position numbers 1 to 9 Selection Specification Click the Select button to switch to the Select Mode Use the numeric keys to specify a position number followed by clicking the Enter button to move to the specified position Use this method for specifying a position number larger than 9 Use the Clear button to clear the specification Position Selection ...

Page 17: ...ase to stop Far button For adjusting the focus towards the Far end Press to start and release to stop Auto pan ON button For turning on the auto pan mode OFF button For turning off the auto pan mode 4 5 Switching Camera Selection This allows switching of the selected camera in the same way as the Play Mode Refer to 3 5 Switching Camera Selection for details ...

Page 18: ...to stop all emergency recording operations Pressing the Start Emergency Recording button during emergency recording resets the remaining time of all cameras for which emergency recording is in progress Example When the Emergency Recording Time is set to 300 seconds Pressing the Start Emergency Recording button when the remaining time is 200 seconds resets the remaining time to 300 seconds As VN RS...

Page 19: ...ture is disabled When the Camera Alarm List button is displayed as Camera List the alarm list is displayed in the list display area Alarms received when VN RS800Viewer is running will be added to the alarm list Select the alarm list and click the Change Camera button to switch the selected camera to the camera specified in the Camera Name field Use the List Operation buttons to select the alarm li...

Page 20: ...cted search is performed on the interval of 1 day 1 hour prior to the specified Date Time Time Click the Specified button to display the Specify Playback Start Time screen When Present is selected search is performed at the time when the Search button is clicked Clicking the Proceed Search button starts search using the preset search condition The number of search results displayed is based on the...

Page 21: ...ton displays the end position Click the as AVI button to start saving Note The time interval that can be specified between the start and end positions is between 10 seconds to 10 minutes Some time is required to save the images and this is indicated by the progress bar Click the Cancel button to stop saving Note Saving continues even upon exiting the VN RS800Viewer 7 2 Saving of Still Images Recor...

Page 22: ...22 COPYRIGHT 2007 Victor Company of Japan Limited ...

Reviews: