background image

21 

EN

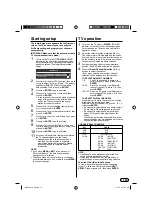
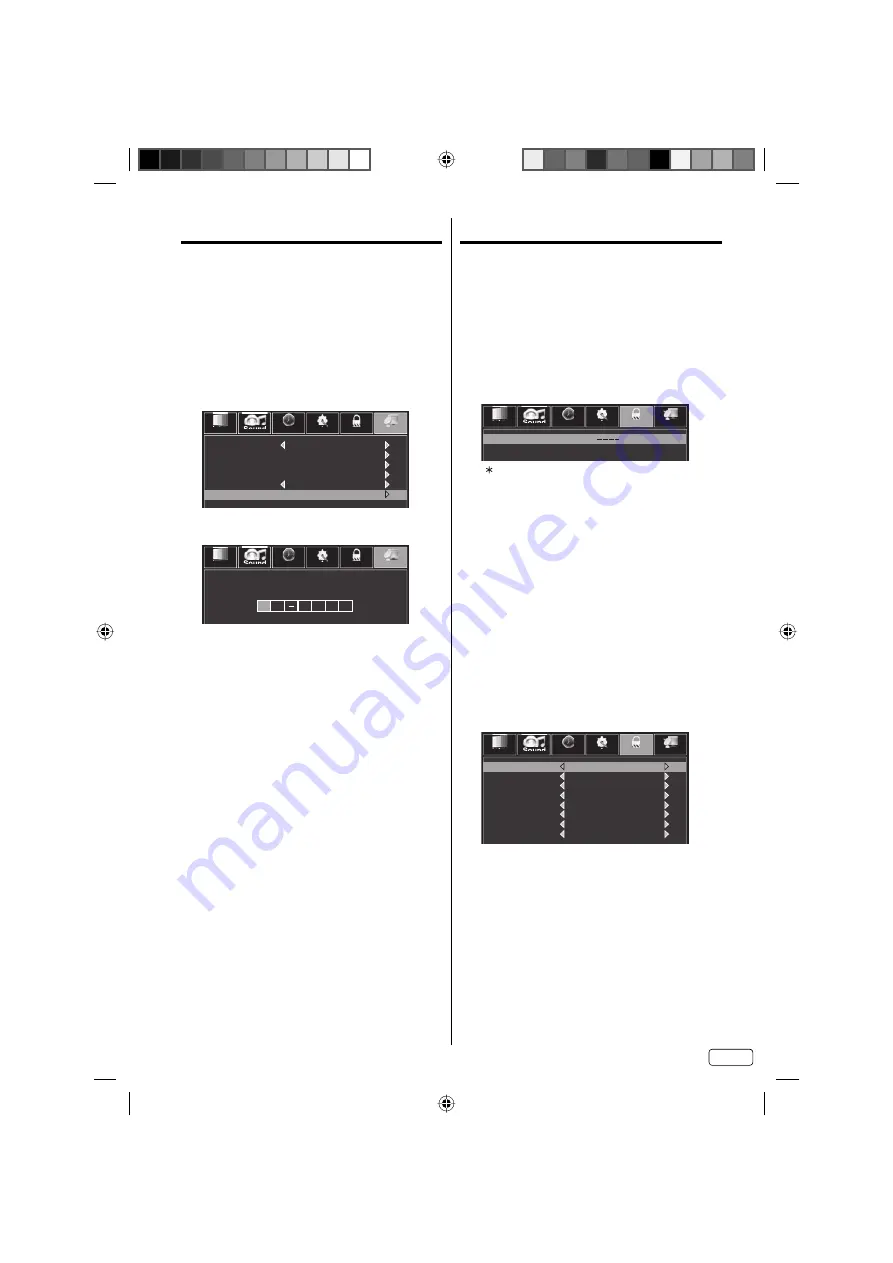
Labeling channels

Channel labels appear with the channel number 

display each time you turn on the TV, select a 

channel, or press DISPLAY.

You can choose any 7 characters to identify a 

channel.

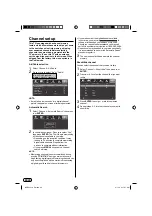
To create channel labels

1

Select “Channel 

 Channel Number”.

2

Press 

 or 

 to select a channel you want to 

label, then press 

 to select “Channel Label”. 

Then press 

 or 

ENTER

.

Sound

Time

Setup

Lock

Picture

Channel

Air/Cable

Automatic Search

Cable

23

CH-2

Channel List

Show/Hide

Channel Number

Channel Label

3

Press 

 or 

 repeatedly until the character you 

want appears in the first space.

Sound

Time

Setup

Lock

Picture

Channel

C

H

3

If the character which you desire appears, press 

.

You can also change the position which input 

character by pressing 

 or 

.

Repeat this step to enter the rest of the characters, 

then press 

ENTER

.

4

Repeat steps 2-3 for other channels. You can 

assign a label to each channel.

5

When you finish inputting the label name, press 

EXIT 

to return to the normal screen. 

NOTE:

The channel labels will be reset after “Automatic 

Search” on page 20.

Setting the V-Chip

An age limitation can be set to restrict children from 

viewing or hearing violent scenes or pictures that you 

may choose to exclude. The restriction applies to “TV 

Rating” and “Movie Rating” if this data is transmitted. 

You may set this restriction separately. To use the

V-Chip function, you must register a password.

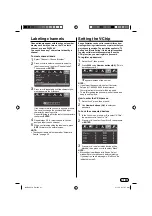
To register a password

1

Select “Lock”, then press 

.

2

Press 

0000

 using 

Number buttons(0-9)

. (This is 

default password.)

Sound

Time

Setup

Lock

Picture

Channel

Enter Password

“ ” appears instead of the number.

NOTE:

If you forget the password, contact Customer 

Service at 1-800-289-0984 for assistance. 

Your original remote control will be required.

To avoid forgetting the password, write it down and 

keep in a safe place.

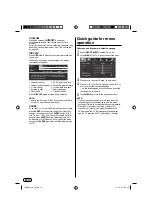
How to enter the V-Chip menu

1

Select “Lock” menu, then press 

.

2

Use 

Number buttons (0-9)

 to enter your 

password. 

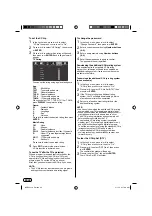
To Lock the connected devices

1

In the Lock menu, press 

 or 

 to select “V-Chip”, 

then press 

 or 

 to set to “On”.

2

Press 

 or 

 to select “Input Block”, then press 


or 

ENTER

.

Sound

Time

Setup

Lock

Picture

Channel

TV

AV

Component

HDMI1

HDMI2

HDMI3

Media

UnBlock

UnBlock

UnBlock

UnBlock

UnBlock

UnBlock

UnBlock

PC

UnBlock

3

Press 

 or 

 to select which device will be 

blocked, then press 

 or 

 to select “Block”.

NOTE:

Blocked device will appear in Source Select 

window. Enter your password before watching. 

If you want to use a device again, “UnBlock” as 

indicated in step 3.

J3QE0221A_EN.indd   21

J3QE0221A_EN.indd   21

3/1/13   9:17:07 AM

3/1/13   9:17:07 AM

Summary of Contents for LT-50E340

Page 1: ...ion Air Before operating the unit please read this manual thoroughly Avant de faire fonctionner l appareil veuillez lire le présent guide attentivement LT 50E340 IF CONTACT WITH CUSTOMER SERVICE IS REQUIRED PLEASE HAVE THE MODEL NUMBER READY PRIOR TO THE CALL S IL FAUT CONTACTER LE SERVICE CLIENTÈLE PRENEZ SOIN D ÊTRE MUNI DU NUMÉRO DE MODÈLE AVANT D APPELER CUSTOMER SERVICE 1 800 289 0984 SERVICE...

Page 2: ...measures Reorient or relocate the receiving antenna Increase the separation between the equipment and receiver Connect the equipment into an outlet on a circuit different from that to which the receiver is connected Consult the dealer or an experienced radio TV technician for help CAUTION Changes or modifications not expressly approved by the party responsible for compliance with the FCC Rules cou...

Page 3: ...f liquid into the unit 19 If an outside antenna or cable system is connected to the unit be sure the antenna or cable system is grounded to provide some protection against voltage surges and built up static charges Section 810 of the National Electrical Code ANSI NFPA 70 provides information with respect to proper grounding of the mast and supporting structure grounding of the lead in wire to an a...

Page 4: ...out your ability to safely install your flat panel display contact your retailer about professional installation Make sure that the wall where you are mounting the display is appropriate to support the weight of the unit product and wall mount If you are unsure contact a professional installer A minimum of two people are required for installation Flat panel displays can be heavy 20 When replacemen...

Page 5: ...for these symptoms LCD Panels are manufactured using an extremely high level of precision technology however sometimes parts of the screen may be missing picture elements or have luminous spots This is not a sign of a malfunction Do not install the LCD Panel near electronic equipment that produces electromagnetic waves Some equipment placed too near this unit may cause interference Effect on infra...

Page 6: ... perform the above steps in reverse order For wall mounting the stand must be removed To disconnect the stand remove the 4 screws from the back see page 5 NOTE Assure the AC cord is not connected to the unit Before beginning this process assure that the TV is laid on a clean safe and cushioned surface to avoid any damage to the unit Do not touch or press the TV screen glass might break under press...

Page 7: ...nit On Screen 3 Languages Display You can select one of 3 languages English French or Spanish for on screen programming NOTE Please make sure to insert the cord securely at both the LCD TV and the wall outlet The AC cord has a polarized type AC line plug If the supplied AC cord does not match your AC outlet contact a qualified electrician WARNING DO NOT CONNECT THIS UNIT TO THE POWER USING ANY DEV...

Page 8: ...e size 24 Media Playback 24 Additional information Reception disturbances 26 Troubleshooting 27 Specifications 28 limited WARRANTY 29 Manufactured under license from Dolby Laboratories Dolby and the double D symbol are trademarks of Dolby Laboratories The terms HDMI and HDMI High Definition Multimedia Interface and the HDMI Logo are trademarks or registered trademarks of HDMI Licensing LLC in the ...

Page 9: ...d to display the menu screen CH CHANNEL buttons VOL VOLUME buttons and INPUT ENTER button can be used to select the desired setting during the menu screen operations AUDIO IN L R jacks COMPONENT IN Y VIDEO Pb Pr jacks COAXIAL OUT jack ANT RF IN jack HDMI DVI1 2 IN jacks USB INPUT Rear PC MONITOR IN jack Right Side HDMI DVI3 IN jack AUDIO OUT L R jacks J3QE0221A_EN indd 9 J3QE0221A_EN indd 9 3 1 13...

Page 10: ... again 3 Direct Channel Selection Buttons 0 9 Allows direct access to any channel of the TV 4 Button This button is used when selecting digital channels 5 MENU Button Use to display the On Screen menu function 6 CURSOR Buttons Use to operate the menu functions of the TV 7 ENTER Button Use to enter or select information for On Screen operations 8 MUTING Button To turn off the sound press this butto...

Page 11: ... service with scrambled premium channels If you subscribe to a Cable TV service in which basic channels are unscrambled and premium channels require the use of a Converter Descrambler box you may wish to use a signal Splitter and an A B Switch box available from the Cable TV company or an electronics supply store Follow the connections shown below With the switch in the B position you can directly...

Page 12: ...nnect the TV to a camcorder or a game console To playback from a camcorder connect the camcorder to the unit as shown This unit can also be used as a display device for many video games However due to the wide variety of signals generated by these devices and subsequent hook up variations required they have not all been included in the suggested connection diagrams You ll need to consult each comp...

Page 13: ...movie Connect an AV amplifier with built in Dolby Digital decoder DTS decoder or MPEG decoder etc as shown below NOTE When you are viewing digital broadcast this unit will not work in conjunction with DTS audio or MPEG audio There will be no sound output if connected to an AV amplifier with a built in DTS decoder or MPEG decoder NOTE The audio output from the devices connected by HDMI may not outp...

Page 14: ...WSXGA 1680x1050 60Hz FHD 1920x1080 60Hz To return to normal mode Press INPUT SELECT again Connections to other equipment NOTE The on screen displays will have a different appearance in PC mode than in TV mode If there is no video signal from the PC when the unit is in PC mode No Signal will appear on the TV screen When the PC s resolution is set to 1920 x 1080 60 Hz FHD mode a signal that differs ...

Page 15: ...rn on the TV press POWER POWER indicator on the front of the unit changes green It may take approx 10 seconds for a picture to appear on screen 2 Adjust the volume level by pressing VOL or The volume level will be indicated on the screen by brown bars As the volume level increases so do the number of bars If the volume decreases the number of brown bars also decreases 3 Set the signal type option ...

Page 16: ...te control The clock will change for each press of the SLEEP button Off 5 min 10 min 240 min To confirm the sleep timer setting press SLEEP and the remaining time will be displayed for a few seconds To cancel the sleep timer press SLEEP repeatedly until the display turns to Off Quick guide for menu operation Call menu and for example Select Language 1 Press INPUT SELECT to select TV mode 2 Press M...

Page 17: ... Picture Size See page 24 Noise Reduction Set the level of decreasing noise included in the video signal Medium High Off Low DBC Use this feature to change the black level automatically according to the brightness of an image The black level will become dark in a dark scene If ECO is selected the power consumption is reduced DBC is not available in Media mode Off ECO On DLC DLC Dynamic Luminance C...

Page 18: ...the TV to standby after a defined period of time To cancel the Sleep Timer set to Off Off 5 10 15 30 60 90 120 180 240 min Time Zone Select your local time zone for auto clock feature You can select Newfoundland Atlantic Eastern Central Mountain Pacific Alaska Hawaii and Samoa Daylight Saving Time If you want to activate Daylight Saving Time select On Off On Time Format Select the time format 12 h...

Page 19: ... Custom 10 characters PC Settings available only for PC mode H Pos To adjust the horizontal placing of the image V Pos To adjust the vertical placing of the image Clock Eliminates the vertical CLOCK interfering lines Phase Eliminates the horizontal PHASE interfering lines Auto To adjust the all PC settings automatically Other Settings Audio Only You can turn off the picture on your TV and listen t...

Page 20: ... digital cable channels Please allow the process to complete without interruption If you press MENU during search channel search will stop NOTE Memorizing channels is best accomplished during evening PRIMETIME hours as more stations are broadcasting digital signals Memorizing channels can only be accomplished while a station is broadcasting a digital signal to set that channel into memory If you a...

Page 21: ... pictures that you may choose to exclude The restriction applies to TV Rating and Movie Rating if this data is transmitted You may set this restriction separately To use the V Chip function you must register a password To register a password 1 Select Lock then press 2 Press 0000 using Number buttons 0 9 This is default password Sound Time Setup Lock Picture Channel Enter Password appears instead o...

Page 22: ...using Number buttons 0 9 3 Enter a new password using Number buttons 0 9 4 Enter the same password again to confirm The password is now registered Downloading the additional V Chip rating system As a supplement to the standard V Chip rating system your television will be able to download an additional rating system if such a system becomes available in the future To download the additional V Chip ...

Page 23: ...oning This is normal with Closed Captioning especially with live programs This is because during live programs captions are also entered live These transmissions do not allow time for editing When Captions are being displayed on screen displays such as volume may be seen but may interfere with Closed Captions Some cable systems and copy protection systems may interfere with the Closed Captioned si...

Page 24: ...mage and it will be shown on the screen with same amount of pixels Media Playback You can enjoy viewing pictures and movies from your USB storage device 1 Connect the USB storage device into the USB Input terminal 2 Press INPUT SELECT then press or to select Media then press ENTER NOTE Do not disconnect a USB storage device while it is being accessed Doing so can damage the device or the files sto...

Page 25: ... select the next file During the playback press to select the previous file Details of operation commands Icon Operation Play Resume playback Pause Skip file to reverse forward direction Stop Repeat playback Press ENTER repeatedly to select desired repeat option Show the playlist Press or and ENTER to select the playback Show the file information Rotate the image Zoom in out Move the frame from th...

Page 26: ...is normal when you adjust the CONTRAST or BRIGHTNESS settings Most types of television interference can be remedied by adjusting the height and position of the VHF UHF antenna Outdoor antennas are recommended for best results The most common types of television interference are shown below If one of these symptoms appear when the TV is connected to a Cable TV system the disturbance may be caused b...

Page 27: ...lug it back in Poor sound or no sound Station or Cable TV experiencing problems tune to another station Check sound adjustments VOL or MUTING Check for sources of possible interference Poor picture or no picture Station or Cable TV experiencing problems tune to another station Make sure channels are set into memory Check antenna or Cable TV connections adjust antenna Check for sources of possible ...

Page 28: ...o RCA 1 V p p 75 ohms Audio RCA 2 Vrms Max Component video Y 1 V p p 75 ohms Pb Pr 0 7 V p p 75 ohms HDMI HDMI compliant type A connector HDCP compliant E EDID compliant Suggested scan rates 480p 480i 720p 1080i 1080p HDMI Audio 2 channel PCM 32 44 1 48 kHz sampling frequency 16 20 24 bits per sample PC Monitor Mini Dsub 15pin E EDID compliant Antenna VHF UHF In 75 ohms coaxial Outputs Audio 300mV...

Page 29: ...cted to the product b Costs incurred in the shipping of the product to an ORION authorized Independent Service Center or ORION Factory Service Center c Damage or improper operation of unit caused by customer abuse misuse negligence or failure to follow operating instructions provided with the product d Ordinary adjustments to the product which can be performed by customer as outlined in the owner ...

Page 30: ...ées à l intérieur de l appareil et dont la tenstion est suf fisante pour provoquer des décharges électriques dangeruses Le point d exclamation dans un triangle équilatéral a pour but d avertir l utilisateur que des instructions importantes relatives à l utilisation et à l entretien se trouvent dans le manuel accompagnant l appareil ATTENTION AFINDEREQUIRELESRISQUES DE CHOC ELECTRIQUE NE RETIREZ PA...

Page 31: ...pas être exposé à des égouttements d eau ou des éclaboussures et de plus aucun objet rempli de liquide tel que des vases ne doit être placé sur I appareil 16 L antenne extérieure ne doit pas être placée à proximité de lignes d alimentation aériennes ni de circuits électriques ni de telle façon qu elle puisse toucher ces lignes ou fils en tombant Faites preuve d extrême prudence pendant l installat...

Page 32: ...ité suivants LE PROBLÈME L expérience du cinéma maison se répand et les gens achètent des écrans plats de plus en plus grands Cependant les écrans plats ne sont pas toujours posés sur des socles adaptés ou installés conformément aux recommandations du fabricant Les écrans plats qui sont mal placés sur une commode une bibliothèque une étagère un bureau un haut parleur un coffre ou un chariot risque...

Page 33: ...i après aucun recours à la garantie d usine ne pourra être réclamé L écran ACL à cristaux liquides de ce téléviseur est constitué de cellules minces et est le fruit d une technologie très précise Bien que les écrans soient produits avec plus de 99 9 de cellules actives il peut y avoir des cellules qui n émettent pas de lumière ou qui restent allumées Ceci n est pas dû à un défaut de l appareil N i...

Page 34: ...ansporter ce produit démontez le socle et posez le à plat contre l arrière de l appareil dans le carton Pour démonter le socle effectuez les étapes ci dessus dans le sens inverse Le socle doit être enlevé lorsqu on désire fixer l appareil au mur Pour déboîter le socle ôtez les 4 vis à l arrière voir page 5 Enfin fixez la plaque du fond avec les 5 vis fournies 4x12mm 5 32 x 15 32 po comme indiqué p...

Page 35: ...pes de la programmation en trois langues anglais français ou espagnol Caractéristiques Source d alimentation POUR EMPLOYER L ALIMENTATION CA Branchez la fiche du cordon CA dans la prise AC INPUT de l appareil Connectez le cordon CA à une prise du CA 1 2 Cordon CA fournie CA 120V 60 Hz Trou et lame plus larges Prise du CA REMARQUE Veillez à bien insérer le cordon sur le téléviseur ACL et la prise m...

Page 36: ... Sous titrage 23 Options CC 23 Réglage du format d image 24 Lecture de fichiers multimédias 24 Informations complémentaires Problèmes de réception 26 Guide de dépannage 27 Fiche technique 28 Fabriqué sous licence de Dolby Laboratories Dolby et le symbole double D sont des marques déposées de Dolby Laboratories HDMI le logo HDMI et High Definition Multimedia Interface sont des marques commerciales ...

Page 37: ...s fonctions à l écran du téléviseur Les touches CH CHANNEL VOL VOLUME et INPUT ENTER peuvent servir à sélectionner le réglage désiré à l intérieur du menu des fonctions du téléviseur apparaissant à l écran Coté droit Prise HDMI DVI3 IN Arrière Prise ANT RF IN Prise PC MONITOR IN Prises COMPONENT IN Y VIDEO Pb Pr Prise COAXIAL OUT Prises HDMI DVI1 2 IN USB INPUT Coté droit Prises AUDIO IN L R Prise...

Page 38: ...hoix 4 Touche Cette touche sert lors de la sélection de canaux numériques 5 Touche MENU Appuyez sur cette touche pour faire apparaître le menu des fonctions à l ecran 6 Touches CURSEUR Pour commander les fonctions de menu du téléviseur ACL 7 Touche ENTER Appuyez sur cette touche pour choisir ou valider des informations affichées à le téléviseur 8 Touche MUTING Appuyez une fois sur cette touche pou...

Page 39: ...illés Si vous êtes abonné à un service de câblodistribution dont les canaux de base ne sont pas brouillés et les canaux payants exigent l utilisation d un convertisseur débrouilleur il est recommandable d utiliser un séparateur de signaux et une boîte de commutation A B vendus par le câblodistributeur ou dans un magasin d électronique Suivez les raccordements illustrés ci dessous Quand le commutat...

Page 40: ...ou à un console de jeux Pour accomplir la lecture à partir d un caméscope raccordez le caméscope à l appareil de la manière illustrée L appareil peut aussi servir de périphérique de lecture pour de nombreux jeux vidéo Toutefois puisque ces dispositifs génèrent une grande variété de signaux et que leurs modes de raccordement doit varier en conséquence tous les schémas de raccordement possibles n on...

Page 41: ...e exactement le même son qu au cinéma Raccordez un amplificateur AV intégrant un décodeur Dolby numérique Dolby Digital etc comme dans l illustration ci dessous REMARQUE Lors du visionnement d émissions numériques il n y aura pas de fonctionnement en conjugaison avec le son DTS ou MPEG Aucun son n est émis si un amplificateur AV avec décodeur DTS ou MPEG intégré est connecté Câble coaxial numériqu...

Page 42: ... WSXGA 1680x1050 60Hz FHD 1920x1080 60Hz Pour rétablir le mode normal Appuyez de nouveau sur INPUT SELECT REMARQUE L affichage apparaît différemment en mode PC qu en mode TV S il n y a pas de signal vidéo en provenance du PC lorsque l appareil est en mode PC No Signal s affiche à l écran du téléviseur Quand la résolution de l ordinateur est réglée sur 1920 1080 60 Hz mode FHD un signal différent d...

Page 43: ...ionner les changements Fonctionnement du téléviseur 1 Pour allumer l appareil appuyez sur POWER Le voyant d alimentation POWER à l avant de l appareil passe au vert Une image apparaît à l écran au bout d environ 10 secondes 2 Réglez le volume au niveau désiré en appuyant les touches de réglage du VOL ou Le niveau d intensité de la reproduction sonore sera indiqué à l écran par des barres brun Au f...

Page 44: ...ne période prédéterminée appuyez sur SLEEP de la télécommande La durée de temps augmentera de à chaque pression de la touche SLEEP Off 5 min 10 min 240 min Pour confirmer le réglage de minuterie d arrêt différé appuyez sur SLEEP et la durée restante s affichera quelques secondes Pour désactiver la minuterie d arrêt différé appuyez de façon répétée sur SLEEP jusqu à ce que l affichage indique Off G...

Page 45: ... Picture Size Consulter la page 24 Noise Reduction Pour régler le niveau de réduction du bruit compris dans le signal vidéo Medium High Off Low DBC Utilisez cette fonction pour modifier automatiquement le niveau de noir luminosité d une image Le niveau de noir deviendra noir dans une scène noire Si vous sélectionnez ECO DBC n est pas disponible sous le mode Media Off ECO On DLC La function DLC Dyn...

Page 46: ...de temps defi nie Pour annuler Sleep Timer réglez à Off Off 5 10 15 30 60 90 120 180 240 min Time Zone Sélectionnez votre fuseau horaire local pour la fonction horloge automatique Vous pourrez sélectionner les fuseaux horaires suivants Newfoundland Atlantic Eastern Central Mountain Pacific Alaska Hawaii et Samoa Daylight Saving Time Si vous souhaitez active la fonction Daylight Saving Time sélecti...

Page 47: ...om 10 caractère PC Settings uniquement disponible pour le mode PC H Pos Pour ajuster le placement horizontal de l image V Pos Pour ajuster le placement vertical de l image Clock Élimine les lignes d interférence verticale CLOCK Phase Élimine les lignes d interférence horizontale PHASE Auto Pour ajuster automatiquement tous les réglages PC Other Settings Audio Only Vous pouvez suspendre l image de ...

Page 48: ...rrompre le processus Si vous appuyez sur MENU pendant la recherche la recherche de chaînes sera interrompue REMARQUE Il est préférable de réaliser la mémorisation des canaux pendant les heures de grande écoute de la soirée puisque davantage de stations diffusent alors des signaux numériques Pour que la mémorisation des canaux soit possible il faut qu une station diffuse aut même moment un signal n...

Page 49: ...es ou des images à exclure La restriction s applique à TV Rating et à Movie Rating si ces données sont transmises Ces restrictions se règlent séparément Pour utiliser la fonction V Chip vous devez enregistrer un mot de passe Pour enregistrer un mot de passe 1 Sélectionnez Lock puis appuyez sur 2 Appuyez sur 0000 au moyen des touches numériques 0 9 Il s agit du mot de passe par défaut Sound Time Se...

Page 50: ... un nouveau mot de passe à l aide des touches numériques 0 9 4 Entrez de nouveau le même mot de passe pour confirmer Le mot de passe est maintenant enregistré Téléchargement d un système de classification V Chip supplémentaire En plus du système de classification V Chip standard votre téléviseur pourra télécharger un système de classification supplémentaire si un tel système vous est offert dans l...

Page 51: ...us titres sont saisis également en direct Ces transmissions ne donnent pas le temps de procéder à une relecture Lorsque les sous titres sont affichés les affichages à l écran tels que le volume peuvent être visibles mais peuvent se superposer aux sous titres Certains systèmes de câblodistribution et de protection contre la copie peuvent gêner la réception des sous titres Si vous utilisez une anten...

Page 52: ...re de fichiers multimédias Votre dispositif de stockage USB vous permettra de regarder des images et des films 1 Raccordez le dispositif de stockage USB au terminal d entrée USB 2 Appuyez sur INPUT SELECT puis appuyez sur ou pour sélectionner Media puis appuyez sur ENTER REMARQUE Ne débranchez pas le dispositif de stockage USB si vous y accédez encore Cela vous évitera ainsi d endommager le dispos...

Page 53: ... Pendant la lecture appuyez sur ce bouton pour sélectionner le fichier suivant Pendant la lecture appuyez sur ce fichier pour sélectionner le fichier précédent Détails des commandes Icone Action Lire reprendre la lecture Pause Sauter le fichier à la position avance retour Stop Répète la lecture Appuyez sur ENTER pour sélectionner l option de répétition souhaitée Affiche la liste de lecture Appuyez...

Page 54: ...les réglages du contraste CONTRAST ou de la luminosité BRIGHTNESS Il est possible de remédier à la plupart des interférences subies par le téléviseur en réglant la hauteur et en changeant la position de l antenne VHF UHF Pour obtenir les meilleurs résultats il est recommandé d utiliser une antenne extérieure Les types les plus courants de brouillage en télévision sont expliqués ci dessous Si l un ...

Page 55: ...Débranchez l appareil pendant une heure puis branchez le de nouveau Son défectueux ou son inexistant Problème à la station ou au réseau de câblodistribution Essayez une autre station Vérifiez le réglage du son au de la mise en sourdine VOL ou MUTING Recherchez des sources d interférences possibles Image défectueuse ou image inexistante Problème à la station ou au réseau de câblodistribution Essaye...

Page 56: ...x Vidéo en composantes Y 1 V p p 75 ohms Pb Pr 0 7 V p p 75 ohms HDMI Compatible HDMI connecteur de type A Compatible HDCP Compatible E EDID Taux de balayage préconisés 480p 480i 720p 1080i 1080p Audio HDMI PCM 2 voies Fréquence d échantillonnage 32 44 1 48 kHz 16 20 24 bits per échantillon Moniteur de PC Mini Dsub 15 broches Compatible E EDID Antenne Entrée VHF UHF 75 ohms de type coaxiale Sortie...

Reviews: